User Manual
Page 3
... ...3 CHAPTER 2 CONFIGURE THE ROUTER ...5 2.1 CONNECT THE ROUTER TO YOUR NETWORK...5 2.2 CONFIGURE THE ROUTER WITH EZ SETUP WIZARD 7 2.3 CONFIGURE THE ROUTER WITH WEB CONFIGURATION UTILITY 15 2.4 CONNECT TO ROUTER WIRELESSLY ...23 CHAPTER 3 ADVANCED CONFIGURATION ...25 3.1 BASIC SETTING... ...27 3.1.1 Primary Setup ...28 3.1.2 DHCP Server ...38 3.1.3 Wireless ...40 3.1.4 Change Password...52 3.2 FORWARDING RULES...53 3.2.1 Virtual Server ...53 3.2.2 Special...
... ...3 CHAPTER 2 CONFIGURE THE ROUTER ...5 2.1 CONNECT THE ROUTER TO YOUR NETWORK...5 2.2 CONFIGURE THE ROUTER WITH EZ SETUP WIZARD 7 2.3 CONFIGURE THE ROUTER WITH WEB CONFIGURATION UTILITY 15 2.4 CONNECT TO ROUTER WIRELESSLY ...23 CHAPTER 3 ADVANCED CONFIGURATION ...25 3.1 BASIC SETTING... ...27 3.1.1 Primary Setup ...28 3.1.2 DHCP Server ...38 3.1.3 Wireless ...40 3.1.4 Change Password...52 3.2 FORWARDING RULES...53 3.2.1 Virtual Server ...53 3.2.2 Special...

User Manual
Page 5
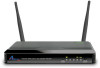
...security features such as WEP, WPA-PSK, and WPA2-PSK provide the highest level of the Airlink101® AR695W Wireless N 300 Gigabit Green Router. The bundled EZ Setup Wizard allows you to set up to gigabit speeds • Two 3dBi antennas for wider coverage and stronger ...firewall with DoS detection prevents your network from outside attacks • Wirelessly connect to another 4 AR695W routers with WDS (Wireless Distribution System) supported • Establish secured wireless connection via Easy Setup Button • QoS (Quality of up to 300Mbps* with an easy-to connect your ...
...security features such as WEP, WPA-PSK, and WPA2-PSK provide the highest level of the Airlink101® AR695W Wireless N 300 Gigabit Green Router. The bundled EZ Setup Wizard allows you to set up to gigabit speeds • Two 3dBi antennas for wider coverage and stronger ...firewall with DoS detection prevents your network from outside attacks • Wirelessly connect to another 4 AR695W routers with WDS (Wireless Distribution System) supported • Establish secured wireless connection via Easy Setup Button • QoS (Quality of up to 300Mbps* with an easy-to connect your ...
User Manual
Page 6
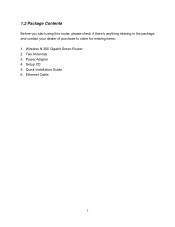
1.2 Package Contents Before you start using this router, please check if there's anything missing in the package, and contact your dealer of purchase to claim for missing items: 1. Power Adapter 4. Ethernet Cable 2 Wireless N 300 Gigabit Green Router 2. Setup CD 5. Quick Installation Guide 6. Two Antennas 3.
1.2 Package Contents Before you start using this router, please check if there's anything missing in the package, and contact your dealer of purchase to claim for missing items: 1. Power Adapter 4. Ethernet Cable 2 Wireless N 300 Gigabit Green Router 2. Setup CD 5. Quick Installation Guide 6. Two Antennas 3.
User Manual
Page 9
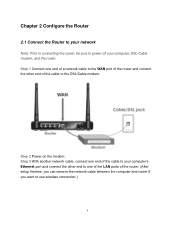
... 1 Connect one end of a network cable to the WAN port of the router and connect the other end to one end of the router. (After setup finishes, you can remove the network cable between the computer and router if you want to your computer, DSL/Cable modem, and the router. Step...
... 1 Connect one end of a network cable to the WAN port of the router and connect the other end to one end of the router. (After setup finishes, you can remove the network cable between the computer and router if you want to your computer, DSL/Cable modem, and the router. Step...
User Manual
Page 11
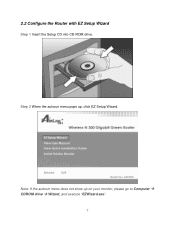
Note: If the autorun menu does not show up , click EZ Setup Wizard. Step 2 When the autorun menu pops up on your monitor, please go to Computer Æ CDROM drive Æ Wizard, and execute "EZWizard.exe". 7 2.2 Configure the Router with EZ Setup Wizard Step 1 Insert the Setup CD into CD-ROM drive.
Note: If the autorun menu does not show up , click EZ Setup Wizard. Step 2 When the autorun menu pops up on your monitor, please go to Computer Æ CDROM drive Æ Wizard, and execute "EZWizard.exe". 7 2.2 Configure the Router with EZ Setup Wizard Step 1 Insert the Setup CD into CD-ROM drive.

User Manual
Page 19
... of this router in to the router from your web browser. Please follow the steps below: Step 1 Go to the computer connected to start the setup wizard. 15 You do not need to first log in the address bar and press Enter. 2.3 Configure the Router with EZ...
... of this router in to the router from your web browser. Please follow the steps below: Step 1 Go to the computer connected to start the setup wizard. 15 You do not need to first log in the address bar and press Enter. 2.3 Configure the Router with EZ...

User Manual
Page 21
Step 5 Change System Password. Enter the current password, new password and reconfirm the new password. (The default password is 'admin'.) If you do not wish to start the Setup Wizard. Click Next. 17 Step 4 Click Next to change the password, please leave all fields blank.
Step 5 Change System Password. Enter the current password, new password and reconfirm the new password. (The default password is 'admin'.) If you do not wish to start the Setup Wizard. Click Next. 17 Step 4 Click Next to change the password, please leave all fields blank.

User Manual
Page 22
For Cable Users: Please select Obtain an IP address from ISP automatically (Dynamic IP 18 For DSL Users: You may select either Obtain an IP address from ISP automatically (Dynamic IP Address). Step 6 Select Auto Detecting WAN Type to let the wizard detect which Internet connection you are using. If you select Setup WAN Type Manually, please specify a WAN type you use or select Setup WAN Type Manually to select the Internet connection type manually. Click Next.
For Cable Users: Please select Obtain an IP address from ISP automatically (Dynamic IP 18 For DSL Users: You may select either Obtain an IP address from ISP automatically (Dynamic IP Address). Step 6 Select Auto Detecting WAN Type to let the wizard detect which Internet connection you are using. If you select Setup WAN Type Manually, please specify a WAN type you use or select Setup WAN Type Manually to select the Internet connection type manually. Click Next.
User Manual
Page 29
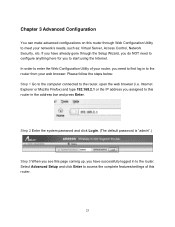
Select Advanced Setup and click Enter to access the complete features/settings of your router, you need to configure anything here for you to start using the Internet. ... 192.168.2.1 or the IP address you assigned to this router. 25 Chapter 3 Advanced Configuration You can make advanced configurations on this router through the Setup Wizard, you do NOT need to first log in to the router from your network's needs, such as: Virtual Server, Access Control, Network Security, etc...
Select Advanced Setup and click Enter to access the complete features/settings of your router, you need to configure anything here for you to start using the Internet. ... 192.168.2.1 or the IP address you assigned to this router. 25 Chapter 3 Advanced Configuration You can make advanced configurations on this router through the Setup Wizard, you do NOT need to first log in to the router from your network's needs, such as: Virtual Server, Access Control, Network Security, etc...
User Manual
Page 32
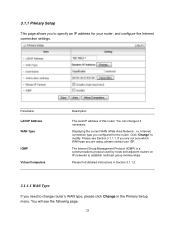
3.1.1 Primary Setup This page allows you to specify an IP address for the router. Parameter LAN IP Address WAN Type IGMP Virtual Computers Description The local IP ... Group Management Protocol (IGMP) is a communications protocol used by hosts and adjacent routers on IP networks to modify. Please find detailed instructions in the Primary Setup menu. If you are not sure which WAN type you are using, please contact your router, and configure the Internet connection settings. Displaying the current...
3.1.1 Primary Setup This page allows you to specify an IP address for the router. Parameter LAN IP Address WAN Type IGMP Virtual Computers Description The local IP ... Group Management Protocol (IGMP) is a communications protocol used by hosts and adjacent routers on IP networks to modify. Please find detailed instructions in the Primary Setup menu. If you are not sure which WAN type you are using, please contact your router, and configure the Internet connection settings. Displaying the current...

User Manual
Page 51
...may have different ways to use the AWLL6077v2 Airlink101 Wireless N 300 USB Adapter as well. Step 2 Push and hold the Easy Setup Button on the Adapter until you see the following window pops up the wireless security manually and you can refer to build secured ...wireless connection between your wireless device support this section. Different adapters have different wireless adapter installed in Easy Setup Button (WPS) which allows you to the user's manual from the manufacturer. Please make sure your wireless computers and the router quickly...
...may have different ways to use the AWLL6077v2 Airlink101 Wireless N 300 USB Adapter as well. Step 2 Push and hold the Easy Setup Button on the Adapter until you see the following window pops up the wireless security manually and you can refer to build secured ...wireless connection between your wireless device support this section. Different adapters have different wireless adapter installed in Easy Setup Button (WPS) which allows you to the user's manual from the manufacturer. Please make sure your wireless computers and the router quickly...
User Manual
Page 55
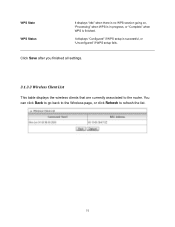
You can click Back to go back to the Wireless page, or click Refresh to the router. Click Save after you finished all settings. 3.1.3.3 Wireless Client List This table displays the wireless clients that are currently associated to refresh the list. 51 It displays "Configured" if WPS setup is finished. WPS State WPS Status It displays "Idle" when there is no WPS session going on, "Processing" when WPS is in progress, or "Complete" when WPS is successful, or "Unconfigured" if WPS setup fails.
You can click Back to go back to the Wireless page, or click Refresh to the router. Click Save after you finished all settings. 3.1.3.3 Wireless Client List This table displays the wireless clients that are currently associated to refresh the list. 51 It displays "Configured" if WPS setup is finished. WPS State WPS Status It displays "Idle" when there is no WPS session going on, "Processing" when WPS is in progress, or "Complete" when WPS is successful, or "Unconfigured" if WPS setup fails.
User Manual
Page 74
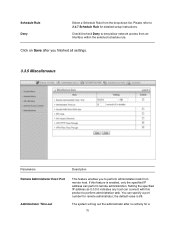
... Administrator Time-out This feature enables you to deny/allow network access from the drop-down list. Click on Save after no activity for detailed setup instructions. the default value is enabled, only the specified IP address can perform remote administration. Schedule Rule Deny Select a Schedule Rule from an Interface within...
... Administrator Time-out This feature enables you to deny/allow network access from the drop-down list. Click on Save after no activity for detailed setup instructions. the default value is enabled, only the specified IP address can perform remote administration. Schedule Rule Deny Select a Schedule Rule from an Interface within...
Quick Installation Guide
Page 1
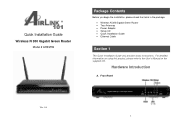
Quick Installation Guide Wireless N 300 Gigabit Green Router Model # AR695W Package Contents Before you begin the installation, please check the items in the package: • Wireless N 300 Gigabit Green Router • Two Antennas • Power Adapter • Setup CD • Quick Installation Guide • Ethernet Cable Section 1 This Quick Installation Guide only provides basic instructions. For detailed information on using this product, please refer to the User's Manual on the supplied CD. Front Panel Ver. 1A 1 Hardware Introduction A.
Quick Installation Guide Wireless N 300 Gigabit Green Router Model # AR695W Package Contents Before you begin the installation, please check the items in the package: • Wireless N 300 Gigabit Green Router • Two Antennas • Power Adapter • Setup CD • Quick Installation Guide • Ethernet Cable Section 1 This Quick Installation Guide only provides basic instructions. For detailed information on using this product, please refer to the User's Manual on the supplied CD. Front Panel Ver. 1A 1 Hardware Introduction A.
Quick Installation Guide
Page 3
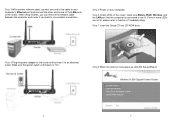
Step 6 Check LEDs of the router: make sure Status, WAN, Wireless, and the LAN port that the computer is "On". Step 7 Insert the Setup CD into CD-ROM drive. Step 4 Plug the power adapter to the router and connect it to are not lit, please refer to Section 4 Troubleshooting.... Step 3 With another network cable, connect one end of the cable to your computer. If one of the LAN ports of the router. (After setup finishes, you can remove the network cable between the computer and router if you want to use wireless connection.) Step 5 Power on your computer's Ethernet...
Step 6 Check LEDs of the router: make sure Status, WAN, Wireless, and the LAN port that the computer is "On". Step 7 Insert the Setup CD into CD-ROM drive. Step 4 Plug the power adapter to the router and connect it to are not lit, please refer to Section 4 Troubleshooting.... Step 3 With another network cable, connect one end of the cable to your computer. If one of the LAN ports of the router. (After setup finishes, you can remove the network cable between the computer and router if you want to use wireless connection.) Step 5 Power on your computer's Ethernet...

