
Quick Installation Guide
Page 1
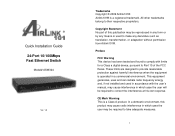
... for a Class a digital device, pursuant to their respective proprietors. CE Mark Warning This is a registered trademark. Quick Installation Guide 24-Port 10/100Mbps Fast Ethernet Switch Model# ASW324 Ver. 1A Trademarks Copyright © 2009 Airlink101® Airlink101® is a Class A product.
... for a Class a digital device, pursuant to their respective proprietors. CE Mark Warning This is a registered trademark. Quick Installation Guide 24-Port 10/100Mbps Fast Ethernet Switch Model# ASW324 Ver. 1A Trademarks Copyright © 2009 Airlink101® Airlink101® is a Class A product.
Quick Installation Guide
Page 2
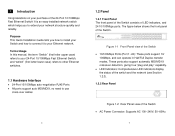
...play" capability. • LED Indicators: Comprehensive LED indicators display the status of the switch and the network (see Section 1.2.3). 1.2.2 Rear Panel Figure 1-2 Rear Panel view of the Switch. 1 Introduction Congratulations on your Ethernet network. Purpose This Quick Installation Guide tells you to... extend your 24-Port 10/100Mbps Fast Ethernet Switch, and "switch" (first letter lower case) refers to other Ethernet switches. 1.1 Hardware Interface • 24-Port 10/100Mbps auto-negotiation RJ45 Ports • All ports...
...play" capability. • LED Indicators: Comprehensive LED indicators display the status of the switch and the network (see Section 1.2.3). 1.2.2 Rear Panel Figure 1-2 Rear Panel view of the Switch. 1 Introduction Congratulations on your Ethernet network. Purpose This Quick Installation Guide tells you to... extend your 24-Port 10/100Mbps Fast Ethernet Switch, and "switch" (first letter lower case) refers to other Ethernet switches. 1.1 Hardware Interface • 24-Port 10/100Mbps auto-negotiation RJ45 Ports • All ports...

Quick Installation Guide
Page 3
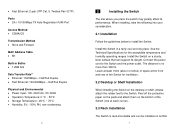
NOTICE: Do not envelop Radiator Fan while the Switch is power-on the Ethernet network. Status Blinking The port is transmitting or receiving data on Status Blinking N/A Off No power 4 • Port 1~24 10/....3x Flow Control Network Cables • Ethernet: Cables: 2-pair UTP Cat. 3, 4, 5, Twisted Pair (UTP) 5 Figure 1-3 Front Panel view of the switch • POWER: Power Indicator LED POWER Color Green Solid The Switch is working. 1.2.3 LED indicators information The front panel LEDs provide instant status feedback and help monitoring and troubleshooting when needed.
NOTICE: Do not envelop Radiator Fan while the Switch is power-on the Ethernet network. Status Blinking The port is transmitting or receiving data on Status Blinking N/A Off No power 4 • Port 1~24 10/....3x Flow Control Network Cables • Ethernet: Cables: 2-pair UTP Cat. 3, 4, 5, Twisted Pair (UTP) 5 Figure 1-3 Front Panel view of the switch • POWER: Power Indicator LED POWER Color Green Solid The Switch is working. 1.2.3 LED indicators information The front panel LEDs provide instant status feedback and help monitoring and troubleshooting when needed.
Quick Installation Guide
Page 4
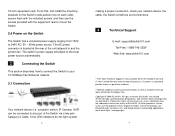
...off the protective paper on the pads and attach them on the bottom of the Switch (one at the front and rear of space at each corner). 2.3 Rack Installation The Switch is no more than 182cm. The distance is rack-mountable and can support its ... Temperature: 0 °C ~ 50°C • Storage Temperature: -20°C ~ 70°C • Humidity: 5% ~ 90% RH, non-condensing 6 2 Installing the Switch The site where you place the switch may greatly affect its weight. See the Technical Specifications for ventilation. 2.2 Desktop or Shelf Installation When installing the...
...off the protective paper on the pads and attach them on the bottom of the Switch (one at the front and rear of space at each corner). 2.3 Rack Installation The Switch is no more than 182cm. The distance is rack-mountable and can support its ... Temperature: 0 °C ~ 50°C • Storage Temperature: -20°C ~ 70°C • Humidity: 5% ~ 90% RH, non-condensing 6 2 Installing the Switch The site where you place the switch may greatly affect its weight. See the Technical Specifications for ventilation. 2.2 Desktop or Shelf Installation When installing the...
Quick Installation Guide
Page 5
... a universal power supply ranging from the date of AirLink101. If the LED indicators do this, first install the mounting brackets on the Switch's side panels (one on each side), secure them with the included screws, and then use the screws provided with the equipment rack to... E-mail: [email protected] Toll-Free: 1-888-746-3238* Web Site: www.airlink101.com * Free Voice Technical Support is located at the rear of the Switch via a two-pair Category 5 Cable. To do not light up after 8 making a proper connection, check your 10/100Mbps Fast Ethernet network. 3.1 Connection Your...
... a universal power supply ranging from the date of AirLink101. If the LED indicators do this, first install the mounting brackets on the Switch's side panels (one on each side), secure them with the included screws, and then use the screws provided with the equipment rack to... E-mail: [email protected] Toll-Free: 1-888-746-3238* Web Site: www.airlink101.com * Free Voice Technical Support is located at the rear of the Switch via a two-pair Category 5 Cable. To do not light up after 8 making a proper connection, check your 10/100Mbps Fast Ethernet network. 3.1 Connection Your...
