

User Manual
Page 2
Introduction ...2 1.1 Package Contents...2 1.2 Features...2 2. Configure Wireless Monitor 13 4.1 General...13 4.2 Profile Settings ...14 4.3 Available Network...16 4.4 Status ...17 4.5 Statistics...18 4.6 Wi-Fi Protected Setup (WPS 19 4.7 Configuring Wireless Security 24 4.8 Ad-hoc and Peer-to the Wireless Network 5 4. Specification ...32 Technical Support...33 1 Table of Contents 1. Connect to -Peer Wireless Networks 29 4.9 About ...31 Appendix A - Install the Wireless Adapter ...3 3.
Introduction ...2 1.1 Package Contents...2 1.2 Features...2 2. Configure Wireless Monitor 13 4.1 General...13 4.2 Profile Settings ...14 4.3 Available Network...16 4.4 Status ...17 4.5 Statistics...18 4.6 Wi-Fi Protected Setup (WPS 19 4.7 Configuring Wireless Security 24 4.8 Ad-hoc and Peer-to the Wireless Network 5 4. Specification ...32 Technical Support...33 1 Table of Contents 1. Connect to -Peer Wireless Networks 29 4.9 About ...31 Appendix A - Install the Wireless Adapter ...3 3.
User Manual
Page 3
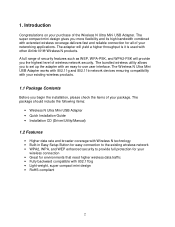
...; Wireless N Ultra Mini USB Adapter • Quick Installation Guide • Installation CD (Driver/Utility/Manual) 1.2 Features • Higher data rate and broader coverage with Wireless N technology • Built-in Easy Setup Button for easy connection to the existing wireless network • WPA2, WPA, and WEP enhanced security to -use user interface. The super compact mini design gives you the highest level of the Wireless N Ultra Mini USB Adapter. Introduction Congratulations on your networking applications. The adapter will...
...; Wireless N Ultra Mini USB Adapter • Quick Installation Guide • Installation CD (Driver/Utility/Manual) 1.2 Features • Higher data rate and broader coverage with Wireless N technology • Built-in Easy Setup Button for easy connection to the existing wireless network • WPA2, WPA, and WEP enhanced security to -use user interface. The super compact mini design gives you the highest level of the Wireless N Ultra Mini USB Adapter. Introduction Congratulations on your networking applications. The adapter will...

User Manual
Page 4
Windows Vista Users: Windows XP Users: 3 Step 2.2 Click Cancel if you see the Found New Hardware Wizard. Step 2.1 Insert the USB adapter into an available USB slot on how to install the Wireless N Ultra Mini USB Adapter. Install the Wireless Adapter This section provides instructions on your computer. 2.
Windows Vista Users: Windows XP Users: 3 Step 2.2 Click Cancel if you see the Found New Hardware Wizard. Step 2.1 Insert the USB adapter into an available USB slot on how to install the Wireless N Ultra Mini USB Adapter. Install the Wireless Adapter This section provides instructions on your computer. 2.

User Manual
Page 5
Windows 7 / Vista Users: When you get a warning message make sure you click Allow to give permission to My Computer, double click your CD ROM drive. Note: If the Autorun screen doesn't appear automatically, go to continue with the installation of the driver software. 4 Step 2.3 Insert the Installation CD in the CD drive. Step 2.4 The Autorun screen will pop up. Select Install Utility and Driver from the menu.
Windows 7 / Vista Users: When you get a warning message make sure you click Allow to give permission to My Computer, double click your CD ROM drive. Note: If the Autorun screen doesn't appear automatically, go to continue with the installation of the driver software. 4 Step 2.3 Insert the Installation CD in the CD drive. Step 2.4 The Autorun screen will pop up. Select Install Utility and Driver from the menu.
User Manual
Page 6
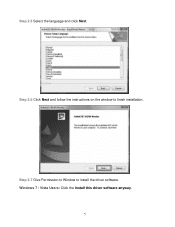
Step 2.6 Click Next and follow the instructions on the window to install the driver software. Windows 7 / Vista Users: Click the Install this driver software anyway. 5 Step 2.7 Give Permission to Window to finish installation. Step 2.5 Select the language and click Next.
Step 2.6 Click Next and follow the instructions on the window to install the driver software. Windows 7 / Vista Users: Click the Install this driver software anyway. 5 Step 2.7 Give Permission to Window to finish installation. Step 2.5 Select the language and click Next.
User Manual
Page 10
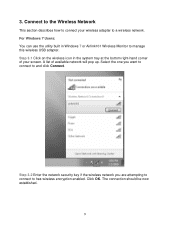
For Windows 7 Users: You can use the utility built in the system tray at the bottom right-hand corner of available network will pop up. Step 3.2 Enter the network security key if the wireless network you want to connect to has wireless encryption enabled. Connect to the Wireless Network This section describes how to connect your screen. 3. Click OK. A list of your wireless adapter to manage this wireless USB adapter. Step 3.1 Click on...
For Windows 7 Users: You can use the utility built in the system tray at the bottom right-hand corner of available network will pop up. Step 3.2 Enter the network security key if the wireless network you want to connect to has wireless encryption enabled. Connect to the Wireless Network This section describes how to connect your screen. 3. Click OK. A list of your wireless adapter to manage this wireless USB adapter. Step 3.1 Click on...

User Manual
Page 13
... with the settings on the wireless router. 3. If you cannot open the wireless monitor utility, make sure that gives you find one that the USB adapter is inserted firmly into the USB port. 2. The network key you reboot the router. Your router has 11 different channels to the documentation that comes with the connection such as low signal strength, slow connection speed, or unstable wireless connection, you may...
... with the settings on the wireless router. 3. If you cannot open the wireless monitor utility, make sure that gives you find one that the USB adapter is inserted firmly into the USB port. 2. The network key you reboot the router. Your router has 11 different channels to the documentation that comes with the connection such as low signal strength, slow connection speed, or unstable wireless connection, you may...
User Manual
Page 14
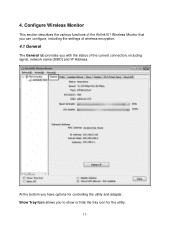
At the bottom you to show or hide the tray icon for controlling the utility and adapter. Show Tray Icon allows you have options for the utility. 13 4. Configure Wireless Monitor This section describes the various functions of the Airlink101 Wireless Monitor that you can configure, including the settings of wireless encryption. 4.1 General The General tab provides you with the status of the current connection, including signal, network name (SSID) and IP Address.
At the bottom you to show or hide the tray icon for controlling the utility and adapter. Show Tray Icon allows you have options for the utility. 13 4. Configure Wireless Monitor This section describes the various functions of the Airlink101 Wireless Monitor that you can configure, including the settings of wireless encryption. 4.1 General The General tab provides you with the status of the current connection, including signal, network name (SSID) and IP Address.

User Manual
Page 15
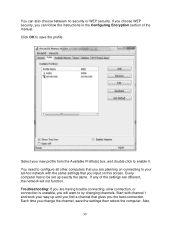
The Available Profile(s) box lists all the profiles that you to new networks. You can also manually add the profiles. 14 Profiles are automatically created and added to this utility version. 4.2 Profile Settings The Profile tab lists the current profiles and allows you 've created for your wireless networks. Note: Virtual WiFi allowed is not supported in this list when you connect to create new profiles. Disable Adapter will completely disable the wireless adapter. Radio Off disables the wireless function of the adapter.
The Available Profile(s) box lists all the profiles that you to new networks. You can also manually add the profiles. 14 Profiles are automatically created and added to this utility version. 4.2 Profile Settings The Profile tab lists the current profiles and allows you 've created for your wireless networks. Note: Virtual WiFi allowed is not supported in this list when you connect to create new profiles. Disable Adapter will completely disable the wireless adapter. Radio Off disables the wireless function of the adapter.

User Manual
Page 20
... for configuring it , you can skip this feature, like the AR570W or AR675W Airlink101 Wireless N Router. Step 4.6.1 Open the Airlink101 Wireless Monitor. You also need to have a router that supports this section. Click the Wi-Fi Protect Setup tab. 19 you should find the instructions for your wireless router does not support WPS, then you need to set up the wireless security manually...
... for configuring it , you can skip this feature, like the AR570W or AR675W Airlink101 Wireless N Router. Step 4.6.1 Open the Airlink101 Wireless Monitor. You also need to have a router that supports this section. Click the Wi-Fi Protect Setup tab. 19 you should find the instructions for your wireless router does not support WPS, then you need to set up the wireless security manually...

User Manual
Page 25
Open the Wireless Monitor utility, click Profile tab and then click Add. The different options of wireless network encryption settings are creating a custom profile, you need to configure them. If you are : Disable: No encryption in Section 3, Step 3.3. In most cases, encryption type will be automatically configured and all you need is to enter the Network key, as described in use WEP: The most...
Open the Wireless Monitor utility, click Profile tab and then click Add. The different options of wireless network encryption settings are creating a custom profile, you need to configure them. If you are : Disable: No encryption in Section 3, Step 3.3. In most cases, encryption type will be automatically configured and all you need is to enter the Network key, as described in use WEP: The most...
User Manual
Page 31
... settings are having trouble connecting, slow connection, or connection is unstable, you will not function. Click OK to try changing channels. You need to configure all other computers that you are planning on connecting to your new profile from the Available Profile(s) box, and double click to be set up until you find a channel that you the best connection. Troubleshooting: If you are different, the network...
... settings are having trouble connecting, slow connection, or connection is unstable, you will not function. Click OK to try changing channels. You need to configure all other computers that you are planning on connecting to your new profile from the Available Profile(s) box, and double click to be set up until you find a channel that you the best connection. Troubleshooting: If you are different, the network...
User Manual
Page 34
... of wireless products used, radio frequency interference (e.g., cordless telephones and microwaves) as well as network overhead lower actual data throughput rate. All products and trademarks are subject to change without notice. Copyright ©2010 Airlink101® 33 Compatibility with 802.11n devices from IEEE standard 802.11 specifications. Specifications are the property of their respective owners. Technical Support E-mail: support@airlink101.com Toll Free: 1-888...
... of wireless products used, radio frequency interference (e.g., cordless telephones and microwaves) as well as network overhead lower actual data throughput rate. All products and trademarks are subject to change without notice. Copyright ©2010 Airlink101® 33 Compatibility with 802.11n devices from IEEE standard 802.11 specifications. Specifications are the property of their respective owners. Technical Support E-mail: support@airlink101.com Toll Free: 1-888...

Quick Installation Guide
Page 1
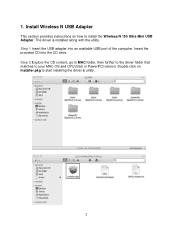
Step 1.2 Click Cancel if you see the Found New Hardware Wizard. Ver. 1.0 Quick Installation Guide Wireless N 150 Ultra Mini USB Adapter Model # AWLL5088 Package Contents: • Wireless N Ultra Mini USB Adapter • Driver & Utility CD • Quick Installation Guide Section 1 Install the Wireless USB Adapter This Quick Installation Guide only provides the basic installation instructions. Step 1.1 Insert the USB adapter into an available USB port of your computer. For detailed installation instructions on advanced features, please refer to the User's Manual on the provided CD.
Step 1.2 Click Cancel if you see the Found New Hardware Wizard. Ver. 1.0 Quick Installation Guide Wireless N 150 Ultra Mini USB Adapter Model # AWLL5088 Package Contents: • Wireless N Ultra Mini USB Adapter • Driver & Utility CD • Quick Installation Guide Section 1 Install the Wireless USB Adapter This Quick Installation Guide only provides the basic installation instructions. Step 1.1 Insert the USB adapter into an available USB port of your computer. For detailed installation instructions on advanced features, please refer to the User's Manual on the provided CD.

Quick Installation Guide
Page 6
You will restart my computer now. You have installed the driver and utility successfully. Step 1.8 Select Yes, I will see the following message when it is installing the driver for Airlink101 Wireless Adapter and the Airlink101 Wireless Monitor. Congratulations! Click Finish to complete the installation.
You will restart my computer now. You have installed the driver and utility successfully. Step 1.8 Select Yes, I will see the following message when it is installing the driver for Airlink101 Wireless Adapter and the Airlink101 Wireless Monitor. Congratulations! Click Finish to complete the installation.
Quick Installation Guide
Page 10
... instructions on changing channels, refer to the documentation that gives you a stable connection. Photo of the antenna(s). Specifications are subject to connect again. Actual data throughput will automatically pick up . Keep going through the channels until you find one that comes with 802.11n devices from . Troubleshooting If you are experiencing problems with the connection (unable to connect, low signal strength, slow connection speed, not working, unstable wireless connection...
... instructions on changing channels, refer to the documentation that gives you a stable connection. Photo of the antenna(s). Specifications are subject to connect again. Actual data throughput will automatically pick up . Keep going through the channels until you find one that comes with 802.11n devices from . Troubleshooting If you are experiencing problems with the connection (unable to connect, low signal strength, slow connection speed, not working, unstable wireless connection...
Installation Guide (MAC OS)
Page 2
1. The driver is installed along with the utility. Double click on how to start installing the driver & utility. 2 Install Wireless N USB Adapter This section provides instructions on Installer.pkg to install the Wireless N 150 Ultra Mini USB Adapter. Step 2 Explore the CD content, go to MAC folder, then further to the driver folder that matches to your MAC OS and CPU (Intel or PowerPC) version. Insert the provided CD into an available USB port of the computer. Step 1 Insert the USB adapter into the CD drive.
1. The driver is installed along with the utility. Double click on how to start installing the driver & utility. 2 Install Wireless N USB Adapter This section provides instructions on Installer.pkg to install the Wireless N 150 Ultra Mini USB Adapter. Step 2 Explore the CD content, go to MAC folder, then further to the driver folder that matches to your MAC OS and CPU (Intel or PowerPC) version. Insert the provided CD into an available USB port of the computer. Step 1 Insert the USB adapter into the CD drive.

Installation Guide (MAC OS)
Page 3
Click Continue. Step 4 Read Me: Read the instruction of installation. Click Continue to begin the installation. 3 Step 3 Introduction: The "Install Wireless N USB Adapter Driver" window will pop up.
Click Continue. Step 4 Read Me: Read the instruction of installation. Click Continue to begin the installation. 3 Step 3 Introduction: The "Install Wireless N USB Adapter Driver" window will pop up.

Installation Guide (MAC OS)
Page 7
For 10.4/10.5 MAC users: Step 1 Go to a wireless network. Connect to Wireless Network 2.1 Enable the Wireless USB Adapter This section describes how to enable your wireless USB adapter before you can connect to System Preferences > Network, select Network Port Configurations from Show. 7 2.
For 10.4/10.5 MAC users: Step 1 Go to a wireless network. Connect to Wireless Network 2.1 Enable the Wireless USB Adapter This section describes how to enable your wireless USB adapter before you can connect to System Preferences > Network, select Network Port Configurations from Show. 7 2.
Installation Guide (MAC OS)
Page 14
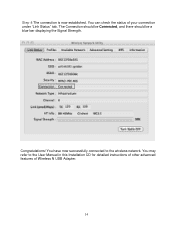
You have now successfully connected to the User Manual in this Installation CD for detailed instructions of other advanced features of your connection under "Link Status" tab. You can check the status of Wireless N USB Adapter. 14 The Connection should be Connected, and there should be a blue bar displaying the Signal Strength. Congratulations! You may refer to the wireless network. Step 4 The connection is now established.
You have now successfully connected to the User Manual in this Installation CD for detailed instructions of other advanced features of your connection under "Link Status" tab. You can check the status of Wireless N USB Adapter. 14 The Connection should be Connected, and there should be a blue bar displaying the Signal Strength. Congratulations! You may refer to the wireless network. Step 4 The connection is now established.


