User Manual
Page 1
Golden N Wireless Mini USB Adapter Model # AWLL6075 User's Manual Rev. 1.2
Golden N Wireless Mini USB Adapter Model # AWLL6075 User's Manual Rev. 1.2

User Manual
Page 2
Table of Contents 1. Introduction ...2 1.1 Package Contents...2 1.2 Features...2 2. Specification ...34 Technical Support...35 1 Install the Wireless Adapter ...3 3. Connect to -Peer Wireless Networks 31 4.9 About ...33 Appendix A - Configure Wireless Monitor 15 4.1 General...15 4.2 Profile Settings ...16 4.3 Available Network...18 4.4 Status ...19 4.5 Statistics...20 4.6 Wi-Fi Protected Setup (WPS 21 4.7 Configuring Wireless Security 26 4.8 Ad-hoc and Peer-to the Wireless Network 8 4.
Table of Contents 1. Introduction ...2 1.1 Package Contents...2 1.2 Features...2 2. Specification ...34 Technical Support...35 1 Install the Wireless Adapter ...3 3. Connect to -Peer Wireless Networks 31 4.9 About ...33 Appendix A - Configure Wireless Monitor 15 4.1 General...15 4.2 Profile Settings ...16 4.3 Available Network...18 4.4 Status ...19 4.5 Statistics...20 4.6 Wi-Fi Protected Setup (WPS 21 4.7 Configuring Wireless Security 26 4.8 Ad-hoc and Peer-to the Wireless Network 8 4.

User Manual
Page 3
...8226; RoHS compliant 2 A full range of your wireless connection • Great for environments that need higher wireless data traffic • Fully backward compatible with extended wireless coverage delivers fast and reliable connection for easy connection to the existing wireless network • WPA2, WPA, and WEP enhanced ...8226; Quick Installation Guide • Installation CD (Driver/Utility/Manual) 1.2 Features • Higher data rate and broader coverage with Wireless N technology • Built-in Easy Setup Button for all of security features such as WEP, WPA-PSK, and WPA2-PSK...
...8226; RoHS compliant 2 A full range of your wireless connection • Great for environments that need higher wireless data traffic • Fully backward compatible with extended wireless coverage delivers fast and reliable connection for easy connection to the existing wireless network • WPA2, WPA, and WEP enhanced ...8226; Quick Installation Guide • Installation CD (Driver/Utility/Manual) 1.2 Features • Higher data rate and broader coverage with Wireless N technology • Built-in Easy Setup Button for all of security features such as WEP, WPA-PSK, and WPA2-PSK...

User Manual
Page 4
Windows 2000/XP Users: Windows Vista/7 Users: 3 Install the Wireless Adapter This section provides instructions on the provided CD. The driver is installed along with the utility. For Macintosh users, you can find the software and installation instructions for MAC under the MAC folder on how to quit the wizard. For Windows 7, only driver will be installed. Step 2.2 Click Cancel to install the Golden N Wireless Mini USB Adapter. 2. Step 2.1 Insert the USB adapter into an available USB port of the computer.
Windows 2000/XP Users: Windows Vista/7 Users: 3 Install the Wireless Adapter This section provides instructions on the provided CD. The driver is installed along with the utility. For Macintosh users, you can find the software and installation instructions for MAC under the MAC folder on how to quit the wizard. For Windows 7, only driver will be installed. Step 2.2 Click Cancel to install the Golden N Wireless Mini USB Adapter. 2. Step 2.1 Insert the USB adapter into an available USB port of the computer.
User Manual
Page 8
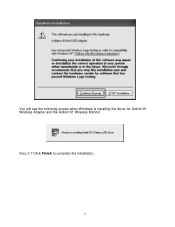
Step 2.7 Click Finish to complete the installation. 7 You will see the following screen when Windows is installing the driver for Airlink101 Wireless Adapter and the Airlink101 Wireless Monitor.
Step 2.7 Click Finish to complete the installation. 7 You will see the following screen when Windows is installing the driver for Airlink101 Wireless Adapter and the Airlink101 Wireless Monitor.
User Manual
Page 10
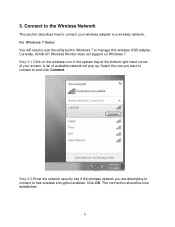
.... Step 3.1 Click on Windows 7. 3. Select the one you are attempting to connect to manage this wireless USB adapter. Currently, Airlink101 Wireless Monitor does not support on the wireless icon in Windows 7 to has wireless encryption enabled. A list of your wireless adapter to use the utility built in the system tray at the bottom right-hand...
.... Step 3.1 Click on Windows 7. 3. Select the one you are attempting to connect to manage this wireless USB adapter. Currently, Airlink101 Wireless Monitor does not support on the wireless icon in Windows 7 to has wireless encryption enabled. A list of your wireless adapter to use the utility built in the system tray at the bottom right-hand...

User Manual
Page 11
For Windows Vista/XP/2000 Users: Step 3.1 Open the Airlink101 Wireless Monitor utility by double clicking on the icon in the system tray at the bottom right-hand corner of your screen. 10
For Windows Vista/XP/2000 Users: Step 3.1 Open the Airlink101 Wireless Monitor utility by double clicking on the icon in the system tray at the bottom right-hand corner of your screen. 10
User Manual
Page 12
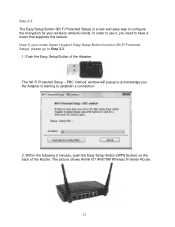
... for your router doesn't support Easy Setup Button function (Wi-Fi Protected Setup), please go to have a router that supports this feature. Note: If your wireless network clients. The 'Wi-Fi Protected Setup - Within the following 2 minutes, push the Easy Setup Button (WPS Button) on the back of the Adapter. The...
... for your router doesn't support Easy Setup Button function (Wi-Fi Protected Setup), please go to have a router that supports this feature. Note: If your wireless network clients. The 'Wi-Fi Protected Setup - Within the following 2 minutes, push the Easy Setup Button (WPS Button) on the back of the Adapter. The...

User Manual
Page 13
If the connection is recommended to Step 3.3. Step 3.4 Enter the wireless security key into the Network Key and Confirm Network Key boxes. The wireless adapter will now start to complete the connection. Step 3.3 Click the Available Network tab of Network Authentication and ... click Add to an unsecured network. The router will automatically detect the type of the Wireless Monitor, select the wireless network that you are . Click OK to synchronize the encryption settings with the wireless adapter. Continue to Step 3.5. Go to Step 3.5. If the network that you finished....
If the connection is recommended to Step 3.3. Step 3.4 Enter the wireless security key into the Network Key and Confirm Network Key boxes. The wireless adapter will now start to complete the connection. Step 3.3 Click the Available Network tab of Network Authentication and ... click Add to an unsecured network. The router will automatically detect the type of the Wireless Monitor, select the wireless network that you are . Click OK to synchronize the encryption settings with the wireless adapter. Continue to Step 3.5. Go to Step 3.5. If the network that you finished....
User Manual
Page 14
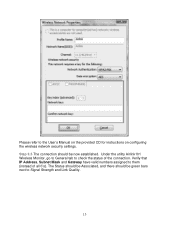
Please refer to check the status of all 0's). Under the utility Airlink101 Wireless Monitor, go to General tab to the User's Manual on the provided CD for instructions on configuring the wireless network security settings. The Status should be Associated, and there should be green bars next to them (instead of the connection. Verify that IP Address, Subnet Mask and Gateway have valid numbers assigned to Signal Strength and Link Quality. 13 Step 3.5 The connection should be now established.
Please refer to check the status of all 0's). Under the utility Airlink101 Wireless Monitor, go to General tab to the User's Manual on the provided CD for instructions on configuring the wireless network security settings. The Status should be Associated, and there should be green bars next to them (instead of the connection. Verify that IP Address, Subnet Mask and Gateway have valid numbers assigned to Signal Strength and Link Quality. 13 Step 3.5 The connection should be now established.
User Manual
Page 15
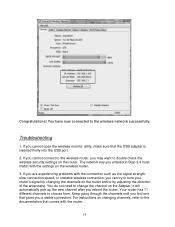
...through the channels until you can try to tune your router's signal by adjusting the direction of the antenna(s). Congratulations! If you cannot open the wireless monitor utility, make sure that gives you entered in Step 3.4 must match with the router. 14 The network key you a stable connection. ...Your router has 11 different channels to change the channel on the Adapter; For instructions on the router. If you cannot connect to the wireless router, you reboot the router. You do not need to choose from. You have now connected to the documentation that comes with the ...
...through the channels until you can try to tune your router's signal by adjusting the direction of the antenna(s). Congratulations! If you cannot open the wireless monitor utility, make sure that gives you entered in Step 3.4 must match with the router. 14 The network key you a stable connection. ...Your router has 11 different channels to change the channel on the Adapter; For instructions on the router. If you cannot connect to the wireless router, you reboot the router. You do not need to choose from. You have now connected to the documentation that comes with the ...
User Manual
Page 16
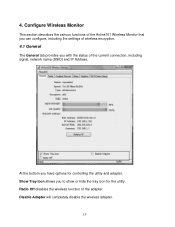
... of the current connection, including signal, network name (SSID) and IP Address. Configure Wireless Monitor This section describes the various functions of the Airlink101 Wireless Monitor that you can configure, including the settings of wireless encryption. 4.1 General The General tab provides you to show or hide the tray icon for controlling the utility...
... of the current connection, including signal, network name (SSID) and IP Address. Configure Wireless Monitor This section describes the various functions of the Airlink101 Wireless Monitor that you can configure, including the settings of wireless encryption. 4.1 General The General tab provides you to show or hide the tray icon for controlling the utility...

User Manual
Page 18
Enter the encryption settings for the profile. The Configuring Encryption section (section 4.7) will give you the information of the wireless network encryption settings. 17 Click OK to set the different options of how to save the changes. Enter a Profile Name and SSID.
Enter the encryption settings for the profile. The Configuring Encryption section (section 4.7) will give you the information of the wireless network encryption settings. 17 Click OK to set the different options of how to save the changes. Enter a Profile Name and SSID.
User Manual
Page 22
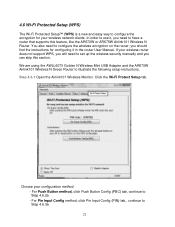
... You also need to set up the wireless security manually and you can skip this feature, like the AR670W or AR675W Airlink101 Wireless N Router. Choose your wireless router does not support WPS, you need to configure the wireless encryption on the router; you should find... to Step 4.6.2a - Step 4.6.1 Open the Airlink101 Wireless Monitor. For Push Button method, click Push Button Config (PBC) tab, continue to Step 4.6.3a 21 We are using the AWLL6075 Golden N Wireless Mini USB Adapter and the AR675W Airlink101 Wireless N Green Router to illustrate the following setup instructions.
... You also need to set up the wireless security manually and you can skip this feature, like the AR670W or AR675W Airlink101 Wireless N Router. Choose your wireless router does not support WPS, you need to configure the wireless encryption on the router; you should find... to Step 4.6.2a - Step 4.6.1 Open the Airlink101 Wireless Monitor. For Push Button method, click Push Button Config (PBC) tab, continue to Step 4.6.3a 21 We are using the AWLL6075 Golden N Wireless Mini USB Adapter and the AR675W Airlink101 Wireless N Green Router to illustrate the following setup instructions.

User Manual
Page 23
Step 4.6.2b Push the Easy Setup Button (WPS button) on the router, and it will be built up in couple minutes. The connection will now start the handshake with wireless adapter. Step 4.6.3a If you choose the Push Button method; Step 4.6.2a If you choose the Pin Code method, write down the PIN and click Yes. 22 click the Push Button Config (PBC) tab.
Step 4.6.2b Push the Easy Setup Button (WPS button) on the router, and it will be built up in couple minutes. The connection will now start the handshake with wireless adapter. Step 4.6.3a If you choose the Push Button method; Step 4.6.2a If you choose the Pin Code method, write down the PIN and click Yes. 22 click the Push Button Config (PBC) tab.

User Manual
Page 25
Then click WPS. Enter the Pin Code in the Client Pin Number box and click Start PIN. 24 Step 4.6.3c Make sure that the Disable WPS is not checked. Step 4.6.3b Log on to your router's configuration page from the web browser and click on Wireless.
Then click WPS. Enter the Pin Code in the Client Pin Number box and click Start PIN. 24 Step 4.6.3c Make sure that the Disable WPS is not checked. Step 4.6.3b Log on to your router's configuration page from the web browser and click on Wireless.

User Manual
Page 26
After a few moments both the router configuration screen and the adapter configuration screen should show a message telling you need to log in to Step 4.6.3b. 25 Then click Wireless security. Make sure that a connection is NOT checked, refer to your router's configuration and click on Wireless. Note: If you cannot connect successfully with WPS, you that the Disable WPS box is established.
After a few moments both the router configuration screen and the adapter configuration screen should show a message telling you need to log in to Step 4.6.3b. 25 Then click Wireless security. Make sure that a connection is NOT checked, refer to your router's configuration and click on Wireless. Note: If you cannot connect successfully with WPS, you that the Disable WPS box is established.

User Manual
Page 27
... need is to configure them. If you are : Disable: No encryption in Section 3, Step3.2. Open the Wireless Monitor utility, click Profile tab and then click Add. 4.7 Configuring Wireless Security This section describes the different types of wireless network encryption settings are creating a custom profile, you need manually configure the encryption settings. The different...
... need is to configure them. If you are : Disable: No encryption in Section 3, Step3.2. Open the Wireless Monitor utility, click Profile tab and then click Add. 4.7 Configuring Wireless Security This section describes the different types of wireless network encryption settings are creating a custom profile, you need manually configure the encryption settings. The different...
User Manual
Page 32
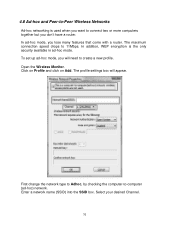
.... 4.8 Ad-hoc and Peer-to-Peer Wireless Networks Ad-hoc networking is the only security available in ad-hoc mode. Select your desired Channel. 31 In addition, WEP encryption is used when ...
.... 4.8 Ad-hoc and Peer-to-Peer Wireless Networks Ad-hoc networking is the only security available in ad-hoc mode. Select your desired Channel. 31 In addition, WEP encryption is used when ...

User Manual
Page 34
make sure that you do this on every ad-hoc machine so that they will all be set to the same channel. 4.9 About The About window provides the information about the Wireless Monitor Utility version and the current driver version. 33
make sure that you do this on every ad-hoc machine so that they will all be set to the same channel. 4.9 About The About window provides the information about the Wireless Monitor Utility version and the current driver version. 33