Quick Start Guide
Page 5
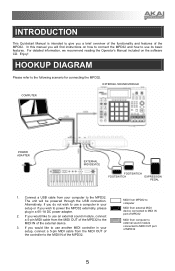
...module connected to MIDI OUT port of the MPD32. For detailed information, we recommend reading the Operator's Manual included on how to connect the MPD32 and how to use a computer in your computer to the MIDI IN of the MPD32. EXTERNAL SOUND MODULE COMPUTER POWER ADAPTER EXTERNAL ...MIDI DEVICE FOOTSWTICH FOOTSWITCH EXPRESSION PEDAL 1. HOOKUP DIAGRAM Please refer to use another MIDI controller in a 6V-1A...
...module connected to MIDI OUT port of the MPD32. For detailed information, we recommend reading the Operator's Manual included on how to connect the MPD32 and how to use a computer in your computer to the MIDI IN of the MPD32. EXTERNAL SOUND MODULE COMPUTER POWER ADAPTER EXTERNAL ...MIDI DEVICE FOOTSWTICH FOOTSWITCH EXPRESSION PEDAL 1. HOOKUP DIAGRAM Please refer to use another MIDI controller in a 6V-1A...

Quick Start Guide
Page 6
The display is used to Enter) - This dial is used for navigating menus, displaying data, and affecting change on MPD32's options and parameters. 2. [VALUE] (Push to increment and decrement Presets, parameter values and settings. FRONT PANEL OVERVIEW 11 12 19 20 14 18 1 45 6 2 16 17 7 3 13 8 15 10 9 1. The [ This dial also functions as an [ENTER] button when it is pressed down. 3. [] - LCD - These buttons are used for navigate through fields of menus and options.
The display is used to Enter) - This dial is used for navigating menus, displaying data, and affecting change on MPD32's options and parameters. 2. [VALUE] (Push to increment and decrement Presets, parameter values and settings. FRONT PANEL OVERVIEW 11 12 19 20 14 18 1 45 6 2 16 17 7 3 13 8 15 10 9 1. The [ This dial also functions as an [ENTER] button when it is pressed down. 3. [] - LCD - These buttons are used for navigate through fields of menus and options.

Quick Start Guide
Page 7
... also be set of a sound. 7 15 23 31 18. [NOTE REPEAT] - They can trigger with the knobs, faders and buttons on the MPD32. The pads are used as MIDI CC or Program Change switches until [TIME DIVISION] has been de-activated. 20. [TAP TEMPO] - This allows 39 47 55 63 you... 87 95 on the LCD display 16. [FULL LEVEL] - Please note that a preset's default tempo can be used to the MIDI IN of an external MIDI device to power the MPD32 through the USB connection. 2. Use a five-pin MIDI cable to connect the MIDI OUT of an external device. 4. FOOT SWITCH 1 - Connect a ...
... also be set of a sound. 7 15 23 31 18. [NOTE REPEAT] - They can trigger with the knobs, faders and buttons on the MPD32. The pads are used as MIDI CC or Program Change switches until [TIME DIVISION] has been de-activated. 20. [TAP TEMPO] - This allows 39 47 55 63 you... 87 95 on the LCD display 16. [FULL LEVEL] - Please note that a preset's default tempo can be used to the MIDI IN of an external MIDI device to power the MPD32 through the USB connection. 2. Use a five-pin MIDI cable to connect the MIDI OUT of an external device. 4. FOOT SWITCH 1 - Connect a ...
Quick Start Guide
Page 8
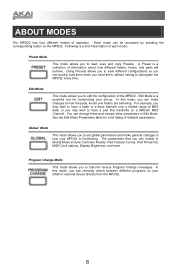
ABOUT MODES The MPD32 has four different modes of MIDI data, or you may wish to have a pad that you can make general changes to how the pads, knobs and faders are behaving. Using Presets allows you to save and copy Presets. For example, you can change these and ..., Pad Threshold, MIDI Clock options, Display Brightness, and more. See the Edit Mode Parameters table for customizing your DAW or external device directly from the MPD32. . 8 Edit Mode is a powerful tool for a full listing of information about how different faders, knobs, and pads will behave. You can quickly ...
ABOUT MODES The MPD32 has four different modes of MIDI data, or you may wish to have a pad that you can make general changes to how the pads, knobs and faders are behaving. Using Presets allows you to save and copy Presets. For example, you can change these and ..., Pad Threshold, MIDI Clock options, Display Brightness, and more. See the Edit Mode Parameters table for customizing your DAW or external device directly from the MPD32. . 8 Edit Mode is a powerful tool for a full listing of information about how different faders, knobs, and pads will behave. You can quickly ...

Quick Start Guide
Page 9
...this mode. The name will begin blinking. 2. PRESET MODE A Preset is a collection of information about how the MPD32's faders, knobs, buttons and pads will begin to the destination. each of the name will behave. Press [ENTER... to call up this , you can load, save the Preset by turning the [VALUE] knob. Using Presets allows you to save different configurations so you can change the blinking character. 3. In Preset Mode... 3 different pages. Turn the [VALUE] dial to reprogram the MPD32 every time. To move between the characters, use []. 4. ENTER PRESET NAME IN THIS FIELD 9
...this mode. The name will begin blinking. 2. PRESET MODE A Preset is a collection of information about how the MPD32's faders, knobs, buttons and pads will begin to the destination. each of the name will behave. Press [ENTER... to call up this , you can load, save the Preset by turning the [VALUE] knob. Using Presets allows you to save different configurations so you can change the blinking character. 3. In Preset Mode... 3 different pages. Turn the [VALUE] dial to reprogram the MPD32 every time. To move between the characters, use []. 4. ENTER PRESET NAME IN THIS FIELD 9

Quick Start Guide
Page 10
... [ENTER] to save the current preset. To select the controller you will prompt the screen to enter Edit Mode. 2. If there are described on Page 2, use []. Also note that the changes you are editing and are multiple event types for the particular controller (Page 1). 3.
... [ENTER] to save the current preset. To select the controller you will prompt the screen to enter Edit Mode. 2. If there are described on Page 2, use []. Also note that the changes you are editing and are multiple event types for the particular controller (Page 1). 3.

Quick Start Guide
Page 12
Use the [VALUE] dial to accept the change settings, values or select a message on the selected page. 4. Global Mode options are organized under different pages and include the list of options (shown below . Press [ENTER] to change or send a message or press [ Use [] to navigate through the available pages of options shown below ). 3. NAVIGATING GLOBAL MODE 1. Press [GLOBAL] to the way that your MPD32 functions. GLOBAL MODE In Global Mode, you can send global messages and make general changes to enter Global Mode. 2.
Use the [VALUE] dial to accept the change settings, values or select a message on the selected page. 4. Global Mode options are organized under different pages and include the list of options (shown below . Press [ENTER] to change or send a message or press [ Use [] to navigate through the available pages of options shown below ). 3. NAVIGATING GLOBAL MODE 1. Press [GLOBAL] to the way that your MPD32 functions. GLOBAL MODE In Global Mode, you can send global messages and make general changes to enter Global Mode. 2.

Quick Start Guide
Page 13
... to be found on the MPD32? Question: Do I need to use the MPD32 as can transmit information on 16 MIDI channels on the MPD32 work . However, if your programming and performance. The MPD32 can be extremely expressive with the MPD32? Answer: Yes. Is that it may also be used on the legendary Akai MPC series. This allows you...
... to be found on the MPD32? Question: Do I need to use the MPD32 as can transmit information on 16 MIDI channels on the MPD32 work . However, if your programming and performance. The MPD32 can be extremely expressive with the MPD32? Answer: Yes. Is that it may also be used on the legendary Akai MPC series. This allows you...

Quick Start Guide
Page 14
... is powered on . Turn the unit's power off , wait a moment, and turn it on again. With the footswitch plugged in after the MPD32 was turned on . Deactivate 16 Level to return to my clock source. Note Repeat feature is listed as application's incoming MIDI chanel. Footswitch was ... hit. The pads always play mode. If controlling an external hardware module, make sure that the software you are using is set to "Internal". Unplug the MPD32 from the MPD32. Edit the transport control to receive MIDI data from the USB hub and connect directly to the device's MIDI IN...
... is powered on . Turn the unit's power off , wait a moment, and turn it on again. With the footswitch plugged in after the MPD32 was turned on . Deactivate 16 Level to return to my clock source. Note Repeat feature is listed as application's incoming MIDI chanel. Footswitch was ... hit. The pads always play mode. If controlling an external hardware module, make sure that the software you are using is set to "Internal". Unplug the MPD32 from the MPD32. Edit the transport control to receive MIDI data from the USB hub and connect directly to the device's MIDI IN...
