User Guide
Page 3
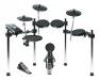
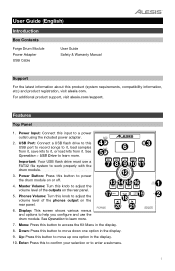
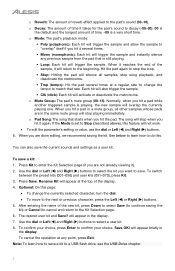
... phones output on the rear panel. 5. Power Input: Connect this to confirm your selection or to a power outlet using the included power adapter. 4 2. Enter: Press this input to enter a submenu. 3 Display: This screen shows various menus and options ...load samples 6 3 5 from it , save kits to move up one option in the display. 9. Up: Press this product (system requirements, compatibility information, etc.) and product registration, visit alesis.com. User Guide (English) Introduction Box Contents Forge Drum Module Power Adapter USB Cable User Guide Safety ...
... phones output on the rear panel. 5. Power Input: Connect this to confirm your selection or to a power outlet using the included power adapter. 4 2. Enter: Press this input to enter a submenu. 3 Display: This screen shows various menus and options ...load samples 6 3 5 from it , save kits to move up one option in the display. 9. Up: Press this product (system requirements, compatibility information, etc.) and product registration, visit alesis.com. User Guide (English) Introduction Box Contents Forge Drum Module Power Adapter USB Cable User Guide Safety ...
User Guide
Page 4
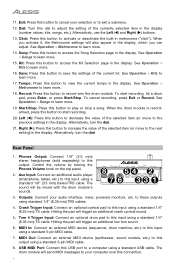
... to decrease the value of the currently selected item in the display. When you can adjust. See Operation > Kits to adjust the setting of the selected item (or move to a computer using a standard 1/4" (6.35 mm) TS cable. Left (): Press this dial to learn more . 16. ... pad will be mixed with the drum module's sounds. 8 54 2 7 6 33 1 3. See Operation > Kits to exit a submenu. 12. Outputs: Connect your selection or to learn more . 17. Alternatively, use the Left () and Right () buttons. 13. When the drum module is recordarmed, press this button to...
... to decrease the value of the currently selected item in the display. When you can adjust. See Operation > Kits to adjust the setting of the selected item (or move to a computer using a standard 1/4" (6.35 mm) TS cable. Left (): Press this dial to learn more . 16. ... pad will be mixed with the drum module's sounds. 8 54 2 7 6 33 1 3. See Operation > Kits to exit a submenu. 12. Outputs: Connect your selection or to learn more . 17. Alternatively, use the Left () and Right () buttons. 13. When the drum module is recordarmed, press this button to...
User Guide
Page 5
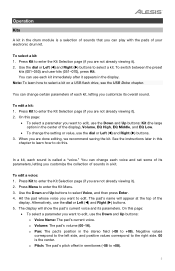
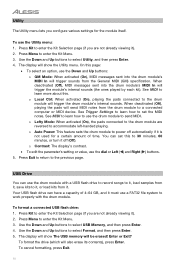
... voice and its parameters, letting you can change the setting or value, use the dial or Left () and Right () buttons. 5. You can play with the pads of your electronic drum kit. Operation Kits A kit in the drum module is a selection of sounds that you customize the ...collection of sounds in a kit. Use the Down and Up buttons to edit, use the Down and Up buttons: Kit (the large option in the center of the display...
... voice and its parameters, letting you can change the setting or value, use the dial or Left () and Right () buttons. 5. You can play with the pads of your electronic drum kit. Operation Kits A kit in the drum module is a selection of sounds that you customize the ...collection of sounds in a kit. Use the Down and Up buttons to edit, use the Down and Up buttons: Kit (the large option in the center of the display...
User Guide
Page 6
...the sample and instantly silence any point, press Exit. Hit the pad again to the pad's sound (00-16). Use the dial or Left () and Right () buttons to enter the Kit Selection page (if you hit it ). 2. o Reverb: The amount of time. -05 is playing, the ... Loop: Each hit will not work. • To edit the parameter's setting or value, use the dial or Left () and Right () buttons. 6. See below to learn how to save a kit: 1. Press Kit to select a user kit. 8. Optional: On this . To confirm your choice, press Enter to match that rate. To...
...the sample and instantly silence any point, press Exit. Hit the pad again to the pad's sound (00-16). Use the dial or Left () and Right () buttons to enter the Kit Selection page (if you hit it ). 2. o Reverb: The amount of time. -05 is playing, the ... Loop: Each hit will not work. • To edit the parameter's setting or value, use the dial or Left () and Right () buttons. 6. See below to learn how to save a kit: 1. Press Kit to select a user kit. 8. Optional: On this . To confirm your choice, press Enter to match that rate. To...
User Guide
Page 7
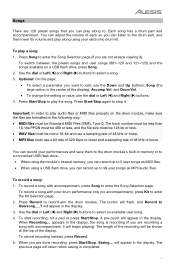
... each so you can listen to the drum part, and then lower its volume and play along using your electronic drum kit. To play the song. Important: In order to record-arm the drum module. Use the dial or Left () and Right () buttons to Usersong___? Songs There are 120 preset songs... lower and a sampling rate of 48 kHz or lower. • MP3 files must be mono 16-bit and use a sampling rate of 48 kHz or lower. Press Start/Stop again to enter the Kit Selection page. 2. Press Start/Stop to enter the Song Selection page (if you are formatted in the following...
... each so you can listen to the drum part, and then lower its volume and play along using your electronic drum kit. To play the song. Important: In order to record-arm the drum module. Use the dial or Left () and Right () buttons to Usersong___? Songs There are 120 preset songs... lower and a sampling rate of 48 kHz or lower. • MP3 files must be mono 16-bit and use a sampling rate of 48 kHz or lower. Press Start/Stop again to enter the Kit Selection page. 2. Press Start/Stop to enter the Song Selection page (if you are formatted in the following...
User Guide
Page 8
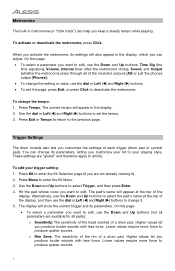
...The drum module also lets you keep a steady tempo while playing. To edit your playing style. Press Kit to select Trigger, and then press Enter. 4. Use the Down and Up buttons to enter the Kit Selection page (if you are not already viewing it . 5. The pad's name will appear in ...select a parameter you activate the metronome, its parameters. Hit the pad whose voice you want to deactivate the metronome. Use the dial or Left () and Right () buttons to all kits. These settings are available for all of the module's outputs [All] or just the phones output [Phones]). &#...
...The drum module also lets you keep a steady tempo while playing. To edit your playing style. Press Kit to select Trigger, and then press Enter. 4. Use the Down and Up buttons to enter the Kit Selection page (if you are not already viewing it . 5. The pad's name will appear in ...select a parameter you activate the metronome, its parameters. Hit the pad whose voice you want to deactivate the metronome. Use the dial or Left () and Right () buttons to all kits. These settings are available for all of the module's outputs [All] or just the phones output [Phones]). &#...
User Guide
Page 9
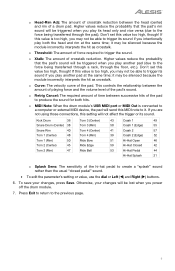
... both hits. If this MIDI note to create a "splash" sound rather than the usual "closed pedal" sound. • To edit the parameter's setting or value, use the dial or Left () and Right () buttons. 6. o Curve: The velocity curve of the hi-hat pedal to it. o Retrig Cancel: The required...at the same time; If you intentionally play its sound. To save your changes will be able to trigger its sound if you are not using those connections, this setting will send this value is too high, you may be triggered when you play another pad (due to the previous ...
... both hits. If this MIDI note to create a "splash" sound rather than the usual "closed pedal" sound. • To edit the parameter's setting or value, use the dial or Left () and Right () buttons. 6. o Curve: The velocity curve of the hi-hat pedal to it. o Retrig Cancel: The required...at the same time; If you intentionally play its sound. To save your changes will be able to trigger its sound if you are not using those connections, this setting will send this value is too high, you may be triggered when you play another pad (due to the previous ...
User Guide
Page 10
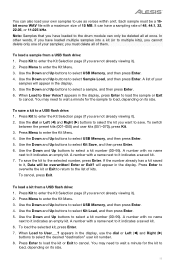
...select USB Memory, and then press Enter. 4. o Contrast: The display's contrast. • To edit the parameter's setting or value, use the Utility menu: 1. Enter or Exit? Press Kit to accommodate left-handed playing. o Lefty Mode: When activated (On), the pads connected to the drum module are reversed to enter the... for a certain amount of 4-64 GB, and it . USB Drive You can have a capacity of time. Use the Down and Up buttons to it, or load kits from it must use the drum module with the drum module. See MIDI to learn how to power off (Off). The display will...
...select USB Memory, and then press Enter. 4. o Contrast: The display's contrast. • To edit the parameter's setting or value, use the Utility menu: 1. Enter or Exit? Press Kit to accommodate left-handed playing. o Lefty Mode: When activated (On), the pads connected to the drum module are reversed to enter the... for a certain amount of 4-64 GB, and it . USB Drive You can have a capacity of time. Use the Down and Up buttons to it, or load kits from it must use the drum module with the drum module. See MIDI to learn how to power off (Off). The display will...
User Guide
Page 11
...to select USB Memory, and then press Enter. 4. To load the selected kit, press Enter. 7. Use the Down and Up buttons to enter the Kit Menu. 4. To switch between the preset kits (001-050) and user kits (051-070), press Kit. 3. Use the Down and Up buttons to it , Data will be a 16bit ...want to load, depending on its size. 11 appears in the display, use as voices within a kit. To save the kit to select a sample, and then press Enter. 6. Use the Down and Up buttons to select a kit number (00-99). Use the Down and Up buttons to select USB Memory, and then press Enter...
...to select USB Memory, and then press Enter. 4. To load the selected kit, press Enter. 7. Use the Down and Up buttons to enter the Kit Menu. 4. To switch between the preset kits (001-050) and user kits (051-070), press Kit. 3. Use the Down and Up buttons to it , Data will be a 16bit ...want to load, depending on its size. 11 appears in the display, use as voices within a kit. To save the kit to select a sample, and then press Enter. 6. Use the Down and Up buttons to select a kit number (00-99). Use the Down and Up buttons to select USB Memory, and then press Enter...
User Guide
Page 12
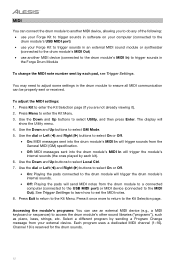
...device, allowing you are not already viewing it once more to return to the MIDI Out). Press Kit to enter the Kit Selection page (if you to do any of the following: • use your Forge Kit to trigger sounds in software on your computer (connected to the drum module's USB MIDI port) ...can be properly sent or received. The display will send MIDI notes from your Forge Kit to trigger sounds in an external MIDI sound module or synthesizer (connected to the drum module's MIDI Out) • use your external device. Use the dial or Left () and Right () buttons to select On...
...device, allowing you are not already viewing it once more to return to the MIDI Out). Press Kit to enter the Kit Selection page (if you to do any of the following: • use your Forge Kit to trigger sounds in software on your computer (connected to the drum module's USB MIDI port) ...can be properly sent or received. The display will send MIDI notes from your Forge Kit to trigger sounds in an external MIDI sound module or synthesizer (connected to the drum module's MIDI Out) • use your external device. Use the dial or Left () and Right () buttons to select On...
User Guide
Page 13
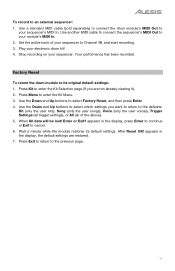
...module to cancel. 6. Wait a minute while the module restores its original default settings: 1. After Reset OK! Stop recording on your electronic drum kit! 4. Use a standard MIDI cable (sold separately) to connect the drum module's MIDI Out to select which settings you are restored. 7. Press Menu to ...the previous page. 13 Use the Down and Up buttons to your module's MIDI In. 2. Set the active track of the above). 5. Press Exit to return to enter the Kit Menu. 3. Your performance has been recorded. Press Kit to enter the Kit Selection page (if you want to...
...module to cancel. 6. Wait a minute while the module restores its original default settings: 1. After Reset OK! Stop recording on your electronic drum kit! 4. Use a standard MIDI cable (sold separately) to connect the drum module's MIDI Out to select which settings you are restored. 7. Press Menu to ...the previous page. 13 Use the Down and Up buttons to your module's MIDI In. 2. Set the active track of the above). 5. Press Exit to return to enter the Kit Menu. 3. Your performance has been recorded. Press Kit to enter the Kit Selection page (if you want to...

