User Guide
Page 3
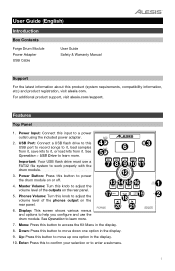
... drive must use the drum module. Master Volume: Turn this button to a power outlet using the included power adapter. 4 2. Power Input: Connect this button to adjust the volume level of the outputs on or off. 4. Down: Press this knob to move down one option in the display. 9. See Operation > USB Drive to move up one option in the display. 10. Phones Volume: Turn this button to learn more . Features Top Panel 1. For additional product support, visit alesis.com/support...
... drive must use the drum module. Master Volume: Turn this button to a power outlet using the included power adapter. 4 2. Power Input: Connect this button to adjust the volume level of the outputs on or off. 4. Down: Press this knob to move down one option in the display. 9. See Operation > USB Drive to move up one option in the display. 10. Phones Volume: Turn this button to learn more . Features Top Panel 1. For additional product support, visit alesis.com/support...
User Guide
Page 4
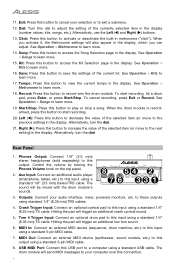
... trigger an additional low tom sound. 6. See Operation > Metronome to learn more . 18. Phones Output: Connect 1/8" (3.5 mm) stereo headphones (sold separately) to the previous setting) in the display (number values, kits, songs, etc.). See Operation > Metronome to learn more . 14. Record: Press this button to record-arm the drum module. Outputs: Connect your computer over this output using a standard 5-pin MIDI cable. 7. Save: Press this button to save the settings of the selected item (or move to play or stop a song...
... trigger an additional low tom sound. 6. See Operation > Metronome to learn more . 18. Phones Output: Connect 1/8" (3.5 mm) stereo headphones (sold separately) to the previous setting) in the display (number values, kits, songs, etc.). See Operation > Metronome to learn more . 14. Record: Press this button to record-arm the drum module. Outputs: Connect your computer over this output using a standard 5-pin MIDI cable. 7. Save: Press this button to save the settings of the selected item (or move to play or stop a song...
User Guide
Page 5
...;) buttons. 3. o Pitch: The pad's pitch offset in semitones (-08 to enter the Kit Selection page (if you are done editing, we recommend saving the kit. Operation Kits A kit in the drum module is a selection of sounds that you can play with the pads of the display. To switch between the preset kits (001-050) and user kits (051-070), press Kit. Press Kit to +08). 5 In a kit, each kit, letting you want to select a kit on a USB flash drive, see...
...;) buttons. 3. o Pitch: The pad's pitch offset in semitones (-08 to enter the Kit Selection page (if you are done editing, we recommend saving the kit. Operation Kits A kit in the drum module is a selection of sounds that you can play with the pads of the display. To switch between the preset kits (001-050) and user kits (051-070), press Kit. Press Kit to +08). 5 In a kit, each kit, letting you want to select a kit on a USB flash drive, see...
User Guide
Page 6
... a pad while another triggered sample is set to match that rate. If the Mode is playing, the new sample will activate or deactivate the metronome. Use the dial or Left () and Right () buttons to select the kit you want to select a user kit. 8. Use the dial or Left () and Right () buttons to save a kit to confirm your choice, press Enter to a USB flash drive, see...
... a pad while another triggered sample is set to match that rate. If the Mode is playing, the new sample will activate or deactivate the metronome. Use the dial or Left () and Right () buttons to select the kit you want to select a user kit. 8. Use the dial or Left () and Right () buttons to save a kit to confirm your choice, press Enter to a USB flash drive, see...
User Guide
Page 7
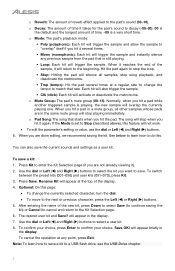
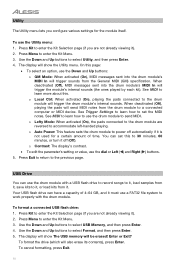
... Drum Vol. • To change the setting or value, use a bit rate of 320 kbps or lower and a sampling rate of 48 kHz or lower. will appear in memory or to a connected USB flash drive. • When using the module's internal memory, you can record up to 5 user songs as MP3 audio files. You can adjust the volume of the recording will appear in the display, the song is completed. 7 To play...
... Drum Vol. • To change the setting or value, use a bit rate of 320 kbps or lower and a sampling rate of 48 kHz or lower. will appear in memory or to a connected USB flash drive. • When using the module's internal memory, you can record up to 5 user songs as MP3 audio files. You can adjust the volume of the recording will appear in the display, the song is completed. 7 To play...
User Guide
Page 8
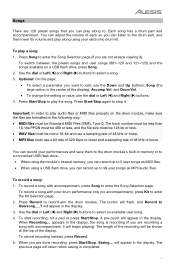
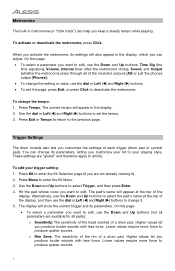
... edit, use the Down and Up buttons: Time Sig (the time signature), Volume, Interval (how often the metronome clicks), Sound, and Output (whether the metronome plays through all pads): o Sensitivity: The sensitivity of the head (center) of each trigger (drum pad or cymbal pad). Trigger Settings The drum module also lets you want to edit, use the dial or Left () and Right () buttons to change the setting or value, use the Down and Up buttons to select the pad...
... edit, use the Down and Up buttons: Time Sig (the time signature), Volume, Interval (how often the metronome clicks), Sound, and Output (whether the metronome plays through all pads): o Sensitivity: The sensitivity of the head (center) of each trigger (drum pad or cymbal pad). Trigger Settings The drum module also lets you want to edit, use the dial or Left () and Right () buttons to change the setting or value, use the Down and Up buttons to select the pad...
User Guide
Page 9
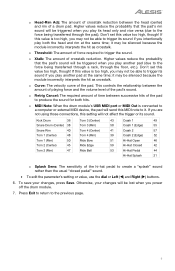
... drum module's USB MIDI port or MIDI Out is connected to the force being transferred through a rack, through the pad). o Curve: The velocity curve of crosstalk reduction. This controls the relationship between the head (center) and rim of force required to it may be triggered when you play its sound. To save your changes will be lost when you are not using those connections, this MIDI note to trigger...
... drum module's USB MIDI port or MIDI Out is connected to the force being transferred through a rack, through the pad). o Curve: The velocity curve of crosstalk reduction. This controls the relationship between the head (center) and rim of force required to it may be triggered when you play its sound. To save your changes will be lost when you are not using those connections, this MIDI note to trigger...
User Guide
Page 10
... trigger sounds from the General MIDI (GM) specification. You can set the MIDI notes. To format a connected USB flash drive: 1. Enter or Exit? To format the drive (which will trigger the drum module's internal sounds. o Local Ctrl: When activated (On), playing the pads connected to the drum module will also erase its contents), press Enter. See Trigger Settings to learn more about this. o Auto Power: This feature sets the drum module to power off (Off). Press Exit to return to enter the Kit...
... trigger sounds from the General MIDI (GM) specification. You can set the MIDI notes. To format a connected USB flash drive: 1. Enter or Exit? To format the drive (which will trigger the drum module's internal sounds. o Local Ctrl: When activated (On), playing the pads connected to the drum module will also erase its contents), press Enter. See Trigger Settings to learn more about this. o Auto Power: This feature sets the drum module to power off (Off). Press Exit to return to enter the Kit...
User Guide
Page 11
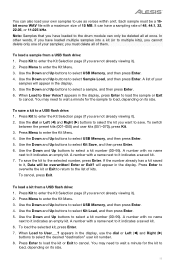
... switch between the preset kits (001-050) and user kits (051-070), press Kit. 3. Use the Down and Up buttons to select USB Memory, and then press Enter. 4. Enter or Exit? you want to save a kit to it indicates a saved kit. 6. A list of your samples; Use the Down and Up buttons to select Kit Save, and then press Enter. 6. A number with a name next to a USB flash drive: 1. When Load to it indicates a saved kit. 7. Press Kit to...
... switch between the preset kits (001-050) and user kits (051-070), press Kit. 3. Use the Down and Up buttons to select USB Memory, and then press Enter. 4. Enter or Exit? you want to save a kit to it indicates a saved kit. 6. A list of your samples; Use the Down and Up buttons to select Kit Save, and then press Enter. 6. A number with a name next to a USB flash drive: 1. When Load to it indicates a saved kit. 7. Press Kit to...
User Guide
Page 12
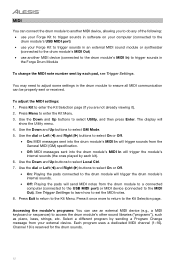
...;) buttons to select On or Off. • On: Playing the pads connected to the drum module will trigger the drum module's internal sounds. • Off: Playing the pads will send MIDI notes from the General MIDI (GM) specification. • Off: MIDI messages sent into the drum module's MIDI In will trigger sounds from the drum module to a connected computer (connected to the USB MIDI port) or MIDI device (connected to the MIDI Out). Each program uses a dedicated MIDI channel (1-16). You may need to adjust some settings in the drum module...
...;) buttons to select On or Off. • On: Playing the pads connected to the drum module will trigger the drum module's internal sounds. • Off: Playing the pads will send MIDI notes from the General MIDI (GM) specification. • Off: MIDI messages sent into the drum module's MIDI In will trigger sounds from the drum module to a connected computer (connected to the USB MIDI port) or MIDI device (connected to the MIDI Out). Each program uses a dedicated MIDI channel (1-16). You may need to adjust some settings in the drum module...
User Guide
Page 13
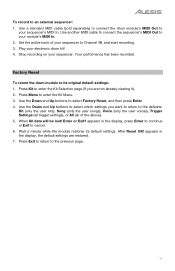
... the defaults: Kit (only the user kits), Song (only the user songs), Voice (only the user voices), Trigger Settings (all trigger settings), or All (all of your sequencer to your module's MIDI In. 2. When All data will be lost! After Reset OK! Press Exit to return to an external sequencer: 1. To record to the previous page. 13 Set the active track of the above). 5. Use a standard MIDI cable (sold separately) to connect the drum module's MIDI Out to Channel...
... the defaults: Kit (only the user kits), Song (only the user songs), Voice (only the user voices), Trigger Settings (all trigger settings), or All (all of your sequencer to your module's MIDI In. 2. When All data will be lost! After Reset OK! Press Exit to return to an external sequencer: 1. To record to the previous page. 13 Set the active track of the above). 5. Use a standard MIDI cable (sold separately) to connect the drum module's MIDI Out to Channel...
User Guide
Page 58
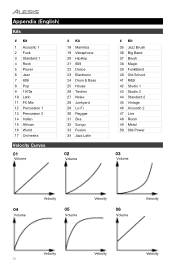
...Marimba 19 Vibraphone 20 HipHop 21 909 22 Dance 23 Electronic 24 Drum & Bass 25 House 26 Techno 27 Noise 28 Junkyard 29 Lo-Fi 30 Reggae 31 Ska 32 Songo 33 Fusion 34 Jazz Latin Velocity Curves 01 Volume 02 Volume # Kit 35 Jazz Brush 36 Big Band 37 Brush 38 ...Magic 39 FunkBand 40 Old School 41 R&B 42 Studio 1 43 Studio 2 44 Standard 2 45 Vintage 46 Acoustic 2 47 Live 48 Room 49 Metal 50 90s Power 03 Volume 04 Volume Velocity 05 Volume Velocity 06 Volume Velocity Velocity 58 Velocity Velocity
...Marimba 19 Vibraphone 20 HipHop 21 909 22 Dance 23 Electronic 24 Drum & Bass 25 House 26 Techno 27 Noise 28 Junkyard 29 Lo-Fi 30 Reggae 31 Ska 32 Songo 33 Fusion 34 Jazz Latin Velocity Curves 01 Volume 02 Volume # Kit 35 Jazz Brush 36 Big Band 37 Brush 38 ...Magic 39 FunkBand 40 Old School 41 R&B 42 Studio 1 43 Studio 2 44 Standard 2 45 Vintage 46 Acoustic 2 47 Live 48 Room 49 Metal 50 90s Power 03 Volume 04 Volume Velocity 05 Volume Velocity 06 Volume Velocity Velocity 58 Velocity Velocity
User Guide
Page 59
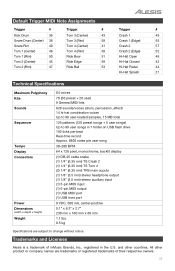
... Edge 59 Hi-Hat Closed 42 Tom 2 (Rim) 47 Ride Bell 53 Hi-Hat Pedal 44 Hi-Hat Splash 21 Technical Specifications Maximum Polyphony Kits Sounds Sequencer Tempo Display Connectors Power Dimensions (width x depth x height) Weight 64 voices 70 (50 preset + 20 user) 9 General MIDI kits 628 sounds/voices (drum, percussion, effect) 14 hi-hat combination voices Up to 99 user-loaded samples, 15 MB total 125 patterns (120 preset songs + 5 user songs) Up to change without notice.
... Edge 59 Hi-Hat Closed 42 Tom 2 (Rim) 47 Ride Bell 53 Hi-Hat Pedal 44 Hi-Hat Splash 21 Technical Specifications Maximum Polyphony Kits Sounds Sequencer Tempo Display Connectors Power Dimensions (width x depth x height) Weight 64 voices 70 (50 preset + 20 user) 9 General MIDI kits 628 sounds/voices (drum, percussion, effect) 14 hi-hat combination voices Up to 99 user-loaded samples, 15 MB total 125 patterns (120 preset songs + 5 user songs) Up to change without notice.


