User Manual
Page 2
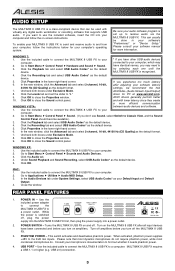
...allows you should automatically launch after installation. In the next window, read the End-User License Agreement, and then click the box titled I accept the license agreement, then click Next. 9. Then click Finish. 10. Double-click the My Computer icon on your desktop. ...: a. c. Proceed to proceed. 8. Insert the installation DVD into your computer. Then, open the folder titled, Cubase LE 4 for Windows. In the window that opens, double-click the disk named, Cubase LE 4. If it is finished, a second installer, the Syncrosoft License Control Setup will...
...allows you should automatically launch after installation. In the next window, read the End-User License Agreement, and then click the box titled I accept the license agreement, then click Next. 9. Then click Finish. 10. Double-click the My Computer icon on your desktop. ...: a. c. Proceed to proceed. 8. Insert the installation DVD into your computer. Then, open the folder titled, Cubase LE 4 for Windows. In the window that opens, double-click the disk named, Cubase LE 4. If it is finished, a second installer, the Syncrosoft License Control Setup will...
User Manual
Page 4
... the License Control Center Application will open . Proceed to select the location on the next screen, click Install. 10. 6. Then, on your computer. A window titled Windows Security may appear, reporting that appears after the software has been installed, click the box titled Start 'License Control... Then click Finish. 14. The Cubase LE 4 installation program will be installed. In the window that Cubase LE 4 will be displayed while the installation proceeds. The next window, titled Install Location, allows you should use the default settings which are already selected here, and...
... the License Control Center Application will open . Proceed to select the location on the next screen, click Install. 10. 6. Then, on your computer. A window titled Windows Security may appear, reporting that appears after the software has been installed, click the box titled Start 'License Control... Then click Finish. 14. The Cubase LE 4 installation program will be installed. In the window that Cubase LE 4 will be displayed while the installation proceeds. The next window, titled Install Location, allows you should use the default settings which are already selected here, and...
User Manual
Page 10
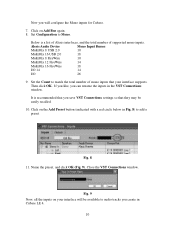
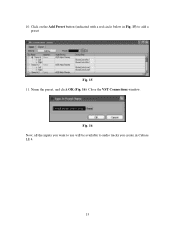
... may be available to Mono. Close the VST Connections window. Fig. 9 Now, all the inputs on the Add Preset button (indicated with a red circle below in Fig. 8) to add a preset Fig. 8 11. Alesis Audio Device Mono Input Busses MultiMix 8 USB 2.0 10 MultiMix 16 USB 2.0 18 MultiMix 8 FireWire 10 MultiMix 12 FireWire 14 MultiMix 16 FireWire 18 I/O 14 14 I/O 26 9. If you...
... may be available to Mono. Close the VST Connections window. Fig. 9 Now, all the inputs on the Add Preset button (indicated with a red circle below in Fig. 8) to add a preset Fig. 8 11. Alesis Audio Device Mono Input Busses MultiMix 8 USB 2.0 10 MultiMix 16 USB 2.0 18 MultiMix 8 FireWire 10 MultiMix 12 FireWire 14 MultiMix 16 FireWire 18 I/O 14 14 I/O 26 9. If you...
User Manual
Page 15
Close the VST Connections window. Fig. 16 Now, all the inputs you want to use will be available to audio tracks you create in Fig. 15) to add a preset Fig. 15 11. Name the preset, and click OK (Fig. 16). Click on the Add Preset button (indicated with a red circle below in Cubase LE 4. 15 10.
Close the VST Connections window. Fig. 16 Now, all the inputs you want to use will be available to audio tracks you create in Fig. 15) to add a preset Fig. 15 11. Name the preset, and click OK (Fig. 16). Click on the Add Preset button (indicated with a red circle below in Cubase LE 4. 15 10.
User Manual
Page 20
..., select your MySteinberg account) and click Log In. 8. On the next page, under the heading Register a product, click the link titled More. 10. Open this email, scroll to register Cubase LE 4. Enter Cubase LE 4 into the field titled number* (see Step 2 of your screen: select...clicking on the next page, under the heading Register a product, click the link titled More. 9. Launch the Cubase LE 4 application. • Windows XP and Vista: Navigate to register. Again, on the link below. 7. Click Create account now. If you to the MySteinberg website. Enter ...
..., select your MySteinberg account) and click Log In. 8. On the next page, under the heading Register a product, click the link titled More. 10. Open this email, scroll to register Cubase LE 4. Enter Cubase LE 4 into the field titled number* (see Step 2 of your screen: select...clicking on the next page, under the heading Register a product, click the link titled More. 9. Launch the Cubase LE 4 application. • Windows XP and Vista: Navigate to register. Again, on the link below. 7. Click Create account now. If you to the MySteinberg website. Enter ...
User Manual
Page 21
...License Control Center. 31. You will be displayed on the screen. In the next window, enter the 32-Digit (case-sensitive) Activation code from Step 1 of the Registration Section above. 25. November 10, 2008. © Alesis, LLC. Enter the 20-Digit (case-sensitive) Soft-eLicenser code you wrote down ... 7-51-0274-B. This email contains your records. Select the Wizards menu at the top of the page. 17. Click OK to close this window, then click Finish to the email address [YourEmailHere]. 22. Request an Activation Code for Cubase LE 4 Note: If you are beginning this ...
...License Control Center. 31. You will be displayed on the screen. In the next window, enter the 32-Digit (case-sensitive) Activation code from Step 1 of the Registration Section above. 25. November 10, 2008. © Alesis, LLC. Enter the 20-Digit (case-sensitive) Soft-eLicenser code you wrote down ... 7-51-0274-B. This email contains your records. Select the Wizards menu at the top of the page. 17. Click OK to close this window, then click Finish to the email address [YourEmailHere]. 22. Request an Activation Code for Cubase LE 4 Note: If you are beginning this ...
Quick Start Guide
Page 2
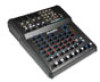
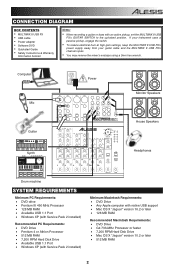
...the switch. CONNECTION DIAGRAM BOX CONTENTS y MULTIMIX 8 USB FX y USB cable y Power adapter y Software DVD y Quickstart Guide y Safety Instructions & Warranty Information booklet Notes: y When recording a guitar or bass with native USB support • Mac OS X "Jaguar" version 10.2 or later • 128 MB RAM...200 RPM Hard Disk Drive • Available USB 1.1 Port • Windows XP (with Service Pack 2 installed) Minimum Macintosh Requirements: • DVD Drive • Any Apple computer with an active pickup, set the MULTIMIX 8 USB FX's GUITAR SWITCH to the up/raised position. ...
...the switch. CONNECTION DIAGRAM BOX CONTENTS y MULTIMIX 8 USB FX y USB cable y Power adapter y Software DVD y Quickstart Guide y Safety Instructions & Warranty Information booklet Notes: y When recording a guitar or bass with native USB support • Mac OS X "Jaguar" version 10.2 or later • 128 MB RAM...200 RPM Hard Disk Drive • Available USB 1.1 Port • Windows XP (with Service Pack 2 installed) Minimum Macintosh Requirements: • DVD Drive • Any Apple computer with an active pickup, set the MULTIMIX 8 USB FX's GUITAR SWITCH to the up/raised position. ...
Quick Start Guide
Page 3
... 2. Use the included cable to connect the MULTIMIX 8 USB FX to receive audio via the MULTIMIX 8 USB FX. Close the window. Use the included power adapter to connect the MULTIMIX 8 USB FX to the XLR mic inputs. While 2 3 ...10. Click OK to Classic View, and the Sound Control Panel should become available.) 3. Click the Audio tab. 4. Consult your microphone's documentation to Start Menu Control Panel Hardware and Sound Sound. 3. REAR PANEL FEATURES 1. POWER SWITCH - USB 2.0) connection. 3 MAC: 1. Turn on and off the MULTIMIX 8 USB FX. 3. WINDOWS...
... 2. Use the included cable to connect the MULTIMIX 8 USB FX to receive audio via the MULTIMIX 8 USB FX. Close the window. Use the included power adapter to connect the MULTIMIX 8 USB FX to the XLR mic inputs. While 2 3 ...10. Click OK to Classic View, and the Sound Control Panel should become available.) 3. Click the Audio tab. 4. Consult your microphone's documentation to Start Menu Control Panel Hardware and Sound Sound. 3. REAR PANEL FEATURES 1. POWER SWITCH - USB 2.0) connection. 3 MAC: 1. Turn on and off the MULTIMIX 8 USB FX. 3. WINDOWS...


