Recital Play - User Guide - v1.0
Page 3
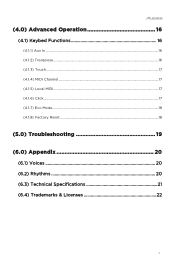
(4.0) Advanced Operation 16 (4.1) Keybed Functions 16 (4.1.1) Aux In...16 (4.1.2) Transpose ...16 (4.1.3) Touch ...17 (4.1.4) MIDI Channel ...17 (4.1.5) Local MIDI...17 (4.1.6) Click...17 (4.1.7) Eco Mode...18 (4.1.8) Factory Reset ...18 (5.0) Troubleshooting 19 (6.0) Appendix 20 (6.1) Voices 20 (6.2) Rhythms 20 (6.3) Technical Specifications 21 (6.4) Trademarks & Licenses 22 3
(4.0) Advanced Operation 16 (4.1) Keybed Functions 16 (4.1.1) Aux In...16 (4.1.2) Transpose ...16 (4.1.3) Touch ...17 (4.1.4) MIDI Channel ...17 (4.1.5) Local MIDI...17 (4.1.6) Click...17 (4.1.7) Eco Mode...18 (4.1.8) Factory Reset ...18 (5.0) Troubleshooting 19 (6.0) Appendix 20 (6.1) Voices 20 (6.2) Rhythms 20 (6.3) Technical Specifications 21 (6.4) Trademarks & Licenses 22 3

Recital Play - User Guide - v1.0
Page 4
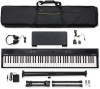
(1.0) Introduction (1.1) Box Contents Recital Play Digital Piano Keyboard Stand Music Rest Sustain Pedal Headphones Carry Case Power Adapter Quickstart Guide Safety & Warranty Manual (1.2) Support For the latest information about this product (system requirements, compatibility information, etc.) and product registration, visit alesis.com. For additional product support, visit alesis.com/support. (1.3) Setup Music Rest: Insert the music rest's tabs into the top of Recital Play until they fit securely, as seen in the images below: 4
(1.0) Introduction (1.1) Box Contents Recital Play Digital Piano Keyboard Stand Music Rest Sustain Pedal Headphones Carry Case Power Adapter Quickstart Guide Safety & Warranty Manual (1.2) Support For the latest information about this product (system requirements, compatibility information, etc.) and product registration, visit alesis.com. For additional product support, visit alesis.com/support. (1.3) Setup Music Rest: Insert the music rest's tabs into the top of Recital Play until they fit securely, as seen in the images below: 4

Recital Play - User Guide - v1.0
Page 5
Keyboard Stand: 1. Screw the safety straps attached to the keyboard supports (4 & 5) to the top of the cross stand (1) using the screws (6) and wrench (7). 2. Attach the two stand feet (2 & 3) onto the bottom of the keyboard. 6 7 6 7 5 Attach the keyboard supports (4 & 5) to the bottom of the cross stand (1) using the remaining screws (6) and wrench (7). 3.
Keyboard Stand: 1. Screw the safety straps attached to the keyboard supports (4 & 5) to the top of the cross stand (1) using the screws (6) and wrench (7). 2. Attach the two stand feet (2 & 3) onto the bottom of the keyboard. 6 7 6 7 5 Attach the keyboard supports (4 & 5) to the bottom of the cross stand (1) using the remaining screws (6) and wrench (7). 3.
Recital Play - User Guide - v1.0
Page 6
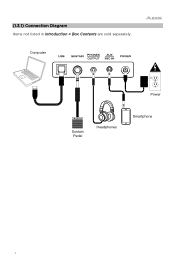
Computer Power Sustain Pedal Headphones Smartphone 6 (1.3.1) Connection Diagram Items not listed in Introduction > Box Contents are sold separately.
Computer Power Sustain Pedal Headphones Smartphone 6 (1.3.1) Connection Diagram Items not listed in Introduction > Box Contents are sold separately.

Recital Play - User Guide - v1.0
Page 7
... set the tempo via tap. Volume +/Press these buttons to show the current internal tempo setting on or o . E. See the Metronome section for more details. 7 Turn the Encoder to set too low or if headphones are headphones plugged into the Phones / Output. (2.0) Features (2.1) Top Panel A. D. See the Keybed Functions section for the metronome, song, and accompaniment rhythm features. Tempo Press this button several times at a consistent pace to adjust the internal tempo used for more details. Power Switch Turns the piano's power...
... set the tempo via tap. Volume +/Press these buttons to show the current internal tempo setting on or o . E. See the Metronome section for more details. 7 Turn the Encoder to set too low or if headphones are headphones plugged into the Phones / Output. (2.0) Features (2.1) Top Panel A. D. See the Keybed Functions section for the metronome, song, and accompaniment rhythm features. Tempo Press this button several times at a consistent pace to adjust the internal tempo used for more details. Power Switch Turns the piano's power...
Recital Play - User Guide - v1.0
Page 8
... voice (sound) and turn the Encoder to enable or disable the reverb e ect. G. M. When Recital Play is playing a user song, the screen will start playback. Play Press this button to select a new voice. See the Layer Mode section for settings while they are being changed. Turn the Encoder to select the split voice. Layer Press this button to show "rEC". When Recital Play is recording a user song, the screen will be deleted. H. F. Voice Press this button to enable Layer Mode...
... voice (sound) and turn the Encoder to enable or disable the reverb e ect. G. M. When Recital Play is playing a user song, the screen will start playback. Play Press this button to select a new voice. See the Layer Mode section for settings while they are being changed. Turn the Encoder to select the split voice. Layer Press this button to show "rEC". When Recital Play is recording a user song, the screen will be deleted. H. F. Voice Press this button to enable Layer Mode...

Recital Play - User Guide - v1.0
Page 9
P. Song Press this function. See the Demo Song Mode section for more information. O. Start/Stop Press this button and then turn the Encoder to start and stop an accompaniment rhythm in Rhythm Mode, or start and stop a currently playing metronome or user song. Press and hold this button to select an accompaniment rhythm for more details on this button to have a short fill play. 9 N. See the Rhythm Mode section for playback. Q. Rhythm Press this button during accompaniment rhythm playback...
P. Song Press this function. See the Demo Song Mode section for more information. O. Start/Stop Press this button and then turn the Encoder to start and stop an accompaniment rhythm in Rhythm Mode, or start and stop a currently playing metronome or user song. Press and hold this button to select an accompaniment rhythm for more details on this button to have a short fill play. 9 N. See the Rhythm Mode section for playback. Q. Rhythm Press this button during accompaniment rhythm playback...
Recital Play - User Guide - v1.0
Page 10
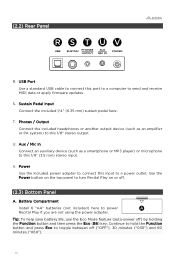
USB Port Use a standard USB cable to connect this input to a power outlet. T. Phones / Output Connect the included headphones or another output device (such as a smartphone or MP3 player) or microphone to send and receive MIDI data or apply firmware updates. Tip: To help save battery life, use the Eco Mode feature (auto-power o ) by holding the Function button and then press the Eco (B6) key. V. Sustain Pedal Input Connect the included 1/4" (6.35 mm) sustain pedal here. Power Use the included power adapter to connect this...
USB Port Use a standard USB cable to connect this input to a power outlet. T. Phones / Output Connect the included headphones or another output device (such as a smartphone or MP3 player) or microphone to send and receive MIDI data or apply firmware updates. Tip: To help save battery life, use the Eco Mode feature (auto-power o ) by holding the Function button and then press the Eco (B6) key. V. Sustain Pedal Input Connect the included 1/4" (6.35 mm) sustain pedal here. Power Use the included power adapter to connect this...

Recital Play - User Guide - v1.0
Page 11
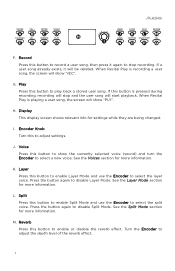
... TURN (3.2) Metronome The metronome feature provides a steady beat to hear the voice. Press the Metronome button to turn the Encoder to adjust the volume level of the metronome. Press the Voice button. 2. Play the keys to aid in practicing at a consistent tempo. PLAY PRESS TURN + HOLD TURN 11 Turn the Encoder to select the time signature to select a voice. 3. (3.0) Basic Operation (3.1) Voices To select and play a voice: 1. Turn the Encoder to be played (0, 2-9). 3. The time signature (beat) will be used during Rhythm, Demo Song, or User Song...
... TURN (3.2) Metronome The metronome feature provides a steady beat to hear the voice. Press the Metronome button to turn the Encoder to adjust the volume level of the metronome. Press the Voice button. 2. Play the keys to aid in practicing at a consistent tempo. PLAY PRESS TURN + HOLD TURN 11 Turn the Encoder to select the time signature to select a voice. 3. (3.0) Basic Operation (3.1) Voices To select and play a voice: 1. Turn the Encoder to be played (0, 2-9). 3. The time signature (beat) will be used during Rhythm, Demo Song, or User Song...
Recital Play - User Guide - v1.0
Page 12
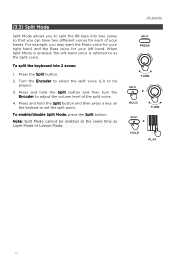
... split the keyboard into two zones so that you can have two di erent voices for your hands. Note: Split Mode cannot be played. 3. (3.3) Split Mode Split Mode allows you to split the 88 keys into 2 zones: 1. Turn the Encoder to select the split voice (L1) to be enabled at the same time as the Split voice. Press and hold the Split button and then press a key on the keybed to adjust the volume...
... split the keyboard into two zones so that you can have two di erent voices for your hands. Note: Split Mode cannot be played. 3. (3.3) Split Mode Split Mode allows you to split the 88 keys into 2 zones: 1. Turn the Encoder to select the split voice (L1) to be enabled at the same time as the Split voice. Press and hold the Split button and then press a key on the keybed to adjust the volume...
Recital Play - User Guide - v1.0
Page 13
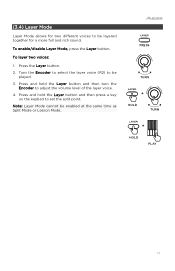
... enabled at the same time as Split Mode or Lesson Mode. Turn the Encoder to select the layer voice (R2) to adjust the volume level of the layer voice. 4. PRESS TURN + HOLD TURN + HOLD PLAY 13 Note: Layer Mode cannot be played. 3. Press the Layer button. 2. (3.4) Layer Mode Layer Mode allows for two di erent voices to set the split point. Press and hold the Layer button and then press a key on the keybed...
... enabled at the same time as Split Mode or Lesson Mode. Turn the Encoder to select the layer voice (R2) to adjust the volume level of the layer voice. 4. PRESS TURN + HOLD TURN + HOLD PLAY 13 Note: Layer Mode cannot be played. 3. Press the Layer button. 2. (3.4) Layer Mode Layer Mode allows for two di erent voices to set the split point. Press and hold the Layer button and then press a key on the keybed...
Recital Play - User Guide - v1.0
Page 14
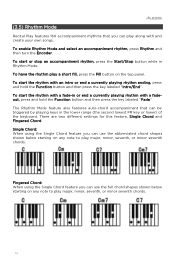
... hold the Function button and then press the key labeled "Fade". To start the rhythm with and create your own songs. There are two di erent settings for this feature, Single Chord and Fingered Chord. (3.5) Rhythm Mode Recital Play features 160 accompaniment rhythms that can be triggered by playing keys in the lower range (the second lowest F# key or lower) of the keyboard. To enable Rhythm Mode and select an accompaniment rhythm, press Rhythm and then turn the Encoder...
... hold the Function button and then press the key labeled "Fade". To start the rhythm with and create your own songs. There are two di erent settings for this feature, Single Chord and Fingered Chord. (3.5) Rhythm Mode Recital Play features 160 accompaniment rhythms that can be triggered by playing keys in the lower range (the second lowest F# key or lower) of the keyboard. To enable Rhythm Mode and select an accompaniment rhythm, press Rhythm and then turn the Encoder...
Recital Play - User Guide - v1.0
Page 15
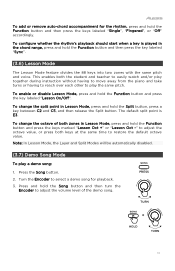
... default octave value. The default split point is played in the chord range, press and hold the Function button and then press the keys labeled "Single", "Fingered", or "Off" accordingly. Turn the Encoder to play a demo song: 1. To configure whether the rhythm's playback should start when a key is E3. To add or remove auto-chord accompaniment for playback. 3. Note: In Lesson Mode, the Layer and Split Modes will be automatically disabled. (3.7) Demo Song Mode To play the same pitch. To change...
... default octave value. The default split point is played in the chord range, press and hold the Function button and then press the keys labeled "Single", "Fingered", or "Off" accordingly. Turn the Encoder to play a demo song: 1. To configure whether the rhythm's playback should start when a key is E3. To add or remove auto-chord accompaniment for playback. 3. Note: In Lesson Mode, the Layer and Split Modes will be automatically disabled. (3.7) Demo Song Mode To play the same pitch. To change...

Recital Play - User Guide - v1.0
Page 16
... default setting is "LNE". (4.1.2) Transpose This function allows the overall pitch of one octave in semitone increments. (4.0) Advanced Operation (4.1) Keybed Functions You can change more advanced settings by pressing and holding the Function button and then press a key that correspond to the graphic below to change your desired setting. (4.1.1) Aux In To change the input level of the Aux/Microphone Input, press and hold Function and then press the key...
... default setting is "LNE". (4.1.2) Transpose This function allows the overall pitch of one octave in semitone increments. (4.0) Advanced Operation (4.1) Keybed Functions You can change more advanced settings by pressing and holding the Function button and then press a key that correspond to the graphic below to change your desired setting. (4.1.1) Aux In To change the input level of the Aux/Microphone Input, press and hold Function and then press the key...
Recital Play - User Guide - v1.0
Page 17
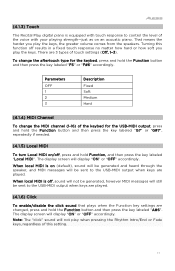
... (4.1.4) MIDI Channel To change the aftertouch type for the USB-MIDI output, press and hold the Function button and then press the key labeled "G7" or "G#7", repeatedly if needed. (4.1.5) Local MIDI To turn Local MIDI on (default), sound will be generated and heard through the speaker, and MIDI messages will still be sent to the USB-MIDI output when keys are played. When local MIDI is equipped with touch response to control the level of this function o results in a fixed touch response...
... (4.1.4) MIDI Channel To change the aftertouch type for the USB-MIDI output, press and hold the Function button and then press the key labeled "G7" or "G#7", repeatedly if needed. (4.1.5) Local MIDI To turn Local MIDI on (default), sound will be generated and heard through the speaker, and MIDI messages will still be sent to the USB-MIDI output when keys are played. When local MIDI is equipped with touch response to control the level of this function o results in a fixed touch response...

Recital Play - User Guide - v1.0
Page 18
When the keyboard is being reset, the display screen will flash "888" five times to factory default settings, press and hold the Function button and then press the key labeled "B6" repeatedly to toggle between o ("OFF"), 30 minutes ("030") and 60 minutes ("060"). (4.1.8) Factory Reset To return the keyboard to show that the reset action has happened. 18 (4.1.7) Eco Mode To adjust the Eco Mode feature (auto-power off), press and hold the Function button and then press the key labeled "C7".
When the keyboard is being reset, the display screen will flash "888" five times to factory default settings, press and hold the Function button and then press the key labeled "B6" repeatedly to toggle between o ("OFF"), 30 minutes ("030") and 60 minutes ("060"). (4.1.8) Factory Reset To return the keyboard to show that the reset action has happened. 18 (4.1.7) Eco Mode To adjust the Eco Mode feature (auto-power off), press and hold the Function button and then press the key labeled "C7".

Recital Play - User Guide - v1.0
Page 19
... set too low or if headphones are headphones plugged into the Phones / Output. Make sure that does not work, then hold the Function button and press the Factory Reset key to restore the factory default settings. 19 This is normal and is set to the Recital Play digital piano may produce interference. Certain notes produce the wrong pitch. Check if the master volume is no cause for alarm. If that the transpose value is turned...
... set too low or if headphones are headphones plugged into the Phones / Output. Make sure that does not work, then hold the Function button and press the Factory Reset key to restore the factory default settings. 19 This is normal and is set to the Recital Play digital piano may produce interference. Certain notes produce the wrong pitch. Check if the master volume is no cause for alarm. If that the transpose value is turned...
Recital Play - User Guide - v1.0
Page 21
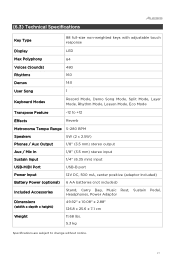
(6.3) Technical Specifications Key Type 88 full-size non-weighted keys with adjustable touch response Display LED Max Polyphony 64 Voices (Sounds) 480 Rhythms 160 Demos 140 User Song 1 Keyboard Modes Record Mode, Demo Song Mode, Split Mode, Layer Mode, Rhythm Mode, Lesson Mode, Eco Mode Transpose Feature -12 to +12 Effects Reverb Metronome Tempo Range 5-280 BPM Speakers 5W (2 x 2.5W) Phones / Aux Output 1/8" (3.5 mm) stereo output Aux / Mic In 1/8" (3.5 mm) stereo input Sustain Input 1/4" (6.35 mm) input USB-MIDI Port USB-B port Power Input 12V DC, 500 mA, ...
(6.3) Technical Specifications Key Type 88 full-size non-weighted keys with adjustable touch response Display LED Max Polyphony 64 Voices (Sounds) 480 Rhythms 160 Demos 140 User Song 1 Keyboard Modes Record Mode, Demo Song Mode, Split Mode, Layer Mode, Rhythm Mode, Lesson Mode, Eco Mode Transpose Feature -12 to +12 Effects Reverb Metronome Tempo Range 5-280 BPM Speakers 5W (2 x 2.5W) Phones / Aux Output 1/8" (3.5 mm) stereo output Aux / Mic In 1/8" (3.5 mm) stereo input Sustain Input 1/4" (6.35 mm) input USB-MIDI Port USB-B port Power Input 12V DC, 500 mA, ...

Recital Play - User Guide - v1.0
Page 22
(6.4) Trademarks & Licenses Alesis is a trademark of their respective owners. 22 and other product names, company names, trademarks, or trade names are those of inMusic Brands, Inc., registered in the U.S. All other countries.
(6.4) Trademarks & Licenses Alesis is a trademark of their respective owners. 22 and other product names, company names, trademarks, or trade names are those of inMusic Brands, Inc., registered in the U.S. All other countries.


