
User Guide
Page 4
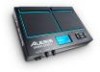
...trigger location of a parameter or enter a submenu. 2 3 5 6. You can use this output. 2. USB/MIDI Port: Connect SamplePad 4 to a computer to send and receive MIDI data or load samples to wall power. 4. Velocity Layer: Displays the velocity layer of the trigger location that ... LCD Screen 1. 1 Kit: Displays the name of the kit that is currently being edited. 5. WARNING: Put on your headphones or turn SamplePad 4 on SamplePad 4. Trigger Location: Displays the trigger location that pad is currently being edited. 1 2. A LED around the pad will illuminate when that is...
...trigger location of a parameter or enter a submenu. 2 3 5 6. You can use this output. 2. USB/MIDI Port: Connect SamplePad 4 to a computer to send and receive MIDI data or load samples to wall power. 4. Velocity Layer: Displays the velocity layer of the trigger location that ... LCD Screen 1. 1 Kit: Displays the name of the kit that is currently being edited. 5. WARNING: Put on your headphones or turn SamplePad 4 on SamplePad 4. Trigger Location: Displays the trigger location that pad is currently being edited. 1 2. A LED around the pad will illuminate when that is...
User Guide
Page 6
... the panning of a sample: 1. Move the cursor to the PAN area by pressing the Cursor Up or Cursor Down buttons. 3. Move the cursor to the MIDI area by pressing the Cursor Up or Cursor Down buttons. 3. trigger. 2. trigger. 2. trigger. 2. trigger. 2. Then press the Cursor Left or Cursor Right button to ...adjust the pan position. [L4, L3, L2, L1, CTR, R1, R2, R3, R4] To adjust the MIDI note sent by the Trigger Location: 1. Move the cursor to adjust the sensitivity level. [1-8] To adjust the volume level of a sample: 1. Then press the ...
... the panning of a sample: 1. Move the cursor to the PAN area by pressing the Cursor Up or Cursor Down buttons. 3. Move the cursor to the MIDI area by pressing the Cursor Up or Cursor Down buttons. 3. trigger. 2. trigger. 2. trigger. 2. trigger. 2. Then press the Cursor Left or Cursor Right button to ...adjust the pan position. [L4, L3, L2, L1, CTR, R1, R2, R3, R4] To adjust the MIDI note sent by the Trigger Location: 1. Move the cursor to adjust the sensitivity level. [1-8] To adjust the volume level of a sample: 1. Then press the ...
User Guide
Page 8
... per Minute). • Level: Adjusts the volume of the metronome from are All, or individual MIDI channels 1-16. • Send Channel: Sets the MIDI channel that SamplePad 4 will send MIDI data. To save the global settings. 5. Press the Cursor Up and Cursor Down buttons to highlight...as system-related information and functions. The available parameters are Yes and No. • Send Program Changes: Sets whether SamplePad 4 will send or receive MIDI Clock. To exit the SAVE GLOBAL SETTINGS submenu, press the Cursor Down button until Exit is changed. Alternatively, press ...
... per Minute). • Level: Adjusts the volume of the metronome from are All, or individual MIDI channels 1-16. • Send Channel: Sets the MIDI channel that SamplePad 4 will send MIDI data. To save the global settings. 5. Press the Cursor Up and Cursor Down buttons to highlight...as system-related information and functions. The available parameters are Yes and No. • Send Program Changes: Sets whether SamplePad 4 will send or receive MIDI Clock. To exit the SAVE GLOBAL SETTINGS submenu, press the Cursor Down button until Exit is changed. Alternatively, press ...