User Guide
Page 3
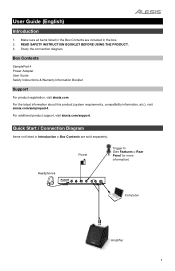
Power Trigger In (See Features > Rear Panel for more information) Headphones Computer Amplifier 3 READ SAFETY INSTRUCTION BOOKLET BEFORE USING THE PRODUCT. 3. For the latest information about this product (system requirements, compatibility information, etc.), visit alesis.com/samplepad-4. Quick Start / Connection Diagram Items not listed in the box. 2. User Guide (English) Introduction 1. Study the connection diagram. For additional product support, visit alesis.com/support. Make sure all items listed in the Box Contents are...
Power Trigger In (See Features > Rear Panel for more information) Headphones Computer Amplifier 3 READ SAFETY INSTRUCTION BOOKLET BEFORE USING THE PRODUCT. 3. For the latest information about this product (system requirements, compatibility information, etc.), visit alesis.com/samplepad-4. Quick Start / Connection Diagram Items not listed in the box. 2. User Guide (English) Introduction 1. Study the connection diagram. For additional product support, visit alesis.com/support. Make sure all items listed in the Box Contents are...

User Guide
Page 4
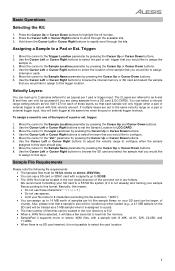
A LED around the pad will illuminate when that pad is currently 5 3 assigned to turn SamplePad 4 off. 3. Main Volume: Adjusts the overall volume level for the Phones Out. WARNING: Put on your headphones or turn on your speakers only AFTER turning on . Power Switch: Press this button to the velocity layer of the trigger location being edited. 4. DC Input: Connect the included power adapter here, then connect the adapter to the SD card. Sample Name: Displays...
A LED around the pad will illuminate when that pad is currently 5 3 assigned to turn SamplePad 4 off. 3. Main Volume: Adjusts the overall volume level for the Phones Out. WARNING: Put on your headphones or turn on your speakers only AFTER turning on . Power Switch: Press this button to the velocity layer of the trigger location being edited. 4. DC Input: Connect the included power adapter here, then connect the adapter to the SD card. Sample Name: Displays...
User Guide
Page 5
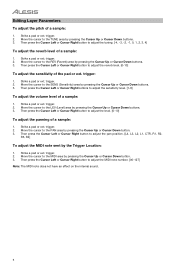
... like to assign the sample to scroll through the kits. The 2 Layers are set the Sample Location to select the layer that a sample's size will take a few seconds to load into the memory. • SamplePad 4 supports mono or stereo .WAV files, with a capacity up to rapidly scroll through the available kits. 3. Use the Cursor Left or Cursor Right buttons to...
... like to assign the sample to scroll through the kits. The 2 Layers are set the Sample Location to select the layer that a sample's size will take a few seconds to load into the memory. • SamplePad 4 supports mono or stereo .WAV files, with a capacity up to rapidly scroll through the available kits. 3. Use the Cursor Left or Cursor Right buttons to...
User Guide
Page 6
... or Cursor Right button to adjust the MIDI note number. [00-127] Note: The MIDI note does not have an effect on the internal sound. 6 Move the cursor to the PAN area by pressing the Cursor Up or Cursor Down buttons. 3. trigger: 1. trigger. 2. Move the cursor to the REV (Reverb) area by pressing the Cursor Up or Cursor Down button. 3. Strike a pad or ext. trigger. 2. Then press the...
... or Cursor Right button to adjust the MIDI note number. [00-127] Note: The MIDI note does not have an effect on the internal sound. 6 Move the cursor to the PAN area by pressing the Cursor Up or Cursor Down buttons. 3. trigger: 1. trigger. 2. Move the cursor to the REV (Reverb) area by pressing the Cursor Up or Cursor Down button. 3. Strike a pad or ext. trigger. 2. Then press the...

User Guide
Page 7
... Down buttons and use the Cursor Left or Cursor Right buttons to set the tempo of a pad when you strike another pad or ext. trigger strike will be muted. • TMP (Tempo) Strike the pad or ext. trigger to a mute group: 1. With the mute group function, you can simulate a hi-hat by SamplePad 4 will trigger the assigned sample and overlap the sound from the beginning after setting both pads...
... Down buttons and use the Cursor Left or Cursor Right buttons to set the tempo of a pad when you strike another pad or ext. trigger strike will be muted. • TMP (Tempo) Strike the pad or ext. trigger to a mute group: 1. With the mute group function, you can simulate a hi-hat by SamplePad 4 will trigger the assigned sample and overlap the sound from the beginning after setting both pads...
User Guide
Page 8
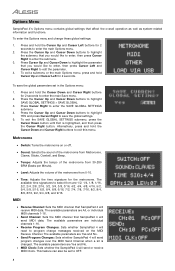
...; Sound: Selects the sound of the metronome from Metronome, Claves, Sticks, Cowbell, and Beep. • Tempo: Adjusts the tempo of the metronome from 30-280 BPM (Beats per Minute). • Level: Adjusts the volume of the metronome from are 1/2, 1/4, 1/8, 1/16, 2/2, 2/4, 2/8, 2/16, 3/2, 3/4, 3/8, 3/16, 4/2, 4/4, 4/8, 4/16, 5/2, 5/4, 5/8, 5/16, 6/2, 6/4, 6/8, 6/16, 7/2, 7/4, 7/8, 7/16, 8/2, 8/4, 8/8, 8/16, 9/2, 9/4, 9/8, and 9/16. Press the Cursor Up and Cursor Down buttons to OFF. 8 MIDI • Receive Channel: Sets the MIDI channel that...
...; Sound: Selects the sound of the metronome from Metronome, Claves, Sticks, Cowbell, and Beep. • Tempo: Adjusts the tempo of the metronome from 30-280 BPM (Beats per Minute). • Level: Adjusts the volume of the metronome from are 1/2, 1/4, 1/8, 1/16, 2/2, 2/4, 2/8, 2/16, 3/2, 3/4, 3/8, 3/16, 4/2, 4/4, 4/8, 4/16, 5/2, 5/4, 5/8, 5/16, 6/2, 6/4, 6/8, 6/16, 7/2, 7/4, 7/8, 7/16, 8/2, 8/4, 8/8, 8/16, 9/2, 9/4, 9/8, and 9/16. Press the Cursor Up and Cursor Down buttons to OFF. 8 MIDI • Receive Channel: Sets the MIDI channel that...

User Guide
Page 9
... kit that you manually power it off). You can audition the Pad Curve by striking a pad while changing this setting. • Auto-Shutdown Time: Selects how long SamplePad 4 will connect to exit this menu. Saving a Kit 1. Copying a Kit 1. Load Samples/Kits Via USB • After this feature is highlighted, and then press the Cursor Right button. Other • Pad Curve: Selects the velocity curve sensitivity setting (1-8) to enter the...
... kit that you manually power it off). You can audition the Pad Curve by striking a pad while changing this setting. • Auto-Shutdown Time: Selects how long SamplePad 4 will connect to exit this menu. Saving a Kit 1. Copying a Kit 1. Load Samples/Kits Via USB • After this feature is highlighted, and then press the Cursor Right button. Other • Pad Curve: Selects the velocity curve sensitivity setting (1-8) to enter the...
User Guide
Page 41
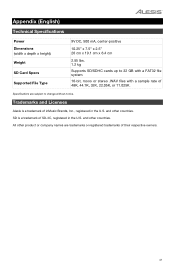
... Licenses Alesis is a trademark of their respective owners. 41 Specifications are trademarks or registered trademarks of SD-3C, registered in the U.S. and other countries. Appendix (English) Technical Specifications Power Dimensions (width x depth x height) Weight SD Card Specs Supported File Type 9V DC, 500 mA, center-positive 10.25" x 7.5" x 2.5" 26 cm x 19.1 cm x 6.4 cm 2.55 lbs. 1.2 kg Supports SD/SDHC cards up to change...
... Licenses Alesis is a trademark of their respective owners. 41 Specifications are trademarks or registered trademarks of SD-3C, registered in the U.S. and other countries. Appendix (English) Technical Specifications Power Dimensions (width x depth x height) Weight SD Card Specs Supported File Type 9V DC, 500 mA, center-positive 10.25" x 7.5" x 2.5" 26 cm x 19.1 cm x 6.4 cm 2.55 lbs. 1.2 kg Supports SD/SDHC cards up to change...


