User Guide
Page 2
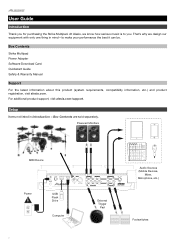
... be. Setup Items not listed in mind-to you for purchasing the Strike Multipad. Powered Monitors MIDI Device Power USB Flash Drive Computer 2 External Trigger Pad Audio Sources (Mobile Devices, Mixer, Microphone, etc.) Footswitches Box Contents Strike Multipad Power Adapter Software Download Card Quickstart Guide Safety & Warranty Manual Support For the latest information about this product (system requirements, compatibility information, etc.) and product registration, visit alesis.com. For additional product support, visit alesis.com/support. User Guide Introduction Thank...
... be. Setup Items not listed in mind-to you for purchasing the Strike Multipad. Powered Monitors MIDI Device Power USB Flash Drive Computer 2 External Trigger Pad Audio Sources (Mobile Devices, Mixer, Microphone, etc.) Footswitches Box Contents Strike Multipad Power Adapter Software Download Card Quickstart Guide Safety & Warranty Manual Support For the latest information about this product (system requirements, compatibility information, etc.) and product registration, visit alesis.com. For additional product support, visit alesis.com/support. User Guide Introduction Thank...

User Guide
Page 3
... display). 3 Main Knob: Turn this knob to adjust the volume level of the Headphone Outputs on the front panel. 5. Phone Knob: Turn this knob to adjust the volume level of the Main Outputs on the rear panel. 4. Use the Function Buttons (F1-F6) to scroll through available options and change parameter values, and press it (at the bottom edge of the Aux Outputs on the rear panel. 3. Aux Knob: Turn this full-color display shows the current kit, settings...
... display). 3 Main Knob: Turn this knob to adjust the volume level of the Headphone Outputs on the front panel. 5. Phone Knob: Turn this knob to adjust the volume level of the Main Outputs on the rear panel. 4. Use the Function Buttons (F1-F6) to scroll through available options and change parameter values, and press it (at the bottom edge of the Aux Outputs on the rear panel. 3. Aux Knob: Turn this full-color display shows the current kit, settings...

User Guide
Page 4
... input. A-Link Bank Buttons: Press these buttons to the headphones without interrupting the main audio output. 21. Adjust the volume with Strike Multipad, or to this button to select the active bank of Perform mode: Pad View, Trigger In View, and Foot Control View. Alternatively, you can record audio from the Record Inputs or from the USB MIDI/Audio port connected to select a kit. 18. BPM: Press this button to bring up the BPM and Time Signature settings...
... input. A-Link Bank Buttons: Press these buttons to the headphones without interrupting the main audio output. 21. Adjust the volume with Strike Multipad, or to this button to select the active bank of Perform mode: Pad View, Trigger In View, and Foot Control View. Alternatively, you can record audio from the Record Inputs or from the USB MIDI/Audio port connected to select a kit. 18. BPM: Press this button to bring up the BPM and Time Signature settings...

User Guide
Page 5
... secure the cable of the Record Inputs. To change the routing and volume level, go to another destination. Mic/Line Gain: Turn this input to the Utility > Audio menu. 12. Use the signal meter in , or foot control to either the Main Outputs or Aux Outputs by going to an available USB port on any connected loudspeakers. Rear Panel 1. Press and hold this input. 2. Power off control or a variable foot controller. 11. Foot Control Inputs (1/4"/6.35 mm, TRS): Connect optional footswitches...
... secure the cable of the Record Inputs. To change the routing and volume level, go to another destination. Mic/Line Gain: Turn this input to the Utility > Audio menu. 12. Use the signal meter in , or foot control to either the Main Outputs or Aux Outputs by going to an available USB port on any connected loudspeakers. Rear Panel 1. Press and hold this input. 2. Power off control or a variable foot controller. 11. Foot Control Inputs (1/4"/6.35 mm, TRS): Connect optional footswitches...

User Guide
Page 6
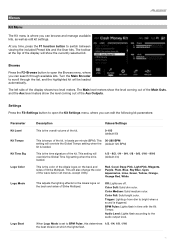
... kits and User kits, press the F1 function button. There are shown. • To change kits, use the Kit Select -/+ buttons. • To switch between these buttons to toggle the respective effects on or off . Each pad icon shows the stop color that has been set for the pad, the current sound file name or control parameter, and the current play mode: o Control: o Loop: o One...
... kits and User kits, press the F1 function button. There are shown. • To change kits, use the Kit Select -/+ buttons. • To switch between these buttons to toggle the respective effects on or off . Each pad icon shows the stop color that has been set for the pad, the current sound file name or control parameter, and the current play mode: o Control: o Loop: o One...

User Guide
Page 7
... current loop as follows: • F2-Play/Stop: Press this button to start or stop overdubbing, or press F2-Play/Stop. • F4-Save: Press this button to disarm recording. 2. To change the values, press the BPM button. Recording a Loop Once you have set number of bars and beats selected in the Time Signature settings. 3. In playback mode, the options for your loop, you can...
... current loop as follows: • F2-Play/Stop: Press this button to start or stop overdubbing, or press F2-Play/Stop. • F4-Save: Press this button to disarm recording. 2. To change the values, press the BPM button. Recording a Loop Once you have set number of bars and beats selected in the Time Signature settings. 3. In playback mode, the options for your loop, you can...

User Guide
Page 8
... Utility menu controls Strike Multipad's global settings. See Other Features > Effects to choose Factory for Sample Name, followed by selecting a Library. To change to open the Kit menu. Customizing Kits and Sounds Strike Multipad includes 30 preset kits which pad is selected, the Pad Select graphic will be shown with the downbeat of the display. 3. To edit the BPM, press the BPM button. P4...
... Utility menu controls Strike Multipad's global settings. See Other Features > Effects to choose Factory for Sample Name, followed by selecting a Library. To change to open the Kit menu. Customizing Kits and Sounds Strike Multipad includes 30 preset kits which pad is selected, the Pad Select graphic will be shown with the downbeat of the display. 3. To edit the BPM, press the BPM button. P4...
User Guide
Page 9
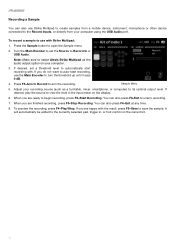
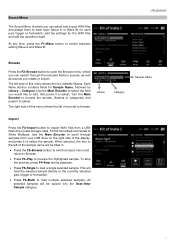
... the Browse screen. Press the Sound button to open the Sound Menu, then hit the pad, trigger in the root directory of the display, under Browse. Sound Menu 5. If WAV files are found on the display and return to adjust the sample settings, such as Playback Mode, Poly/Mono, Volume, Pan, and more. While browsing, you can import your USB flash drive, an error message...
... the Browse screen. Press the Sound button to open the Sound Menu, then hit the pad, trigger in the root directory of the display, under Browse. Sound Menu 5. If WAV files are found on the display and return to adjust the sample settings, such as Playback Mode, Poly/Mono, Volume, Pan, and more. While browsing, you can import your USB flash drive, an error message...
User Guide
Page 10
... the level in , or foot control on the current kit. 10 When you are finished recording, press F5-Stop Recording. To preview the recording, press F4-Play/Stop. Adjust your recording source (such as the audio output option on the display. 6. It will automatically be added to the currently selected pad, trigger in the input meter on your computer using the USB Audio port. If desired, set...
... the level in , or foot control on the current kit. 10 When you are finished recording, press F5-Stop Recording. To preview the recording, press F4-Play/Stop. Adjust your recording source (such as the audio output option on the display. 6. It will automatically be added to the currently selected pad, trigger in the input meter on your computer using the USB Audio port. If desired, set...
User Guide
Page 11
... at which the lights flash. 11 This 30-280 BPM setting will show the level coming out of the Main Outs, and the Aux level meters show the currently selected kit. Off: Lights are off. At any time, press the F1 function button to BPM Pulse, this determines 1/2, 1/4, 1/8, 1/16 the beat division at the top of the display will override the Global Tempo setting when the (default...
... at which the lights flash. 11 This 30-280 BPM setting will show the level coming out of the Main Outs, and the Aux level meters show the currently selected kit. Off: Lights are off. At any time, press the F1 function button to BPM Pulse, this determines 1/2, 1/4, 1/8, 1/16 the beat division at the top of the display will override the Global Tempo setting when the (default...
User Guide
Page 12
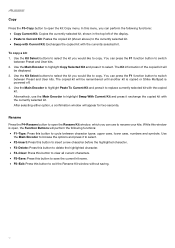
... it to switch between Preset and User kits. After selecting either option, a confirmation window will be remembered until another kit is copied or Strike Multipad is open the Rename Kit window, which you can press the F1 function button to select. While this menu, you can press the F1 function button to copy. In this window is powered off. 4. To copy a kit: 1. Use the Main Encoder to...
... it to switch between Preset and User kits. After selecting either option, a confirmation window will be remembered until another kit is copied or Strike Multipad is open the Rename Kit window, which you can press the F1 function button to select. While this menu, you can press the F1 function button to copy. In this window is powered off. 4. To copy a kit: 1. Use the Main Encoder to...
User Guide
Page 13
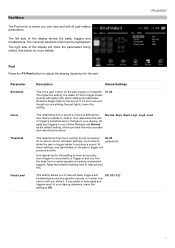
... playing dynamics, leave this setting. 01-32 This determines how a sound's volume is affected by how hard you 'll need to (default 04) strike the pad or trigger harder to produce a sound. At lower settings, very light strikes on your Strike Multipad use for a voice to the sound. This setting allows you find the bass from a nearby speaker is causing unexpected triggers. The currently selected control...
... playing dynamics, leave this setting. 01-32 This determines how a sound's volume is affected by how hard you 'll need to (default 04) strike the pad or trigger harder to produce a sound. At lower settings, very light strikes on your Strike Multipad use for a voice to the sound. This setting allows you find the bass from a nearby speaker is causing unexpected triggers. The currently selected control...

User Guide
Page 14
... pad turns the Master Effect on the next downbeat. Main+Phone, FX1-3, Aux+Phone, Phone Only This setting determines the output level of effects applied to start recording, beginning with a countdown. Parameter Audio Output Kit FX Level MIDI Note Output Description Values/Settings This setting determines the audio output routing for each pad, as a tap tempo. Parameter Mode Sound Description Values/Settings This setting determines what, if any, control function will set the Looper from sounding. Panic: Triggering the pad sends a MIDI...
... pad turns the Master Effect on the next downbeat. Main+Phone, FX1-3, Aux+Phone, Phone Only This setting determines the output level of effects applied to start recording, beginning with a countdown. Parameter Audio Output Kit FX Level MIDI Note Output Description Values/Settings This setting determines the audio output routing for each pad, as a tap tempo. Parameter Mode Sound Description Values/Settings This setting determines what, if any, control function will set the Looper from sounding. Panic: Triggering the pad sends a MIDI...

User Guide
Page 16
..., and a confirmation window will appear for two seconds. Parameter Sync Group Sync Mode Description This setting allows you want to a "round robin" function. This setting determines how pads in the group will be remembered until another pad is copied or Strike Multipad is similar to paste the copied pad. Random: Pads in random order. Copy Press the F6-Copy button to edit the pad group settings. The Kit...
..., and a confirmation window will appear for two seconds. Parameter Sync Group Sync Mode Description This setting allows you want to a "round robin" function. This setting determines how pads in the group will be remembered until another pad is copied or Strike Multipad is similar to paste the copied pad. Random: Pads in random order. Copy Press the F6-Copy button to edit the pad group settings. The Kit...
User Guide
Page 17
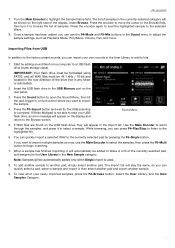
...time, press the F1-Wave button to Strike Multipad. Library Category Sample Name Import Press the F3-Import button to import WAV files from your USB drive on the right side of the sample name will be placed into the User>New Sample category. 17 Use the Main Encoder to scroll through the included Factory sounds, as well as sounds...itself. Sound Menu The Sound Menu is where you can select and import WAV files and assign them to open the Browse menu, where you can search through samples from a USB flash drive (mass storage class, FAT32 formatted) connected to switch between editing...
...time, press the F1-Wave button to Strike Multipad. Library Category Sample Name Import Press the F3-Import button to import WAV files from your USB drive on the right side of the sample name will be placed into the User>New Sample category. 17 Use the Main Encoder to scroll through the included Factory sounds, as well as sounds...itself. Sound Menu The Sound Menu is where you can select and import WAV files and assign them to open the Browse menu, where you can search through samples from a USB flash drive (mass storage class, FAT32 formatted) connected to switch between editing...

User Guide
Page 19
... edit a Factory Sample, you can perform the following functions: Use the Main Encoder to Cancel. Adjust the Global Tempo using the A-Link Bank Buttons-press A for coarse adjustment, B for medium and C for fine. Moving the A-Link encoders will at the same time. Once the sample has been copied to the User Library, the following additional functions: o F1-Play/Stop: Press this button and turn the Main Encoder to change , and...
... edit a Factory Sample, you can perform the following functions: Use the Main Encoder to Cancel. Adjust the Global Tempo using the A-Link Bank Buttons-press A for coarse adjustment, B for medium and C for fine. Moving the A-Link encoders will at the same time. Once the sample has been copied to the User Library, the following additional functions: o F1-Play/Stop: Press this button and turn the Main Encoder to change , and...

User Guide
Page 20
... edit various parameters for Strike Multipad's hardware and firmware functionality. On, Off Local Control This setting determines whether Strike Multipad triggers its internal sounds. This setting determines the level of the USB audio input. 0-100 This setting determines the level of the USB audio output. 0-100 This setting determines the audio routing of the digital USB In signal. buttons, and Program Change Number messages will change kits when receiving program change messages. On, Off MIDI Thru This setting determines whether MIDI received from the 0-100...
... edit various parameters for Strike Multipad's hardware and firmware functionality. On, Off Local Control This setting determines whether Strike Multipad triggers its internal sounds. This setting determines the level of the USB audio input. 0-100 This setting determines the level of the USB audio output. 0-100 This setting determines the audio routing of the digital USB In signal. buttons, and Program Change Number messages will change kits when receiving program change messages. On, Off MIDI Thru This setting determines whether MIDI received from the 0-100...

User Guide
Page 21
... X-Talk When Type is selected. Higher settings will send a variable range of trigger control. Head+Rim: The connected trigger is set to Variable, increase this setting determines how long the Strike Multipad firmware scans the voltage to 0-32 reduce center hits accidentally triggering rim sounds, or rim hits triggering center sounds when using a dual-zone drum. Scan Time When Type is a dual-zone...
... X-Talk When Type is selected. Higher settings will send a variable range of trigger control. Head+Rim: The connected trigger is set to Variable, increase this setting determines how long the Strike Multipad firmware scans the voltage to 0-32 reduce center hits accidentally triggering rim sounds, or rim hits triggering center sounds when using a dual-zone drum. Scan Time When Type is a dual-zone...
User Guide
Page 23
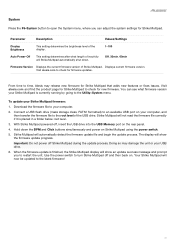
... not power off , insert the USB drive into the USB Memory port on the rear panel. 4. When the firmware update is currently running by going to restart the unit. Strike Multipad will show an update success message and prompt you can see what length of Strike Multipad. Strike Multipad will Strike Multipad automatically shut down the BPM and Click buttons simultaneously and power on Strike Multipad using the power switch. 5. System Press the F5-System button to turn Strike Multipad...
... not power off , insert the USB drive into the USB Memory port on the rear panel. 4. When the firmware update is currently running by going to restart the unit. Strike Multipad will show an update success message and prompt you can see what length of Strike Multipad. Strike Multipad will Strike Multipad automatically shut down the BPM and Click buttons simultaneously and power on Strike Multipad using the power switch. 5. System Press the F5-System button to turn Strike Multipad...

User Guide
Page 24
... data onto a connected USB flash drive (mass storage class, FAT32 formatted). • Save All User Kits: Select this option to restore Strike Multipad's settings to confirm. All available backup files will appear prompting you would like to load, then press it to the original factory defaults. Use the Main Encoder to highlight the backup you to confirm, and Strike Multipad will reset automatically. Press the Main...
... data onto a connected USB flash drive (mass storage class, FAT32 formatted). • Save All User Kits: Select this option to restore Strike Multipad's settings to confirm. All available backup files will appear prompting you would like to load, then press it to the original factory defaults. Use the Main Encoder to highlight the backup you to confirm, and Strike Multipad will reset automatically. Press the Main...


