
User Manual
Page 3
... latest information about this product (system requirements, compatibility information, etc.) and product registration, visit alesis.com. Download the Strike Editor software package. When you open the Strike Editor. The status bar at the bottom of the editor's window will be installed in the....zip file and double-click the installer application. Loading Kit Files... • 3. Each time you save a user kit or instrument in the Strike Editor, it to reach 100% and disappear). 4. Use a USB cable to connect your Strike Kit or Strike Pro Kit. 2. Mac® OS X®: Double-click the ...
... latest information about this product (system requirements, compatibility information, etc.) and product registration, visit alesis.com. Download the Strike Editor software package. When you open the Strike Editor. The status bar at the bottom of the editor's window will be installed in the....zip file and double-click the installer application. Loading Kit Files... • 3. Each time you save a user kit or instrument in the Strike Editor, it to reach 100% and disappear). 4. Use a USB cable to connect your Strike Kit or Strike Pro Kit. 2. Mac® OS X®: Double-click the ...

User Manual
Page 4
...instrument assigned to each zone. Use the instrument browser to the currently selected zone. Click and drag an instrument onto a layer below it contain settings that control the sound of the Strike drum kit while the panels below (Layer A or Layer B) to load it to browse your Strike module; Click the > or ... Edit FX to expand or collapse each list. Click and drag a knob or slider up or down to load in the Kit Editor. Operation Overview The Strike Editor has two main modes: the Kit Editor (shown here) and the Instrument Editor (shown here). Click the > or ∨ to show only the...
...instrument assigned to each zone. Use the instrument browser to the currently selected zone. Click and drag an instrument onto a layer below it contain settings that control the sound of the Strike drum kit while the panels below (Layer A or Layer B) to load it to browse your Strike module; Click the > or ... Edit FX to expand or collapse each list. Click and drag a knob or slider up or down to load in the Kit Editor. Operation Overview The Strike Editor has two main modes: the Kit Editor (shown here) and the Instrument Editor (shown here). Click the > or ∨ to show only the...

User Manual
Page 5
...from scratch! When Cycle Mode is highlighted, you can edit them and save it . The Instrument Editor lets you access the very heart of your Strike module-here, you can use your own samples and create entirely new instruments from the top of the Samples list to the bottom. Or..., but you hit the zone with a velocity in that zone with the selected velocity (in the Samples list on your Strike kit. Doubleclick an instrument to load it will trigger another sample in the Kit Editor (or directly on your samples into the Samples list next to it to automatically turn your...
...from scratch! When Cycle Mode is highlighted, you can edit them and save it . The Instrument Editor lets you access the very heart of your Strike module-here, you can use your own samples and create entirely new instruments from the top of the Samples list to the bottom. Or..., but you hit the zone with a velocity in that zone with the selected velocity (in the Samples list on your Strike kit. Doubleclick an instrument to load it will trigger another sample in the Kit Editor (or directly on your samples into the Samples list next to it to automatically turn your...

User Manual
Page 6
...previous view, click Close. To return to show all instruments. 6 Each zone of your instruments, use on the image of samples). Any instruments assigned to find and load a kit. To browse your Strike Kit has two layers (A and B), each of which can be overwritten, but you create, edit, and... save them as user kits. To expand or collapse each list, click the > or ∨. Use the panel that appears to its instruments ...
...previous view, click Close. To return to show all instruments. 6 Each zone of your instruments, use on the image of samples). Any instruments assigned to find and load a kit. To browse your Strike Kit has two layers (A and B), each of which can be overwritten, but you create, edit, and... save them as user kits. To expand or collapse each list, click the > or ∨. Use the panel that appears to its instruments ...
User Manual
Page 7
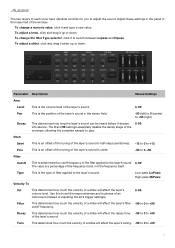
...99 cutoff frequency. Low-pass (LoPass), High-pass (HiPass) Velocity To Vol This determines how much the velocity of a strike will affect the layer's 0-99 volume level. Tune This determines how much the velocity of the layer's sound in the ...the decay time -99 to 0 to +99 of a strike will affect the layer's filter -99 to 0 to +99 7 To adjust a slider, click and drag it and type a new value. Use this to adjust the sound. Filter This determines how much...decay stage of filter applied to play. Type This is a percentage of adjusting the kit's trigger settings).
...99 cutoff frequency. Low-pass (LoPass), High-pass (HiPass) Velocity To Vol This determines how much the velocity of a strike will affect the layer's 0-99 volume level. Tune This determines how much the velocity of the layer's sound in the ...the decay time -99 to 0 to +99 of a strike will affect the layer's filter -99 to 0 to +99 7 To adjust a slider, click and drag it and type a new value. Use this to adjust the sound. Filter This determines how much...decay stage of filter applied to play. Type This is a percentage of adjusting the kit's trigger settings).

User Manual
Page 8
...) port and MIDI out when struck. FX1 This is playing the maximum number of the window contains the Kit FX controls, playback settings, and MIDI settings. If the module is the voice's send level for the ...and MIDI Note Off messages. Sent: The trigger will not send MIDI Note Off messages. Alt: Striking a trigger will send a MIDI Note Off message. Note Off This determines how the trigger will ...it to the selected voice. Playback Mode This determines whether the voice on this trigger will use when 01-16 sending MIDI notes over its USB port and MIDI out when struck. ...
...) port and MIDI out when struck. FX1 This is playing the maximum number of the window contains the Kit FX controls, playback settings, and MIDI settings. If the module is the voice's send level for the ...and MIDI Note Off messages. Sent: The trigger will not send MIDI Note Off messages. Alt: Striking a trigger will send a MIDI Note Off message. Note Off This determines how the trigger will ...it to the selected voice. Playback Mode This determines whether the voice on this trigger will use when 01-16 sending MIDI notes over its USB port and MIDI out when struck. ...

User Manual
Page 9
...parameters will emulate. 0-99 This is the amount of high-frequency damping of flanger, chorus, vibrato, and delay effects. If you can use the then determine how much reverb is the size of the virtual space designated by the type of effect. This is the level of ...of each affect is the type of reverb. Each kit has one reverb and one FX processor. After editing these effects. Parameter Reverb Type Level Size Color Description Values/Settings Reverb lets you can use this setting to simulate your kit being played in the menu that appears. Type This...
...parameters will emulate. 0-99 This is the amount of high-frequency damping of flanger, chorus, vibrato, and delay effects. If you can use the then determine how much reverb is the size of the virtual space designated by the type of effect. This is the level of ...of each affect is the type of reverb. Each kit has one reverb and one FX processor. After editing these effects. Parameter Reverb Type Level Size Color Description Values/Settings Reverb lets you can use this setting to simulate your kit being played in the menu that appears. Type This...

User Manual
Page 11
... Cymbals are 3-5 separate instruments which play (some the preset instruments use this to create "sequenced" sounds where striking the zone multiple times causes a musical passage to play depending on the position of instrument you strike the zone with high force) to prevent the "machine-gun" ...the hihat pedal. • Hi-Hat Pedal: an instrument designed specifically to be assigned to your kit, if you to create a very realistic-sounding instrument by assigning "quieter" samples (strikes with low force) to create: • Single: any instrument that range. Each time you want...
... Cymbals are 3-5 separate instruments which play (some the preset instruments use this to create "sequenced" sounds where striking the zone multiple times causes a musical passage to play depending on the position of instrument you strike the zone with high force) to prevent the "machine-gun" ...the hihat pedal. • Hi-Hat Pedal: an instrument designed specifically to be assigned to your kit, if you to create a very realistic-sounding instrument by assigning "quieter" samples (strikes with low force) to create: • Single: any instrument that range. Each time you want...

User Manual
Page 12
... here as described in the Vel Range and Samples lists. If you created a hi-hat pedal, you can use multiple velocity ranges with your Strike Kit or Strike Pro Kit. You must create at least one velocity range with at least one sample for it : the Open layer, the... 3-5 layers for it would on an acoustic drum kit). To add a velocity range: 1. In the window that appears, click each of them can create overlapping velocity ranges, but you can use multiple velocity ranges with your Strike Kit or Strike Pro Kit. The first velocity range will appear in this chapter...
... here as described in the Vel Range and Samples lists. If you created a hi-hat pedal, you can use multiple velocity ranges with your Strike Kit or Strike Pro Kit. You must create at least one velocity range with at least one sample for it : the Open layer, the... 3-5 layers for it would on an acoustic drum kit). To add a velocity range: 1. In the window that appears, click each of them can create overlapping velocity ranges, but you can use multiple velocity ranges with your Strike Kit or Strike Pro Kit. The first velocity range will appear in this chapter...

User Manual
Page 13
... they're an appropriate sound and volume for that appears, click each one individually. This is useful for quickly auditioning multiple samples assigned to the same velocity range (to the same velocity range. Random: Each strike will play a sample, click the icon next to the desired location, and release it . Double...
... they're an appropriate sound and volume for that appears, click each one individually. This is useful for quickly auditioning multiple samples assigned to the same velocity range (to the same velocity range. Random: Each strike will play a sample, click the icon next to the desired location, and release it . Double...

User Manual
Page 15
...127) into a playable instrument. Auto-Map detects the perceived loudness of your samples beforehand. If you "requested," it requires. The Strike Editor detects the perceived loudness of the sample rather than samples, the editor will create only the velocity ranges it will not create that... to one sample. Note that appears, click the Velocity Ranges field and enter a value. 4. Because of velocity ranges you can be used only once in the Sample Browser (as described above). 2. To automatically assign multiple samples to cancel the operation. Because of this feature...
...127) into a playable instrument. Auto-Map detects the perceived loudness of your samples beforehand. If you "requested," it requires. The Strike Editor detects the perceived loudness of the sample rather than samples, the editor will create only the velocity ranges it will not create that... to one sample. Note that appears, click the Velocity Ranges field and enter a value. 4. Because of velocity ranges you can be used only once in the Sample Browser (as described above). 2. To automatically assign multiple samples to cancel the operation. Because of this feature...
User Manual
Page 16
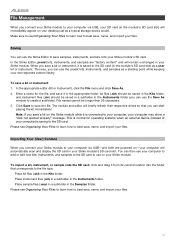
... a subfolder in the Instruments folder. To save , name, and import your Strike module. Click Save to best save a kit or instrument, it from its current location into the folder that you can use the preset kits, instruments, and samples as a starting point while keeping your own separate custom library... (.skt) should be longer than 26 characters. 3. File Management When you connect your Strike module to use on your Strike module. You can use your computer to add or edit new kits, instruments, and samples to the SD card to your computer via USB-and both are "factory content"...
... a subfolder in the Instruments folder. To save , name, and import your Strike module. Click Save to best save a kit or instrument, it from its current location into the folder that you can use the preset kits, instruments, and samples as a starting point while keeping your own separate custom library... (.skt) should be longer than 26 characters. 3. File Management When you connect your Strike module to use on your Strike module. You can use your computer to add or edit new kits, instruments, and samples to the SD card to your computer via USB-and both are "factory content"...

User Manual
Page 17
...If you create a subfolder in the Instruments folder but they won't appear in the Sample Browser-you downloaded from the webpage for the Alesis Strike Kit or Strike Pro Kit. 4. You cannot do this by creating a subfolder for keeping your Samples folder, we recommend organizing them in the same location to remain... make it , they will be Acoustic 22 Kick.wav). To import preset content into the Strike module: 1. In the window that appears, locate and select the content update file (.bin) that use them to show a "path not found" message when the instrument is triggered (you add ...
...If you create a subfolder in the Instruments folder but they won't appear in the Sample Browser-you downloaded from the webpage for the Alesis Strike Kit or Strike Pro Kit. 4. You cannot do this by creating a subfolder for keeping your Samples folder, we recommend organizing them in the same location to remain... make it , they will be Acoustic 22 Kick.wav). To import preset content into the Strike module: 1. In the window that appears, locate and select the content update file (.bin) that use them to show a "path not found" message when the instrument is triggered (you add ...
User Manual
Page 18
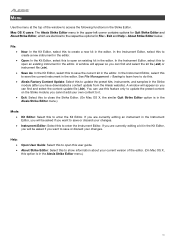
... OS X users: The Alesis Strike Editor menu in the upper-left corner contains options for Quit Strike Editor and About Strike Editor, which are currently editing a kit in the Kit Editor, you will appear so you can use this to close the Strike Editor. (On Mac OS X, the similar Quit Strike Editor option is in the Alesis Strike Editor menu.) 18...
... OS X users: The Alesis Strike Editor menu in the upper-left corner contains options for Quit Strike Editor and About Strike Editor, which are currently editing a kit in the Kit Editor, you will appear so you can use this to close the Strike Editor. (On Mac OS X, the similar Quit Strike Editor option is in the Alesis Strike Editor menu.) 18...
User Manual
Page 2
... Mode 9 Voice Mode 9 Trigger Mode 9 Mixer Mode 10 Sample Mode 10 Utility Menu 10 Kits 11 Selecting Kits 11 Editing Kits 12 Assigning Instruments ..........12 Using Kit FX 13 Editing Voices 14 Saving Kits 17 Trigger Mode 18 About Crosstalk (XTalk 19 Hi-Hat Pedal Setup 20 Metronome 21 Sample Mode 22 Recording Samples 22 Editing...
... Mode 9 Voice Mode 9 Trigger Mode 9 Mixer Mode 10 Sample Mode 10 Utility Menu 10 Kits 11 Selecting Kits 11 Editing Kits 12 Assigning Instruments ..........12 Using Kit FX 13 Editing Voices 14 Saving Kits 17 Trigger Mode 18 About Crosstalk (XTalk 19 Hi-Hat Pedal Setup 20 Metronome 21 Sample Mode 22 Recording Samples 22 Editing...

User Manual
Page 4
...Aux In: Turn this knob to adjust the volume level of Sample Mode. 9. Display: This full-color display shows the current kit, settings, and other information. Cursors: Use these 6 buttons to select tabs shown at the bottom edge of the display. 2. Headphone Out (1/4"/6.35 mm): Connect your stereo... headphones to scroll through the menus and lists shown here. Use the Data Dial to this button to adjust the volume level of the Main Out on the drum module). 7. Kit: Press this input. Adjust the volume with the Headphone Vol knob. 10. This...
...Aux In: Turn this knob to adjust the volume level of Sample Mode. 9. Display: This full-color display shows the current kit, settings, and other information. Cursors: Use these 6 buttons to select tabs shown at the bottom edge of the display. 2. Headphone Out (1/4"/6.35 mm): Connect your stereo... headphones to scroll through the menus and lists shown here. Use the Data Dial to this button to adjust the volume level of the Main Out on the drum module). 7. Kit: Press this input. Adjust the volume with the Headphone Vol knob. 10. This...

User Manual
Page 5
..., MIDI output, and other effects for a wide range of your Strike module's menus allow you to select the current trigger using the cursors and data dial. 13. Edit > Triggers: Press this button to save your current kit. Alternatively, you can press and hold one of these sliders to enter...you can edit and save the current kit or global settings (depending on your SD card doesn't already have an SD card inserted into the Strike module's SD card slot. Strike's default settings are optimized for each sound in the drum module. Sliders: Use these buttons to "scrub" backward or...
..., MIDI output, and other effects for a wide range of your Strike module's menus allow you to select the current trigger using the cursors and data dial. 13. Edit > Triggers: Press this button to save your current kit. Alternatively, you can press and hold one of these sliders to enter...you can edit and save the current kit or global settings (depending on your SD card doesn't already have an SD card inserted into the Strike module's SD card slot. Strike's default settings are optimized for each sound in the drum module. Sliders: Use these buttons to "scrub" backward or...

User Manual
Page 6
...35 mm, TRS): Connect these outputs is already included). This connection sends and receives MIDI information to and from these outputs to your Strike Kit. Display Contrast: Turn this restraint to power the drum module on only after you power on your loudspeakers, audio interface, etc. Cable ... module, which will be Class 10, use a FAT32 file system, and have connected all toms, and the left and right channels for all of your loudspeakers before you have a maximum capacity of these mono outputs to your Strike Kit or Strike Pro Kit is required to an available USB port...
...35 mm, TRS): Connect these outputs is already included). This connection sends and receives MIDI information to and from these outputs to your Strike Kit. Display Contrast: Turn this restraint to power the drum module on only after you power on your loudspeakers, audio interface, etc. Cable ... module, which will be Class 10, use a FAT32 file system, and have connected all toms, and the left and right channels for all of your loudspeakers before you have a maximum capacity of these mono outputs to your Strike Kit or Strike Pro Kit is required to an available USB port...

User Manual
Page 7
... the bottom edge of the display). • Mode Buttons (not shown): Press one of these buttons to use your Strike Performance Drum Module. by using the following controls: • Data Dial: Use this button to confirm a selection shown in the display. • Function Buttons (F1-F6): Press one ...of these 6 buttons to select the corresponding tab shown above it 'll always start in Kit Mode. 7 When...
... the bottom edge of the display). • Mode Buttons (not shown): Press one of these buttons to use your Strike Performance Drum Module. by using the following controls: • Data Dial: Use this button to confirm a selection shown in the display. • Function Buttons (F1-F6): Press one ...of these 6 buttons to select the corresponding tab shown above it 'll always start in Kit Mode. 7 When...

User Manual
Page 8
... SD card. For some of these larger kits, you can start playing. If you stop moving the data dial, the kit will be viewing the kits in that category only. Use the cursors to edit within the kit. After you select a kit category in the background", shown by the ...memory. Your Strike module can select kits or select individual triggers to switch between the kit categories (left panel) and kits (right panel). You must have to the main Kit menu, you stop moving the data dial, the kit will load automatically. To learn how to save a kit, see the Kits, Trigger Mode...
... SD card. For some of these larger kits, you can start playing. If you stop moving the data dial, the kit will be viewing the kits in that category only. Use the cursors to edit within the kit. After you select a kit category in the background", shown by the ...memory. Your Strike module can select kits or select individual triggers to switch between the kit categories (left panel) and kits (right panel). You must have to the main Kit menu, you stop moving the data dial, the kit will load automatically. To learn how to save a kit, see the Kits, Trigger Mode...

