
Turbo Drum Module - User Guide v1.2
Page 4
...so it is lit red, 1 2 3 4 5 VARIATION and then press the 1, 2, 3, 4, or 5 button to each pad in your electronic drum kit has velocity-sensitive pads, Turbo Drum Module will play sounds of varying timbres depending on the position of the hi-hat controller pedal: • Open hi-hat: With...8226; Press the Variation button so it immediately. Playing the Pads If your drum kit. Selecting a Kit To select one of the module's 10 preset kits, do one of the steps above or by the module! Learn more about using the - / + buttons. Setup Items not listed in the Operation section of ...
...so it is lit red, 1 2 3 4 5 VARIATION and then press the 1, 2, 3, 4, or 5 button to each pad in your electronic drum kit has velocity-sensitive pads, Turbo Drum Module will play sounds of varying timbres depending on the position of the hi-hat controller pedal: • Open hi-hat: With...8226; Press the Variation button so it immediately. Playing the Pads If your drum kit. Selecting a Kit To select one of the module's 10 preset kits, do one of the steps above or by the module! Learn more about using the - / + buttons. Setup Items not listed in the Operation section of ...
Turbo Drum Module - User Guide v1.2
Page 5
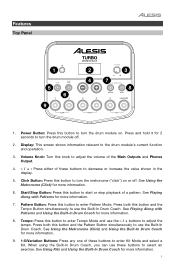
... Coach. Start/Stop Button: Press this button and the Pattern Button simultaneously to select an exercise. When using the Built-In Drum Coach, you can use the - / + buttons to enter Kit Mode and select a Kit. See Using Kits and Using the Built-In Drum Coach for more information. 6. Press and hold it for more information. 7. Press both...
... Coach. Start/Stop Button: Press this button and the Pattern Button simultaneously to select an exercise. When using the Built-In Drum Coach, you can use the - / + buttons to enter Kit Mode and select a Kit. See Using Kits and Using the Built-In Drum Coach for more information. 6. Press and hold it for more information. 7. Press both...
Turbo Drum Module - User Guide v1.2
Page 6
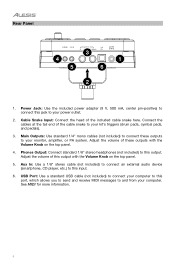
... 1/4" mono cables (not included) to this output. Adjust the volume of the cable snake to your kit's triggers (drum pads, cymbal pads, and pedals). 3. USB Port: Use a standard USB cable (not included) to connect your computer to this jack to your power outlet. 2. Rear Panel 1. Connect the cables ...at the tail end of this output with the Volume Knob on the top panel. 5. Power Jack: Use the included power adapter (9 V, 500 mA, center pin-positive) to connect this port, which allows you to send and receive MIDI messages to this...
... 1/4" mono cables (not included) to this output. Adjust the volume of the cable snake to your kit's triggers (drum pads, cymbal pads, and pedals). 3. USB Port: Use a standard USB cable (not included) to connect your computer to this jack to your power outlet. 2. Rear Panel 1. Connect the cables ...at the tail end of this output with the Volume Knob on the top panel. 5. Power Jack: Use the included power adapter (9 V, 500 mA, center pin-positive) to connect this port, which allows you to send and receive MIDI messages to this...
Turbo Drum Module - User Guide v1.2
Page 7
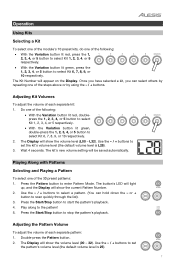
... the Display. Press the Start/Stop button to enter Pattern Mode. The kit's new volume setting will show the volume level (00 - 32). Use the - / + buttons to select Kit 6, 7, 8, 9, or 10 respectively. Operation Using Kits Selecting a Kit To select one of the module's 10 preset kits, do one of the following : • With the Variation button lit...
... the Display. Press the Start/Stop button to enter Pattern Mode. The kit's new volume setting will show the volume level (00 - 32). Use the - / + buttons to select Kit 6, 7, 8, 9, or 10 respectively. Operation Using Kits Selecting a Kit To select one of the module's 10 preset kits, do one of the following : • With the Variation button lit...
Turbo Drum Module - User Guide v1.2
Page 8
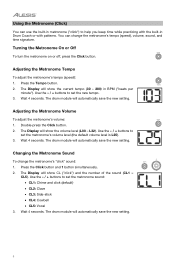
...the built-in Drum Coach or with patterns. The Display will show CL ("click") and the number of the sound (CL1 - Wait 4 seconds. Using the Metronome (Click) You can change the metronome's "click" sound: 1 CLICK 1. Adjusting the Metronome Volume To adjust the metronome's volume: CLICK ...button. The Display will show the current tempo (30 - 280) in BPM ("beats per minute"). The drum module will show the volume level (L00 - L32). Use the - / + buttons to set the metronome sound: • CL1: Chime and click (default) • CL2: Clave • CL3: Side-stick &#...
...the built-in Drum Coach or with patterns. The Display will show CL ("click") and the number of the sound (CL1 - Wait 4 seconds. Using the Metronome (Click) You can change the metronome's "click" sound: 1 CLICK 1. Adjusting the Metronome Volume To adjust the metronome's volume: CLICK ...button. The Display will show the current tempo (30 - 280) in BPM ("beats per minute"). The drum module will show the volume level (L00 - L32). Use the - / + buttons to set the metronome sound: • CL1: Chime and click (default) • CL2: Clave • CL3: Side-stick &#...
Turbo Drum Module - User Guide v1.2
Page 9
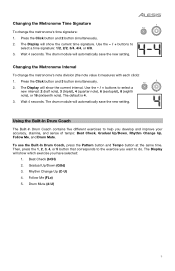
... signature: 2 CLICK 1. Then, press the 1, 2, 3, 4, or 5 button that corresponds to do. Beat Check (bCH) 2. Rhythm Change Up (C-U) 4. Use the - / + buttons to select a new interval: 2 (half note), 3 (triplet), 4 (quarter note), 6 (sextuplet), 8 (eighth note), or 16 (sixteenth note). The default...Drum Mute (d-U) 9 Press the Click button and 2 button simultaneously. 2. The Display will show the current interval. Wait 4 seconds. To use the Built-In Drum Coach, press the Pattern button and Tempo button at the same time. The drum module will show the current time signature...
... signature: 2 CLICK 1. Then, press the 1, 2, 3, 4, or 5 button that corresponds to do. Beat Check (bCH) 2. Rhythm Change Up (C-U) 4. Use the - / + buttons to select a new interval: 2 (half note), 3 (triplet), 4 (quarter note), 6 (sextuplet), 8 (eighth note), or 16 (sixteenth note). The default...Drum Mute (d-U) 9 Press the Click button and 2 button simultaneously. 2. The Display will show the current interval. Wait 4 seconds. To use the Built-In Drum Coach, press the Pattern button and Tempo button at the same time. The drum module will show the current time signature...
Turbo Drum Module - User Guide v1.2
Page 10
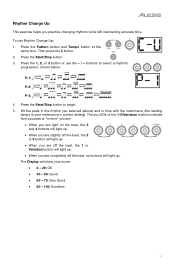
... button to select G-2 Mode. Then press the 2 button. PATTERN TEMPO 2. Set the metronome's time signature and interval (as described in Using the Metronome (Click)). 3. SLOW GOOD • When you are off the beat, the 1 or Variation button will light up. •...six LEDs of the following: 1 • Press the 1 button to stop . SLOW GOOD FAST • When you can play along with the metronome. To use Gradual Up/Down: 2 COACH 1. PATTERN TEMPO 2. In this mode, the 2 tempo automatically decreases or increases by 5 BPM every 4 measures, depending on the beat...
... button to select G-2 Mode. Then press the 2 button. PATTERN TEMPO 2. Set the metronome's time signature and interval (as described in Using the Metronome (Click)). 3. SLOW GOOD • When you are off the beat, the 1 or Variation button will light up. •...six LEDs of the following: 1 • Press the 1 button to stop . SLOW GOOD FAST • When you can play along with the metronome. To use Gradual Up/Down: 2 COACH 1. PATTERN TEMPO 2. In this mode, the 2 tempo automatically decreases or increases by 5 BPM every 4 measures, depending on the beat...
Turbo Drum Module - User Guide v1.2
Page 11
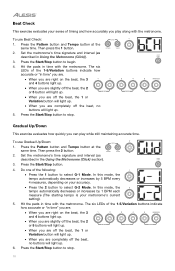
...tempo is your score: • 0 - 29: OK • 30 - 59: Good • 60 - 79: Very Good • 80 - 100: Excellent 11 To use the - / + buttons to begin. 5. Press the Start/Stop button to select a rhythmic 1 2 3 progression, shown below: P-1: P-2: P-3: 4. START /STOP 2. Press the... Pattern button and Tempo button at the PATTERN TEMPO same time. Press the 1, 2, or 3 button or use Rhythm Change Up: 3 COACH 1. Hit the pads in the rhythm you selected (above) and in time" you are: • When you are right on ...
...tempo is your score: • 0 - 29: OK • 30 - 59: Good • 60 - 79: Very Good • 80 - 100: Excellent 11 To use the - / + buttons to begin. 5. Press the Start/Stop button to select a rhythmic 1 2 3 progression, shown below: P-1: P-2: P-3: 4. START /STOP 2. Press the... Pattern button and Tempo button at the PATTERN TEMPO same time. Press the 1, 2, or 3 button or use Rhythm Change Up: 3 COACH 1. Hit the pads in the rhythm you selected (above) and in time" you are: • When you are right on ...

Turbo Drum Module - User Guide v1.2
Page 12
...drum pattern yourself. For reference, the Display will alternate between (1) a drum pattern and (2) a metronome track of various drum patterns so that use the entire drum kit. To use Follow Me: 4 COACH 1. Press the Pattern button and Tempo button at the PATTERN TEMPO same time.... Use the - / + buttons to select the drum pattern you want to stop . 12 To use Drum Mute: 5 COACH 1. Press one or several of the 1-5/Variation buttons indicate how...
...drum pattern yourself. For reference, the Display will alternate between (1) a drum pattern and (2) a metronome track of various drum patterns so that use the entire drum kit. To use Follow Me: 4 COACH 1. Press the Pattern button and Tempo button at the PATTERN TEMPO same time.... Use the - / + buttons to select the drum pattern you want to stop . 12 To use Drum Mute: 5 COACH 1. Press one or several of the 1-5/Variation buttons indicate how...
Turbo Drum Module - User Guide v1.2
Page 13
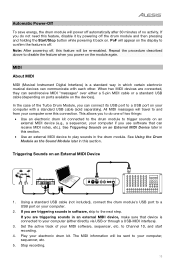
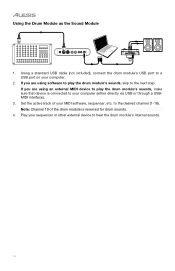
... your computer over either directly via USB or through a USB-MIDI interface). 3. Set the active track of the Turbo Drum Module, you can communicate with a standard USB cable (sold separately). Using a standard USB cable (not included), connect the drum module's USB port to your computer (either a 5-pin ... each other. If you are triggering sounds in this feature will be sent to Channel 10, and start recording. 4. Play your electronic drum kit. This allows you to do not need this connection. to your computer, sequencer, etc. 5. Automatic Power-Off To save energy, the drum...
... your computer over either directly via USB or through a USB-MIDI interface). 3. Set the active track of the Turbo Drum Module, you can communicate with a standard USB cable (sold separately). Using a standard USB cable (not included), connect the drum module's USB port to your computer (either a 5-pin ... each other. If you are triggering sounds in this feature will be sent to Channel 10, and start recording. 4. Play your electronic drum kit. This allows you to do not need this connection. to your computer, sequencer, etc. 5. Automatic Power-Off To save energy, the drum...
Turbo Drum Module - User Guide v1.2
Page 14
... Note: Channel 10 of your computer (either directly via USB or through a USBMIDI interface). 3. Using the Drum Module as the Sound Module VOL MIDI IN MIDI OUT R L RL USB 1. If you are using an external MIDI device to play the drum module's sounds, skip to play the drum module's ... device is reserved for drum sounds. 4. Set the active track of the drum module is connected to hear the drum module's internal sounds. 14 Using a standard USB cable (not included), connect the drum module's USB port to the desired channel (1-16). Play your sequencer or other external device ...
... Note: Channel 10 of your computer (either directly via USB or through a USBMIDI interface). 3. Using the Drum Module as the Sound Module VOL MIDI IN MIDI OUT R L RL USB 1. If you are using an external MIDI device to play the drum module's sounds, skip to play the drum module's ... device is reserved for drum sounds. 4. Set the active track of the drum module is connected to hear the drum module's internal sounds. 14 Using a standard USB cable (not included), connect the drum module's USB port to the desired channel (1-16). Play your sequencer or other external device ...

