Vortex Wireless 2 Editor - User Guide
Page 2
Table of Contents Introduction 3 Support 3 Installation 3 Getting Started 3 Editing the Controls 6 Pads 6 Faders 8 Touch Ribbon 9 Tilt 10 Pitch Wheel / Volume / Sustain ....... 11 Program Change / Keybed 12 Operation 4 Software Menus 4 File 4 Help 4 Managing Your Presets 5 About Presets 5 Loading Presets 5 Saving Presets 5 Sending Presets 5 Appendix 14 Velocity Curves 14 Trademarks & Licenses 14 2
Table of Contents Introduction 3 Support 3 Installation 3 Getting Started 3 Editing the Controls 6 Pads 6 Faders 8 Touch Ribbon 9 Tilt 10 Pitch Wheel / Volume / Sustain ....... 11 Program Change / Keybed 12 Operation 4 Software Menus 4 File 4 Help 4 Managing Your Presets 5 About Presets 5 Loading Presets 5 Saving Presets 5 Sending Presets 5 Appendix 14 Velocity Curves 14 Trademarks & Licenses 14 2
Vortex Wireless 2 Editor - User Guide
Page 3
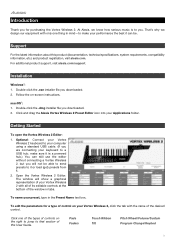
... serious music is a powered hub.) You can be able to send presets to you downloaded. 2. Pads Faders Touch Ribbon Tilt Pitch Wheel/Volume/Sustain Program Change/Keybed 3 Open the Vortex Wireless 2 Editor. To edit the parameters for purchasing the Vortex Wireless 2. Installation Windows®: 1. Double-click the .exe installer file you for a type of controls on -screen instructions. At Alesis, we design our equipment with the name of this product (documentation, technical specifications...
... serious music is a powered hub.) You can be able to send presets to you downloaded. 2. Pads Faders Touch Ribbon Tilt Pitch Wheel/Volume/Sustain Program Change/Keybed 3 Open the Vortex Wireless 2 Editor. To edit the parameters for purchasing the Vortex Wireless 2. Installation Windows®: 1. Double-click the .exe installer file you for a type of controls on -screen instructions. At Alesis, we design our equipment with the name of this product (documentation, technical specifications...
Vortex Wireless 2 Editor - User Guide
Page 4
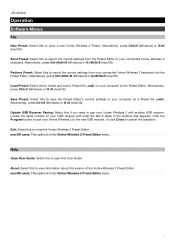
... and load a Preset file (.vw2) on your Vortex Wireless 2 with another USB receiver. Locate the serial number on your computer to pair your USB receiver and enter the last 6 digits in the Vortex Wireless 2 Preset Editor menu. macOS users: This option is in the window that appears. Alternatively, press Ctrl+O (Windows) or +O (macOS). Exit: Select this to export the current settings from your connected Vortex Wireless 2 keyboard...
... and load a Preset file (.vw2) on your Vortex Wireless 2 with another USB receiver. Locate the serial number on your computer to pair your USB receiver and enter the last 6 digits in the Vortex Wireless 2 Preset Editor menu. macOS users: This option is in the window that appears. Alternatively, press Ctrl+O (Windows) or +O (macOS). Exit: Select this to export the current settings from your connected Vortex Wireless 2 keyboard...
Vortex Wireless 2 Editor - User Guide
Page 5
... MIDI assignments you maintain several different control configurations to select the desired preset number. 3. After that appears, click the Preset Slot drop-down menu to your Vortex Wireless 2 keyboard's internal memory. In the window that , select the desired location, enter a file name, and click Save. You can store 25 presets at a time. Click Get to confirm or Cancel to cancel the operation...
... MIDI assignments you maintain several different control configurations to select the desired preset number. 3. After that appears, click the Preset Slot drop-down menu to your Vortex Wireless 2 keyboard's internal memory. In the window that , select the desired location, enter a file name, and click Save. You can store 25 presets at a time. Click Get to confirm or Cancel to cancel the operation...
Vortex Wireless 2 Editor - User Guide
Page 6
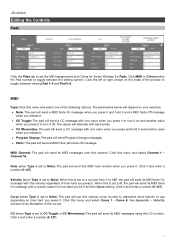
... select Channel 1 - See Appendix > Velocity Curves for Vortex Wireless 2's Pads. MIDI Type: Click this is set to a number from 1 to 127, the pad will send its MIDI Note On message with a velocity based on the sides of the window to toggle between the editing options. Velocity (when Type is set to Note): When this is set to 0, the pad will send its MIDI Note On message with this channel. Curve (when Type is set to...
... select Channel 1 - See Appendix > Velocity Curves for Vortex Wireless 2's Pads. MIDI Type: Click this is set to a number from 1 to 127, the pad will send its MIDI Note On message with a velocity based on the sides of the window to toggle between the editing options. Velocity (when Type is set to Note): When this is set to 0, the pad will send its MIDI Note On message with this channel. Curve (when Type is set to...
Vortex Wireless 2 Editor - User Guide
Page 7
... Type is set to CC Momentary): The pad will send this Bank MSB (Most Significant Byte) number when you press it to CC Momentary): The pad will send this Program Change number when you press it and enter a number (0-127). Click each pad. LSB (when Type is triggered with a velocity from 1-63. • Color 3: The color of the pad when it . Program (when Type is set to Note...
... Type is set to CC Momentary): The pad will send this Bank MSB (Most Significant Byte) number when you press it to CC Momentary): The pad will send this Program Change number when you press it and enter a number (0-127). Click each pad. LSB (when Type is triggered with a velocity from 1-63. • Color 3: The color of the pad when it . Program (when Type is set to Note...
Vortex Wireless 2 Editor - User Guide
Page 8
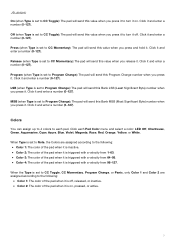
... on the sides of the window to set the MIDI assignments for Vortex Wireless 2's Faders. Click it and enter a number (0-127). 8 Click this CC number. Click it and enter a number (0-127). MIDI Channel: The fader will be the highest value that the fader can send. Click it and enter a number (0-127). Min: This will send its MIDI messages using this menu and select...
... on the sides of the window to set the MIDI assignments for Vortex Wireless 2's Faders. Click it and enter a number (0-127). 8 Click this CC number. Click it and enter a number (0-127). MIDI Channel: The fader will be the highest value that the fader can send. Click it and enter a number (0-127). Min: This will send its MIDI messages using this menu and select...
Vortex Wireless 2 Editor - User Guide
Page 9
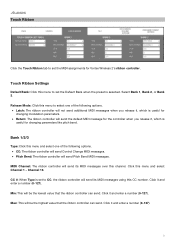
... and enter a number (0-127). MIDI Channel: The ribbon controller will be the highest value that the ribbon controller can send. Touch Ribbon Click the Touch Ribbon tab to set the Default Bank when the preset is selected. Touch Ribbon Settings Default Bank: Click this menu and select Channel 1 - Click it , which is useful for Vortex Wireless 2's ribbon controller. Click this menu to set the MIDI assignments for changing parameters like pitch bend. Min: This...
... and enter a number (0-127). MIDI Channel: The ribbon controller will be the highest value that the ribbon controller can send. Touch Ribbon Click the Touch Ribbon tab to set the Default Bank when the preset is selected. Touch Ribbon Settings Default Bank: Click this menu and select Channel 1 - Click it , which is useful for Vortex Wireless 2's ribbon controller. Click this menu to set the MIDI assignments for changing parameters like pitch bend. Min: This...
Vortex Wireless 2 Editor - User Guide
Page 10
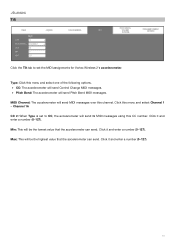
... the Tilt tab to set to CC, the accelerometer will send its MIDI messages using this CC number. Type: Click this menu and select one of the following options. • CC: The accelerometer will send Control Change MIDI messages. • Pitch Bend: The accelerometer will send MIDI messages over this menu and select Channel 1 - MIDI Channel: The accelerometer will send Pitch Bend MIDI messages. Max: This will...
... the Tilt tab to set to CC, the accelerometer will send its MIDI messages using this CC number. Type: Click this menu and select one of the following options. • CC: The accelerometer will send Control Change MIDI messages. • Pitch Bend: The accelerometer will send MIDI messages over this menu and select Channel 1 - MIDI Channel: The accelerometer will send Pitch Bend MIDI messages. Max: This will...
Vortex Wireless 2 Editor - User Guide
Page 11
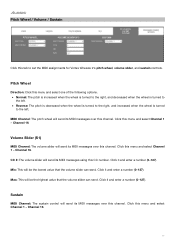
... of the following options. • Normal: The pitch is increased when the wheel is turned to the right, and decreased when the wheel is turned to the left. • Reverse: The pitch is decreased when the wheel is turned to the right, and increased when the wheel is turned to set the MIDI assignments for Vortex Wireless 2's pitch wheel, volume slider, and sustain controls.
... of the following options. • Normal: The pitch is increased when the wheel is turned to the right, and decreased when the wheel is turned to the left. • Reverse: The pitch is decreased when the wheel is turned to the right, and increased when the wheel is turned to set the MIDI assignments for Vortex Wireless 2's pitch wheel, volume slider, and sustain controls.
Vortex Wireless 2 Editor - User Guide
Page 12
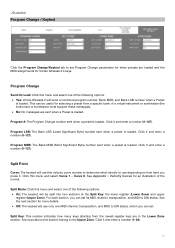
... Lower Zone section. Split Point Curve: The keybed will use this velocity curve number to determine what velocity to use only one of the following options. • Yes: Vortex Wireless 2 will be useful for Vortex Wireless 2's keys. Click it . Curve 8. Program LSB: The Bank LSB (Least Significant Byte) number sent when a preset is loaded. Click it and enter a number (0-127). For each section, you can set . Click it and enter a number...
... Lower Zone section. Split Point Curve: The keybed will use this velocity curve number to determine what velocity to use only one of the following options. • Yes: Vortex Wireless 2 will be useful for Vortex Wireless 2's keys. Click it . Curve 8. Program LSB: The Bank LSB (Least Significant Byte) number sent when a preset is loaded. Click it and enter a number (0-127). For each section, you can set . Click it and enter a number...
Vortex Wireless 2 Editor - User Guide
Page 13
Transpose: The zone will be sent out of the USB Port only. 13 Lower Zone / Upper Zone MIDI Channel: The zone will send its MIDI messages over this many semitones. 0 indicates no transposition. 12 semitones is a full octave. Click it and enter a number (-12 to select one of the following options: • On: The zone's MIDI messages will be sent out of the USB Port and MIDI Out. • Off: The zone's MIDI messages will be transposed up or down by this channel. Channel 16. MIDI to DIN: Click the menu to 12). Click this menu and select Channel 1 -
Transpose: The zone will be sent out of the USB Port only. 13 Lower Zone / Upper Zone MIDI Channel: The zone will send its MIDI messages over this many semitones. 0 indicates no transposition. 12 semitones is a full octave. Click it and enter a number (-12 to select one of the following options: • On: The zone's MIDI messages will be sent out of the USB Port and MIDI Out. • Off: The zone's MIDI messages will be transposed up or down by this channel. Channel 16. MIDI to DIN: Click the menu to 12). Click this menu and select Channel 1 -
Vortex Wireless 2 Editor - User Guide
Page 14
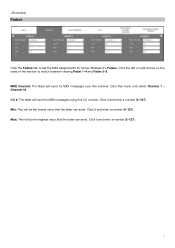
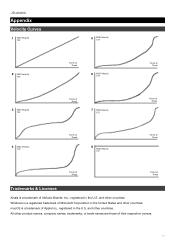
... of their respective owners. 14 All other countries. and other countries. Windows is a registered trademark of Microsoft Corporation in the United States and other countries. Appendix Velocity Curves 1 MIDI Velocity 127 5 MIDI Velocity 127 2 MIDI Velocity 127 3 MIDI Velocity 127 Force of Press 6 MIDI Velocity 127 Force of Press 7 MIDI Velocity 127 Force of Press Force of Press 4 MIDI Velocity 127 Force of Press 8 MIDI Velocity 127 Force of...
... of their respective owners. 14 All other countries. and other countries. Windows is a registered trademark of Microsoft Corporation in the United States and other countries. Appendix Velocity Curves 1 MIDI Velocity 127 5 MIDI Velocity 127 2 MIDI Velocity 127 3 MIDI Velocity 127 Force of Press 6 MIDI Velocity 127 Force of Press 7 MIDI Velocity 127 Force of Press Force of Press 4 MIDI Velocity 127 Force of Press 8 MIDI Velocity 127 Force of...
Vortex Wireless 2 - User Guide
Page 3
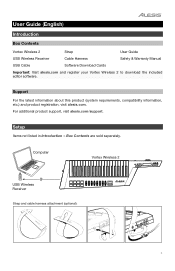
... alesis.com/support. Computer Vortex Wireless 2 USB Wireless Receiver Strap and cable harness attachment (optional): 3 Support For the latest information about this product (system requirements, compatibility information, etc.) and product registration, visit alesis.com. User Guide (English) Introduction Box Contents Vortex Wireless 2 Strap User Guide USB Wireless Receiver Cable Harness Safety & Warranty Manual USB Cable Software Download Cards Important: Visit alesis.com and register your Vortex Wireless 2 to download the included editor software. Setup Items not listed...
... alesis.com/support. Computer Vortex Wireless 2 USB Wireless Receiver Strap and cable harness attachment (optional): 3 Support For the latest information about this product (system requirements, compatibility information, etc.) and product registration, visit alesis.com. User Guide (English) Introduction Box Contents Vortex Wireless 2 Strap User Guide USB Wireless Receiver Cable Harness Safety & Warranty Manual USB Cable Software Download Cards Important: Visit alesis.com and register your Vortex Wireless 2 to download the included editor software. Setup Items not listed...
Vortex Wireless 2 - User Guide
Page 4
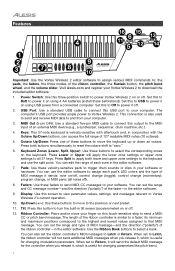
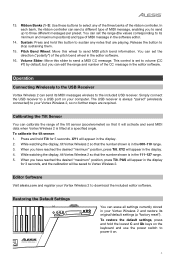
... an external MIDI device (e.g., a synthesizer, sequencer, drum machine, etc.). 4. This connection is velocity-sensitive with the Octave Up/Down buttons, can also set the range and CC message number-and the direction ("polarity") of the ribbon controller-in tilt sensor (accelerometer) on or off . 2. Keys: This 37-note keyboard is also used to send and receive MIDI data to power Vortex Wireless 2 on or off ). 8. Display: Use this output to the MIDI input of MIDI...
... an external MIDI device (e.g., a synthesizer, sequencer, drum machine, etc.). 4. This connection is velocity-sensitive with the Octave Up/Down buttons, can also set the range and CC message number-and the direction ("polarity") of the ribbon controller-in tilt sensor (accelerometer) on or off . 2. Keys: This 37-note keyboard is also used to send and receive MIDI data to power Vortex Wireless 2 on or off ). 8. Display: Use this output to the MIDI input of MIDI...
Vortex Wireless 2 - User Guide
Page 5
... display for 5 seconds. 13. You can set the direction ("polarity") of the ribbon controller. Sustain: Press and hold the lowest C and Gb keys on the keyboard and use the power switch to Vortex Wireless 2. The USB receiver is tilted at a specified angle. Ribbon Banks (1-3): Use these buttons to download the included editor software. XY2 will activate and send MIDI data when Vortex Wireless 2 is always "paired" (wirelessly connected) to your Vortex Wireless 2 to select any notes...
... display for 5 seconds. 13. You can set the direction ("polarity") of the ribbon controller. Sustain: Press and hold the lowest C and Gb keys on the keyboard and use the power switch to Vortex Wireless 2. The USB receiver is tilted at a specified angle. Ribbon Banks (1-3): Use these buttons to download the included editor software. XY2 will activate and send MIDI data when Vortex Wireless 2 is always "paired" (wirelessly connected) to your Vortex Wireless 2 to select any notes...
Vortex Wireless 2 - User Guide
Page 18
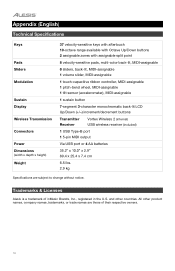
... to change without notice. All other countries. Appendix (English) Technical Specifications Keys Pads Sliders Modulation Sustain Display Wireless Transmission Connectors Power Dimensions (width x depth x height) Weight 37 velocity-sensitive keys with aftertouch 10-octave range available with Octave Up/Down buttons 2 assignable zones with assignable split point 8 velocity-sensitive pads, multi-color back-lit, MIDI-assignable 8 sliders, back-lit, MIDI-assignable 1 volume slider, MIDI-assignable 1 touch-capacitive ribbon controller, MIDI-assignable 1 pitch-bend wheel, MIDI-assignable...
... to change without notice. All other countries. Appendix (English) Technical Specifications Keys Pads Sliders Modulation Sustain Display Wireless Transmission Connectors Power Dimensions (width x depth x height) Weight 37 velocity-sensitive keys with aftertouch 10-octave range available with Octave Up/Down buttons 2 assignable zones with assignable split point 8 velocity-sensitive pads, multi-color back-lit, MIDI-assignable 8 sliders, back-lit, MIDI-assignable 1 volume slider, MIDI-assignable 1 touch-capacitive ribbon controller, MIDI-assignable 1 pitch-bend wheel, MIDI-assignable...


