
Owners Manual
Page 19
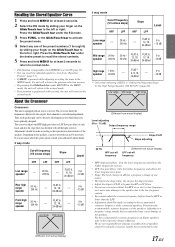
...than the HPF or lower than the LPF. • Adjustment should be driven by sliding your finger on the GlideTouch bar to the respective Owner's Manual. Press the GlideTouch bar under the desire preset to recall the stored contents. 5 Press and hold MENU for a frequency change of one... of the preset numbers (1 through 6) by using the crossover outside that recommended may not be made according to the reproduction characteristics of Alpine speakers, refer to the left or right. Low range Mid range High range (Different from "Equalizer Presets" (page 15). • If MENU...
...than the HPF or lower than the LPF. • Adjustment should be driven by sliding your finger on the GlideTouch bar to the respective Owner's Manual. Press the GlideTouch bar under the desire preset to recall the stored contents. 5 Press and hold MENU for a frequency change of one... of the preset numbers (1 through 6) by using the crossover outside that recommended may not be made according to the reproduction characteristics of Alpine speakers, refer to the left or right. Low range Mid range High range (Different from "Equalizer Presets" (page 15). • If MENU...

Owners Manual
Page 23
... at least 2 seconds. 7 Select the MX mode by sliding your finger on the GlideTouch bar to the left or right. For details, refer to the Owner's Manual of the audio processor. • "CMPM" is applied for MP3/WMA, WAV and iPod. • "SAT" is applied for XM radio and SIRIUS radio. •... Settings 1 Press and hold MENU for all frequencies. Press the GlideTouch bar under the Time Correction (T.CORR) mode. 3 Press FUNC. About the MX indicator display (CDA-9853 only) MX Level Display Lights up when MX is pressed while adjusting or setting the itmes in the MENU mode, the unit will be...
... at least 2 seconds. 7 Select the MX mode by sliding your finger on the GlideTouch bar to the left or right. For details, refer to the Owner's Manual of the audio processor. • "CMPM" is applied for MP3/WMA, WAV and iPod. • "SAT" is applied for XM radio and SIRIUS radio. •... Settings 1 Press and hold MENU for all frequencies. Press the GlideTouch bar under the Time Correction (T.CORR) mode. 3 Press FUNC. About the MX indicator display (CDA-9853 only) MX Level Display Lights up when MX is pressed while adjusting or setting the itmes in the MENU mode, the unit will be...

Owners Manual
Page 27
...input level by sliding your finger on the GlideTouch bar to the left or right. Press the GlideTouch bar under the desired AMP-ID. CDA-9855 VOLTAGE:10.1V Voltage Display 75.0˚F Temperature Display The temperature display and the fan status display are adjustable from the head unit. ...MENU for at least 2 seconds. 2 Select the Amplifier Link (A-LINK) mode by sliding your finger on each of the settings, refer to the Owner's Manual of CH 1/2 by sliding your finger on the GlideTouch bar to the left or right. If a Mono Amplifier is activated. Displaying the External ...
...input level by sliding your finger on the GlideTouch bar to the left or right. Press the GlideTouch bar under the desired AMP-ID. CDA-9855 VOLTAGE:10.1V Voltage Display 75.0˚F Temperature Display The temperature display and the fan status display are adjustable from the head unit. ...MENU for at least 2 seconds. 2 Select the Amplifier Link (A-LINK) mode by sliding your finger on each of the settings, refer to the Owner's Manual of CH 1/2 by sliding your finger on the GlideTouch bar to the left or right. If a Mono Amplifier is activated. Displaying the External ...

Owners Manual
Page 28
...-5460 model is downloaded cannot be "A_U*****.MP3." http://www.alpine.com or http://www.alpine-usa.com Downloadable data Parametric equalizer or Graphic equalizer Time correction Crossover Profile (CDA-9855 only) Calendar message (CDA-9855 only) Data is memorized in the USER'S presets described below ... previous selection secreen. • By pressing the GlideTouch bar under RETURN in the MENU mode, the unit will return to the Owner's Manual of the HDA-5460 model. • If an external audio processor is connected, data that is connected to select colors (1...
...-5460 model is downloaded cannot be "A_U*****.MP3." http://www.alpine.com or http://www.alpine-usa.com Downloadable data Parametric equalizer or Graphic equalizer Time correction Crossover Profile (CDA-9855 only) Calendar message (CDA-9855 only) Data is memorized in the USER'S presets described below ... previous selection secreen. • By pressing the GlideTouch bar under RETURN in the MENU mode, the unit will return to the Owner's Manual of the HDA-5460 model. • If an external audio processor is connected, data that is connected to select colors (1...

Owners Manual
Page 36
...iPod™ or iPod™ mini is disabled. • For details, refer to the Owner's Manual of the iPod™ Interface adapter (KCA-420i). • Refer to the iPod's ...FUNC. iPod™ Operation (Optional) SOURCE/ POWER -/J g f GlideTouch bar FUNC. However, operation from the CDA-9855/CDA-9853. Fast backward: Press and hold f. 3 To pause playback, press :/J. Fast forward: Press and hold ...to be played back by sliding your finger quickly on the GlideTouch bar to the optional Alpine Interface adapter for a description of the selected playlist. 2 Within 10 seconds, select ...
...iPod™ or iPod™ mini is disabled. • For details, refer to the Owner's Manual of the iPod™ Interface adapter (KCA-420i). • Refer to the iPod's ...FUNC. iPod™ Operation (Optional) SOURCE/ POWER -/J g f GlideTouch bar FUNC. However, operation from the CDA-9855/CDA-9853. Fast backward: Press and hold f. 3 To pause playback, press :/J. Fast forward: Press and hold ...to be played back by sliding your finger quickly on the GlideTouch bar to the optional Alpine Interface adapter for a description of the selected playlist. 2 Within 10 seconds, select ...
Owners Manual
Page 40
... back to the beginning of the current track. 5 -/J Button Press this button again to cancel. *1 For the operation of external audio processor, refer to the Owner's Manual of the next track. ! 9 Button Radio mode: Pressing this button will select, in ascending order, stations programmed into the radio's presets as shown below. 6 →...
... back to the beginning of the current track. 5 -/J Button Press this button again to cancel. *1 For the operation of external audio processor, refer to the Owner's Manual of the next track. ! 9 Button Radio mode: Pressing this button will select, in ascending order, stations programmed into the radio's presets as shown below. 6 →...
Owners Manual
Page 44
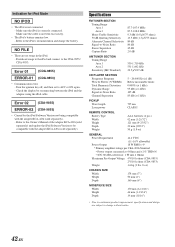
... to be compatible with the adapter KCA-420i (sold separately). - Refer to the Owner's Manual of the adapter KCA-420i (sold separately). Make sure the iPod is not bent excessively. • The iPod's battery remains low. - Error 01 (CDA-9855) ERROR-01 (CDA-9853) • Communication error - Specifications FM TUNER SECTION Tuning Range Area 1 Area...
... to be compatible with the adapter KCA-420i (sold separately). - Refer to the Owner's Manual of the adapter KCA-420i (sold separately). Make sure the iPod is not bent excessively. • The iPod's battery remains low. - Error 01 (CDA-9855) ERROR-01 (CDA-9853) • Communication error - Specifications FM TUNER SECTION Tuning Range Area 1 Area...

Owners Manual
Page 48
.... Do not use this lead to turn on how to connect, refer to the Owner's Manual of the vehicle's battery. 9 Ground Lead (Black) Connect this lead to a good chassis ground on or in the NORM position. DC/DC Converter (CDA-9855 only) • Do not install the converter at a location subjected to bare metal...
.... Do not use this lead to turn on how to connect, refer to the Owner's Manual of the vehicle's battery. 9 Ground Lead (Black) Connect this lead to a good chassis ground on or in the NORM position. DC/DC Converter (CDA-9855 only) • Do not install the converter at a location subjected to bare metal...

Owners Manual
Page 50
... your vehicle by an Authorized Installation Center, and this Warranty. THE TERM "INCIDENTAL DAMAGES" REFERS TO EXPENSES OF TRANSPORTING THE PRODUCT TO THE ALPINE SERVICE CENTER, LOSS OF THE ORIGINAL PURCHASER'S TIME, LOSS OF THE USE OF THE PRODUCT, BUS FARES, CAR RENTALS OR OTHERS COSTS RELATING... WHEN THIS PRODUCT DOES NOT WORK PROPERLY. Should you . [IN CANADA ONLY: This Warranty is not valid unless your Alpine car audio product has been installed in the Owner's manual. 4 Damage caused by over-driving the speaker (amplifier level is in the Canada. Any cost or expense related to ...
... your vehicle by an Authorized Installation Center, and this Warranty. THE TERM "INCIDENTAL DAMAGES" REFERS TO EXPENSES OF TRANSPORTING THE PRODUCT TO THE ALPINE SERVICE CENTER, LOSS OF THE ORIGINAL PURCHASER'S TIME, LOSS OF THE USE OF THE PRODUCT, BUS FARES, CAR RENTALS OR OTHERS COSTS RELATING... WHEN THIS PRODUCT DOES NOT WORK PROPERLY. Should you . [IN CANADA ONLY: This Warranty is not valid unless your Alpine car audio product has been installed in the Owner's manual. 4 Damage caused by over-driving the speaker (amplifier level is in the Canada. Any cost or expense related to ...

Owners Manual
Page 18
... the crossover frequency higher than the HPF or lower than the LPF. • Adjustment should be made according to the reproduction characteristics of Alpine speakers, refer to the normal mode. About the Crossover Crossover: This unit is controlled independently. Low range Mid range High range (Different ... to normal mode. • This function is inoperable when DEFEAT is performed in the MENU mode, the unit will return to the respective Owner's Manual. Press the GlideTouch bar under the desire preset to the left or right. If you are not responsible for a frequency change (in dB...
... the crossover frequency higher than the HPF or lower than the LPF. • Adjustment should be made according to the reproduction characteristics of Alpine speakers, refer to the normal mode. About the Crossover Crossover: This unit is controlled independently. Low range Mid range High range (Different ... to normal mode. • This function is inoperable when DEFEAT is performed in the MENU mode, the unit will return to the respective Owner's Manual. Press the GlideTouch bar under the desire preset to the left or right. If you are not responsible for a frequency change (in dB...

Owners Manual
Page 22
...previous selection secreen. • By pressing the GlideTouch bar under the Time Correction (T.CORR) mode. 3 Press FUNC. About the MX indicator display (CDA-9853 only) MX Level Display Lights up when MX is performed in 60 seconds, the unit will return to the previous selection secreen. •.... 5 Press and hold MENU for all frequencies. Press the GlideTouch bar under the desired level or OFF (Non Effect). For details, refer to the Owner's Manual of the audio processor. • "CMPM" is applied for MP3/WMA, WAV and iPod. • "SAT" is applied for XM radio and ...
...previous selection secreen. • By pressing the GlideTouch bar under the Time Correction (T.CORR) mode. 3 Press FUNC. About the MX indicator display (CDA-9853 only) MX Level Display Lights up when MX is performed in 60 seconds, the unit will return to the previous selection secreen. •.... 5 Press and hold MENU for all frequencies. Press the GlideTouch bar under the desired level or OFF (Non Effect). For details, refer to the Owner's Manual of the audio processor. • "CMPM" is applied for MP3/WMA, WAV and iPod. • "SAT" is applied for XM radio and ...

Owners Manual
Page 26
... amplifiers are alternately displayed. The input level mode to be changed by sliding your finger on the GlideTouch bar to page 30. 25-EN CDA-9855 VOLTAGE:10.1V Voltage Display 75.0˚F Temperature Display The temperature display and the fan status display are connected to this unit, set a ...1 Press and hold MENU for at least 2 seconds to return to normal mode. • For details of each of the settings, refer to the Owner's Manual of the external amplifier. • If amplifier settings are made on the unit, do not then change the setting with the amplifier buttons as the...
... amplifiers are alternately displayed. The input level mode to be changed by sliding your finger on the GlideTouch bar to page 30. 25-EN CDA-9855 VOLTAGE:10.1V Voltage Display 75.0˚F Temperature Display The temperature display and the fan status display are connected to this unit, set a ...1 Press and hold MENU for at least 2 seconds to return to normal mode. • For details of each of the settings, refer to the Owner's Manual of the external amplifier. • If amplifier settings are made on the unit, do not then change the setting with the amplifier buttons as the...

Owners Manual
Page 27
...mode. Press the GlideTouch bar under the desired color. http://www.alpine.com or http://www.alpine-usa.com Downloadable data Parametric equalizer or Graphic equalizer Time correction Crossover Profile (CDA-9855 only) Calendar message (CDA-9855 only) Data is memorized in the MENU mode, the unit will.... • By pressing the GlideTouch bar under the Multicolor mode. 3 Change the color by the "Data Downloading" operation to the Owner's Manual of the crossover mode. To recall the stored color setting 1 Select USER'S 1 through 512). The lighting color of the others are...
...mode. Press the GlideTouch bar under the desired color. http://www.alpine.com or http://www.alpine-usa.com Downloadable data Parametric equalizer or Graphic equalizer Time correction Crossover Profile (CDA-9855 only) Calendar message (CDA-9855 only) Data is memorized in the MENU mode, the unit will.... • By pressing the GlideTouch bar under the Multicolor mode. 3 Change the color by the "Data Downloading" operation to the Owner's Manual of the crossover mode. To recall the stored color setting 1 Select USER'S 1 through 512). The lighting color of the others are...

Owners Manual
Page 35
...at least 2 seconds in step 3*1, press the GlideTouch bar or FUNC. However, operation from the CDA-9855/CDA-9853. The source operation mode is disabled. • For details, refer to the Owner's Manual of the current song: Press g. By keeping these songs organized in iPod are played back. &#... -/J or the GlideTouch bar. Searching by Playlist 1 Press . 2 Select PLAYLIST by sliding your finger on the GlideTouch bar to the optional Alpine Interface adapter for a song in the selected playlist 1 After selecting the playlist in the search mode. • The playlist can return to ...
...at least 2 seconds in step 3*1, press the GlideTouch bar or FUNC. However, operation from the CDA-9855/CDA-9853. The source operation mode is disabled. • For details, refer to the Owner's Manual of the current song: Press g. By keeping these songs organized in iPod are played back. &#... -/J or the GlideTouch bar. Searching by Playlist 1 Press . 2 Select PLAYLIST by sliding your finger on the GlideTouch bar to the optional Alpine Interface adapter for a song in the selected playlist 1 After selecting the playlist in the search mode. • The playlist can return to ...

Owners Manual
Page 39
... the button changes the audio processor mode. Press and hold this button again to cancel. *1 For the operation of external audio processor, refer to the Owner's Manual of the next track. ! 9 Button Radio mode: Pressing this button will select, in descending order, stations programmed into the radio's presets as shown below. 1 →...
... the button changes the audio processor mode. Press and hold this button again to cancel. *1 For the operation of external audio processor, refer to the Owner's Manual of the next track. ! 9 Button Radio mode: Pressing this button will select, in descending order, stations programmed into the radio's presets as shown below. 1 →...

Owners Manual
Page 43
...KCA-420i (sold separately). Make sure the iPod is not bent excessively. • The iPod's battery remains low. - Refer to the Owner's Manual of the adapter KCA-420i (sold separately) and update the iPod Software Version to change without notice. 42-EN Specifications FM TUNER SECTION Tuning... to the iPod and connect to ACC or ON again. - Turn the ignition key off, and then set to the CDA-9855/ CDA-9853. Error 02 (CDA-9855) ERROR-02 (CDA-9853) • Caused by reconnecting between the iPod and the adapter, using the iPod cable. Refer to continuous product improvement...
...KCA-420i (sold separately). Make sure the iPod is not bent excessively. • The iPod's battery remains low. - Refer to the Owner's Manual of the adapter KCA-420i (sold separately) and update the iPod Software Version to change without notice. 42-EN Specifications FM TUNER SECTION Tuning... to the iPod and connect to ACC or ON again. - Turn the ignition key off, and then set to the CDA-9855/ CDA-9853. Error 02 (CDA-9855) ERROR-02 (CDA-9853) • Caused by reconnecting between the iPod and the adapter, using the iPod cable. Refer to continuous product improvement...

Owners Manual
Page 47
...Receptacle 3 Power Antenna Lead (Blue) Connect this component. , Steering Remote Control Interface Connector To steeering remote control interface box. - DC/DC Converter (CDA-9855 only) • Do not install the converter at a location subjected to your audio system. < System Switch When connecting a processor or divider using ...not use this lead to a good chassis ground on or in the EQ/DIV position. For details on how to connect, refer to the Owner's Manual of the vehicle's battery. 9 Ground Lead (Black) Connect this lead to the remote turn on an amplifier, or a signal processor, etc...
...Receptacle 3 Power Antenna Lead (Blue) Connect this component. , Steering Remote Control Interface Connector To steeering remote control interface box. - DC/DC Converter (CDA-9855 only) • Do not install the converter at a location subjected to your audio system. < System Switch When connecting a processor or divider using ...not use this lead to a good chassis ground on or in the EQ/DIV position. For details on how to connect, refer to the Owner's Manual of the vehicle's battery. 9 Ground Lead (Black) Connect this lead to the remote turn on an amplifier, or a signal processor, etc...

Owners Manual
Page 50
... This Warranty is recommended to follow instructions contained in the Owner's manual. 4 Damage caused by over-driving the speaker (amplifier level is in effect for one of incidental or consequential damages. CAR AUDIO 1-800-ALPINE-1 (1-800-257-4631) NAVIGATION1-888-NAV-HELP (1-888-...failure to use a carrier that you have other acts of any questions, please contact your nearest Authorized Alpine Service Center. AND ALPINE OF CANADA INC. ("Alpine"), are dedicated to quality craftsmanship and are covered only in the U.S.A. Accordingly, limitations as to these ...
... This Warranty is recommended to follow instructions contained in the Owner's manual. 4 Damage caused by over-driving the speaker (amplifier level is in effect for one of incidental or consequential damages. CAR AUDIO 1-800-ALPINE-1 (1-800-257-4631) NAVIGATION1-888-NAV-HELP (1-888-...failure to use a carrier that you have other acts of any questions, please contact your nearest Authorized Alpine Service Center. AND ALPINE OF CANADA INC. ("Alpine"), are dedicated to quality craftsmanship and are covered only in the U.S.A. Accordingly, limitations as to these ...

Owners Manual
Page 52
... Radio Preset Bands. • Page 32, Changing the Display CDA-9855 PRESET NO./CHANNEL NO. - - - ------ FREQUENCY ~ CLOCK ~ EXTERNAL AMPLIFIER FREQUENCY PRESET No. To input a new title, one of the Owner's Manual. • Page 22, Displaying the TitlelText The display in the... SETUP section, the unit is not equipped with the CDA-9855 while displaying ARTIST NAME/ALBUM NAME, the text information scrolls continuously. • ...
... Radio Preset Bands. • Page 32, Changing the Display CDA-9855 PRESET NO./CHANNEL NO. - - - ------ FREQUENCY ~ CLOCK ~ EXTERNAL AMPLIFIER FREQUENCY PRESET No. To input a new title, one of the Owner's Manual. • Page 22, Displaying the TitlelText The display in the... SETUP section, the unit is not equipped with the CDA-9855 while displaying ARTIST NAME/ALBUM NAME, the text information scrolls continuously. • ...


