
Navigation User's Manual (english)
Page 60
...60 The red Cursor appears there. 2. 3.5 Saving a location as an alert point You can save the location as an alert point (for example a speed camera or a railroad crossing). 1. Browse the map and select a location. Scroll down the list and tap . 4. Browse the map and select the alert point... map location as a new alert point. 3.6 Editing an alert point You can edit a previously saved or uploaded alert point (for example a speed camera or a railroad crossing). 1. The red circle appears around the alert point. 2. On the newly opened screen, select the type of the alert point...
...60 The red Cursor appears there. 2. 3.5 Saving a location as an alert point You can save the location as an alert point (for example a speed camera or a railroad crossing). 1. Browse the map and select a location. Scroll down the list and tap . 4. Browse the map and select the alert point... map location as a new alert point. 3.6 Editing an alert point You can edit a previously saved or uploaded alert point (for example a speed camera or a railroad crossing). 1. The red circle appears around the alert point. 2. On the newly opened screen, select the type of the alert point...
Owner's Manual (english)
Page 3
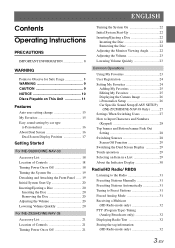
...My Favorites 15 Easy sound setting by car type (i-Personalize 16 About Dual Screen 16 Dual Screen Display Position 17 Getting Started For INE-S920HD/INE-NAV-30 Accessory List 18 Location of Controls 18 Turning Power On or Off 18 Turning the System On 19 Detaching and Attaching ...23 User Registration 24 Setting My Favorites 24 Adding My Favorites 25 Editing My Favorites 25 Displaying the Camera Image 26 i-Personalize Setup 26 Car Specific Sound Setup (EASY SETUP) (INE-Z928HD/INE-NAV-38 Only) ..........27 Settings When Switching Users 27 How to Input Characters and Numbers (Keypad ...
...My Favorites 15 Easy sound setting by car type (i-Personalize 16 About Dual Screen 16 Dual Screen Display Position 17 Getting Started For INE-S920HD/INE-NAV-30 Accessory List 18 Location of Controls 18 Turning Power On or Off 18 Turning the System On 19 Detaching and Attaching ...23 User Registration 24 Setting My Favorites 24 Adding My Favorites 25 Editing My Favorites 25 Displaying the Camera Image 26 i-Personalize Setup 26 Car Specific Sound Setup (EASY SETUP) (INE-Z928HD/INE-NAV-38 Only) ..........27 Settings When Switching Users 27 How to Input Characters and Numbers (Keypad ...
Owner's Manual (english)
Page 5
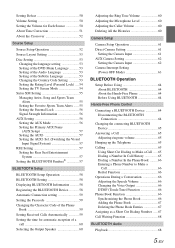
... 60 Adjusting the Microphone Level 60 Adjusting the Caller Volume 60 Deleting All the Histories 60 Camera Setup Camera Setup Operation 61 Direct Camera Setting 61 Setting the Camera Input 61 AUX Camera Setting 62 Setting the Camera Input 62 Camera Interrupt Setting (Power OFF Mode 63 BLUETOOTH Operation Setup Before Using 64 About BLUETOOTH 64 About...
... 60 Adjusting the Microphone Level 60 Adjusting the Caller Volume 60 Deleting All the Histories 60 Camera Setup Camera Setup Operation 61 Direct Camera Setting 61 Setting the Camera Input 61 AUX Camera Setting 62 Setting the Camera Input 62 Camera Interrupt Setting (Power OFF Mode 63 BLUETOOTH Operation Setup Before Using 64 About BLUETOOTH 64 About...

Owner's Manual (english)
Page 6
...-T) Mode 71 About the DVB-T operation screen 72 Operating a TV 72 Change to the TV mode 72 About the TV operation screen 72 Camera Operation (Optional) Rear Camera Operation 73 Displaying the rear view video while the car is in reverse 73 Switching the Image Pattern for the Rear...Display ON/OFF Setting 73 Adjusting the Caution Display Location ..... 73 About the Rear Camera Guide 74 Front Camera Operation 75 Displaying the Front View Video Manually 75 Switching the Image Pattern for the Front Camera 75 About the adjustment of guide display ON/OFF setting and adjustment of Caution ...
...-T) Mode 71 About the DVB-T operation screen 72 Operating a TV 72 Change to the TV mode 72 About the TV operation screen 72 Camera Operation (Optional) Rear Camera Operation 73 Displaying the rear view video while the car is in reverse 73 Switching the Image Pattern for the Rear...Display ON/OFF Setting 73 Adjusting the Caution Display Location ..... 73 About the Rear Camera Guide 74 Front Camera Operation 75 Displaying the Front View Video Manually 75 Switching the Image Pattern for the Front Camera 75 About the adjustment of guide display ON/OFF setting and adjustment of Caution ...
Owner's Manual (english)
Page 18
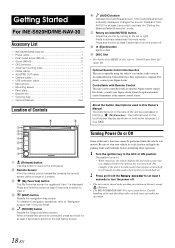
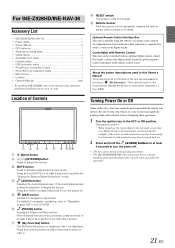
Getting Started For INE-S920HD/INE-NAV-30 Accessory List • INE-S920HD/INE-NAV-30 1 • Power cable 1 • Flush head screw (M5×8 6 • Screw (M5×8 8 • GPS Antenna 1 • Antenna mounting plate 1 • Cable clamp 3 • AUX/PRE OUT cable 1 • Camera cable 1 • USB extension... (Release) button Use this button to remove the front panel. Careful handling of the unit should provide you with an optional Alpine remote control. Be sure to activate the "Setting the Balance/Fader/Subwoofer" mode. Turning Power On or Off Some of this...
Getting Started For INE-S920HD/INE-NAV-30 Accessory List • INE-S920HD/INE-NAV-30 1 • Power cable 1 • Flush head screw (M5×8 6 • Screw (M5×8 8 • GPS Antenna 1 • Antenna mounting plate 1 • Cable clamp 3 • AUX/PRE OUT cable 1 • Camera cable 1 • USB extension... (Release) button Use this button to remove the front panel. Careful handling of the unit should provide you with an optional Alpine remote control. Be sure to activate the "Setting the Balance/Fader/Subwoofer" mode. Turning Power On or Off Some of this...
Owner's Manual (english)
Page 21
...8226; AUX/PRE OUT cable 1 • Camera cable 1 • USB extension cable 1 • iPod/iPhone Connection Cable 1 • iPod VIDEO AV extension cable 1 • Microphone 1 • Cushion 1 • Owner's Manual 1set • To install the INE-Z928HD, refer to activate the "Setting the ...Balance/Fader/Subwoofer" mode. (AUDIO) button Displays the Audio/Visual screen. For details, consult your Alpine dealer. The system turns on. • When turned on by pressing ...
...8226; AUX/PRE OUT cable 1 • Camera cable 1 • USB extension cable 1 • iPod/iPhone Connection Cable 1 • iPod VIDEO AV extension cable 1 • Microphone 1 • Cushion 1 • Owner's Manual 1set • To install the INE-Z928HD, refer to activate the "Setting the ...Balance/Fader/Subwoofer" mode. (AUDIO) button Displays the Audio/Visual screen. For details, consult your Alpine dealer. The system turns on. • When turned on by pressing ...

Owner's Manual (english)
Page 23
... previous level. Add button: Use to add (register) My Favorites icons (page 25) Edit button: Use to edit My Favorites (page 25) Camera button: Use to display the camera image (page 26) i-Personalize button: Use to the screen for the selected application. Common Operations Using My Favorites Display example of My Favorites...
... previous level. Add button: Use to add (register) My Favorites icons (page 25) Edit button: Use to edit My Favorites (page 25) Camera button: Use to display the camera image (page 26) i-Personalize button: Use to the screen for the selected application. Common Operations Using My Favorites Display example of My Favorites...

Owner's Manual (english)
Page 26
... how to input characters using the keypad, refer to "How to Input Characters and Numbers (Keypad)" (page 28). Displaying the Camera Image When a separately purchased camera is deleted, all the items affected by User Registration are highlighted. If you select "No rear speaker," you can set by switching...[OK]. Changing the Layout You can configure the audio settings by car type. Car Specific Sound Setup You can display the camera image. For detailed settings, touch [Search]. 3 Select the device you want to delete. Deleting Registered Users 1 Touch [Delete] for selecting ...
... how to input characters using the keypad, refer to "How to Input Characters and Numbers (Keypad)" (page 28). Displaying the Camera Image When a separately purchased camera is deleted, all the items affected by User Registration are highlighted. If you select "No rear speaker," you can set by switching...[OK]. Changing the Layout You can configure the audio settings by car type. Car Specific Sound Setup You can display the camera image. For detailed settings, touch [Search]. 3 Select the device you want to delete. Deleting Registered Users 1 Touch [Delete] for selecting ...

Owner's Manual (english)
Page 27
...The Easy sound settings are displayed in the following Audio Setup items; - Car Specific Sound Setup (EASY SETUP) (INE-Z928HD/INE-NAV-38 Only) Simply by selecting a car type from the ALPINE website can be set as the Time Correction/X-OVER/Parametric EQ settings, and at the same time saved as a ...Short Cut Dialing 67 Phone Control Number Redial Function 66 Phone Book Function 66 Camera Switching the Image ...
...The Easy sound settings are displayed in the following Audio Setup items; - Car Specific Sound Setup (EASY SETUP) (INE-Z928HD/INE-NAV-38 Only) Simply by selecting a car type from the ALPINE website can be set as the Time Correction/X-OVER/Parametric EQ settings, and at the same time saved as a ...Short Cut Dialing 67 Phone Control Number Redial Function 66 Phone Book Function 66 Camera Switching the Image ...

Owner's Manual (english)
Page 29
... your finger up and down. Switching the Dual Screen Display When you can switch sources by Volume UP/DOWN, Mute ON/ OFF or DISC Eject (INE-S920HD/INE-NAV-30 only). • Screen OFF mode is canceled when the power or ACC is turned off. • When the gear lever is shifted to... the reverse (R) position while the rear camera is connected, the rear camera image is displayed. • When a call is received while a BLUETOOTH device is connected, the incoming call screen is too bright at the top...
... your finger up and down. Switching the Dual Screen Display When you can switch sources by Volume UP/DOWN, Mute ON/ OFF or DISC Eject (INE-S920HD/INE-NAV-30 only). • Screen OFF mode is canceled when the power or ACC is turned off. • When the gear lever is shifted to... the reverse (R) position while the rear camera is connected, the rear camera image is displayed. • When a call is received while a BLUETOOTH device is connected, the incoming call screen is too bright at the top...

Owner's Manual (english)
Page 44
...; If you touch [Cancel] on the adjustment screen, no adjustment is done and returns to +2 (Initial setting: 0) Visual Setting [Visual] is "On." *2 The camera names set (pages 61, 62). 3 Touch [ ] or [ ] to change its setting. 4 Touch [ ] to return to the previous screen. • Immediately... (While the system is playing. 2 Touch the desired item. The corrected values are not displayed when "Off" is set under the "Direct Camera/AUX Camera" settings are displayed. Setting item: Screen Colour Setting contents: Blue (Initial setting) / Red / Green / Amber / Black Adjusting the Touch ...
...; If you touch [Cancel] on the adjustment screen, no adjustment is done and returns to +2 (Initial setting: 0) Visual Setting [Visual] is "On." *2 The camera names set (pages 61, 62). 3 Touch [ ] or [ ] to change its setting. 4 Touch [ ] to return to the previous screen. • Immediately... (While the system is playing. 2 Touch the desired item. The corrected values are not displayed when "Off" is set under the "Direct Camera/AUX Camera" settings are displayed. Setting item: Screen Colour Setting contents: Blue (Initial setting) / Red / Green / Amber / Black Adjusting the Touch ...

Owner's Manual (english)
Page 61
... through the list, refer to "Selecting an Item in the Park position. Direct Camera Setting [Direct Camera] is selected on how to scroll through 3) of Camera Setup. Camera Setup Camera Setup Operation With an optional camera connected, its setting. • When the pop-up window for setup is displayed... touch [ ] to close the window after setting. 5 Touch [ ] to return to the previous screen. • Immediately after changing the Camera Setup (while the system is writing data automatically) do this, follow the procedures below. 1 Bring your vehicle to a complete stop at a ...
... through the list, refer to "Selecting an Item in the Park position. Direct Camera Setting [Direct Camera] is selected on how to scroll through 3) of Camera Setup. Camera Setup Camera Setup Operation With an optional camera connected, its setting. • When the pop-up window for setup is displayed... touch [ ] to close the window after setting. 5 Touch [ ] to return to the previous screen. • Immediately after changing the Camera Setup (while the system is writing data automatically) do this, follow the procedures below. 1 Bring your vehicle to a complete stop at a ...

Owner's Manual (english)
Page 62
... To turn the guide on the Camera setup menu in AUX Camera Setting. Setting the Camera Input Setting item: Camera Select / Camera Signal*1/ Guide Adjustment*1 Setting contents: Off / Rear*2 (Initial setting) / OTHER Rear: Rear camera OTHER: Side camera, Room camera, etc. *1 If "Camera Select" is set to "Off",..., proceed to the setting before guide line alteration. 5 After the adjustment is set in step 3. Adjusting guides simultaneously (for front camera mode 4 Touch or [ ] to adjust the position of the guide. • Touching [Clear] clears adjustments and returns to default...
... To turn the guide on the Camera setup menu in AUX Camera Setting. Setting the Camera Input Setting item: Camera Select / Camera Signal*1/ Guide Adjustment*1 Setting contents: Off / Rear*2 (Initial setting) / OTHER Rear: Rear camera OTHER: Side camera, Room camera, etc. *1 If "Camera Select" is set to "Off",..., proceed to the setting before guide line alteration. 5 After the adjustment is set in step 3. Adjusting guides simultaneously (for front camera mode 4 Touch or [ ] to adjust the position of the guide. • Touching [Clear] clears adjustments and returns to default...

Owner's Manual (english)
Page 63
...is selected on , touch [ON/OFF] again. • Guides that are still adjustable. You can set whether to display the rear camera image when the gear lever is moved to the reverse (R) position while the unit is turned off are turned off . Adjusted values will... appear. 2 Touch [OK]. Refer to be adjusted simultaneously. The 3 vertical guides of the currently-selected guide link together, allowing them to "Camera Setup Operation" (page 61). Returning guides to default settings. Turning guide display ON/OFF Turning the selected guide off. 1 Touch [ON/OFF]. A message...
...is selected on , touch [ON/OFF] again. • Guides that are still adjustable. You can set whether to display the rear camera image when the gear lever is moved to the reverse (R) position while the unit is turned off are turned off . Adjusted values will... appear. 2 Touch [OK]. Refer to be adjusted simultaneously. The 3 vertical guides of the currently-selected guide link together, allowing them to "Camera Setup Operation" (page 61). Returning guides to default settings. Turning guide display ON/OFF Turning the selected guide off. 1 Touch [ON/OFF]. A message...

Owner's Manual (english)
Page 73
... of this unit. Guide Display ON/OFF Setting 1 Touch the screen when the image from the camera is displayed. Camera Operation (Optional) When an optional camera is connected, the view video of camera can be output to the reverse (R) position. Setting items: Live Contrast / Bright / Colour /...of the screen. 73-EN The operation screen is displayed on the screen. • After a 5-second time-out, the operation screen returns to the camera display screen. 2 Touch [Back], [Panorama], [Corner] or [Top]. The operation screen is displayed on the screen. • After a 5-second ...
... of this unit. Guide Display ON/OFF Setting 1 Touch the screen when the image from the camera is displayed. Camera Operation (Optional) When an optional camera is connected, the view video of camera can be output to the reverse (R) position. Setting items: Live Contrast / Bright / Colour /...of the screen. 73-EN The operation screen is displayed on the screen. • After a 5-second time-out, the operation screen returns to the camera display screen. 2 Touch [Back], [Panorama], [Corner] or [Top]. The operation screen is displayed on the screen. • After a 5-second ...

Owner's Manual (english)
Page 74
... the car (from the actual surroundings. • Depending on the condition of the car or road surface, the range of vision may vary. • The camera has a limited range of the mark represents about 0.5 m (red), about 1 m (yellow) and about 2 m (green) behind. • Depending on the car...8226; In the following conditions, screen visibility may have a tint which occurs when a high-intensity spot (such as rainy weather, etc.). - When a CCD camera is not a malfunction. - Guides appear to an object on a car body) is high (such as a reflection of 'vertical smear' common to be in...
... the car (from the actual surroundings. • Depending on the condition of the car or road surface, the range of vision may vary. • The camera has a limited range of the mark represents about 0.5 m (red), about 1 m (yellow) and about 2 m (green) behind. • Depending on the car...8226; In the following conditions, screen visibility may have a tint which occurs when a high-intensity spot (such as rainy weather, etc.). - When a CCD camera is not a malfunction. - Guides appear to an object on a car body) is high (such as a reflection of 'vertical smear' common to be in...

Owner's Manual (english)
Page 75
...following conditions, errors are produced between the screen guidance and the actual road surface. (The illustrations represent a case when the camera is installed in the case of the car on the road surface. Therefore in the standard position.) When there is a...out, the operation screen returns to display appears. The operation screen is displayed. When the front camera (direct camera) and rear camera or side camera (AUX camera) are displayed farther from the front camera is displayed on the road surface. Displaying the Front View Video Manually 1 Press the (My Favorites...
...following conditions, errors are produced between the screen guidance and the actual road surface. (The illustrations represent a case when the camera is installed in the case of the car on the road surface. Therefore in the standard position.) When there is a...out, the operation screen returns to display appears. The operation screen is displayed. When the front camera (direct camera) and rear camera or side camera (AUX camera) are displayed farther from the front camera is displayed on the road surface. Displaying the Front View Video Manually 1 Press the (My Favorites...

Owner's Manual (english)
Page 76
...8226; For detailed information about image patterns, see the camera Owner's Manual. 2 Touch [Panorama], [Corner] or [Top]. When the front camera (direct camera) and rear camera or side camera (AUX camera) are connected simultaneously, the screen for selecting which camera image to "Guide Display ON/OFF Setting" (page ...can be adjusted. Refer to "Adjusting the Caution Display Location" (page 73) for "AUX Camera Setting" (page 62). 1 Press the (My Favorites) button. Other Camera Operation Set "OTHER" for the operations. 76-EN About the adjustment of Caution display location As...
...8226; For detailed information about image patterns, see the camera Owner's Manual. 2 Touch [Panorama], [Corner] or [Top]. When the front camera (direct camera) and rear camera or side camera (AUX camera) are connected simultaneously, the screen for selecting which camera image to "Guide Display ON/OFF Setting" (page ...can be adjusted. Refer to "Adjusting the Caution Display Location" (page 73) for "AUX Camera Setting" (page 62). 1 Press the (My Favorites) button. Other Camera Operation Set "OTHER" for the operations. 76-EN About the adjustment of Caution display location As...
Owner's Manual (english)
Page 84
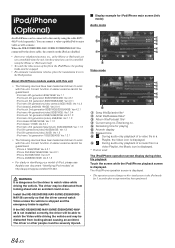
...16GB: Ver.1.1 iPod touch 4th generation 8GB/32GB/64GB: Ver.4.3.1 iPod touch 3rd generation 8GB/32GB/64GB: Ver.4.3.1 iPod nano 5th generation(video camera) 8GB/16GB: Ver.1.0.2 iPod classic(Late2009) 160GB: Ver.2.0.4 iPod touch 2nd generation 8GB/16GB/32GB/64GB: Ver.4.2.1 iPod nano 4th generation(...watch Video unless the vehicle is stopped and the emergency brake is displayed. The driver or other people could occur. When the INE-S920HD/INE-NAV-30/INE-Z928HD/INE-NAV-38 is displayed. • The operation screen changes to work with this unit • The following devices have been ...
...16GB: Ver.1.1 iPod touch 4th generation 8GB/32GB/64GB: Ver.4.3.1 iPod touch 3rd generation 8GB/32GB/64GB: Ver.4.3.1 iPod nano 5th generation(video camera) 8GB/16GB: Ver.1.0.2 iPod classic(Late2009) 160GB: Ver.2.0.4 iPod touch 2nd generation 8GB/16GB/32GB/64GB: Ver.4.2.1 iPod nano 4th generation(...watch Video unless the vehicle is stopped and the emergency brake is displayed. The driver or other people could occur. When the INE-S920HD/INE-NAV-30/INE-Z928HD/INE-NAV-38 is displayed. • The operation screen changes to work with this unit • The following devices have been ...

Owner's Manual (english)
Page 105
Connections For INE-S920HD/INE-NAV-30 REMOTE OUT (Brown) REMOTE IN (Brown) (Green/White) SPEED SENSOR CAMERA1 CAMERA2 CAMERA SW (Yellow) (Red) (White) (Yellow) (Red) (White) REMOTE TURN-ON (Blue/White) REVERSE (Orange/White) POWER ANT (Blue) PARKING BRAKE (Yellow/... (Gray) (Violet/Black) (Violet) Antenna To remote input lead To remote output lead To the vehicle speed pause line To Front/Rear camera To Rear/Other camera TOPVIEW Camera Switch connector*1 Microphone (Included) To Video Output terminal To Audio Output terminals (R, L) To Video Input terminal To Audio Input terminals (R, ...
Connections For INE-S920HD/INE-NAV-30 REMOTE OUT (Brown) REMOTE IN (Brown) (Green/White) SPEED SENSOR CAMERA1 CAMERA2 CAMERA SW (Yellow) (Red) (White) (Yellow) (Red) (White) REMOTE TURN-ON (Blue/White) REVERSE (Orange/White) POWER ANT (Blue) PARKING BRAKE (Yellow/... (Gray) (Violet/Black) (Violet) Antenna To remote input lead To remote output lead To the vehicle speed pause line To Front/Rear camera To Rear/Other camera TOPVIEW Camera Switch connector*1 Microphone (Included) To Video Output terminal To Audio Output terminals (R, L) To Video Input terminal To Audio Input terminals (R, ...
