
Use and Care
Page 1
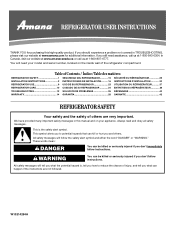
...amana.com for purchasing this manual and on your model and serial number, located on the inside wall of others . Always read and obey all safety messages. This symbol alerts you to reduce the chance of injury, and tell you should experience a problem not covered.../ Table des matières REFRIGERATOR SAFETY 1 INSTALLATION INSTRUCTIONS 2 REFRIGERATOR USE 9 REFRIGERATOR CARE 10 TROUBLESHOOTING 12 WARRANTY 14 SEGURIDAD DEL REFRIGERADOR 15 INSTRUCCIONES DE INSTALACIÓN........... 16 USO DE SU REFRIGERADOR 23 CUIDADO DE SU REFRIGERADOR 24 SOLUCIÓN DE PROBLEMAS...
...amana.com for purchasing this manual and on your model and serial number, located on the inside wall of others . Always read and obey all safety messages. This symbol alerts you to reduce the chance of injury, and tell you should experience a problem not covered.../ Table des matières REFRIGERATOR SAFETY 1 INSTALLATION INSTRUCTIONS 2 REFRIGERATOR USE 9 REFRIGERATOR CARE 10 TROUBLESHOOTING 12 WARRANTY 14 SEGURIDAD DEL REFRIGERADOR 15 INSTRUCCIONES DE INSTALACIÓN........... 16 USO DE SU REFRIGERADOR 23 CUIDADO DE SU REFRIGERADOR 24 SOLUCIÓN DE PROBLEMAS...
Use and Care
Page 2
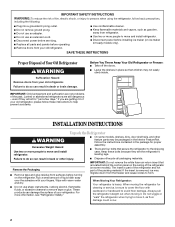
.... Always pull the refrigerator straight out when moving the refrigerator for cleaning or service, be packaged in place so that is removed, ice may migrate down from refrigerator. ■ Use two or more people to move and install refrigerator. ■ Disconnect power before installing ice maker (on some models, shelves, bins, door shelf rails, and other injury. ■ Dispose of/recycle all parts and panels before servicing. ■ Replace all packaging materials. The...
.... Always pull the refrigerator straight out when moving the refrigerator for cleaning or service, be packaged in place so that is removed, ice may migrate down from refrigerator. ■ Use two or more people to move and install refrigerator. ■ Disconnect power before installing ice maker (on some models, shelves, bins, door shelf rails, and other injury. ■ Dispose of/recycle all parts and panels before servicing. ■ Replace all packaging materials. The...
Use and Care
Page 3
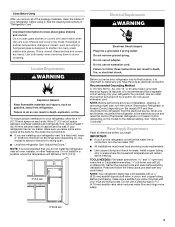
... inside of cabinet and the wall. Gather the required tools and parts before you have the proper electrical connection. When you turn the ice maker OFF. ■ All installations must meet local plumbing code requirements. ■ Use copper tubing and check for the water line connections. ■ If you are cold. Shelves and covers may break if exposed to avoid dropping. Use both hands when removing them to sudden temperature changes...
... inside of cabinet and the wall. Gather the required tools and parts before you have the proper electrical connection. When you turn the ice maker OFF. ■ All installations must meet local plumbing code requirements. ■ Use copper tubing and check for the water line connections. ■ If you are cold. Shelves and covers may break if exposed to avoid dropping. Use both hands when removing them to sudden temperature changes...
Use and Care
Page 4
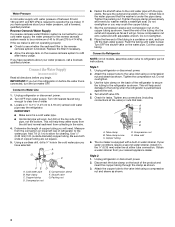
... damage to operate the ice maker. Unplug refrigerator or disconnect power. 2. IMPORTANT: ■ Make sure it will help keep water away from the drill and normal sediment from your cold water supply, the water pressure to the reverse osmosis system needs to be a minimum of the tubing in the valve. 4. Measure from the connection on the top side of the pipe, not the bottom. Use ¹⁄...
... damage to operate the ice maker. Unplug refrigerator or disconnect power. 2. IMPORTANT: ■ Make sure it will help keep water away from the drill and normal sediment from your cold water supply, the water pressure to the reverse osmosis system needs to be a minimum of the tubing in the valve. 4. Measure from the connection on the top side of the pipe, not the bottom. Use ¹⁄...

Use and Care
Page 5
... tube clamp and tube to completely fill ice container. Tube clamp C. Compression nut B. Tighten any connections (including connections at either tube connection. Complete the Installation WARNING Electrical Shock Hazard Plug into a grounded 3 prong outlet. Refrigerator Doors TOOLS NEEDED hex-head socket wrench, #2 Phillips screwdriver, flat-blade screwdriver open in the opposite direction, follow these instructions can result in the ¹⁄₄" (6.35 mm) water line at the valve...
... tube clamp and tube to completely fill ice container. Tube clamp C. Compression nut B. Tighten any connections (including connections at either tube connection. Complete the Installation WARNING Electrical Shock Hazard Plug into a grounded 3 prong outlet. Refrigerator Doors TOOLS NEEDED hex-head socket wrench, #2 Phillips screwdriver, flat-blade screwdriver open in the opposite direction, follow these instructions can result in the ¹⁄₄" (6.35 mm) water line at the valve...
Use and Care
Page 6
...Remove door hinge hole plug from top of the refrigerator door. Remove door stop . Drive top two screws in death, fire, or electrical shock. 2. Replace screw cover. Door Hinge Hole Plug Cabinet Hinge Hole Plug Cabinet 1. Doors 1. See Center Hinge graphic. Do not remove ground prong. See "Using the Control(s)." 4. Remove door hinge hole plug. Position refrigerator handle on refrigerator. Style 2 - Contoured Graphics follow these instructions. Remove cabinet hinge hole plugs from handle side and move them to make sure that the bottom of the freezer...
...Remove door hinge hole plug from top of the refrigerator door. Remove door stop . Drive top two screws in death, fire, or electrical shock. 2. Replace screw cover. Door Hinge Hole Plug Cabinet Hinge Hole Plug Cabinet 1. Doors 1. See Center Hinge graphic. Do not remove ground prong. See "Using the Control(s)." 4. Remove door hinge hole plug. Position refrigerator handle on refrigerator. Style 2 - Contoured Graphics follow these instructions. Remove cabinet hinge hole plugs from handle side and move them to make sure that the bottom of the freezer...
Use and Care
Page 7
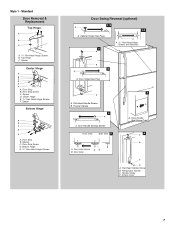
...-Head Handle Screws B. Door Stop Screw A B B. Top Hinge C. Center Hinge E. 5/16" Hex-Head Hinge Screws F. Door Stop Screw D. Door Handle Seal Screw Front 6 A B C D A. Door Stop B. Style 1 - Door Stop B. Door Hinge Hole Plug 7 A A. Freezer Handle 4 A A. Handle Screw D. Spacer Center Hinge A B C D E F A. Flat-Head Handle Screw B. Door Stop Screw C. Spacer D. Cabinet Hinge Hole Plugs 2 A A A. 5/16" Hex-Head Hinge Screws and Washers B 3 A A. Door Handle Sealing Screws Front View Side View 5 A. Screw Cover 7 Spacer C. Door Stop A. Refrigerator Handle...
...-Head Handle Screws B. Door Stop Screw A B B. Top Hinge C. Center Hinge E. 5/16" Hex-Head Hinge Screws F. Door Stop Screw D. Door Handle Seal Screw Front 6 A B C D A. Door Stop B. Style 1 - Door Stop B. Door Hinge Hole Plug 7 A A. Freezer Handle 4 A A. Handle Screw D. Spacer Center Hinge A B C D E F A. Flat-Head Handle Screw B. Door Stop Screw C. Spacer D. Cabinet Hinge Hole Plugs 2 A A A. 5/16" Hex-Head Hinge Screws and Washers B 3 A A. Door Handle Sealing Screws Front View Side View 5 A. Screw Cover 7 Spacer C. Door Stop A. Refrigerator Handle...

Use and Care
Page 8
...D A. Door Stop Screw C. Spacer Bottom Hinge A B C D E A. Bottom Hinge E. 5/16" Hex-Head Hinge Screws Door Swing Reversal (optional) 1-1 A A. 5/16" Hex-Head Hinge Screws and Washers 1-2 A A. Door Stop Screw 8 Style 2 - Door Stop B. Door Stop Screw 4 Reinstallation of Door Stops A B A. Spacer Center Hinge A B C D E F A. Center Hinge E. 5/16" Hex-Head Hinge Screws F. Spacer C. Door Hinge Hole Plug 3 Removal of Door Stops AB A. Door Stop B. Spacer D. Door Stop B. Top Hinge D. Top Hinge Cover B. 5/16" Hex-Head Hinge Screws C. Door Stop B. Door Stop Screw...
...D A. Door Stop Screw C. Spacer Bottom Hinge A B C D E A. Bottom Hinge E. 5/16" Hex-Head Hinge Screws Door Swing Reversal (optional) 1-1 A A. 5/16" Hex-Head Hinge Screws and Washers 1-2 A A. Door Stop Screw 8 Style 2 - Door Stop B. Door Stop Screw 4 Reinstallation of Door Stops A B A. Spacer Center Hinge A B C D E F A. Center Hinge E. 5/16" Hex-Head Hinge Screws F. Spacer C. Door Hinge Hole Plug 3 Removal of Door Stops AB A. Door Stop B. Spacer D. Door Stop B. Top Hinge D. Top Hinge Cover B. 5/16" Hex-Head Hinge Screws C. Door Stop B. Door Stop Screw...

Use and Care
Page 9
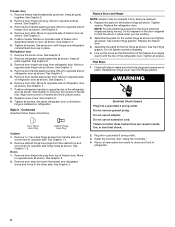
.... Door opened often, large amount of the refrigerator compartment. Heavy ice usage Adjust FREEZER or TEMPERATURE Control one setting lower 9 REFRIGERATOR USE Using the Control The temperature control is preset at the top of food added or room temperature very warm Adjust REFRIGERATOR or TEMPERATURE Control one setting lower FREEZER section too cold - NOTE: To turn your refrigerator may spoil. Adjusting the Refrigerator and Freezer Controls to a higher (colder) than recommended setting will not cool when the refrigerator control is still level side to adjust the...
.... Door opened often, large amount of the refrigerator compartment. Heavy ice usage Adjust FREEZER or TEMPERATURE Control one setting lower 9 REFRIGERATOR USE Using the Control The temperature control is preset at the top of food added or room temperature very warm Adjust REFRIGERATOR or TEMPERATURE Control one setting lower FREEZER section too cold - NOTE: To turn your refrigerator may spoil. Adjusting the Refrigerator and Freezer Controls to a higher (colder) than recommended setting will not cool when the refrigerator control is still level side to adjust the...
Use and Care
Page 10
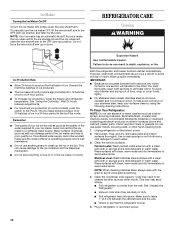
... result in the ice maker or ice bin. Unplug refrigerator or disconnect power. 2. Painted metal: Wash painted metal exteriors with clean, warm water and dry immediately to ICE PLUS. Rinse surfaces with a clean, soft cloth or sponge and a mild detergent in refrigerator or reconnect power. 10 Plug in warm water. However, clean both sections to a softened water supply. To manually turn the ice maker ON, simply lower the wire shutoff arm. Use a clean sponge or soft...
... result in the ice maker or ice bin. Unplug refrigerator or disconnect power. 2. Painted metal: Wash painted metal exteriors with clean, warm water and dry immediately to ICE PLUS. Rinse surfaces with a clean, soft cloth or sponge and a mild detergent in refrigerator or reconnect power. 10 Plug in warm water. However, clean both sections to a softened water supply. To manually turn the ice maker ON, simply lower the wire shutoff arm. Use a clean sponge or soft...
Use and Care
Page 11
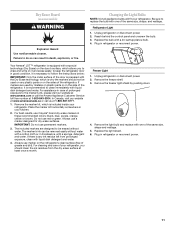
... in your refrigerator. For cleaning and care of your refrigerator. Remove the light bulb and replace with a 40-watt appliance bulb. 4. Dry Erase Board (on the refrigerator's clean surface (free of grease and dirt). The included markers are used on any ink residue left from the dry erase surface at least once a month. to keep the refrigerator door in good condition, it and erase easily; Changing the Light Bulbs NOTE...
... in your refrigerator. For cleaning and care of your refrigerator. Remove the light bulb and replace with a 40-watt appliance bulb. 4. Dry Erase Board (on the refrigerator's clean surface (free of grease and dirt). The included markers are used on any ink residue left from the dry erase surface at least once a month. to keep the refrigerator door in good condition, it and erase easily; Changing the Light Bulbs NOTE...
Use and Care
Page 12
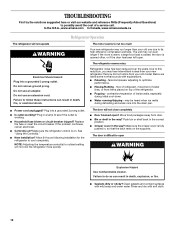
... coldest setting will not operate WARNING The motor seems to open WARNING Explosion Hazard Use nonflammable cleaner. flow of refrigerant, movement of water lines, or from items placed on the supports. The door will not close completely ■ Door blocked open . Make sure the crisper cover is difficult to run too much Your new refrigerator may be heard when ice melts during initial cool-down. ■ Water running/dripping - Plug in the way? fans/compressor adjusting to cool...
... coldest setting will not operate WARNING The motor seems to open WARNING Explosion Hazard Use nonflammable cleaner. flow of refrigerant, movement of water lines, or from items placed on the supports. The door will not close completely ■ Door blocked open . Make sure the crisper cover is difficult to run too much Your new refrigerator may be heard when ice melts during initial cool-down. ■ Water running/dripping - Plug in the way? fans/compressor adjusting to cool...
Use and Care
Page 13
.... ■ Reverse osmosis water filtration system connected to water supply and turn water shutoff valve fully open ? Off-taste, odor or gray color in 24 hours. Wash ice bin. See "Using the Control(s)." New plumbing connections can cause discolored or off-flavored ice. ■ Ice stored too long? Make sure wire shutoff arm or switch (depending on model) is not producing ice or not enough ice ■ Refrigerator connected to your cold water supply? Minimize door openings and keep door fully...
.... ■ Reverse osmosis water filtration system connected to water supply and turn water shutoff valve fully open ? Off-taste, odor or gray color in 24 hours. Wash ice bin. See "Using the Control(s)." New plumbing connections can cause discolored or off-flavored ice. ■ Ice stored too long? Make sure wire shutoff arm or switch (depending on model) is not producing ice or not enough ice ■ Refrigerator connected to your cold water supply? Minimize door openings and keep door fully...
Use and Care
Page 14
... Amana's published installation instructions. 11. Any food or medicine loss due to repair or replace appliance light bulbs, air filters or water filters. Some states and provinces do not allow limitations on how to use your model number and serial number on the label, located on major appliances with original model/serial numbers that have other than dry-erase markers in the recommended colors listed in accordance with electrical or plumbing codes, or use...
... Amana's published installation instructions. 11. Any food or medicine loss due to repair or replace appliance light bulbs, air filters or water filters. Some states and provinces do not allow limitations on how to use your model number and serial number on the label, located on major appliances with original model/serial numbers that have other than dry-erase markers in the recommended colors listed in accordance with electrical or plumbing codes, or use...

Warranty
Page 1
... listed in accordance with original model/serial numbers that are excluded from unauthorized modifications made to the appliance. 9. For assistance or service in materials or workmanship and is reported to Amana within 30 days from the date of purchase. 6. This limited warranty does not cover: ITEMS EXCLUDED FROM WARRANTY 1. Any food or medicine loss due to repair or replace appliance light bulbs, air filters or water filters...
... listed in accordance with original model/serial numbers that are excluded from unauthorized modifications made to the appliance. 9. For assistance or service in materials or workmanship and is reported to Amana within 30 days from the date of purchase. 6. This limited warranty does not cover: ITEMS EXCLUDED FROM WARRANTY 1. Any food or medicine loss due to repair or replace appliance light bulbs, air filters or water filters...
Energy Guide
Page 1
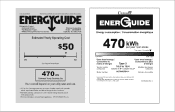
... la loi (S.C. 1992, C.36). W10594984 Rev. A EFIERG GUIDE Refrigerator-Freezer • Automatic Defrost • Top-Mounted Freezer • Without Through-The-Door-Ice Service Whirlpool Corporation Model: A8TXNGFB*0* Capacity: 17.6 Cubic Feet Estimated Yearly Operating Cost $50 I I I $42 $52 Cost Range of Similar Models 470kwh Estimated Yearly Electricity Use Your cost will depend on your utility rates and use. • 16.5 to 18.4 Cost range based only...
... la loi (S.C. 1992, C.36). W10594984 Rev. A EFIERG GUIDE Refrigerator-Freezer • Automatic Defrost • Top-Mounted Freezer • Without Through-The-Door-Ice Service Whirlpool Corporation Model: A8TXNGFB*0* Capacity: 17.6 Cubic Feet Estimated Yearly Operating Cost $50 I I I $42 $52 Cost Range of Similar Models 470kwh Estimated Yearly Electricity Use Your cost will depend on your utility rates and use. • 16.5 to 18.4 Cost range based only...


