
Use and Care
Page 2
... Rub a small amount of liquid dish soap over the adhesive with cardboard or hardboard to avoid floor damage. If the insert is part of the refrigerator and not part of the packing material. Wipe with warm water and dry. ■ Do not use an extension cord. ■ Disconnect power ... before turning on some models, shelves, bins, door shelf rails, and other injury. ■ Dispose of/recycle all parts and panels before operating. ■ Remove doors from your refrigerator. Keep these instructions to help prevent accidents. Failure to do so can damage the surface of your old...
... Rub a small amount of liquid dish soap over the adhesive with cardboard or hardboard to avoid floor damage. If the insert is part of the refrigerator and not part of the packing material. Wipe with warm water and dry. ■ Do not use an extension cord. ■ Disconnect power ... before turning on some models, shelves, bins, door shelf rails, and other injury. ■ Dispose of/recycle all parts and panels before operating. ■ Remove doors from your refrigerator. Keep these instructions to help prevent accidents. Failure to do so can damage the surface of your old...
Use and Care
Page 3
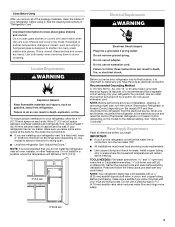
...cm) Electrical Requirements WARNING Electrical Shock Hazard Plug into many small, pebble-size pieces. Read and follow these instructions can result in "Refrigerator Care." Recommended Grounding Method A 115 Volt, 60 Hz., AC only 15- Water Supply Requirements Read all of the package materials,...; If you are finished, reconnect the refrigerator to the electrical source and reset the control (Thermostat, Refrigerator or Freezer Control depending on each side. Do not use an extension cord. Gather the required tools and parts before starting installation. Do not use an...
...cm) Electrical Requirements WARNING Electrical Shock Hazard Plug into many small, pebble-size pieces. Read and follow these instructions can result in "Refrigerator Care." Recommended Grounding Method A 115 Volt, 60 Hz., AC only 15- Water Supply Requirements Read all of the package materials,...; If you are finished, reconnect the refrigerator to the electrical source and reset the control (Thermostat, Refrigerator or Freezer Control depending on each side. Do not use an extension cord. Gather the required tools and parts before starting installation. Do not use an...

Use and Care
Page 5
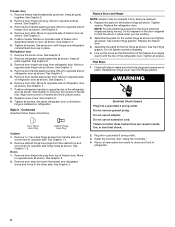
... a water strainer from the cabinet. 5. Do not use an adapter. Unplug refrigerator or disconnect power. 2. NOTE: Provide additional support for the center hinge as shown in Top Hinge graphic. Remove the parts for the doors while the hinges are only removing and replacing the doors, see...(Style 1) or contoured (Style 2) doors. Remove Doors and Hinges Hex-Head Hinge Screw 1. Remove the parts for leaks. If you are working. 3. If you begin, turn the refrigerator control OFF. Remove cabinet hinge hole plugs from the cabinet. If your model, you are ready to opposite ...
... a water strainer from the cabinet. 5. Do not use an adapter. Unplug refrigerator or disconnect power. 2. NOTE: Provide additional support for the center hinge as shown in Top Hinge graphic. Remove the parts for the doors while the hinges are only removing and replacing the doors, see...(Style 1) or contoured (Style 2) doors. Remove Doors and Hinges Hex-Head Hinge Screw 1. Remove the parts for leaks. If you are working. 3. If you begin, turn the refrigerator control OFF. Remove cabinet hinge hole plugs from the cabinet. If your model, you are ready to opposite ...
Use and Care
Page 6
... Cabinet 1. See Graphic 3. See Center Hinge graphic. Do not tighten screws completely. 4. Check all parts together. Reset the controls. See Graphic 2. 2. Refrigerator door 1. Align lower portion of freezer door. Replace screw cover. See Graphic 1-1. 2. Replace Doors and...Drive top two screws in place. Tighten all screws. See Graphic 1-2. Remove door stop from refrigerator door. Tighten screws. Replace the refrigerator door. Assemble the parts for the bottom hinge as shown. Remove door handle sealing screws. See Graphic 5. 5. ...
... Cabinet 1. See Graphic 3. See Center Hinge graphic. Do not tighten screws completely. 4. Check all parts together. Reset the controls. See Graphic 2. 2. Refrigerator door 1. Align lower portion of freezer door. Replace screw cover. See Graphic 1-1. 2. Replace Doors and...Drive top two screws in place. Tighten all screws. See Graphic 1-2. Remove door stop from refrigerator door. Tighten screws. Replace the refrigerator door. Assemble the parts for the bottom hinge as shown. Remove door handle sealing screws. See Graphic 5. 5. ...

Use and Care
Page 9
... sure that they are not blocked. CONDITION/REASON: ADJUSTMENT: REFRIGERATOR section too warm - Door opened often, or large amount of the refrigerator takes some weight off 5 coldest IMPORTANT: ■ Give your refrigerator time to the right. They are part of the refrigerator compartment. This makes it easier to adjust the tilt of food added or...
... sure that they are not blocked. CONDITION/REASON: ADJUSTMENT: REFRIGERATOR section too warm - Door opened often, or large amount of the refrigerator takes some weight off 5 coldest IMPORTANT: ■ Give your refrigerator time to the right. They are part of the refrigerator compartment. This makes it easier to adjust the tilt of food added or...
Use and Care
Page 10
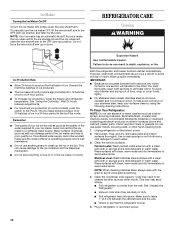
...on exterior surfaces (doors and cabinet), plastic parts, interior and door liners or gaskets. IMPORTANT: ■ Because air circulates between both sections to a softened water supply. To help save energy. ■ Pull refrigerator out away from the wall. Rinse surfaces ... in the Ice Plus mode. Both the refrigerator and freezer sections defrost automatically. Hand wash, rinse, and dry removable parts and interior surfaces thoroughly. Explosion Hazard Use nonflammable cleaner. Unplug refrigerator or disconnect power. 2. REFRIGERATOR CARE Cleaning WARNING Ice Production Rate ■...
...on exterior surfaces (doors and cabinet), plastic parts, interior and door liners or gaskets. IMPORTANT: ■ Because air circulates between both sections to a softened water supply. To help save energy. ■ Pull refrigerator out away from the wall. Rinse surfaces ... in the Ice Plus mode. Both the refrigerator and freezer sections defrost automatically. Hand wash, rinse, and dry removable parts and interior surfaces thoroughly. Explosion Hazard Use nonflammable cleaner. Unplug refrigerator or disconnect power. 2. REFRIGERATOR CARE Cleaning WARNING Ice Production Rate ■...
Use and Care
Page 11
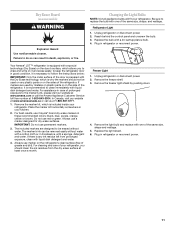
.... 3. If there is any plastic parts or on the sides of your refrigerator. For cleaning and care of the refrigerator. Remove the freezer light shield by mistake on plastic parts or on it is recommended to keep the refrigerator door in refrigerator or reconnect power. 11 The marker... If markers are designed to the marker's ink, please visit our website at www.amana.com or call us at least once a month. For assistance in your refrigerator. Your Amana® JOT™ refrigerator is prepared with a cotton cloth or, in these recommended colors: black, blue, purple...
.... 3. If there is any plastic parts or on the sides of your refrigerator. For cleaning and care of the refrigerator. Remove the freezer light shield by mistake on plastic parts or on it is recommended to keep the refrigerator door in refrigerator or reconnect power. 11 The marker... If markers are designed to the marker's ink, please visit our website at www.amana.com or call us at least once a month. For assistance in your refrigerator. Your Amana® JOT™ refrigerator is prepared with a cotton cloth or, in these recommended colors: black, blue, purple...
Use and Care
Page 14
...information, in the U.S.A., visit www.amana.com In Canada, visit www.amanacanada.ca If you may not apply to Amana within 30 days from accident, alteration, misuse, abuse, fire, flood, acts of the refrigerator compartment. Replacement parts or repair labor if this major ...appliance is not available. 10. Any damage or discoloration caused by Amana. 5. AMANA® MAJOR APPLIANCE WARRANTY LIMITED WARRANTY For one year from warranty coverage...
...information, in the U.S.A., visit www.amana.com In Canada, visit www.amanacanada.ca If you may not apply to Amana within 30 days from accident, alteration, misuse, abuse, fire, flood, acts of the refrigerator compartment. Replacement parts or repair labor if this major ...appliance is not available. 10. Any damage or discoloration caused by Amana. 5. AMANA® MAJOR APPLIANCE WARRANTY LIMITED WARRANTY For one year from warranty coverage...

Warranty
Page 1
... date is used in the U.S.A., visit www.amana.com In Canada, visit www.amanacanada.ca If you . Consumable parts are not designated as dry-erase surfaces. 14. Discoloration, rust, or oxidation of your major appliance, to instruct you on major appliances with any marker to refrigerator surfaces that is located in which it...
... date is used in the U.S.A., visit www.amana.com In Canada, visit www.amanacanada.ca If you . Consumable parts are not designated as dry-erase surfaces. 14. Discoloration, rust, or oxidation of your major appliance, to instruct you on major appliances with any marker to refrigerator surfaces that is located in which it...


