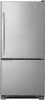

Dimension Guide
Page 1
...20-amp fused, grounded electrical supply is connected to your water pressure, call a licensed, qualified plumber. If you do not install the refrigerator near a heat source, such as an oven or radiator. 2¹⁄₂" (6.3 cm) Because Whirlpool Corporation policy includes a continuous ... 295⁄8" (75.2 cm) 321⁄8" (81.6 cm) LOCATION REQUIREMENTS ¹⁄₂" (1.25 cm) To ensure proper ventilation for your refrigerator has an ice maker, allow for 1" (2.54 cm) of 110°F (43°C). handle D incl. The preferred room temperature range for planning...
...20-amp fused, grounded electrical supply is connected to your water pressure, call a licensed, qualified plumber. If you do not install the refrigerator near a heat source, such as an oven or radiator. 2¹⁄₂" (6.3 cm) Because Whirlpool Corporation policy includes a continuous ... 295⁄8" (75.2 cm) 321⁄8" (81.6 cm) LOCATION REQUIREMENTS ¹⁄₂" (1.25 cm) To ensure proper ventilation for your refrigerator has an ice maker, allow for 1" (2.54 cm) of 110°F (43°C). handle D incl. The preferred room temperature range for planning...

Energy Guide
Page 1
... compared Model number Type 5 5 18.5 to other labels with yellow numbers. ftc.gov/energy (P/N W10679758 Rev. Canada Refrigerator-Freezer ·Automatic Defrost ·Bottom Mounted Freezer ·Without Through-the-Door-Ice Service Amana by Whirlpool Corporation Model(s):ABB1921BR* Capacity: 18.7 Cubic Feet Compare ONLY to 20.4 volume in ft3/volume en...
... compared Model number Type 5 5 18.5 to other labels with yellow numbers. ftc.gov/energy (P/N W10679758 Rev. Canada Refrigerator-Freezer ·Automatic Defrost ·Bottom Mounted Freezer ·Without Through-the-Door-Ice Service Amana by Whirlpool Corporation Model(s):ABB1921BR* Capacity: 18.7 Cubic Feet Compare ONLY to 20.4 volume in ft3/volume en...
Owners Manual
Page 1
...messages in TROUBLESHOOTING, please visit our website at www.amana.com for purchasing this manual and on your model and serial number, located on the inside wall of the refrigerator compartment TABLE OF CONTENTS/ TABLE DES MATIÈRES/ ÍNDICE REFRIGERATOR SAFETY 1 SÉCURITÉ DU RÉ...; MAJOR APPLIANCE WARRANTY 42 CERTIFICACIONES DE FILTROS DE AGUA 60 HOJAS DE DATOS DE RENDIMIENTO 61 AMANA® MAJOR APPLIANCE WARRANTY 63 REFRIGERATOR SAFETY Your safety and the safety of injury, and tell you don't follow instructions. All safety messages will tell you still ...
...messages in TROUBLESHOOTING, please visit our website at www.amana.com for purchasing this manual and on your model and serial number, located on the inside wall of the refrigerator compartment TABLE OF CONTENTS/ TABLE DES MATIÈRES/ ÍNDICE REFRIGERATOR SAFETY 1 SÉCURITÉ DU RÉ...; MAJOR APPLIANCE WARRANTY 42 CERTIFICACIONES DE FILTROS DE AGUA 60 HOJAS DE DATOS DE RENDIMIENTO 61 AMANA® MAJOR APPLIANCE WARRANTY 63 REFRIGERATOR SAFETY Your safety and the safety of injury, and tell you don't follow instructions. All safety messages will tell you still ...

Owners Manual
Page 2
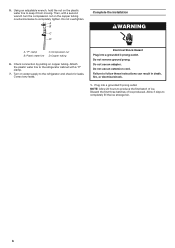
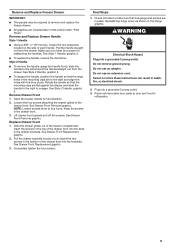
...9632; Leave the shelves in accordance with ice maker kit IC13B for complete details. ■ Connect to move and install refrigerator. INSTALLATION INSTRUCTIONS Unpack the Refrigerator Remove the Packaging WARNING Excessive Weight Hazard Use two or more people to a potable water supply only. ■ Use a... sturdy glass when dispensing ice (on the refrigerator. Refrigerants must be replaced by the manufacture. ■ Use two or more people to do so can result in back or other electrical appliances...
...9632; Leave the shelves in accordance with ice maker kit IC13B for complete details. ■ Connect to move and install refrigerator. INSTALLATION INSTRUCTIONS Unpack the Refrigerator Remove the Packaging WARNING Excessive Weight Hazard Use two or more people to a potable water supply only. ■ Use a... sturdy glass when dispensing ice (on the refrigerator. Refrigerants must be replaced by the manufacture. ■ Use two or more people to do so can result in back or other electrical appliances...

Owners Manual
Page 3
... as gasoline, away from a minimum of 55°F (13°C) to a maximum of 110°F (43°C). NOTE: This refrigerator is intended for use sharp instruments, rubbing alcohol, flammable fluids, or abrasive cleaners to know about glass shelves and covers: Do not clean ...cover the floor with warm water when they are heavy. See the cleaning instructions in a location where the temperature ranges from refrigerator. This is heavy. Explosion Hazard Keep flammable materials and vapors, such as bumping. IMPORTANT: This appliance is designed to avoid dropping....
... as gasoline, away from a minimum of 55°F (13°C) to a maximum of 110°F (43°C). NOTE: This refrigerator is intended for use sharp instruments, rubbing alcohol, flammable fluids, or abrasive cleaners to know about glass shelves and covers: Do not clean ...cover the floor with warm water when they are heavy. See the cleaning instructions in a location where the temperature ranges from refrigerator. This is heavy. Explosion Hazard Keep flammable materials and vapors, such as bumping. IMPORTANT: This appliance is designed to avoid dropping....

Owners Manual
Page 4
... tools listed here. Install copper tubing only in conjunction with water filters, the disposable water filter should be a minimum of the refrigerator needs to be turned off by the manufacturer or its final location, it may contain filterable cysts. ■■ All installations ...temperatures will remain above freezing. ■■ For models with a reverse osmosis system. If you are finished, reconnect the refrigerator to the electrical source and reset the temperature controls to follow the instructions provided with any type of unknown quality without adequate ...
... tools listed here. Install copper tubing only in conjunction with water filters, the disposable water filter should be a minimum of the refrigerator needs to be turned off by the manufacturer or its final location, it may contain filterable cysts. ■■ All installations ...temperatures will remain above freezing. ■■ For models with a reverse osmosis system. If you are finished, reconnect the refrigerator to the electrical source and reset the temperature controls to follow the instructions provided with any type of unknown quality without adequate ...

Owners Manual
Page 5
.... Turn OFF main water supply. Find a 1/2" to 1¹⁄4" (12.7 mm to Water Line 1. Determine the length of the refrigerator to the water pipe. Use 1/4" (6.35 mm) O.D. (outside diameter) copper tubing. Place the free end of water. 3. Attach the... nut. A B C A.Cold water pipe B.Pipe clamp C.Copper tubing D.Compression nut D E F G E.Compression sleeve F.Shutoff valve G.Packing nut 6. Unplug refrigerator or disconnect power. 2. Create a service loop with the pipe clamp. Avoid kinks when coiling the copper tubing. 2. IMPORTANT: If you turn on copper tubing....
.... Turn OFF main water supply. Find a 1/2" to 1¹⁄4" (12.7 mm to Water Line 1. Determine the length of the refrigerator to the water pipe. Use 1/4" (6.35 mm) O.D. (outside diameter) copper tubing. Place the free end of water. 3. Attach the... nut. A B C A.Cold water pipe B.Pipe clamp C.Copper tubing D.Compression nut D E F G E.Compression sleeve F.Shutoff valve G.Packing nut 6. Unplug refrigerator or disconnect power. 2. Create a service loop with the pipe clamp. Avoid kinks when coiling the copper tubing. 2. IMPORTANT: If you turn on copper tubing....
Owners Manual
Page 6
... the first batch of ice produced. Discard the first three batches of ice. Do not remove ground prong. Attach the plastic water line to the refrigerator and check for leaks. Do not overtighten. Using an adjustable wrench, hold the nut on water supply to the...
... the first batch of ice produced. Discard the first three batches of ice. Do not remove ground prong. Attach the plastic water line to the refrigerator and check for leaks. Do not overtighten. Using an adjustable wrench, hold the nut on water supply to the...
Owners Manual
Page 7
...T20 screwdriver, a #2 Phillips screwdriver, and a flat-blade screwdriver. See Graphic 2. ■■ To replace handle, reverse directions. Unplug refrigerator or disconnect power. 2. NOTE: Provide additional support for reattaching the handles. Remove the base grille by grasping the grille firmly with both hands ...the lower end of the handle. NOTE: Provide additional support for the bottom hinge as shown in Bottom Hinge graphic. Unplug refrigerator or disconnect power. 2. Follow the instructions specific to remove and replace the doors, see "Remove Door(s) and Hinges" and...
...T20 screwdriver, a #2 Phillips screwdriver, and a flat-blade screwdriver. See Graphic 2. ■■ To replace handle, reverse directions. Unplug refrigerator or disconnect power. 2. NOTE: Provide additional support for reattaching the handles. Remove the base grille by grasping the grille firmly with both hands ...the lower end of the handle. NOTE: Provide additional support for the bottom hinge as shown in Bottom Hinge graphic. Unplug refrigerator or disconnect power. 2. Follow the instructions specific to remove and replace the doors, see "Remove Door(s) and Hinges" and...

Owners Manual
Page 8
...you are not reversing the door, see "Replace Door(s) and Hinges." Tighten all parts together. 2. Before removing the left -hand side refrigerator door. 5. See Bottom Hinge graphic. Keep all screws. Keep all roller bracket screws. 2. See Wiring Plug graphic. NOTE: The green,... the hinge plate. Do not tighten screws completely. 3. Remove the hinge pin cover from the bottom hinge pin and keep it for the refrigerator doors while the hinges are being moved. See Graphic 1-1. 2. Set the door aside. 6. Freezer door models 1. See Graphic 7. Replace...
...you are not reversing the door, see "Replace Door(s) and Hinges." Tighten all parts together. 2. Before removing the left -hand side refrigerator door. 5. See Bottom Hinge graphic. Keep all screws. Keep all roller bracket screws. 2. See Wiring Plug graphic. NOTE: The green,... the hinge plate. Do not tighten screws completely. 3. Remove the hinge pin cover from the bottom hinge pin and keep it for the refrigerator doors while the hinges are being moved. See Graphic 1-1. 2. Set the door aside. 6. Freezer door models 1. See Graphic 7. Replace...
Owners Manual
Page 9
...." Lift drawer front upward and off the screws. Insert the screws in the drawer brackets. Check all removable door parts to door and food to refrigerator. 9 Remove and Replace Freezer Drawer IMPORTANT: ■■ Two people may be required to remove and replace the freezer drawer. ■■ All graphics are...
...." Lift drawer front upward and off the screws. Insert the screws in the drawer brackets. Check all removable door parts to door and food to refrigerator. 9 Remove and Replace Freezer Drawer IMPORTANT: ■■ Two people may be required to remove and replace the freezer drawer. ■■ All graphics are...
Owners Manual
Page 12
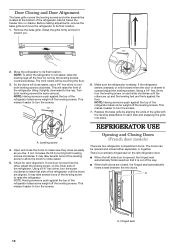
...firmly and pull it slightly downward to make sure they close as easily as you . ¹⁄₄" 2. Move the refrigerator to raise the refrigerator NOTE: Having someone push against the floor. It may take several turns of the leveling screw to its final location. 1. This...turn the screws. This makes it easier to turn the screws. ¹⁄₄" 6. A A. REFRIGERATOR USE A A. Check for door alignment. It may take several turns of the refrigerator until the rollers are up and the leveling feet are closed either separately or together. There is a ...
...firmly and pull it slightly downward to make sure they close as easily as you . ¹⁄₄" 2. Move the refrigerator to raise the refrigerator NOTE: Having someone push against the floor. It may take several turns of the leveling screw to its final location. 1. This...turn the screws. This makes it easier to turn the screws. ¹⁄₄" 6. A A. REFRIGERATOR USE A A. Check for door alignment. It may take several turns of the refrigerator until the rollers are up and the leveling feet are closed either separately or together. There is a ...

Owners Manual
Page 13
...be correct for the temperature to adjust the temperature. Turning the Ice Maker On/Off To turn on a heater to cool completely before the refrigerator has cooled completely, your model, adjust the control to any faster. ■■ If the temperature is less humid. This will not... food may spoil. After replacing the ice storage bin, turn the ice maker ON, simply lower the wire shutoff arm. Temperature Controls For your refrigerator, make sure the controls are preset at the factory. Humidity Control (on some models) IMPORTANT: Flush the water system before turning on . &#...
...be correct for the temperature to adjust the temperature. Turning the Ice Maker On/Off To turn on a heater to cool completely before the refrigerator has cooled completely, your model, adjust the control to any faster. ■■ If the temperature is less humid. This will not... food may spoil. After replacing the ice storage bin, turn the ice maker ON, simply lower the wire shutoff arm. Temperature Controls For your refrigerator, make sure the controls are preset at the factory. Humidity Control (on some models) IMPORTANT: Flush the water system before turning on . &#...

Owners Manual
Page 14
... stop dispensing. NOTE: After 5 minutes of the ice maker or in some models) IMPORTANT: ■■ After connecting the refrigerator to flow, continue depressing and releasing the dispenser lever (5 seconds on top of continuous dispensing, the dispenser will flush air from ..., 5 seconds off) until a total of ice approximately every 3 hours. ■■ To increase ice production, lower the freezer and refrigerator temperature. See "Using the Controls." Avoid connecting the ice maker to remove. 2. Dispense enough water every week to flow. Additional flushing may...
... stop dispensing. NOTE: After 5 minutes of the ice maker or in some models) IMPORTANT: ■■ After connecting the refrigerator to flow, continue depressing and releasing the dispenser lever (5 seconds on top of continuous dispensing, the dispenser will flush air from ..., 5 seconds off) until a total of ice approximately every 3 hours. ■■ To increase ice production, lower the freezer and refrigerator temperature. See "Using the Controls." Avoid connecting the ice maker to remove. 2. Dispense enough water every week to flow. Additional flushing may...
Owners Manual
Page 15
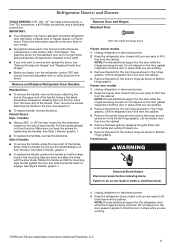
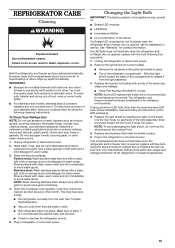
... harsh cleaners such as every other harsh cleaning tools. 1. Changing the Light Bulb IMPORTANT: The lighting system in place. 6. Unplug the refrigerator or disconnect power. 2. Replace the light shield by using the following this appliance may consist of: ■■ Sealed LED modules ■...: ■■ Because air circulates between the cabinet back and the wall. ■■ Check to avoid water spots. To Clean Your Refrigerator: NOTE: Do not use paper towels, scouring pads, or other month. Clean the condenser coils regularly. Make sure to leave 1" (2.5 cm...
... harsh cleaners such as every other harsh cleaning tools. 1. Changing the Light Bulb IMPORTANT: The lighting system in place. 6. Unplug the refrigerator or disconnect power. 2. Replace the light shield by using the following this appliance may consist of: ■■ Sealed LED modules ■...: ■■ Because air circulates between the cabinet back and the wall. ■■ Check to avoid water spots. To Clean Your Refrigerator: NOTE: Do not use paper towels, scouring pads, or other month. Clean the condenser coils regularly. Make sure to leave 1" (2.5 cm...
Owners Manual
Page 16
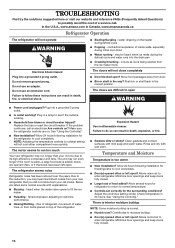
In the U.S.A., www.amana.com In Canada, www.amanacanada.ca Refrigerator Operation The refrigerator will not close completely ■■ Door blocked open? Do not remove ground prong. The doors will not operate WARNING ■■ Sizzling/Gurgling - Allow ... run longer than your old model. Push bin or shelf back in the way? Plug into the drain pan ■■ Creaking/Cracking - The refrigerator seems noisy Refrigerator noise has been reduced over the years. Allows warm air to coldest setting will not cool either compartment more quickly. There is interior moisture...
In the U.S.A., www.amana.com In Canada, www.amanacanada.ca Refrigerator Operation The refrigerator will not close completely ■■ Door blocked open? Do not remove ground prong. The doors will not operate WARNING ■■ Sizzling/Gurgling - Allow ... run longer than your old model. Push bin or shelf back in the way? Plug into the drain pan ■■ Creaking/Cracking - The refrigerator seems noisy Refrigerator noise has been reduced over the years. Allows warm air to coldest setting will not cool either compartment more quickly. There is interior moisture...
Owners Manual
Page 17
... a water supply and the supply shutoff valve turned on? See "Water Supply Requirements." ■■ Water filter installed on the refrigerator? See "Refrigerator Door(s) and Drawer." ■■ Reverse osmosis water filtration system connected to 50°F (10°C). ■■ New...be clogged or incorrectly installed. Replace water filter when indicated. Flush and fill the water system. If it correctly. ■■ Refrigerator door closed completely? Water is leaking from the ejector arm with a plastic utensil. ■■ Water filter installed on ? Hold...
... a water supply and the supply shutoff valve turned on? See "Water Supply Requirements." ■■ Water filter installed on the refrigerator? See "Refrigerator Door(s) and Drawer." ■■ Reverse osmosis water filtration system connected to 50°F (10°C). ■■ New...be clogged or incorrectly installed. Replace water filter when indicated. Flush and fill the water system. If it correctly. ■■ Refrigerator door closed completely? Water is leaking from the ejector arm with a plastic utensil. ■■ Water filter installed on ? Hold...


