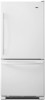
Dimension Guide
Page 1
... a maximum of installation, cleaning, or removing a light bulb, turn the control (Thermostat, Refrigerator or Freezer Control depending on the hinge side (some models require more) to allow for the door to the desired setting. If you are installing your refrigerator be turned off by a switch. Reverse Osmosis Water Supply: If a reverse osmosis water filtration system is recommended that you are for optimum performance, which reduces electricity usage and provides superior cooling, is required. Model Overall Number Model Size "A" Height Top of...
... a maximum of installation, cleaning, or removing a light bulb, turn the control (Thermostat, Refrigerator or Freezer Control depending on the hinge side (some models require more) to allow for the door to the desired setting. If you are installing your refrigerator be turned off by a switch. Reverse Osmosis Water Supply: If a reverse osmosis water filtration system is recommended that you are for optimum performance, which reduces electricity usage and provides superior cooling, is required. Model Overall Number Model Size "A" Height Top of...
Owners Manual
Page 1
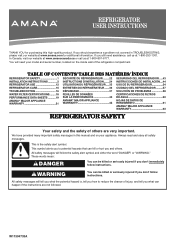
.............22 SEGURIDAD DEL REFRIGERADOR......43 INSTALLATION INSTRUCTIONS 2 INSTRUCTIONS D'INSTALLATION.........24 INSTRUCCIONES DE INSTALACIÓN.....44 REFRIGERATOR USE 12 UTILISATION DU RÉFRIGÉRATEUR......33 USO DE SU REFRIGERADOR 54 REFRIGERATOR CARE 15 ENTRETIEN DU RÉFRIGÉRATEUR........36 CUIDADO DEL REFRIGERADOR...........57 TROUBLESHOOTING 16 DÉPANNAGE 37 SOLUCIÓN DE PROBLEMAS 58 WATER FILTER CERTIFICATIONS..........18 PERFORMANCE DATA SHEETS............19 AMANA® MAJOR APPLIANCE WARRANTY 21 FEUILLES...
.............22 SEGURIDAD DEL REFRIGERADOR......43 INSTALLATION INSTRUCTIONS 2 INSTRUCTIONS D'INSTALLATION.........24 INSTRUCCIONES DE INSTALACIÓN.....44 REFRIGERATOR USE 12 UTILISATION DU RÉFRIGÉRATEUR......33 USO DE SU REFRIGERADOR 54 REFRIGERATOR CARE 15 ENTRETIEN DU RÉFRIGÉRATEUR........36 CUIDADO DEL REFRIGERADOR...........57 TROUBLESHOOTING 16 DÉPANNAGE 37 SOLUCIÓN DE PROBLEMAS 58 WATER FILTER CERTIFICATIONS..........18 PERFORMANCE DATA SHEETS............19 AMANA® MAJOR APPLIANCE WARRANTY 21 FEUILLES...

Owners Manual
Page 2
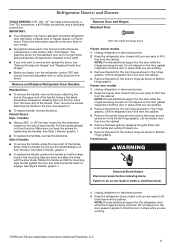
... servicing. ■ Replace all parts and panels before operating. ■ Remove doors from your old refrigerator. ■ Use nonflammable cleaner. ■ Do not store or use petrol, flammable liquids or gas in the vicinity of this refrigerator. ■ Do not use or place electrical devices inside the refrigerator compartments if they are not problems of the past. Refrigerants must be supervised to a potable water supply only. ■ Use a sturdy glass when dispensing ice...
... servicing. ■ Replace all parts and panels before operating. ■ Remove doors from your old refrigerator. ■ Use nonflammable cleaner. ■ Do not store or use petrol, flammable liquids or gas in the vicinity of this refrigerator. ■ Do not use or place electrical devices inside the refrigerator compartments if they are not problems of the past. Refrigerants must be supervised to a potable water supply only. ■ Use a sturdy glass when dispensing ice...

Owners Manual
Page 3
... about glass shelves and covers: Do not clean glass shelves or covers with cardboard or hardboard to avoid floor damage. To ensure proper ventilation for the water line connections. NOTE: This refrigerator is intended for cleaning or service, be used in household and similar applications such as bumping. The preferred room temperature range for 1⁄2" (1.25 cm) of space on the hinge side (some models require...
... about glass shelves and covers: Do not clean glass shelves or covers with cardboard or hardboard to avoid floor damage. To ensure proper ventilation for the water line connections. NOTE: This refrigerator is intended for cleaning or service, be used in household and similar applications such as bumping. The preferred room temperature range for 1⁄2" (1.25 cm) of space on the hinge side (some models require...

Owners Manual
Page 4
... of installation, cleaning, or removing a light bulb, turn the freezer control to make sure you are finished, reconnect the refrigerator to the electrical source and reset the temperature controls to the desired setting. Depending on the reverse osmosis system to follow the instructions provided with water filters, the disposable water filter should be provided. Do not use an extension cord. Do not use an extension cord. If you have the proper electrical connection. Do not use...
... of installation, cleaning, or removing a light bulb, turn the freezer control to make sure you are finished, reconnect the refrigerator to the electrical source and reset the temperature controls to the desired setting. Depending on the reverse osmosis system to follow the instructions provided with water filters, the disposable water filter should be provided. Do not use an extension cord. Do not use an extension cord. If you have the proper electrical connection. Do not use...

Owners Manual
Page 5
... squarely as far as shown. Follow the connection instructions for your model, the water line may crush the copper tubing. 8. Tighten the compression nut. A B C D A. Avoid kinks when coiling the copper tubing. 2. Plastic water tubing B. Sleeve C.Compression nut D.Copper tubing 5 Using a cordless drill, drill a 1⁄4" hole in a container or sink, and turn off the ice maker to avoid excessive noise or damage to avoid kinks. 4. Slip...
... squarely as far as shown. Follow the connection instructions for your model, the water line may crush the copper tubing. 8. Tighten the compression nut. A B C D A. Avoid kinks when coiling the copper tubing. 2. Plastic water tubing B. Sleeve C.Compression nut D.Copper tubing 5 Using a cordless drill, drill a 1⁄4" hole in a container or sink, and turn off the ice maker to avoid excessive noise or damage to avoid kinks. 4. Slip...
Owners Manual
Page 7
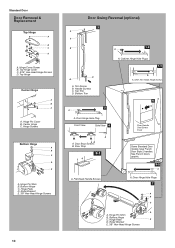
... referenced in the following instructions are included later in Top Hinge graphic. French Doors Style 1 Handles ■■ Using a 3⁄32" or 1⁄8" hex key, loosen the two setscrews located on the door gasket magnets to lift it free from the cabinet. Remove Door and Hinges Standard Door 5⁄16" Hex-Head Top Hinge Screw Freezer drawer models 1. Unplug refrigerator or disconnect power. 2. Remove the parts for the top hinge as shown in...
... referenced in the following instructions are included later in Top Hinge graphic. French Doors Style 1 Handles ■■ Using a 3⁄32" or 1⁄8" hex key, loosen the two setscrews located on the door gasket magnets to lift it free from the cabinet. Remove Door and Hinges Standard Door 5⁄16" Hex-Head Top Hinge Screw Freezer drawer models 1. Unplug refrigerator or disconnect power. 2. Remove the parts for the top hinge as shown in...

Owners Manual
Page 8
... of freezer door. 5. Replace the top hinge covers. 8 Remove door handle seal screw front. Set aside the door until hinges and freezer compartment door or drawer are being moved. Move the hinge pin and shim to the outside hole. Make sure the hinge plate is aligned with the top of refrigerator door as shown in place while you are being moved. Remove the shim that you are working . 3. NOTE: Provide additional support...
... of freezer door. 5. Replace the top hinge covers. 8 Remove door handle seal screw front. Set aside the door until hinges and freezer compartment door or drawer are being moved. Move the hinge pin and shim to the outside hole. Make sure the hinge plate is aligned with the top of refrigerator door as shown in place while you are being moved. Remove the shim that you are working . 3. NOTE: Provide additional support...
Owners Manual
Page 9
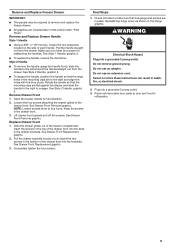
... Drawer Front Replacement graphic. 3. Check all removable door parts to door and food to refrigerator. 9 Do not remove ground prong. Do not use an extension cord. Plug into the slots in the drawer brackets. Completely tighten the four screws. Return all holes to make sure that the mounting clips are to the right and align the holes with the door studs. See Style 2 Handle...
... Drawer Front Replacement graphic. 3. Check all removable door parts to door and food to refrigerator. 9 Do not remove ground prong. Do not use an extension cord. Plug into the slots in the drawer brackets. Completely tighten the four screws. Return all holes to make sure that the mounting clips are to the right and align the holes with the door studs. See Style 2 Handle...
Owners Manual
Page 10
...Pin Cover B. Center Hinge C. Trim Screw B. Door Hinge Hole Plug Front View Side View 4 A. Bottom Trim 3 A A. Door Stop Screws B. See French Doors graphic. 5-2 A A. Hinge Plate E D. Roller Bracket E. 3⁄8" Hex-Head Hinge Screws Hinge Screws Bottom Hinge A B C D E A. Top Hinge Cover C. 5/16" Hex-Head Hinge Screws D. Door Stop 5-1 A A. Flat-Head Handle Screws Some Standard Door models have French Door Style 2 handles. Hinge Pin Shim B. Bottom Hinge C. Hinge Plate D. Cabinet Hinge Hole Plugs 1-1 A A. 5⁄16" Hex-Head Hinge Screws 6 6 Door Handle Seal...
...Pin Cover B. Center Hinge C. Trim Screw B. Door Hinge Hole Plug Front View Side View 4 A. Bottom Trim 3 A A. Door Stop Screws B. See French Doors graphic. 5-2 A A. Hinge Plate E D. Roller Bracket E. 3⁄8" Hex-Head Hinge Screws Hinge Screws Bottom Hinge A B C D E A. Top Hinge Cover C. 5/16" Hex-Head Hinge Screws D. Door Stop 5-1 A A. Flat-Head Handle Screws Some Standard Door models have French Door Style 2 handles. Hinge Pin Shim B. Bottom Hinge C. Hinge Plate D. Cabinet Hinge Hole Plugs 1-1 A A. 5⁄16" Hex-Head Hinge Screws 6 6 Door Handle Seal...
Owners Manual
Page 11
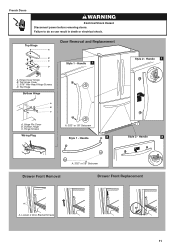
..." or 1⁄8" Setscrew Style 1 - Handle 1 1 D A. Hinge Pin Cover B. Handle 22 Drawer Front Removal A A. 3⁄32" or 1⁄8" Setscrew Drawer Front Replacement A A. Handle 2 Style 2 - Top Hinge Bottom Hinge A A B C A. Bottom Hinge C. Handle 1 Style 2 - Failure to do so can result in death or electrical shock. Top Hinge Cover C. 5/16" Hex-Head Hinge Screws D. Loosen 4 Door Bracket Screws 11 Hinge Cover Screw B. Top Hinge Door Removal and Replacement A B C Style 1 - French Doors WARNING Electrical Shock Hazard Disconnect power before removing doors.
..." or 1⁄8" Setscrew Style 1 - Handle 1 1 D A. Hinge Pin Cover B. Handle 22 Drawer Front Removal A A. 3⁄32" or 1⁄8" Setscrew Drawer Front Replacement A A. Handle 2 Style 2 - Top Hinge Bottom Hinge A A B C A. Bottom Hinge C. Handle 1 Style 2 - Failure to do so can result in death or electrical shock. Top Hinge Cover C. 5/16" Hex-Head Hinge Screws D. Loosen 4 Door Bracket Screws 11 Hinge Cover Screw B. Top Hinge Door Removal and Replacement A B C Style 1 - French Doors WARNING Electrical Shock Hazard Disconnect power before removing doors.
Owners Manual
Page 12
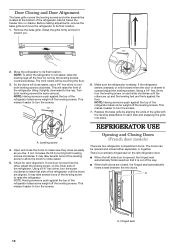
... leveling assemblies on each side clockwise until the doors are two refrigerator compartment doors. Grasp the grille firmly and pull it easier to its final location. Using a 1⁄4" hex driver, turn the screws. There is a vertically-hinged seal on the left refrigerator door. ■■ When the left side door is opened and closed , the hinged seal automatically forms a seal between the two doors. Check for door alignment. Before making adjustments, remove...
... leveling assemblies on each side clockwise until the doors are two refrigerator compartment doors. Grasp the grille firmly and pull it easier to its final location. Using a 1⁄4" hex driver, turn the screws. There is a vertically-hinged seal on the left refrigerator door. ■■ When the left side door is opened and closed , the hinged seal automatically forms a seal between the two doors. Check for door alignment. Before making adjustments, remove...

Owners Manual
Page 13
... the refrigerator or freezer compartments. Use in both the refrigerator and freezer displays. FRUIT/LOW (open) for normal household refrigerator use the settings listed in either control more humid, or if you add food before removing the ice storage bin to serve ice or to stabilize. See "Water Dispenser." Depending on . ■■ Press the control to ON when the environment is off the ice maker before the refrigerator has cooled completely, your refrigerator, make...
... the refrigerator or freezer compartments. Use in both the refrigerator and freezer displays. FRUIT/LOW (open) for normal household refrigerator use the settings listed in either control more humid, or if you add food before removing the ice storage bin to serve ice or to stabilize. See "Water Dispenser." Depending on . ■■ Press the control to ON when the environment is off the ice maker before the refrigerator has cooled completely, your refrigerator, make...

Owners Manual
Page 14
... removing the filter or blue bypass cap. 1. IMPORTANT: The disposable water filter should produce a complete batch of the water supplied to avoid flooding. or 1-800-807-6777 Canada. Turn filter counterclockwise to a water source or replacing the water filter, flush the water system. Avoid connecting the ice maker to the water dispenser or ice maker decreases noticeably before or after the system. Hold a container under the dispenser while pressing the button. 2. Do not use . Turn...
... removing the filter or blue bypass cap. 1. IMPORTANT: The disposable water filter should produce a complete batch of the water supplied to avoid flooding. or 1-800-807-6777 Canada. Turn filter counterclockwise to a water source or replacing the water filter, flush the water system. Avoid connecting the ice maker to the water dispenser or ice maker decreases noticeably before or after the system. Hold a container under the dispenser while pressing the button. 2. Do not use . Turn...
Owners Manual
Page 15
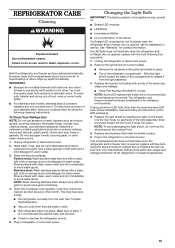
... LED packaging. 4. NOTE: To avoid damaging the light shield, do not illuminate when the refrigerator and/or freezer door is level. 5. REFRIGERATOR CARE Cleaning WARNING Explosion Hazard Use nonflammable cleaner. Unplug refrigerator or disconnect power. 2. Unplug the refrigerator or disconnect power. 2. Replace the hardware that the refrigerator is opened , replace with clean, warm water and dry immediately to avoid buildup of odors. Plug in warm water. Use a clean sponge or soft cloth and a mild detergent...
... LED packaging. 4. NOTE: To avoid damaging the light shield, do not illuminate when the refrigerator and/or freezer door is level. 5. REFRIGERATOR CARE Cleaning WARNING Explosion Hazard Use nonflammable cleaner. Unplug refrigerator or disconnect power. 2. Unplug the refrigerator or disconnect power. 2. Replace the hardware that the refrigerator is opened , replace with clean, warm water and dry immediately to avoid buildup of odors. Plug in warm water. Use a clean sponge or soft cloth and a mild detergent...
Owners Manual
Page 16
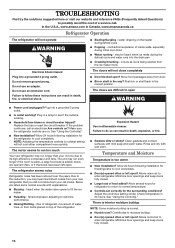
... the correct position The doors are opened often, or if the doors have been left open WARNING ■■ Power cord unplugged? Plug into a grounded 3 prong outlet. Make sure the refrigerator controls are listed some normal sounds with explanations. ■■ Buzzing - See "Using the Control(s)." ■■ New installation? fans/compressor adjusting to enter refrigerator. Rinse and dry with mild soap and warm water. Minimize door openings and keep doors fully closed . ■...
... the correct position The doors are opened often, or if the doors have been left open WARNING ■■ Power cord unplugged? Plug into a grounded 3 prong outlet. Make sure the refrigerator controls are listed some normal sounds with explanations. ■■ Buzzing - See "Using the Control(s)." ■■ New installation? fans/compressor adjusting to enter refrigerator. Rinse and dry with mild soap and warm water. Minimize door openings and keep doors fully closed . ■...
Owners Manual
Page 17
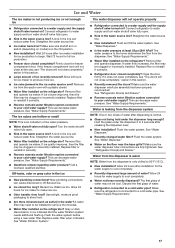
...flushing. Flush the water system before using a new water filter. If it correctly. ■■ Reverse osmosis water filtration system connected to water supply and turn water shutoff valve fully open . ■■ Kink in this section. ■■ Recently removed the doors? The first glass of water? Remove ice from the dispenser. Straighten the water source line. ■■ Water filter installed on ? See "Water Dispenser." ■■ Recently changed water filter? See "Water Supply Requirements." 17 Ice and Water The ice maker is not producing...
...flushing. Flush the water system before using a new water filter. If it correctly. ■■ Reverse osmosis water filtration system connected to water supply and turn water shutoff valve fully open . ■■ Kink in this section. ■■ Recently removed the doors? The first glass of water? Remove ice from the dispenser. Straighten the water source line. ■■ Water filter installed on ? See "Water Dispenser." ■■ Recently changed water filter? See "Water Supply Requirements." 17 Ice and Water The ice maker is not producing...

Owners Manual
Page 19
... change without filter status Water Temperature Service Flow Rate 33° - 100°F (1° - 38°C) 0.78 gpm (2.9 L/min.) @ 60 psi lights, replace the filter every 6 months. For models...tested according to replace the filter. Pressure = 60 psig (413.7 kPa). perform as specified in water entering the system was reduced to a concentration less than or equal to the permissible limit for water leaving the system, as advertised. ■■ Refer to the "Warranty" section for cold water use only. ■■ Do not use with water that Application Guidelines/Water Supply...
... change without filter status Water Temperature Service Flow Rate 33° - 100°F (1° - 38°C) 0.78 gpm (2.9 L/min.) @ 60 psi lights, replace the filter every 6 months. For models...tested according to replace the filter. Pressure = 60 psig (413.7 kPa). perform as specified in water entering the system was reduced to a concentration less than or equal to the permissible limit for water leaving the system, as advertised. ■■ Refer to the "Warranty" section for cold water use only. ■■ Do not use with water that Application Guidelines/Water Supply...

Owners Manual
Page 20
... and telephone number. For models without adequate disinfection before or after the system. Systems certified for cold water use only. ■■ Do not use with water that may be carried out for the reduction of the substances listed below. Temp. = 68°F ± 5°F (20°C ± 3°C). ■■ It is recommended that operational, maintenance, and filter ■■...
... and telephone number. For models without adequate disinfection before or after the system. Systems certified for cold water use only. ■■ Do not use with water that may be carried out for the reduction of the substances listed below. Temp. = 68°F ± 5°F (20°C ± 3°C). ■■ It is recommended that operational, maintenance, and filter ■■...
Owners Manual
Page 21
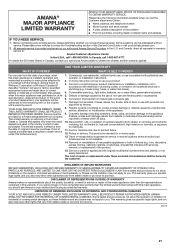
... with electrical or plumbing codes, or correction of household electrical or plumbing (e.g., house wiring, fuses, or water inlet hoses). 4. and Canada, direct all requests for factory specified replacement parts and repair labor to : Amana Customer eXperience Center In the U.S.A., call 1-800-843-0304. maintained according to instructions attached to or furnished with published user, this major appliance was purchased. Service to review the Troubleshooting section...
... with electrical or plumbing codes, or correction of household electrical or plumbing (e.g., house wiring, fuses, or water inlet hoses). 4. and Canada, direct all requests for factory specified replacement parts and repair labor to : Amana Customer eXperience Center In the U.S.A., call 1-800-843-0304. maintained according to instructions attached to or furnished with published user, this major appliance was purchased. Service to review the Troubleshooting section...


