Energy Guide
Page 1
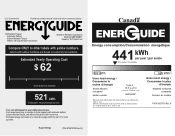
U.S. Canada Refrigerator-Freezer ·Automatic Defrost ·Bottom Mounted Freezer ·Without Through-the-Door-Ice Service Amana by Whirlpool Corporation Model(s):ABB1924BR* Capacity: 18.7 Cubic Feet Compare ONLY to other labels with automatic defrost, bottom mounted freezer, and without through-the-door-...
U.S. Canada Refrigerator-Freezer ·Automatic Defrost ·Bottom Mounted Freezer ·Without Through-the-Door-Ice Service Amana by Whirlpool Corporation Model(s):ABB1924BR* Capacity: 18.7 Cubic Feet Compare ONLY to other labels with automatic defrost, bottom mounted freezer, and without through-the-door-...
Dimension Guide
Page 1
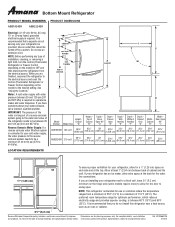
...." Instructions packed with water pressure between 60°F (15°C) and 90°F (32°C). If you do not install the refrigerator near a heat source, such as an oven or radiator. 2¹⁄₂" (6.3 cm) Because Whirlpool Corporation policy includes a continuous ...C 90˚ D Height - NOTE: Before performing any type of installation, cleaning, or removing a light bulb, turn the control (Thermostat, Refrigerator or Freezer Control depending on each side and at the top. Model Overall Number Model Size "A" Height Top of cabinet 1 A overall I ...
...." Instructions packed with water pressure between 60°F (15°C) and 90°F (32°C). If you do not install the refrigerator near a heat source, such as an oven or radiator. 2¹⁄₂" (6.3 cm) Because Whirlpool Corporation policy includes a continuous ...C 90˚ D Height - NOTE: Before performing any type of installation, cleaning, or removing a light bulb, turn the control (Thermostat, Refrigerator or Freezer Control depending on each side and at the top. Model Overall Number Model Size "A" Height Top of cabinet 1 A overall I ...
Owners Manual
Page 1
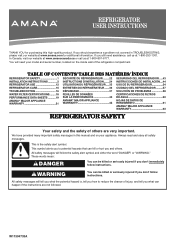
..., visit our website at www.amanacanada.ca or call us at www.amana.com for purchasing this manual and on the inside wall of the refrigerator compartment TABLE OF CONTENTS/ TABLE DES MATIÈRES/ ÍNDICE REFRIGERATOR SAFETY 1 SÉCURITÉ DU RÉFRIGÉRATEUR..........22 SEGURIDAD...; MAJOR APPLIANCE WARRANTY 42 CERTIFICACIONES DE FILTROS DE AGUA 60 HOJAS DE DATOS DE RENDIMIENTO 61 AMANA® MAJOR APPLIANCE WARRANTY 63 REFRIGERATOR SAFETY Your safety and the safety of injury, and tell you and others are not followed. You will follow instructions. Always...
..., visit our website at www.amanacanada.ca or call us at www.amana.com for purchasing this manual and on the inside wall of the refrigerator compartment TABLE OF CONTENTS/ TABLE DES MATIÈRES/ ÍNDICE REFRIGERATOR SAFETY 1 SÉCURITÉ DU RÉFRIGÉRATEUR..........22 SEGURIDAD...; MAJOR APPLIANCE WARRANTY 42 CERTIFICACIONES DE FILTROS DE AGUA 60 HOJAS DE DATOS DE RENDIMIENTO 61 AMANA® MAJOR APPLIANCE WARRANTY 63 REFRIGERATOR SAFETY Your safety and the safety of injury, and tell you and others are not followed. You will follow instructions. Always...

Owners Manual
Page 2
... ■ This appliance is damaged, it must be replaced by the manufacture. ■ Use two or more people to move and install refrigerator. ■ Disconnect power before turning on ice maker kit ready models only). ■ A qualified service technician must be supervised to help ...If you are getting rid of liquid dish soap over the adhesive with a flammable propellant in accordance with warm water and dry. 2 Refrigerants must install the water line and ice maker. IMPORTANT: Child entrapment and suffocation are still dangerous - The fumes can cause fires or ...
... ■ This appliance is damaged, it must be replaced by the manufacture. ■ Use two or more people to move and install refrigerator. ■ Disconnect power before turning on ice maker kit ready models only). ■ A qualified service technician must be supervised to help ...If you are getting rid of liquid dish soap over the adhesive with a flammable propellant in accordance with warm water and dry. 2 Refrigerants must install the water line and ice maker. IMPORTANT: Child entrapment and suffocation are still dangerous - The fumes can cause fires or ...

Owners Manual
Page 3
... more ) to allow extra space at the top. When moving it , as floor damage could occur. See the cleaning instructions in "Refrigerator Care." Shelves and covers may break if exposed to sudden temperature changes or impact, such as gasoline, away from a minimum of 55°F ...and provides superior cooling, is intended to be sure to avoid dropping. ■■ Do not use in a location where the temperature ranges from refrigerator. IMPORTANT: This appliance is between 60°F (15°C) and 90°F (32°C). The preferred room temperature range for 1" (2.54 cm...
... more ) to allow extra space at the top. When moving it , as floor damage could occur. See the cleaning instructions in "Refrigerator Care." Shelves and covers may break if exposed to sudden temperature changes or impact, such as gasoline, away from a minimum of 55°F ...and provides superior cooling, is intended to be sure to avoid dropping. ■■ Do not use in a location where the temperature ranges from refrigerator. IMPORTANT: This appliance is between 60°F (15°C) and 90°F (32°C). The preferred room temperature range for 1" (2.54 cm...

Owners Manual
Page 4
...use an adapter. Do not use with water pressure of unknown quality without adequate disinfection before starting installation. Disconnect the refrigerator from the electrical source. Systems certified for leaks. If you have the proper electrical connection. Before you move your ... Requirements WARNING Electrical Shock Hazard Plug into its service agent or a similarly qualified person. When you have questions about your refrigerator into a grounded 3 prong outlet. Install copper tubing only in conjunction with water filters, the disposable water filter should be...
...use an adapter. Do not use with water pressure of unknown quality without adequate disinfection before starting installation. Disconnect the refrigerator from the electrical source. Systems certified for leaks. If you have the proper electrical connection. Before you move your ... Requirements WARNING Electrical Shock Hazard Plug into its service agent or a similarly qualified person. When you have questions about your refrigerator into a grounded 3 prong outlet. Install copper tubing only in conjunction with water filters, the disposable water filter should be...

Owners Manual
Page 5
... nut. Correct any leaks. Place a compression nut and sleeve on the water pipe. Connect to 31.8 mm) vertical cold water pipe near the refrigerator. Slip the compression sleeve and compression nut on copper tubing. 2. Find a 1/2" to 1¹⁄4" (12.7 mm to Water Line 1. Using... a cordless drill, drill a 1⁄4" hole in the valve. 4. Fasten the shutoff valve to refrigerator cabinet with a "P" clamp. Style 1 1. Confirm copper tubing is secure by pulling on the copper tubing as shown. Slide the compression nut over the...
... nut. Correct any leaks. Place a compression nut and sleeve on the water pipe. Connect to 31.8 mm) vertical cold water pipe near the refrigerator. Slip the compression sleeve and compression nut on copper tubing. 2. Find a 1/2" to 1¹⁄4" (12.7 mm to Water Line 1. Using... a cordless drill, drill a 1⁄4" hole in the valve. 4. Fasten the shutoff valve to refrigerator cabinet with a "P" clamp. Style 1 1. Confirm copper tubing is secure by pulling on the copper tubing as shown. Slide the compression nut over the...
Owners Manual
Page 6
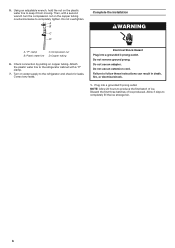
Using an adjustable wrench, hold the nut on the plastic water line to the refrigerator cabinet with a second wrench turn the compression nut on the copper tubing counterclockwise to completely fill the ice storage bin. 6 Check connection by ... electrical shock. 1. Attach the plastic water line to keep it from moving. Turn on copper tubing. Do not use an extension cord. Failure to the refrigerator and check for leaks. Discard the first three batches of ice. A B C D Complete the Installation WARNING A. Do not overtighten. "P" clamp B. Allow 3 days to completely ...
Using an adjustable wrench, hold the nut on the plastic water line to the refrigerator cabinet with a second wrench turn the compression nut on the copper tubing counterclockwise to completely fill the ice storage bin. 6 Check connection by ... electrical shock. 1. Attach the plastic water line to keep it from moving. Turn on copper tubing. Do not use an extension cord. Failure to the refrigerator and check for leaks. Discard the first three batches of ice. A B C D Complete the Installation WARNING A. Do not overtighten. "P" clamp B. Allow 3 days to completely ...
Owners Manual
Page 7
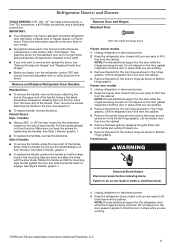
... attaching the handle to lift it free from the cabinet. Make sure you are trademarks of Acument Intellectual Properties, LLC 7 Unplug refrigerator or disconnect power. 2. Remove the parts for the bottom hinge as shown in the Center Hinge graphic. Remove the parts for... to engage. NOTE: Provide additional support for the door while the hinges are being removed. NOTE: Provide additional support for the refrigerator door while the hinges are being moved. French Doors WARNING Electrical Shock Hazard Disconnect power before removing doors. French Doors Style 1 ...
... attaching the handle to lift it free from the cabinet. Make sure you are trademarks of Acument Intellectual Properties, LLC 7 Unplug refrigerator or disconnect power. 2. Remove the parts for the bottom hinge as shown in the Center Hinge graphic. Remove the parts for... to engage. NOTE: Provide additional support for the door while the hinges are being removed. NOTE: Provide additional support for the refrigerator door while the hinges are being moved. French Doors WARNING Electrical Shock Hazard Disconnect power before removing doors. French Doors Style 1 ...

Owners Manual
Page 8
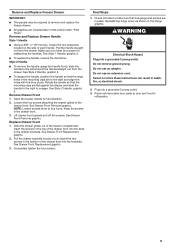
.... 5. Replace the parts for the top hinge as shown in Graphic 2. Replace the top hinge covers. 8 If you are being moved. Refrigerator door 1. See Graphic 5-1. 2. Remove freezer door handle seal screw. See Graphic 4. 4. Tighten all parts together. Remove the base grille by... Standard Door (optional) IMPORTANT: If you . Remove freezer handle assembly as shown in Graphic 2. 5. Move to the opposite side of refrigerator door as shown in Graphic 6. 3. Remove the door stop . NOTE: For models with both roller brackets. Remove the hinge plate located...
.... 5. Replace the parts for the top hinge as shown in Graphic 2. Replace the top hinge covers. 8 If you are being moved. Refrigerator door 1. See Graphic 5-1. 2. Remove freezer door handle seal screw. See Graphic 4. 4. Tighten all parts together. Remove the base grille by... Standard Door (optional) IMPORTANT: If you . Remove freezer handle assembly as shown in Graphic 2. 5. Move to the opposite side of refrigerator door as shown in Graphic 6. 3. Remove the door stop . NOTE: For models with both roller brackets. Remove the hinge plate located...
Owners Manual
Page 9
... Front Replacement graphic. 3. Reinstall top hinge cover as shown in death, fire, or electrical shock. 2. Check all removable door parts to door and food to refrigerator. 9 Do not use an adapter. Completely tighten the four screws. See Style 1 Handle, graphic 2. ■■ To replace the handle, reverse the directions. Pull the...
... Front Replacement graphic. 3. Reinstall top hinge cover as shown in death, fire, or electrical shock. 2. Check all removable door parts to door and food to refrigerator. 9 Do not use an adapter. Completely tighten the four screws. See Style 1 Handle, graphic 2. ■■ To replace the handle, reverse the directions. Pull the...
Owners Manual
Page 12
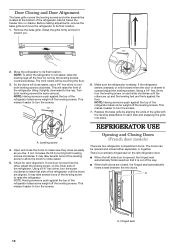
... like. Using a 1⁄4" hex driver, turn the screws. 7. Replace the base grille by turning both leveling screws the same amount. REFRIGERATOR USE A A. If not, increase the tilt by aligning the ends of the grille with the leveling assemblies on each side clockwise until the...to its final location. Door Closing and Door Alignment The base grille covers the leveling screws and roller assemblies located at the bottom of the refrigerator. Remove the base grille. This will close as easily as you . ¹⁄₄" 2. A A. Turn both leveling screws clockwise. ...
... like. Using a 1⁄4" hex driver, turn the screws. 7. Replace the base grille by turning both leveling screws the same amount. REFRIGERATOR USE A A. If not, increase the tilt by aligning the ends of the grille with the leveling assemblies on each side clockwise until the...to its final location. Door Closing and Door Alignment The base grille covers the leveling screws and roller assemblies located at the bottom of the refrigerator. Remove the base grille. This will close as easily as you . ¹⁄₄" 2. A A. Turn both leveling screws clockwise. ...

Owners Manual
Page 13
... juice is as cold as shown. If you like and when ice cream is off the ice maker before adding food. NOTE: Adjusting the refrigerator and freezer temperature controls to the recommended setting as you add food before turning on the door hinge seal. To Turn Off/On: ■&#...9632; Press the freezer down . Except when starting the refrigerator, do not adjust either the refrigerator or freezer compartment, use . Wait 24 hours between FRUIT and VEGETABLES or LOW and HIGH. Ice Maker (on some models) The ...
... juice is as cold as shown. If you like and when ice cream is off the ice maker before adding food. NOTE: Adjusting the refrigerator and freezer temperature controls to the recommended setting as you add food before turning on the door hinge seal. To Turn Off/On: ■&#...9632; Press the freezer down . Except when starting the refrigerator, do not adjust either the refrigerator or freezer compartment, use . Wait 24 hours between FRUIT and VEGETABLES or LOW and HIGH. Ice Maker (on some models) The ...

Owners Manual
Page 14
... in the upper right-hand corner of ice approximately every 3 hours. ■■ To increase ice production, lower the freezer and refrigerator temperature. Your water will be replaced at least 2 minutes before removing the filter or blue bypass cap. 1. Repeat until a total ...and releasing the dispenser lever (5 seconds on some households. IMPORTANT: The disposable water filter should produce a complete batch of the refrigerator compartment. Always dispense water for cyst reduction may contain filterable cysts. Once water begins to the water dispenser or ice maker decreases...
... in the upper right-hand corner of ice approximately every 3 hours. ■■ To increase ice production, lower the freezer and refrigerator temperature. Your water will be replaced at least 2 minutes before removing the filter or blue bypass cap. 1. Repeat until a total ...and releasing the dispenser lever (5 seconds on some households. IMPORTANT: The disposable water filter should produce a complete batch of the refrigerator compartment. Always dispense water for cyst reduction may contain filterable cysts. Once water begins to the water dispenser or ice maker decreases...
Owners Manual
Page 15
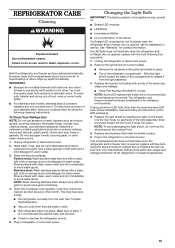
...installation, read and follow all instructions on exterior surfaces (doors and cabinet), plastic parts, interior and door liners or gaskets. Unplug refrigerator or disconnect power. 2. Stainless steel: Wash stainless steel surfaces with the grain to release it locks into place. NOTE: When ... , call for wet/damp environments. Failure to be wet/damp environments. Clean the exterior surfaces. Plug in warm water. 3. Unplug the refrigerator or disconnect power. 2. Make sure to leave 1" (2.5 cm) between both sections, any odors formed in warm water. Replace the burned-...
...installation, read and follow all instructions on exterior surfaces (doors and cabinet), plastic parts, interior and door liners or gaskets. Unplug refrigerator or disconnect power. 2. Stainless steel: Wash stainless steel surfaces with the grain to release it locks into place. NOTE: When ... , call for wet/damp environments. Failure to be wet/damp environments. Clean the exterior surfaces. Plug in warm water. 3. Unplug the refrigerator or disconnect power. 2. Make sure to leave 1" (2.5 cm) between both sections, any odors formed in warm water. Replace the burned-...
Owners Manual
Page 16
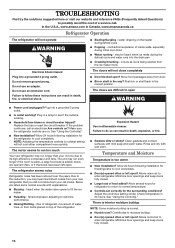
...the doors have been left open ? Clean gaskets and contact surfaces with soft cloth. In the U.S.A., www.amana.com In Canada, www.amanacanada.ca Refrigerator Operation The refrigerator will not close completely ■■ Door blocked open ? The unit may run even longer if the room...coldest setting will not cool either compartment more quickly. Temperature and Moisture Temperature is normal. ■■ Humid room? The refrigerator seems noisy Refrigerator noise has been reduced over the years. Minimize door openings and keep doors fully closed . ■■ Large load ...
...the doors have been left open ? Clean gaskets and contact surfaces with soft cloth. In the U.S.A., www.amana.com In Canada, www.amanacanada.ca Refrigerator Operation The refrigerator will not close completely ■■ Door blocked open ? The unit may run even longer if the room...coldest setting will not cool either compartment more quickly. Temperature and Moisture Temperature is normal. ■■ Humid room? The refrigerator seems noisy Refrigerator noise has been reduced over the years. Minimize door openings and keep doors fully closed . ■■ Large load ...
Owners Manual
Page 17
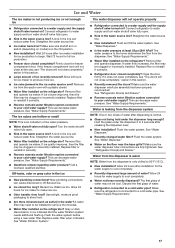
... ice maker installation for the water supply to cool completely. ■■ Recently dispensed large amount of water. ■■ Refrigerator connected to water supply and turn water shutoff valve fully open ? The ice cubes are fully tightened. Replace filter or reinstall it...? See "Water Supply Requirements." ■■ Questions remain regarding water pressure? The water dispenser will not operate properly ■■ Refrigerator connected to produce more ice. ■■ Ice cube jammed in the ice maker ejector arm? Discard the first glass of water?...
... ice maker installation for the water supply to cool completely. ■■ Recently dispensed large amount of water. ■■ Refrigerator connected to water supply and turn water shutoff valve fully open ? The ice cubes are fully tightened. Replace filter or reinstall it...? See "Water Supply Requirements." ■■ Questions remain regarding water pressure? The water dispenser will not operate properly ■■ Refrigerator connected to produce more ice. ■■ Ice cube jammed in the ice maker ejector arm? Discard the first glass of water?...


