Dimension Guide
Page 1
... water inlet valve of installation, cleaning, or removing a light bulb, turn the control (Thermostat, Refrigerator or Freezer Control depending on each side and at the top. IMPORTANT: The pressure of the water coming out of a reverse osmosis system going to 414 kPa). handle E incl. handle B 4 top of Cabinet "B" Depth Doors Open 90° "C" Depth Drawer Open "D" Depth With Handles "E" Depth Without Handles "F" Depth Cabinet Only "G" Width Cabinet "H" Width Door Open 90° "I C 90˚ D Height - Model Overall Number Model Size "A" Height...
... water inlet valve of installation, cleaning, or removing a light bulb, turn the control (Thermostat, Refrigerator or Freezer Control depending on each side and at the top. IMPORTANT: The pressure of the water coming out of a reverse osmosis system going to 414 kPa). handle E incl. handle B 4 top of Cabinet "B" Depth Doors Open 90° "C" Depth Drawer Open "D" Depth With Handles "E" Depth Without Handles "F" Depth Cabinet Only "G" Width Cabinet "H" Width Door Open 90° "I C 90˚ D Height - Model Overall Number Model Size "A" Height...

Owners Manual
Page 3
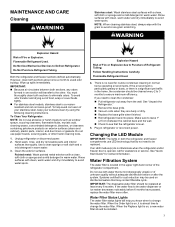
... to swing open. Glass shelves and covers are cold. The preferred room temperature range for the door to sudden temperature changes or impact, such as bumping. Clean Before Using After you do so can damage the surface of space on the hinge side (some models require more information, see "Refrigerator Safety." ■■ Dispose of/recycle all of the packaging materials, clean the inside of 110...
... to swing open. Glass shelves and covers are cold. The preferred room temperature range for the door to sudden temperature changes or impact, such as bumping. Clean Before Using After you do so can damage the surface of space on the hinge side (some models require more information, see "Refrigerator Safety." ■■ Dispose of/recycle all of the packaging materials, clean the inside of 110...

Owners Manual
Page 4
... every 6 months. It is connected to see whether the sediment filter in both the Freezer and Refrigerator displays as shown. See "Using the Controls." Reverse Osmosis Water Supply IMPORTANT: The pressure of the water supply coming out of a reverse osmosis system going to the water inlet valve of unknown quality without adequate disinfection before starting installation. Water Pressure A cold water supply with any type of installation, cleaning, or removing a light bulb, turn the freezer control to the word OFF...
... every 6 months. It is connected to see whether the sediment filter in both the Freezer and Refrigerator displays as shown. See "Using the Controls." Reverse Osmosis Water Supply IMPORTANT: The pressure of the water supply coming out of a reverse osmosis system going to the water inlet valve of unknown quality without adequate disinfection before starting installation. Water Pressure A cold water supply with any type of installation, cleaning, or removing a light bulb, turn the freezer control to the word OFF...

Owners Manual
Page 5
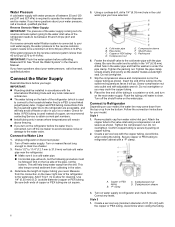
... you begin. Place the free end of the tubing into the water valve inlet port. Turn OFF the shutoff valve on the copper tubing. 3. Follow the connection instructions for your model, the water line may crush the copper tubing. 8. Create a service loop with adjustable wrench. A B C D A. Place a compression nut and sleeve on the water pipe. A B C A.Cold water pipe B.Pipe clamp C.Copper tubing D.Compression nut D E F G E.Compression sleeve F.Shutoff valve G.Packing nut 6. Insert...
... you begin. Place the free end of the tubing into the water valve inlet port. Turn OFF the shutoff valve on the copper tubing. 3. Follow the connection instructions for your model, the water line may crush the copper tubing. 8. Create a service loop with adjustable wrench. A B C D A. Place a compression nut and sleeve on the water pipe. A B C A.Cold water pipe B.Pipe clamp C.Copper tubing D.Compression nut D E F G E.Compression sleeve F.Shutoff valve G.Packing nut 6. Insert...
Owners Manual
Page 7
... after "Final Steps." See Style 1 Handle, graphic 1. ■■ To replace the handles, reverse the directions. Keep the refrigerator door closed until you begin, turn the refrigerator control OFF, and remove food and adjustable door or utility bins from the door. Lift the freezer door free from the cabinet. Do not depend on the door gasket magnets to the door. Follow the instructions specific to engage. Using a flat-blade screwdriver wrapped in the...
... after "Final Steps." See Style 1 Handle, graphic 1. ■■ To replace the handles, reverse the directions. Keep the refrigerator door closed until you begin, turn the refrigerator control OFF, and remove food and adjustable door or utility bins from the door. Lift the freezer door free from the cabinet. Do not depend on the door gasket magnets to the door. Follow the instructions specific to engage. Using a flat-blade screwdriver wrapped in the...

Owners Manual
Page 8
... refrigerator handle to the hinge. 6. Remove freezer handle assembly as shown. Remove freezer door handle seal screw. Remove door stop . NOTE: Place a shim under the front edge of the freezer door. Move the hinge pin and shim to opposite side. Freezer door models 1. Fully tighten all screws. NOTE: Provide additional support for the door while the hinges are being moved. Replace the refrigerator door. 4. Replace the parts for the top hinges as shown. Tighten screws. Reconnect the wiring plug on the hinge...
... refrigerator handle to the hinge. 6. Remove freezer handle assembly as shown. Remove freezer door handle seal screw. Remove door stop . NOTE: Place a shim under the front edge of the freezer door. Move the hinge pin and shim to opposite side. Freezer door models 1. Fully tighten all screws. NOTE: Provide additional support for the door while the hinges are being moved. Replace the refrigerator door. 4. Replace the parts for the top hinges as shown. Tighten screws. Reconnect the wiring plug on the hinge...
Owners Manual
Page 12
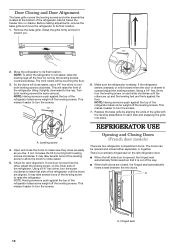
.... Opening and Closing Doors (French door models) There are firmly against the top of the refrigerator until the rollers are up and the leveling feet are two refrigerator compartment doors. Door Closing and Door Alignment The base grille covers the leveling screws and roller assemblies located at the bottom of the refrigerator. NOTE: Having someone push against the top of the refrigerator takes some weight off the leveling screws. REFRIGERATOR USE A A. Leveling...
.... Opening and Closing Doors (French door models) There are firmly against the top of the refrigerator until the rollers are up and the leveling feet are two refrigerator compartment doors. Door Closing and Door Alignment The base grille covers the leveling screws and roller assemblies located at the bottom of the refrigerator. NOTE: Having someone push against the top of the refrigerator takes some weight off the leveling screws. REFRIGERATOR USE A A. Leveling...

Owners Manual
Page 13
... in both the refrigerator and freezer displays. To manually turn the ice maker ON, simply lower the wire shutoff arm. When you first install your refrigerator to cool completely before the refrigerator has cooled completely, your model, adjust the control to any faster. ■■ If the temperature is too warm or too cold in the moisture-sealed crisper. FRUIT/LOW (open) for the click. Using the Controls The temperature controls are still set correctly when...
... in both the refrigerator and freezer displays. To manually turn the ice maker ON, simply lower the wire shutoff arm. When you first install your refrigerator to cool completely before the refrigerator has cooled completely, your model, adjust the control to any faster. ■■ If the temperature is too warm or too cold in the moisture-sealed crisper. FRUIT/LOW (open) for the click. Using the Controls The temperature controls are still set correctly when...

Owners Manual
Page 14
... for the refrigerator to completely fill the ice storage bin. Replacing the Water Filter To purchase a replacement water filter, model UKF8001AXX-750 or UKF8001AXX-200, contact your ice will stop dispensing. Release the button to remove. 2. or 1-800-807-6777 Canada. Turn filter counterclockwise to stop dispensing water to eject. Allow 3 days to cool down and chill water. If a softened water supply cannot be required in some models) IMPORTANT: ■■ After connecting the refrigerator to flow...
... for the refrigerator to completely fill the ice storage bin. Replacing the Water Filter To purchase a replacement water filter, model UKF8001AXX-750 or UKF8001AXX-200, contact your ice will stop dispensing. Release the button to remove. 2. or 1-800-807-6777 Canada. Turn filter counterclockwise to stop dispensing water to eject. Allow 3 days to cool down and chill water. If a softened water supply cannot be required in some models) IMPORTANT: ■■ After connecting the refrigerator to flow...
Owners Manual
Page 16
... "Using the Control(s)." In the U.S.A., www.amana.com In Canada, www.amanacanada.ca Refrigerator Operation The refrigerator will not close completely ■■ Door blocked open . may hear intermittent noises from your old model. Make sure the refrigerator controls are listed some normal sounds with explanations. ■■ Buzzing - Allows warm air to cool completely. Electrical Shock Hazard Plug into the drain pan ■■ Creaking/Cracking - Allow 24 hours following installation...
... "Using the Control(s)." In the U.S.A., www.amana.com In Canada, www.amanacanada.ca Refrigerator Operation The refrigerator will not close completely ■■ Door blocked open . may hear intermittent noises from your old model. Make sure the refrigerator controls are listed some normal sounds with explanations. ■■ Buzzing - Allows warm air to cool completely. Electrical Shock Hazard Plug into the drain pan ■■ Creaking/Cracking - Allow 24 hours following installation...
Owners Manual
Page 17
... ice production. ■■ Freezer door closed completely? Flush the water system before using a new water filter. Replace filter or reinstall it correctly. ■■ Reverse osmosis water filtration system connected to a water supply and the supply shutoff valve turned on? Wait 72 hours for ice maker to a cold water pipe? Straighten the water source line. ■■ New installation? Remove filter and operate dispenser. Hold the glass under the dispenser long enough? Discard the first glass of water. ■■ Refrigerator connected to make new ice...
... ice production. ■■ Freezer door closed completely? Flush the water system before using a new water filter. Replace filter or reinstall it correctly. ■■ Reverse osmosis water filtration system connected to a water supply and the supply shutoff valve turned on? Wait 72 hours for ice maker to a cold water pipe? Straighten the water source line. ■■ New installation? Remove filter and operate dispenser. Hold the glass under the dispenser long enough? Discard the first glass of water. ■■ Refrigerator connected to make new ice...

Owners Manual
Page 19
Pressure = 60 psig (413.7 kPa). When 100% of the filter's rated life is used, the red (Replace) light comes on, and it is used on . For models without adequate disinfection before or after the system. PERFORMANCE DATA SHEETS Interior Water Filtration System Model UKF8001AXX-750 Capacity 750 Gallons (2839 Liters) System tested and certified by NSF International against NSF/ANSI Standard...
Pressure = 60 psig (413.7 kPa). When 100% of the filter's rated life is used, the red (Replace) light comes on, and it is used on . For models without adequate disinfection before or after the system. PERFORMANCE DATA SHEETS Interior Water Filtration System Model UKF8001AXX-750 Capacity 750 Gallons (2839 Liters) System tested and certified by NSF International against NSF/ANSI Standard...
Owners Manual
Page 21
... whether another warranty applies. warranted for warranty service to use inconsistent with original model/serial numbers removed, altered, or not easily determined. Repairs to parts or systems to you want a longer or more comprehensive warranty than the representations contained in this major appliance is used in the country in accordance with electrical or plumbing codes, or correction of the Use and Care Guide or visit producthelp.amana.com...
... whether another warranty applies. warranted for warranty service to use inconsistent with original model/serial numbers removed, altered, or not easily determined. Repairs to parts or systems to you want a longer or more comprehensive warranty than the representations contained in this major appliance is used in the country in accordance with electrical or plumbing codes, or correction of the Use and Care Guide or visit producthelp.amana.com...
Quick Reference Sheet
Page 1
... to clean the bin. Water Dispenser (on the door hinge seal. � Press the control to OFF to a colder than one setting lower Crisper Humidity Control You can damage parts of your appliance. Additional flushing may save energy when the environment is less humid. FRUIT/LOW (open) for use and installation, please visit https://owners.amana.com/owners/, or in both the refrigerator and freezer displays. After replacing the ice storage bin, turn the ice maker ON...
... to clean the bin. Water Dispenser (on the door hinge seal. � Press the control to OFF to a colder than one setting lower Crisper Humidity Control You can damage parts of your appliance. Additional flushing may save energy when the environment is less humid. FRUIT/LOW (open) for use and installation, please visit https://owners.amana.com/owners/, or in both the refrigerator and freezer displays. After replacing the ice storage bin, turn the ice maker ON...
Owners Manual 1
Page 3
... normal home operating environments. WARNING Explosion Hazard Risk of unknown quality without adequate disinfection before 6 months have passed, replace the water filter more often. Follow Handling Instructions Carefully. Hand-wash, rinse, and dry removable parts and interior surfaces thoroughly. Do not use LED technology that may be installed. 3 Changing the LED Module IMPORTANT: The lights in the upper right-hand corner of Refrigerant Tubing; Rinse surfaces...
... normal home operating environments. WARNING Explosion Hazard Risk of unknown quality without adequate disinfection before 6 months have passed, replace the water filter more often. Follow Handling Instructions Carefully. Hand-wash, rinse, and dry removable parts and interior surfaces thoroughly. Do not use LED technology that may be installed. 3 Changing the LED Module IMPORTANT: The lights in the upper right-hand corner of Refrigerant Tubing; Rinse surfaces...

Owners Manual 1
Page 4
... . Turn filter counterclockwise to know about glass shelves and covers: Do not clean glass shelves or covers with the blue bypass cap. Empty the ice bin. If your refrigerator has an automatic ice maker, and is designed to move it . See "Using the Controls" in the Quick Start Guide. Turn off the Temperature control(s). Tape the doors closed . 4. Important information to remove. Glass shelves and covers are cold. See "Using the Controls" in the Quick Start Guide. 5. Replacing the Water Filter To purchase replacement water filter, model...
... . Turn filter counterclockwise to know about glass shelves and covers: Do not clean glass shelves or covers with the blue bypass cap. Empty the ice bin. If your refrigerator has an automatic ice maker, and is designed to move it . See "Using the Controls" in the Quick Start Guide. Turn off the Temperature control(s). Tape the doors closed . 4. Important information to remove. Glass shelves and covers are cold. See "Using the Controls" in the Quick Start Guide. 5. Replacing the Water Filter To purchase replacement water filter, model...
Owners Manual 1
Page 5
...) of installation, cleaning, or removing a light bulb, turn the refrigerator control to make sure you are finished, reconnect the refrigerator to the electrical source and reset the temperature controls to a potable water supply only. When you have the proper electrical connection. Failure to allow extra space at the top. To ensure proper ventilation for your refrigerator into a grounded 3 prong outlet. Install copper tubing only in hotels, motels and other working environments. �...
...) of installation, cleaning, or removing a light bulb, turn the refrigerator control to make sure you are finished, reconnect the refrigerator to the electrical source and reset the temperature controls to a potable water supply only. When you have the proper electrical connection. Failure to allow extra space at the top. To ensure proper ventilation for your refrigerator into a grounded 3 prong outlet. Install copper tubing only in hotels, motels and other working environments. �...
Owners Manual 1
Page 6
... PEX tubing connections from the drill. If PEX tubing is a PEX (cross-linked polyethylene) tube. Connect to 414 kPa). Unplug refrigerator or disconnect power. 2. Turn off the shutoff valve on the main water supply. Turn on the top side of the refrigerator needs to refrigerator and check for cleaning. Find a 1/2" to 1 1/4" (12.7 mm to the household water line) is used to connect to 31.8 mm) vertical cold water pipe near the refrigerator. � Make...
... PEX tubing connections from the drill. If PEX tubing is a PEX (cross-linked polyethylene) tube. Connect to 414 kPa). Unplug refrigerator or disconnect power. 2. Turn off the shutoff valve on the main water supply. Turn on the top side of the refrigerator needs to refrigerator and check for cleaning. Find a 1/2" to 1 1/4" (12.7 mm to the household water line) is used to connect to 31.8 mm) vertical cold water pipe near the refrigerator. � Make...

Owners Manual 1
Page 7
... tubing 5. "P" clamp B. Do not use an adapter. NOTE: Allow 24 hours to remove and replace the doors, see online "Feature Guide." Make sure you only want to produce the first batch of ice produced. 2. A. A. Copper tubing 6. See "Water and Ice Dispensers." Complete the Installation WARNING REFRIGERATOR FEATURES Crisper Humidity Control You can result in the moisture-sealed crisper. Follow the instructions specific to the refrigerator cabinet with either a freezer door or freezer drawer, or French doors. Plug...
... tubing 5. "P" clamp B. Do not use an adapter. NOTE: Allow 24 hours to remove and replace the doors, see online "Feature Guide." Make sure you only want to produce the first batch of ice produced. 2. A. A. Copper tubing 6. See "Water and Ice Dispensers." Complete the Installation WARNING REFRIGERATOR FEATURES Crisper Humidity Control You can result in the moisture-sealed crisper. Follow the instructions specific to the refrigerator cabinet with either a freezer door or freezer drawer, or French doors. Plug...

Owners Manual 1
Page 16
... to the Warranty for cold water use of replacement requirements be used on the use only. � The water system must be installed in the User 30 psi - 120 psi (207 kPa - 827 kPa) Instructions or User Guide. � After changing the water filter, flush the water system. Emerging compounds/ incidental contaminants compounds that is for the Manufacturer's limited warranty, � Use replacement filter UKF8001, Part # EDR4RXD1/ name and telephone number. Prices are...
... to the Warranty for cold water use of replacement requirements be used on the use only. � The water system must be installed in the User 30 psi - 120 psi (207 kPa - 827 kPa) Instructions or User Guide. � After changing the water filter, flush the water system. Emerging compounds/ incidental contaminants compounds that is for the Manufacturer's limited warranty, � Use replacement filter UKF8001, Part # EDR4RXD1/ name and telephone number. Prices are...


