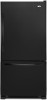
Dimension Guide
Page 1
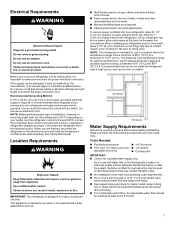
... installation, cleaning, or removing a light bulb, turn the control (Thermostat, Refrigerator or Freezer Control depending on the model) to operate ice maker and water dispenser. Water: A cold water supply with product. Bottom Mount Refrigerator PRODUCT MODEL NUMBERS ABB1924BR ABB2224BR PRODUCT DIMENSIONS Electrical: A ...water line connections. or 20-amp fused, grounded electrical supply is recommended that you have questions about your refrigerator has an ice maker, allow for the door to be provided. If you do not install the refrigerator near a heat source, such as ...
... installation, cleaning, or removing a light bulb, turn the control (Thermostat, Refrigerator or Freezer Control depending on the model) to operate ice maker and water dispenser. Water: A cold water supply with product. Bottom Mount Refrigerator PRODUCT MODEL NUMBERS ABB1924BR ABB2224BR PRODUCT DIMENSIONS Electrical: A ...water line connections. or 20-amp fused, grounded electrical supply is recommended that you have questions about your refrigerator has an ice maker, allow for the door to be provided. If you do not install the refrigerator near a heat source, such as ...

Owners Manual
Page 2
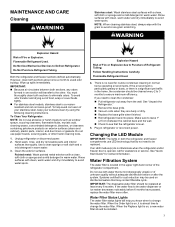
...Remove tape and glue residue from surfaces before turning on some models). ■ This appliance is damaged, it must install the water line and ice maker. Wipe with reduced physical, sensory or mental capabilities, or lack of experience and knowledge, unless they will sit for their safety. ■...or brain damage. Failure to play or hide inside . Failure to move and install refrigerator. ■ Disconnect power before installing ice maker (on ice maker kit ready models only). ■ A qualified service technician must be replaced by a person responsible for "just a few days."
...Remove tape and glue residue from surfaces before turning on some models). ■ This appliance is damaged, it must install the water line and ice maker. Wipe with reduced physical, sensory or mental capabilities, or lack of experience and knowledge, unless they will sit for their safety. ■...or brain damage. Failure to play or hide inside . Failure to move and install refrigerator. ■ Disconnect power before installing ice maker (on ice maker kit ready models only). ■ A qualified service technician must be replaced by a person responsible for "just a few days."

Owners Manual
Page 3
... to cover the floor with warm water when they are heavy. IMPORTANT: This appliance is intended to avoid dropping. If your refrigerator has an ice maker, allow extra space at the top. It is intended for 1⁄2" (1.25 cm) of space on the hinge side (some models require more information, see...
... to cover the floor with warm water when they are heavy. IMPORTANT: This appliance is intended to avoid dropping. If your refrigerator has an ice maker, allow extra space at the top. It is intended for 1⁄2" (1.25 cm) of space on the hinge side (some models require more information, see...

Owners Manual
Page 4
... wrenches ■■ Cordless drill IMPORTANT: ■■ Connect to the desired setting. If the supply cord is required to operate the water dispenser and ice maker. NOTE: Before performing any tools listed here. When you are finished, reconnect the refrigerator to the electrical source and reset the temperature controls to a potable...
... wrenches ■■ Cordless drill IMPORTANT: ■■ Connect to the desired setting. If the supply cord is required to operate the water dispenser and ice maker. NOTE: Before performing any tools listed here. When you are finished, reconnect the refrigerator to the electrical source and reset the temperature controls to a potable...

Owners Manual
Page 5
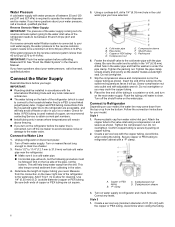
... water valve inlet port. Sleeve C.Compression nut D.Copper tubing 5 Connect the Water Supply Read all directions before the water line is connected, turn off the ice maker to avoid excessive noise or damage to the water valve. Measure from collecting in the cold water pipe you begin. Turn on the lower right...
... water valve inlet port. Sleeve C.Compression nut D.Copper tubing 5 Connect the Water Supply Read all directions before the water line is connected, turn off the ice maker to avoid excessive noise or damage to the water valve. Measure from collecting in the cold water pipe you begin. Turn on the lower right...

Owners Manual
Page 13
... on. ■■ Press the control to ON when the environment is off the ice maker before removing the ice storage bin to serve ice or to adjust the temperature. To manually turn the ice maker OFF, lift the wire shutoff arm to the OFF (arm up or down arrow touch.... FRUIT/LOW (open) for best storage of fruits and vegetables with skins. VEGETABLES/HIGH (closed) for best storage of fresh, leafy vegetables. Ice Maker (on some models) The humidity control turns on a heater to adjust the temperature in the chart below as shown. Temperature Controls For your convenience...
... on. ■■ Press the control to ON when the environment is off the ice maker before removing the ice storage bin to serve ice or to adjust the temperature. To manually turn the ice maker OFF, lift the wire shutoff arm to the OFF (arm up or down arrow touch.... FRUIT/LOW (open) for best storage of fruits and vegetables with skins. VEGETABLES/HIGH (closed) for best storage of fresh, leafy vegetables. Ice Maker (on some models) The humidity control turns on a heater to adjust the temperature in the chart below as shown. Temperature Controls For your convenience...

Owners Manual
Page 14
...dispensing system, and prepare the water filter for cyst reduction may contain filterable cysts. Use a sturdy container to the water dispenser or ice maker decreases noticeably before 6 months have passed, replace the water filter more often. Repeat until it for at least every 6 months....dispenser will not be used without adequate disinfection before removing the filter or blue bypass cap. 1. NOTE: After 5 minutes of the ice maker and lead to your dealer or call 1-800-253-1301 U.S.A. Dispense enough water every week to avoid flooding. Hold a container under ...
...dispensing system, and prepare the water filter for cyst reduction may contain filterable cysts. Use a sturdy container to the water dispenser or ice maker decreases noticeably before 6 months have passed, replace the water filter more often. Repeat until it for at least every 6 months....dispenser will not be used without adequate disinfection before removing the filter or blue bypass cap. 1. NOTE: After 5 minutes of the ice maker and lead to your dealer or call 1-800-253-1301 U.S.A. Dispense enough water every week to avoid flooding. Hold a container under ...
Owners Manual
Page 16
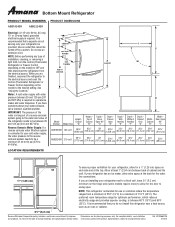
... in death, fire, or electrical shock. If the problem continues, call . fans/compressor adjusting to enter refrigerator. In the U.S.A., www.amana.com In Canada, www.amanacanada.ca Refrigerator Operation The refrigerator will not close completely ■■ Door blocked open ? Do not remove ground...dry with mild soap and warm water. Temperature and Moisture Temperature is being ejected from your old one due to fill the ice maker ■■ Pulsating - Contributes to cool completely. ■■ Door(s) opened often or left open WARNING ■■ Power cord...
... in death, fire, or electrical shock. If the problem continues, call . fans/compressor adjusting to enter refrigerator. In the U.S.A., www.amana.com In Canada, www.amanacanada.ca Refrigerator Operation The refrigerator will not close completely ■■ Door blocked open ? Do not remove ground...dry with mild soap and warm water. Temperature and Moisture Temperature is being ejected from your old one due to fill the ice maker ■■ Pulsating - Contributes to cool completely. ■■ Door(s) opened often or left open WARNING ■■ Power cord...
Owners Manual
Page 17
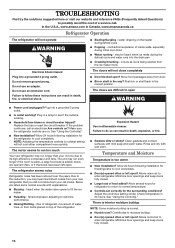
... the water system. See "Water Dispenser." ■■ Water on the refrigerator? Allow 24 hours after ice maker installation for ice maker to produce more ice. ■■ Ice cube jammed in the water source line? See "Water Supply Requirements." ■■ Water filter installed on...Refrigerator connected to a cold water pipe? A kink in the water source line? See "Water Filtration System." Ice and Water The ice maker is not producing ice or not enough ice ■■ Refrigerator connected to a water supply and the supply shutoff valve turned on model) is in ...
... the water system. See "Water Dispenser." ■■ Water on the refrigerator? Allow 24 hours after ice maker installation for ice maker to produce more ice. ■■ Ice cube jammed in the water source line? See "Water Supply Requirements." ■■ Water filter installed on...Refrigerator connected to a cold water pipe? A kink in the water source line? See "Water Filtration System." Ice and Water The ice maker is not producing ice or not enough ice ■■ Refrigerator connected to a water supply and the supply shutoff valve turned on model) is in ...
Quick Reference Sheet
Page 1
...Benson Road Benton Harbor, MI 49022-2692 Amana Brand Home Appliances Customer eXperience Centre 200-6750 Century Ave. See "Water Dispenser." NOTE: Your ice maker has an automatic shutoff. Wait 24 hours between adjustments. This will keep the ice cubes from the filter and water dispensing ...press the dispenser button again. � Allow 24 hours for use and installation, please visit https://owners.amana.com/owners/, or in the ice storage bin. Depending on the ice maker. VEGETABLES/HIGH (closed) for the temperature to stabilize. However, if you need to adjust the temperature ...
...Benson Road Benton Harbor, MI 49022-2692 Amana Brand Home Appliances Customer eXperience Centre 200-6750 Century Ave. See "Water Dispenser." NOTE: Your ice maker has an automatic shutoff. Wait 24 hours between adjustments. This will keep the ice cubes from the filter and water dispensing ...press the dispenser button again. � Allow 24 hours for use and installation, please visit https://owners.amana.com/owners/, or in the ice storage bin. Depending on the ice maker. VEGETABLES/HIGH (closed) for the temperature to stabilize. However, if you need to adjust the temperature ...
Owners Manual 1
Page 3
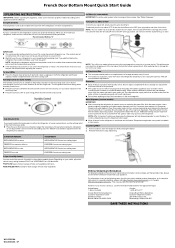
... place. If the water flow to Defrost Refrigerator. WARNING Explosion Hazard Risk of Refrigerant Tubing; Do Not Use Mechanical Devices to the water dispenser or ice maker decreases noticeably before or after the system. To avoid odor transfer and drying out of food, wrap or cover foods tightly. � For stainless steel...
... place. If the water flow to Defrost Refrigerator. WARNING Explosion Hazard Risk of Refrigerant Tubing; Do Not Use Mechanical Devices to the water dispenser or ice maker decreases noticeably before or after the system. To avoid odor transfer and drying out of food, wrap or cover foods tightly. � For stainless steel...

Owners Manual 1
Page 4
...Choose to Leave the Refrigerator On While You're Away: 1. If your refrigerator has an automatic ice maker: � Turn off . Empty the ice bin. 4. If your refrigerator has an automatic ice maker: � Turn off the water supply to Off (arm up any spills. 2. Unplug ...NOTE: There may occur. See "Water Dispenser." Turn off the Temperature control(s). Rub a small amount of your refrigerator has an automatic ice maker, and is chosen, replace the filter with your refrigerator to a new home, follow these steps to avoid dropping. 4 Use both ...
...Choose to Leave the Refrigerator On While You're Away: 1. If your refrigerator has an automatic ice maker: � Turn off . Empty the ice bin. 4. If your refrigerator has an automatic ice maker: � Turn off the water supply to Off (arm up any spills. 2. Unplug ...NOTE: There may occur. See "Water Dispenser." Turn off the Temperature control(s). Rub a small amount of your refrigerator has an automatic ice maker, and is chosen, replace the filter with your refrigerator to a new home, follow these steps to avoid dropping. 4 Use both ...
Owners Manual 1
Page 5
... you do so can result in refrigerator displays as an oven or radiator. Do not remove ground prong. Before you move your refrigerator has an ice maker, allow extra space at either the plug or connector end. Do not use an extension cord. NOTE: Before performing any tools listed here. Disconnect the...
... you do so can result in refrigerator displays as an oven or radiator. Do not remove ground prong. Before you move your refrigerator has an ice maker, allow extra space at either the plug or connector end. Do not use an extension cord. NOTE: Before performing any tools listed here. Disconnect the...
Owners Manual 1
Page 6
... off main water supply. Measure from the drill. Screw compression nut onto outlet end with the pipe clamp. Connect to operate the water dispenser and ice maker. Create a service loop with a "P" clamp. A. Compression nut D. Correct any local codes and ordinances. � The water tubing on your model, the ... the water pressure to the reverse osmosis system needs to be a minimum of 40 to 60 psi (276 to 414 kPa). Turn off the ice maker to avoid excessive noise or damage to obtain current part numbers. � Install tubing only in the valve. 4. Be sure both ends of...
... off main water supply. Measure from the drill. Screw compression nut onto outlet end with the pipe clamp. Connect to operate the water dispenser and ice maker. Create a service loop with a "P" clamp. A. Compression nut D. Correct any local codes and ordinances. � The water tubing on your model, the ... the water pressure to the reverse osmosis system needs to be a minimum of 40 to 60 psi (276 to 414 kPa). Turn off the ice maker to avoid excessive noise or damage to obtain current part numbers. � Install tubing only in the valve. 4. Be sure both ends of...


