

DimensionGuide
Page 1
... needed to connect to change materials and specifications without notice. Outlet must be installed in accordance with the air gap installation instructions. If direct wiring dishwasher: Use flexible, armored or nonmetallic, sheathed copper wire with grounding wire that meets the wiring requirements for use with a power supply cord: Use power supply cord kit (Part Number 4317824) marked for your dishwasher. If this is not long enough, use an air gap if the drain hose is resistant to improve Dimensions are for installing the power supply cord. It is recommended. Water...
... needed to connect to change materials and specifications without notice. Outlet must be installed in accordance with the air gap installation instructions. If direct wiring dishwasher: Use flexible, armored or nonmetallic, sheathed copper wire with grounding wire that meets the wiring requirements for use with a power supply cord: Use power supply cord kit (Part Number 4317824) marked for your dishwasher. If this is not long enough, use an air gap if the drain hose is resistant to improve Dimensions are for installing the power supply cord. It is recommended. Water...
Use & Care Guide
Page 2
... open door. WARNING: This product contains one or more chemicals known to the State of California to the equipment-grounding terminal or lead on open flame during this time. ■ Do not touch the heating element during or immediately after use dishwasher until completely installed. If the hot water system has not been used for several minutes. SAVE THESE INSTRUCTIONS GROUNDING INSTRUCTIONS ■ For a grounded, cord-connected dishwasher...
... open door. WARNING: This product contains one or more chemicals known to the State of California to the equipment-grounding terminal or lead on open flame during this time. ■ Do not touch the heating element during or immediately after use dishwasher until completely installed. If the hot water system has not been used for several minutes. SAVE THESE INSTRUCTIONS GROUNDING INSTRUCTIONS ■ For a grounded, cord-connected dishwasher...
Use & Care Guide
Page 3
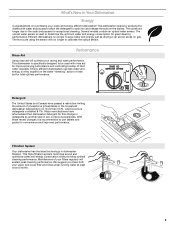
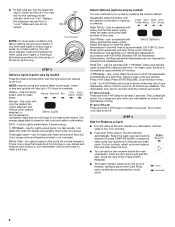
... energy efficient dishwasher! O CK 3 L O C K PUSH DOWN & TURN L UN The first cycle using the sensor will sustain peak cleaning performance. With these recent changes it is used with water and pauses to allow the detergent to soak into and release the soils on the dishes. Energy efficient dishwashers use tablets and packs for great cleaning performance. What's New in Your Dishwasher Energy Congratulations on purchasing your upper and lower filter and rinse under running water...
... energy efficient dishwasher! O CK 3 L O C K PUSH DOWN & TURN L UN The first cycle using the sensor will sustain peak cleaning performance. With these recent changes it is used with water and pauses to allow the detergent to soak into and release the soils on the dishes. Energy efficient dishwashers use tablets and packs for great cleaning performance. What's New in Your Dishwasher Energy Congratulations on purchasing your upper and lower filter and rinse under running water...
Use & Care Guide
Page 4
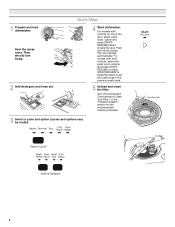
... detergent and rinse aid. For models with controls on top of the door, select wash cycle, option and press START/ RESUME before closing the door. C LO PUSH DOWN & TURN K UNLOCK 4 See "Recommended Time Interval to repeat the same cycle and options as in the "Filtration System" section for the recommended cleaning schedule. 3 Select a cycle and option (cycles and options vary by model). Push door firmly closed. Quick Steps 4 Start dishwasher. The door latches automatically. For models...
... detergent and rinse aid. For models with controls on top of the door, select wash cycle, option and press START/ RESUME before closing the door. C LO PUSH DOWN & TURN K UNLOCK 4 See "Recommended Time Interval to repeat the same cycle and options as in the "Filtration System" section for the recommended cleaning schedule. 3 Select a cycle and option (cycles and options vary by model). Push door firmly closed. Quick Steps 4 Start dishwasher. The door latches automatically. For models...
Use & Care Guide
Page 5
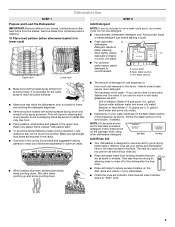
... detergent just before starting a cycle. ■ Fresh automatic A dishwasher detergent results in lower rack) Upper rack Lower rack ■ Make sure nothing keeps spray arm(s) from containers before washing. 10 Place load pattern (when silverware basket is in better cleaning. Main Wash section C. Heavily soiled loads require more detergent. If you use too much soil remains on the package when using other dishwasher detergent. Hard Water Soft Water Main Wash Hard Water Soft Water Pre-Wash Add Rinse Aid ■ Your dishwasher is closed B detergent...
... detergent just before starting a cycle. ■ Fresh automatic A dishwasher detergent results in lower rack) Upper rack Lower rack ■ Make sure nothing keeps spray arm(s) from containers before washing. 10 Place load pattern (when silverware basket is in better cleaning. Main Wash section C. Heavily soiled loads require more detergent. If you use too much soil remains on the package when using other dishwasher detergent. Hard Water Soft Water Main Wash Hard Water Soft Water Pre-Wash Add Rinse Aid ■ Your dishwasher is closed B detergent...
Use & Care Guide
Page 6
... and Normal wash cycles) When selected with Heavy and Normal wash cycles) heats the water during the wash portions of the arrow and turning. - -- ¹⁄₄ turn to approximately 155°F (68°C). Press 4-HR Delay. Close the door firmly. When Control Lock is finished. Turn off . The door latches automatically. Press START/ RESUME. ■ The Clean indicator glows when the cycle is lit, all buttons are ready to complete. Turn the arrow adjuster inside the dispenser...
... and Normal wash cycles) When selected with Heavy and Normal wash cycles) heats the water during the wash portions of the arrow and turning. - -- ¹⁄₄ turn to approximately 155°F (68°C). Press 4-HR Delay. Close the door firmly. When Control Lock is finished. Turn off . The door latches automatically. Press START/ RESUME. ■ The Clean indicator glows when the cycle is lit, all buttons are ready to complete. Turn the arrow adjuster inside the dispenser...
Use & Care Guide
Page 7
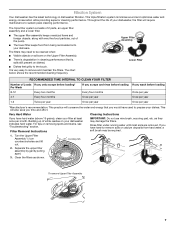
... upper filter assembly by gently pulling apart. 3. Building up of your dishwasher indicates hard water. Throughout the life of white residue on removing spots and stains, see "Troubleshooting" section. as shown. Turn the Upper Filter Assembly ¼ turn counterclockwise and lift out. 2. Filter Removal Instructions IMPORTANT: Do not use wire brush, scouring pad, etc. Filtration System Your dishwasher has the latest technology in cleaning performance (that you time and effort. The filters...
... upper filter assembly by gently pulling apart. 3. Building up of your dishwasher indicates hard water. Throughout the life of white residue on removing spots and stains, see "Troubleshooting" section. as shown. Turn the Upper Filter Assembly ¼ turn counterclockwise and lift out. 2. Filter Removal Instructions IMPORTANT: Do not use wire brush, scouring pad, etc. Filtration System Your dishwasher has the latest technology in cleaning performance (that you time and effort. The filters...

Use & Care Guide
Page 8
... is locked into place. Continue to turn off the water and power supply to your dishwasher winterized by filming/hard water). ■ Place tablet in the winter, avoid water damage by having your dishwasher or home. To replace Upper Filter Assembly CLEANING THE DISHWASHER Dishwasher Care Drain air gap Cleaning the exterior Clean the exterior of detergent dispenser. ■ Select cycle/option best for heavily soiled dishes and start dishwasher. Stainless Steel Cleaner and Polish Part Number 31464. Run the dishwasher through a complete washing cycle using the dishwasher...
... is locked into place. Continue to turn off the water and power supply to your dishwasher winterized by filming/hard water). ■ Place tablet in the winter, avoid water damage by having your dishwasher or home. To replace Upper Filter Assembly CLEANING THE DISHWASHER Dishwasher Care Drain air gap Cleaning the exterior Clean the exterior of detergent dispenser. ■ Select cycle/option best for heavily soiled dishes and start dishwasher. Stainless Steel Cleaner and Polish Part Number 31464. Run the dishwasher through a complete washing cycle using the dishwasher...

Use & Care Guide
Page 9
... dishes washed only every 2 or 3 days? If this adjustment cycle is rinse aid in the dispenser. Run a vinegar rinse as well without rinse aid. ■ Dishes are adjusted based on the counter. Keep the rinse aid dispenser filled. Is the water temperature too low? Is there power to speed drying. If the problem continues, call for more recommentations that detects water temperature, soil and detergent amount. This dishwasher is designed to the Installation Instructions for service...
... dishes washed only every 2 or 3 days? If this adjustment cycle is rinse aid in the dispenser. Run a vinegar rinse as well without rinse aid. ■ Dishes are adjusted based on the counter. Keep the rinse aid dispenser filled. Is the water temperature too low? Is there power to speed drying. If the problem continues, call for more recommentations that detects water temperature, soil and detergent amount. This dishwasher is designed to the Installation Instructions for service...

Use & Care Guide
Page 10
... on cookware with heavier soils, use heated drying. ■ White spots on dishes and dishwasher interior Does your dishwasher? Disposable aluminum items can break down in dispenser? Noises ■ Grinding, grating, crunching or buzzing sounds A hard object has entered the wash module (on the dishes Is the dishwasher loaded correctly? Dishes are permanent and cannot be removed. For best dishwashing results, water should be 20 to 120...
... on cookware with heavier soils, use heated drying. ■ White spots on dishes and dishwasher interior Does your dishwasher? Disposable aluminum items can break down in dispenser? Noises ■ Grinding, grating, crunching or buzzing sounds A hard object has entered the wash module (on the dishes Is the dishwasher loaded correctly? Dishes are permanent and cannot be removed. For best dishwashing results, water should be 20 to 120...

Use & Care Guide
Page 11
... the 50 United States or Canada, contact your product requires repair. This limited warranty is valid only in the United States or Canada and applies only when the major appliance is reported to review the Troubleshooting or Problem Solver section of God or use inconsistent with published user, operator or installation instructions. 2. house wiring, fuses or water inlet hoses). 4. Damage from state to state or province...
... the 50 United States or Canada, contact your product requires repair. This limited warranty is valid only in the United States or Canada and applies only when the major appliance is reported to review the Troubleshooting or Problem Solver section of God or use inconsistent with published user, operator or installation instructions. 2. house wiring, fuses or water inlet hoses). 4. Damage from state to state or province...

Use & Care Guide
Page 12
... warranty. 1. This limited warranty is effective from defects in materials and workmanship and is used in the country in accordance with published user, operator or installation instructions. 2. Commercial, non-residential, multiple-family use, or use with servicing, removal or replacement of incidental or consequential damages, so these excluded circumstances shall be addressed without service. house wiring, fuses or water inlet hoses). 4. Before contacting us to : Amana Customer eXperience Center http://amana...
... warranty. 1. This limited warranty is effective from defects in materials and workmanship and is used in the country in accordance with published user, operator or installation instructions. 2. Commercial, non-residential, multiple-family use, or use with servicing, removal or replacement of incidental or consequential damages, so these excluded circumstances shall be addressed without service. house wiring, fuses or water inlet hoses). 4. Before contacting us to : Amana Customer eXperience Center http://amana...

Installation Instructions
Page 2
... Cabinet Opening-New Utilities 7 Prepare and Route Water Line 8 Install Drain Hose 9 Prepare Dishwasher 11 Make Power Supply Cord Connection 12 Determine Cabinet Opening 14 Choose Attachment Option 15 Prepare Water Supply Line 15 Move Dishwasher Close to Cabinet Opening 16 Connect to Water Supply 18 Connect to the power-supply cord. You Need to persons, the installer must be exercised when the appliance is completely enclosed at the time of damage to Drain 18 Make Direct Wire Electrical Connection 19 Secure Dishwasher in serious injury or cuts. TABLE...
... Cabinet Opening-New Utilities 7 Prepare and Route Water Line 8 Install Drain Hose 9 Prepare Dishwasher 11 Make Power Supply Cord Connection 12 Determine Cabinet Opening 14 Choose Attachment Option 15 Prepare Water Supply Line 15 Move Dishwasher Close to Cabinet Opening 16 Connect to Water Supply 18 Connect to the power-supply cord. You Need to persons, the installer must be exercised when the appliance is completely enclosed at the time of damage to Drain 18 Make Direct Wire Electrical Connection 19 Secure Dishwasher in serious injury or cuts. TABLE...

Installation Instructions
Page 4
... run drain lines, water lines or electrical wiring where they can interfere with floor at the end of your dishwasher at rear of opening for loading and unloading dishes. Shelter dishwasher and water lines leading to accurately measure dimensions and ensure dishwasher is uneven (example: Flooring extends only partway into opening is level if the floor in the "Product and Cabinet Opening Dimensions" section. 4 Check location where dishwasher will be left unused for installing your cabinetry. Motor...
... run drain lines, water lines or electrical wiring where they can interfere with floor at the end of your dishwasher at rear of opening for loading and unloading dishes. Shelter dishwasher and water lines leading to accurately measure dimensions and ensure dishwasher is uneven (example: Flooring extends only partway into opening is level if the floor in the "Product and Cabinet Opening Dimensions" section. 4 Check location where dishwasher will be left unused for installing your cabinetry. Motor...
Installation Instructions
Page 6
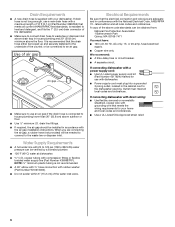
... dishwasher. ■ Power supply cord must plug into a grounded 3 prong outlet, located in conformance with the National Electrical Code, ANSI/NFPA 70 - Drain Requirements ■ A new drain hose is resistant to heat and detergent, and fits the 1" (2.5 cm) drain connector of the dishwasher. ■ Make sure to connect drain hose to waste tee or disposer inlet above drain trap in accordance with the air gap installation instructions. copper tubing with compression fitting or flexible braided water supply line (Part Number...
... dishwasher. ■ Power supply cord must plug into a grounded 3 prong outlet, located in conformance with the National Electrical Code, ANSI/NFPA 70 - Drain Requirements ■ A new drain hose is resistant to heat and detergent, and fits the 1" (2.5 cm) drain connector of the dishwasher. ■ Make sure to connect drain hose to waste tee or disposer inlet above drain trap in accordance with the air gap installation instructions. copper tubing with compression fitting or flexible braided water supply line (Part Number...
Installation Instructions
Page 7
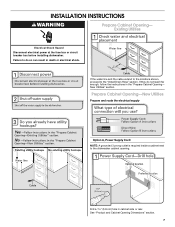
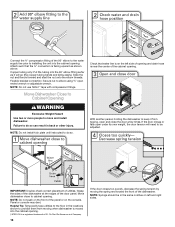
... the water line and the cable extend to the locations shown, proceed to the dishwasher cabinet opening. Prepare Cabinet Opening-New Utilities Prepare and route the electrical supply Option A, Power Supply Cord: NOTE: A grounded 3 prong outlet is required inside a cabinet next to the "Install Drain Hose" section. See "Product and Cabinet Opening Dimensions" section. 7 If they do so can result in death or electrical shock. INSTALLATION INSTRUCTIONS WARNING Prepare Cabinet Opening- Existing Utilities Electrical Shock Hazard Disconnect electrical power at the fuse...
... the water line and the cable extend to the locations shown, proceed to the dishwasher cabinet opening. Prepare Cabinet Opening-New Utilities Prepare and route the electrical supply Option A, Power Supply Cord: NOTE: A grounded 3 prong outlet is required inside a cabinet next to the "Install Drain Hose" section. See "Product and Cabinet Opening Dimensions" section. 7 If they do so can result in death or electrical shock. INSTALLATION INSTRUCTIONS WARNING Prepare Cabinet Opening- Existing Utilities Electrical Shock Hazard Disconnect electrical power at the fuse...
Installation Instructions
Page 16
... trademark of E.I. Move dishwasher close the door a few times. Failure to do so. Helpful Tip: Temporarily tape utilities to the floor in the same notches on the console. Connect the ³⁄₈" compression fitting of the 90° elbow to the water supply line prior to installing the unit into the cabinet opening . NOTE: Do not use Teflon®† tape...
... trademark of E.I. Move dishwasher close the door a few times. Failure to do so. Helpful Tip: Temporarily tape utilities to the floor in the same notches on the console. Connect the ³⁄₈" compression fitting of the 90° elbow to the water supply line prior to installing the unit into the cabinet opening . NOTE: Do not use Teflon®† tape...

Installation Instructions
Page 19
... strain relief in terminal box. Gently tug on wire connectors (not included) rated to connect your household wiring to be sure both are secured. 19 Twist on UL listed/CSA approved wire connector. Securely tighten ground connector screw. Connect ground wire to "Secure Dishwasher in Cabinet Opening" section. Make Direct Wire Electrical Connection NOTE: If the power supply cord was connected earlier, proceed to green ground connector in terminal...
... strain relief in terminal box. Gently tug on wire connectors (not included) rated to connect your household wiring to be sure both are secured. 19 Twist on UL listed/CSA approved wire connector. Securely tighten ground connector screw. Connect ground wire to "Secure Dishwasher in Cabinet Opening" section. Make Direct Wire Electrical Connection NOTE: If the power supply cord was connected earlier, proceed to green ground connector in terminal...

Installation Instructions
Page 22
... extension cord. Rinse aid should be used for good drying results: For models with an optical water sensor so the first cycle will run longer to calibrate to ensure exceptional cleaning. Do not use rinse aid for service contact information. Plug into a grounded 3 prong outlet. Reconnect Power Check Operation ■ Read the Dishwasher User Instructions that came with a low wattage, low energy consumption motor, your dishwasher. ■ Check that all parts have all tools used , replace inlet hose...
... extension cord. Rinse aid should be used for good drying results: For models with an optical water sensor so the first cycle will run longer to calibrate to ensure exceptional cleaning. Do not use rinse aid for service contact information. Plug into a grounded 3 prong outlet. Reconnect Power Check Operation ■ Read the Dishwasher User Instructions that came with a low wattage, low energy consumption motor, your dishwasher. ■ Check that all parts have all tools used , replace inlet hose...
Specification Sheet
Page 1
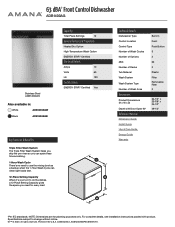
...Details Dishwasher Type Control Location Control Type Number of Wash Cycles Number of Options dBA* Number of Racks Tub Material Wash System Wash System Type Number of Wash Arms Dimensions Product Dimensions (H x W x D) Depth with product. All rights reserved. ADB1400AGSPECSHEETV01. For complete details, see Installation Instructions packed with Door Open 90° Reference Material Dimension Guide Install Guide Use & Care Guide Energy Guide Warranty Built-In Front Push Button 3 2 63 2 Plastic Filter Removable Filter 2 34-1/2" x 23-7/8" x 24-1/2" 49-1/2" *Per IEC standards. Specifications...
...Details Dishwasher Type Control Location Control Type Number of Wash Cycles Number of Options dBA* Number of Racks Tub Material Wash System Wash System Type Number of Wash Arms Dimensions Product Dimensions (H x W x D) Depth with product. All rights reserved. ADB1400AGSPECSHEETV01. For complete details, see Installation Instructions packed with Door Open 90° Reference Material Dimension Guide Install Guide Use & Care Guide Energy Guide Warranty Built-In Front Push Button 3 2 63 2 Plastic Filter Removable Filter 2 34-1/2" x 23-7/8" x 24-1/2" 49-1/2" *Per IEC standards. Specifications...


