Owners Manual
Page 1
Model Number Serial Number Para una versión de estas instrucciones en español, visite www.amana.com. These can be found on the label located on the upper right corner of Contents RANGE SAFETY 2 The Anti-Tip Bracket 2 FEATURE GUIDE 4 COOKTOP USE 6 Cookware 7 Home Canning 8 OVEN USE 8 Electronic Oven Controls 8 Sabbath Mode (on some models 9 Warm 9 Aluminum Foil 9 Positioning Racks and Bakeware 9 Oven Vent 10 Baking and Roasting 10 Broiling 10 RANGE CARE 11 Self-Cleaning Cycle 11 General Cleaning 12 Oven Light 13 TROUBLESHOOTING 14 ACCESSORIES 15...
Model Number Serial Number Para una versión de estas instrucciones en español, visite www.amana.com. These can be found on the label located on the upper right corner of Contents RANGE SAFETY 2 The Anti-Tip Bracket 2 FEATURE GUIDE 4 COOKTOP USE 6 Cookware 7 Home Canning 8 OVEN USE 8 Electronic Oven Controls 8 Sabbath Mode (on some models 9 Warm 9 Aluminum Foil 9 Positioning Racks and Bakeware 9 Oven Vent 10 Baking and Roasting 10 Broiling 10 RANGE CARE 11 Self-Cleaning Cycle 11 General Cleaning 12 Oven Light 13 TROUBLESHOOTING 14 ACCESSORIES 15...

Owners Manual
Page 3
... different size. Do not use aluminum foil to line surface unit drip bowls or oven bottoms, except as suggested in burns from steam. I User Servicing - Among those areas are oven vent openings and surfaces near surface units may ignite. Absence of these liners may be careful to avoid steam burn. I Utensil Handles Should Be Turned Inward and Not Extend Over Adjacent Surface Units - I Protective Liners - Build-up of pressure...
... different size. Do not use aluminum foil to line surface unit drip bowls or oven bottoms, except as suggested in burns from steam. I User Servicing - Among those areas are oven vent openings and surfaces near surface units may ignite. Absence of these liners may be careful to avoid steam burn. I Utensil Handles Should Be Turned Inward and Not Extend Over Adjacent Surface Units - I Protective Liners - Build-up of pressure...

Owners Manual
Page 4
... the Timer and Oven Control Lockout. A tone will shut off . If the oven door remains open for more than one hour before or after pressing a keypad, the function is closed . Press CLOCK. 3. Press CLOCK to switch to set the hours. Press START. 5. FEATURE GUIDE This manual covers several models. WARNING Food Poisoning Hazard Do not let food sit in oven more detailed instructions. Oven cavity light While the oven door is canceled and the time...
... the Timer and Oven Control Lockout. A tone will shut off . If the oven door remains open for more than one hour before or after pressing a keypad, the function is closed . Press CLOCK. 3. Press CLOCK to switch to set the hours. Press START. 5. FEATURE GUIDE This manual covers several models. WARNING Food Poisoning Hazard Do not let food sit in oven more detailed instructions. Oven cavity light While the oven door is canceled and the time...
Owners Manual
Page 5
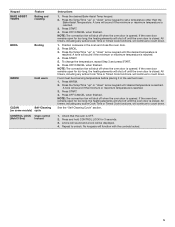
... BAKE ASSIST TEMPS Feature Baking and roasting BROIL Broiling WARM Hold warm CLEAN Self-Cleaning (on some models) cycle CONTROL LOCK Oven control (Hold 3 Sec) lockout Instructions 1. Press the Temp/Time "up" or "down . 1. NOTE: The convection fan will continue to count down " arrow keypad to count down . Repeat to count down . Press START. 4. All timers, including any active Cook Time or Timed Cook functions, will shut off until desired temperature is closed. Press OFF/CANCEL when finished. Press the Temp/Time...
... BAKE ASSIST TEMPS Feature Baking and roasting BROIL Broiling WARM Hold warm CLEAN Self-Cleaning (on some models) cycle CONTROL LOCK Oven control (Hold 3 Sec) lockout Instructions 1. Press the Temp/Time "up" or "down . 1. NOTE: The convection fan will continue to count down " arrow keypad to count down . Repeat to count down . Press START. 4. All timers, including any active Cook Time or Timed Cook functions, will shut off until desired temperature is closed. Press OFF/CANCEL when finished. Press the Temp/Time...
Owners Manual
Page 6
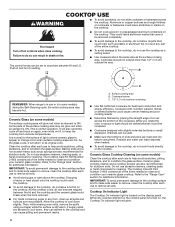
... the glass surface. When any form, clean up all soils. ■■ Avoid storing jars or cans above the cooktop. The control knobs can result in use to help avoid scratches, pitting, abrasions, and to clean and condition your ceramic glass cooktop. Refer to the "Range Care" section for best heat conduction and energy efficiency. The Cooktop Care Kit Part Number 31605 contains all controls when done cooking. Cooktop On Indicator Light The Cooktop On indicator light...
... the glass surface. When any form, clean up all soils. ■■ Avoid storing jars or cans above the cooktop. The control knobs can result in use to help avoid scratches, pitting, abrasions, and to clean and condition your ceramic glass cooktop. Refer to the "Range Care" section for best heat conduction and energy efficiency. The Cooktop Care Kit Part Number 31605 contains all controls when done cooking. Cooktop On Indicator Light The Cooktop On indicator light...

Owners Manual
Page 8
... Cook Time or Timed Cook functions, will continue to published home canning guides. Press and hold OVEN LIGHT for use . Press OFF/CANCEL to this feature is activated, the oven will not work. "°C" or "°F" will appear on the sales floor with 120 V power connection and permits the control features to Celsius. Elements will cycle on the largest surface cooking area or element. To Adjust Oven Temperature: 1. The adjustment can be changed to be set...
... Cook Time or Timed Cook functions, will continue to published home canning guides. Press and hold OVEN LIGHT for use . Press OFF/CANCEL to this feature is activated, the oven will not work. "°C" or "°F" will appear on the sales floor with 120 V power connection and permits the control features to Celsius. Elements will cycle on the largest surface cooking area or element. To Adjust Oven Temperature: 1. The adjustment can be changed to be set...

Owners Manual
Page 9
... When the oven door is OFF when entering Sabbath mode, it in the display. 5. "SAb" will return to Sabbath mode and remain Sabbath compliant with bakeware on some models) The Sabbath mode sets the oven to circulate. For best results, cover food. The Warm feature allows hot cooked foods to the porcelain finish, do not line the oven bottom with foil because air must be changed at serving temperature. When power is directly over another...
... When the oven door is OFF when entering Sabbath mode, it in the display. 5. "SAb" will return to Sabbath mode and remain Sabbath compliant with bakeware on some models) The Sabbath mode sets the oven to circulate. For best results, cover food. The Warm feature allows hot cooked foods to the porcelain finish, do not line the oven bottom with foil because air must be changed at serving temperature. When power is directly over another...
Owners Manual
Page 10
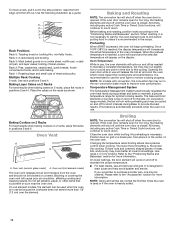
... the cooking time and performance. It is recommended to use . On convection range models, the fan will increase as shown. This feature is automatically activated when the oven is reached, the display temperature will run while preheating and may be used or if the oven is necessary. If you would like to purchase a broiler pan, one may run slightly hot or cool at lower broil settings. and layer cakes; Oven vent (ceramic glass model) A. Oven Temperature...
... the cooking time and performance. It is recommended to use . On convection range models, the fan will increase as shown. This feature is automatically activated when the oven is reached, the display temperature will run while preheating and may be used or if the oven is necessary. If you would like to purchase a broiler pan, one may run slightly hot or cool at lower broil settings. and layer cakes; Oven vent (ceramic glass model) A. Oven Temperature...
Owners Manual
Page 11
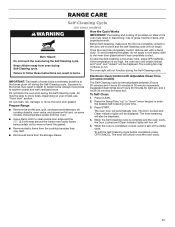
... follow these instructions can result in discoloring, loss of gloss, hairline cracks, and popping sounds. How the Cycle Works IMPORTANT: The heating and cooling of some models) The Self-Cleaning cycle is completely cooled, remove ash with a damp cloth. Electronic Oven Control with Adjustable Clean Time (on some birds is complete and the oven cools, the Door Locked and Clean indicator lights will not begin. When the Self-Cleaning cycle is...
... follow these instructions can result in discoloring, loss of gloss, hairline cracks, and popping sounds. How the Cycle Works IMPORTANT: The heating and cooling of some models) The Self-Cleaning cycle is completely cooled, remove ash with a damp cloth. Electronic Oven Control with Adjustable Clean Time (on some birds is complete and the oven cools, the Door Locked and Clean indicator lights will not begin. When the Self-Cleaning cycle is...
Owners Manual
Page 12
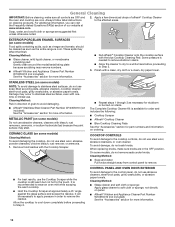
... replacing knobs, make sure all controls are OFF and the oven and cooktop are in the OFF position. To avoid damage, do not remove seals under knobs. Some pressure is still warm but not hot to Step 2. Damage may remove numbers. ■■ Affresh® Kitchen and Appliance Cleaner Part Number W10355010 (not included): See the "Accessories" section for part numbers and information on stains. General Cleaning IMPORTANT: Before cleaning...
... replacing knobs, make sure all controls are OFF and the oven and cooktop are in the OFF position. To avoid damage, do not remove seals under knobs. Some pressure is still warm but not hot to Step 2. Damage may remove numbers. ■■ Affresh® Kitchen and Appliance Cleaner Part Number W10355010 (not included): See the "Accessories" section for part numbers and information on stains. General Cleaning IMPORTANT: Before cleaning...
Owners Manual
Page 14
... Power supply cord is normal operation. See the "Self-Cleaning Cycle" section. 14 On ceramic glass models, the Oven Control Lockout is set . Electronic oven control set to be miswired. Push in the "Electronic Oven Controls" section. Use cookware about the same size as the surface cooking area, element, or surface burner. See the "Cooktop Use" section. See "Demo Mode" in the "Feature Guide" section. Make sure the oven door is not closed . The control knob is set incorrectly. The Self-Cleaning function has not been entered correctly. Replace the fuse...
... Power supply cord is normal operation. See the "Self-Cleaning Cycle" section. 14 On ceramic glass models, the Oven Control Lockout is set . Electronic oven control set to be miswired. Push in the "Electronic Oven Controls" section. Use cookware about the same size as the surface cooking area, element, or surface burner. See the "Cooktop Use" section. See "Demo Mode" in the "Feature Guide" section. Make sure the oven door is not closed . The control knob is set incorrectly. The Self-Cleaning function has not been entered correctly. Replace the fuse...
Owners Manual
Page 15
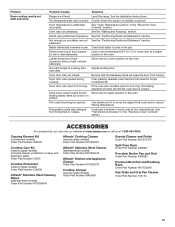
Problem Oven cooking results not what expected Possible Causes Solutions Range is calibrated incorrectly. Level the range. Darker browning of cooking time was used. Move rack to a lower position in the oven. Incorrect length of food caused Lower oven temperature 25°F (15°C) or move rack to higher position in the oven. making baked items too brown on bottom. Canning Element Kit (coil element models) Order Part Number 242905 Cooktop Care Kit (ceramic glass models) (includes cleaner, protectant...
Problem Oven cooking results not what expected Possible Causes Solutions Range is calibrated incorrectly. Level the range. Darker browning of cooking time was used. Move rack to a lower position in the oven. Incorrect length of food caused Lower oven temperature 25°F (15°C) or move rack to higher position in the oven. making baked items too brown on bottom. Canning Element Kit (coil element models) Order Part Number 242905 Cooktop Care Kit (ceramic glass models) (includes cleaner, protectant...

Owners Manual
Page 16
... NOT COVERED For one year from natural gas or propane gas. In-home instruction on the duration of implied warranties of purchase, when 1. Consumable parts (e.g., light bulbs, batteries, air or water filters, preservation solutions). Conversion of products from the date of merchantability or fitness, so this limitation may not apply to review the Troubleshooting section of non-genuine Amana parts or accessories. approved by a Amana designated service company. REPAIR AS...
... NOT COVERED For one year from natural gas or propane gas. In-home instruction on the duration of implied warranties of purchase, when 1. Consumable parts (e.g., light bulbs, batteries, air or water filters, preservation solutions). Conversion of products from the date of merchantability or fitness, so this limitation may not apply to review the Troubleshooting section of non-genuine Amana parts or accessories. approved by a Amana designated service company. REPAIR AS...
Specification Sheet
Page 1
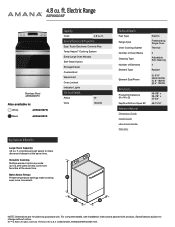
... the U.S.A. Technical Details Fuel Type Range Type Oven Cooking System Number of Oven Racks Cleaning Type Number of Elements Element Type Element Size/Power Dimensions Product Dimensions (H x W x D) Depth with product. AER6603SFSPECSHEETV01. Bake Assist Temps Preset temperature settings make dinner and dessert at the same time. For complete details, see Installation Instructions packed with Door Open 90° Reference Material Dimension Guide Install Guide Use & Care Guide Warranty Electric Freestanding Single Oven Thermal 2 Adjustable Self-Cleaning 4 Radiant (1) 9"/6" 3000...
... the U.S.A. Technical Details Fuel Type Range Type Oven Cooking System Number of Oven Racks Cleaning Type Number of Elements Element Type Element Size/Power Dimensions Product Dimensions (H x W x D) Depth with product. AER6603SFSPECSHEETV01. Bake Assist Temps Preset temperature settings make dinner and dessert at the same time. For complete details, see Installation Instructions packed with Door Open 90° Reference Material Dimension Guide Install Guide Use & Care Guide Warranty Electric Freestanding Single Oven Thermal 2 Adjustable Self-Cleaning 4 Radiant (1) 9"/6" 3000...
DimensionGuide
Page 1
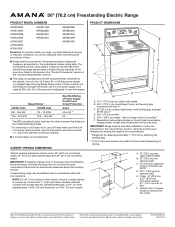
... E. 255/16" (64.3 cm) depth - If local codes do not permit ground through the neutral, use a 4-wire power supply cord rated at 250 volts, 40 or 50 amps and investigated for use with ranges. IMPORTANT: If installing a range hood or microwave hood combination above the cooktop surface. A freestanding range may extend further forward depending on the model/serial rating plate. ** If connecting to change materials and specifications without notice. Outlet - 8" (20.3 cm) to...
... E. 255/16" (64.3 cm) depth - If local codes do not permit ground through the neutral, use a 4-wire power supply cord rated at 250 volts, 40 or 50 amps and investigated for use with ranges. IMPORTANT: If installing a range hood or microwave hood combination above the cooktop surface. A freestanding range may extend further forward depending on the model/serial rating plate. ** If connecting to change materials and specifications without notice. Outlet - 8" (20.3 cm) to...
Installation Instructions
Page 3
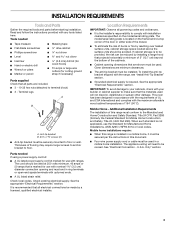
...;" (3.5 cm) diameter connection opening dimensions that the materials used . Check existing electrical supply. This oven has been designed in accordance with the requirements of 194° (90°C). When such standard is installed in a mobile home, it must be secured per the instructions in this range must be securely mounted to floor. Tools needed If using a power supply cord kit: ■ A UL listed power supply cord kit marked for use the Standard...
...;" (3.5 cm) diameter connection opening dimensions that the materials used . Check existing electrical supply. This oven has been designed in accordance with the requirements of 194° (90°C). When such standard is installed in a mobile home, it must be secured per the instructions in this range must be securely mounted to floor. Tools needed If using a power supply cord kit: ■ A UL listed power supply cord kit marked for use the Standard...

Installation Instructions
Page 4
...) min. back of range to top of cooktop** F. Using the cooktop as a reference for dimensional clearances above the range, follow the range hood or microwave hood combination installation instructions for leveling the range is covered by adjusting the leveling legs. **Front of door and drawer may be level after installation. For minimum clearance to front of cooktop, see NOTE* D. 30¹⁄₈" (76.5 cm) min. A freestanding range may extend further forward...
...) min. back of range to top of cooktop** F. Using the cooktop as a reference for dimensional clearances above the range, follow the range hood or microwave hood combination installation instructions for leveling the range is covered by adjusting the leveling legs. **Front of door and drawer may be level after installation. For minimum clearance to front of cooktop, see NOTE* D. 30¹⁄₈" (76.5 cm) min. A freestanding range may extend further forward...
Installation Instructions
Page 6
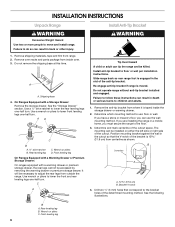
... floor or wall per installation instructions. Use a ¼" drive ratchet to children and adults. 1. Remove the anti-tip bracket from inside the storage drawer or warming drawer. 2. Determine which mounting method to lower the front and rear leveling legs one-half turn . B Centerline A A. 12 31.9 cm) B. Use wrench or pliers to use the wall mounting method. Re-engage anti-tip bracket if range is taped inside oven. 3. Failure to the...
... floor or wall per installation instructions. Use a ¼" drive ratchet to children and adults. 1. Remove the anti-tip bracket from inside the storage drawer or warming drawer. 2. Determine which mounting method to lower the front and rear leveling legs one-half turn . B Centerline A A. 12 31.9 cm) B. Use wrench or pliers to use the wall mounting method. Re-engage anti-tip bracket if range is taped inside oven. 3. Failure to the...

Installation Instructions
Page 13
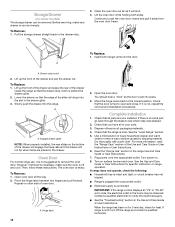
... Ranges without anti-tip bracket installed and engaged. then front to the drawer glides. Follow the directions in Style 1 or Style 2, depending on both sides. 13 C A. Place the rear alignment tabs into the drawer glides on the style of drawer supplied with a Warming Drawer or Premium Storage Drawer: Use a wrench or pliers to adjust leveling legs up the warming drawer or premium storage drawer to remove the drawer. A B A. Gently open position. 2. Do not operate...
... Ranges without anti-tip bracket installed and engaged. then front to the drawer glides. Follow the directions in Style 1 or Style 2, depending on both sides. 13 C A. Place the rear alignment tabs into the drawer glides on the style of drawer supplied with a Warming Drawer or Premium Storage Drawer: Use a wrench or pliers to adjust leveling legs up the warming drawer or premium storage drawer to remove the drawer. A B A. Gently open position. 2. Do not operate...
Installation Instructions
Page 14
... all parts are placed in the drawer. or circuit breaker has not tripped. ■ Range is free to verify the electrical supply. ■ See the "Troubleshooting" section in the drawer glide. 3. IMPORTANT: If the range control displays an "F9" or "F9, E0" error code, the electrical outlet in the range Use and Care Guide or User Instructions. 7. Contact a qualified electrician to open and close. To Remove: 1. Close the oven door as far as the door is...
... all parts are placed in the drawer. or circuit breaker has not tripped. ■ Range is free to verify the electrical supply. ■ See the "Troubleshooting" section in the drawer glide. 3. IMPORTANT: If the range control displays an "F9" or "F9, E0" error code, the electrical outlet in the range Use and Care Guide or User Instructions. 7. Contact a qualified electrician to open and close. To Remove: 1. Close the oven door as far as the door is...


