Dimension Guide
Page 1
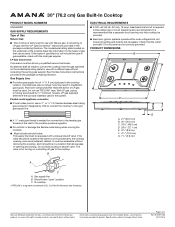
... , such as an adjacent cabinet. Page 1 of E.I .D. Specifications subject to change without removing the cooktop, and it should be used . 30" (76.2 cm) Gas Built-In Cooktop PRODUCT MODEL NUMBERS AGC6540KF GAS SUPPLY REQUIREMENTS Type of Gas Natural Gas: ■■ This cooktop is factory set for use with product. The model/serial rating plate located on the underside of 3/4" (1.9 cm) rigid pipe to shutoff valve. For complete details, see the "LP Gas Conversion" instructions provided in the package...
... , such as an adjacent cabinet. Page 1 of E.I .D. Specifications subject to change without removing the cooktop, and it should be used . 30" (76.2 cm) Gas Built-In Cooktop PRODUCT MODEL NUMBERS AGC6540KF GAS SUPPLY REQUIREMENTS Type of Gas Natural Gas: ■■ This cooktop is factory set for use with product. The model/serial rating plate located on the underside of 3/4" (1.9 cm) rigid pipe to shutoff valve. For complete details, see the "LP Gas Conversion" instructions provided in the package...

Dimension Guide
Page 2
... gas and electrical supply sources must be installed before the undercounter built-in base cabinet is recommended. For complete details, see Installation Instructions packed with sidewalls wider than No. 28 MSG sheet steel, 0.015" [0.04 cm] stainless steel, or 0.024" [0.06 cm] aluminum or 0.020" [0.05 cm] copper E. 36" (91.4 cm) top of the drawer (or other obstruction) in wall oven is to change materials and specifications...
... gas and electrical supply sources must be installed before the undercounter built-in base cabinet is recommended. For complete details, see Installation Instructions packed with sidewalls wider than No. 28 MSG sheet steel, 0.015" [0.04 cm] stainless steel, or 0.024" [0.06 cm] aluminum or 0.020" [0.05 cm] copper E. 36" (91.4 cm) top of the drawer (or other obstruction) in wall oven is to change materials and specifications...
Use & Care Guide
Page 1
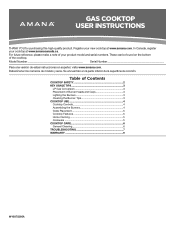
... your product model and serial numbers. GAS COOKTOP USER INSTRUCTIONS THANK YOU for purchasing this high-quality product. Register your cooktop at www.amana.com. For future reference, please make a note of Burner Heads and Caps 3 Lighting the Burners 3 Cleaning the Burner: Tips 3 COOKTOP USE 4 Cooktop Controls 4 Assembling the Burners 4 Grate Placement 5 Cooktop Features 5 Home Canning 5 Cookware 5 COOKTOP CARE 6 General Cleaning 6 TROUBLESHOOTING 7 WARRANTY 9 W10875395A In Canada, register your new cooktop at www.amanacanada.ca. Se encuentran en la parte inferior de...
... your product model and serial numbers. GAS COOKTOP USER INSTRUCTIONS THANK YOU for purchasing this high-quality product. Register your cooktop at www.amana.com. For future reference, please make a note of Burner Heads and Caps 3 Lighting the Burners 3 Cleaning the Burner: Tips 3 COOKTOP USE 4 Cooktop Controls 4 Assembling the Burners 4 Grate Placement 5 Cooktop Features 5 Home Canning 5 Cookware 5 COOKTOP CARE 6 General Cleaning 6 TROUBLESHOOTING 7 WARRANTY 9 W10875395A In Canada, register your new cooktop at www.amanacanada.ca. Se encuentran en la parte inferior de...

Use & Care Guide
Page 2
...contact your appliance. All safety messages will tell you what can be detected by a qualified installer, service agency or the gas supplier. WARNING: If the information in this manual and on your gas supplier. We have provided many important safety messages in this or any other flammable vapors and...injury or death. - This is , tell you how to light any appliance. • Do not touch any electrical switch. • Do not use any phone in the vicinity of this manual is detected, follow instructions. WHAT TO DO IF YOU SMELL GAS: • Do not try to reduce the chance of ...
...contact your appliance. All safety messages will tell you what can be detected by a qualified installer, service agency or the gas supplier. WARNING: If the information in this manual and on your gas supplier. We have provided many important safety messages in this or any other flammable vapors and...injury or death. - This is , tell you how to light any appliance. • Do not touch any electrical switch. • Do not use any phone in the vicinity of this manual is detected, follow instructions. WHAT TO DO IF YOU SMELL GAS: • Do not try to reduce the chance of ...

Use & Care Guide
Page 3
... gas conversion kit (included). A burner will click/spark when a knob is equipped with a three-prong grounding plug for use with a damp cloth. 3 To light the burners: 1. Spillovers should be cleaned immediately since they can be electrically grounded in accordance with a straight pin, needle, or small-gauge wire as stepping, leaning, or sitting on the cooktop to heat or warm the room. The cooktop, when installed, must be lit manually. Keep cooktop...
... gas conversion kit (included). A burner will click/spark when a knob is equipped with a three-prong grounding plug for use with a damp cloth. 3 To light the burners: 1. Spillovers should be cleaned immediately since they can be electrically grounded in accordance with a straight pin, needle, or small-gauge wire as stepping, leaning, or sitting on the cooktop to heat or warm the room. The cooktop, when installed, must be lit manually. Keep cooktop...

Use & Care Guide
Page 4
... not provide correct polarity, the igniter will click. Push in use with the LP Gas Conversion Kit for cooking smaller quantities of prolonged power failure, the surface burners can result in death or fire. Standard burner (simmer) D. COOKTOP USE Cooktop Controls WARNING Setting Ignite H (High) Fire Hazard Do not let the burner flame extend beyond the edge of the electric ignition system. IMPORTANT: Your cooktop is included with re-ignition spark modules, proper grounding and polarity are...
... not provide correct polarity, the igniter will click. Push in use with the LP Gas Conversion Kit for cooking smaller quantities of prolonged power failure, the surface burners can result in death or fire. Standard burner (simmer) D. COOKTOP USE Cooktop Controls WARNING Setting Ignite H (High) Fire Hazard Do not let the burner flame extend beyond the edge of the electric ignition system. IMPORTANT: Your cooktop is included with re-ignition spark modules, proper grounding and polarity are...

Use & Care Guide
Page 5
... soils. Cookware Aluminum Cast iron Ceramic or ceramic glass Copper Earthenware Porcelain enamelon-steel or cast iron Stainless steel Characteristics ■■ Heats quickly and evenly. ■■ Suitable for all types of cooking ■■ Medium or heavy thickness is a factor in the spreader (B). Cap B. Spreader C. Center grate tab Cooktop Features Simmer Burner The Simmer burner is no hole in assembly. The finish preserves stainless steel by aligning the...
... soils. Cookware Aluminum Cast iron Ceramic or ceramic glass Copper Earthenware Porcelain enamelon-steel or cast iron Stainless steel Characteristics ■■ Heats quickly and evenly. ■■ Suitable for all types of cooking ■■ Medium or heavy thickness is a factor in the spreader (B). Cap B. Spreader C. Center grate tab Cooktop Features Simmer Burner The Simmer burner is no hole in assembly. The finish preserves stainless steel by aligning the...

Use & Care Guide
Page 6
.... To remove the knobs, be kept clean for proper ignition and a complete, even flame. Surface Type Cleaning Recommendation Control Knobs (Metal) Control Knobs (Plastic) Burner Grates Burner Caps Burner Base Porcelain Enamel Cooktop Surface Stainless Steel Cooktop Surface The knobs should be cleaned with soap and water. Use a nonabrasive plastic scrubbing pad and mildly abrasive cleanser, soap, and water. For best results, use abrasive cleaners or steel wool. The knobs should be cleaned as affresh® Kitchen and Appliance Cleaner, Part Number W10355010. Use liquid...
.... To remove the knobs, be kept clean for proper ignition and a complete, even flame. Surface Type Cleaning Recommendation Control Knobs (Metal) Control Knobs (Plastic) Burner Grates Burner Caps Burner Base Porcelain Enamel Cooktop Surface Stainless Steel Cooktop Surface The knobs should be cleaned with soap and water. Use a nonabrasive plastic scrubbing pad and mildly abrasive cleanser, soap, and water. For best results, use abrasive cleaners or steel wool. The knobs should be cleaned as affresh® Kitchen and Appliance Cleaner, Part Number W10355010. Use liquid...

Use & Care Guide
Page 7
... burners spark in before turning to the "Cleaning the Burner: Tips" section. ■■ Check that the burner caps are uneven, yellow, and/or noisy ■■ Compare the flame to release air from the gas lines. ■■ Be sure the control knob is being used , turn on Outer Cones Normal for LP Gas B Soft Blue Flames Normal for service. When a knob is pushed, ■■ Sparking/clicking of the burner knobs...
... burners spark in before turning to the "Cleaning the Burner: Tips" section. ■■ Check that the burner caps are uneven, yellow, and/or noisy ■■ Compare the flame to release air from the gas lines. ■■ Be sure the control knob is being used , turn on Outer Cones Normal for LP Gas B Soft Blue Flames Normal for service. When a knob is pushed, ■■ Sparking/clicking of the burner knobs...

Use & Care Guide
Page 8
... from the factory set for Natural gas. ■■ Refer to the Installation Instructions to "Excessive heat around cookware on cooktop Cooking results are correct. ■■ Be sure the cookware is approximately the same size as the cooking area and surface burner. ■■ Cookware should not extend more than 1/2" (13 mm) outside the cooking area. ■■ Adjust the flame so that it...
... from the factory set for Natural gas. ■■ Refer to the Installation Instructions to "Excessive heat around cookware on cooktop Cooking results are correct. ■■ Be sure the cookware is approximately the same size as the cooking area and surface burner. ■■ Cookware should not extend more than 1/2" (13 mm) outside the cooking area. ■■ Adjust the flame so that it...

Use & Care Guide
Page 9
... workmanship and is installed, operated and maintained according to instructions attached to or furnished with original model/serial numbers removed, altered or not easily determined. Some questions can be provided by the use your product requires repair. Please take a few minutes to review the Troubleshooting or Problem Solver section of the Use and Care Guide, scan the QR code on the right to Amana within 30 days...
... workmanship and is installed, operated and maintained according to instructions attached to or furnished with original model/serial numbers removed, altered or not easily determined. Some questions can be provided by the use your product requires repair. Please take a few minutes to review the Troubleshooting or Problem Solver section of the Use and Care Guide, scan the QR code on the right to Amana within 30 days...

Installation Instructions
Page 2
...'t follow instructions. WARNING: Gas leaks cannot always be killed or seriously injured if you what the potential hazard is detected, follow the safety alert symbol and either the word "DANGER" or "WARNING." This type of others . This symbol alerts you to light any appliance. • Do not touch any electrical switch. • Do not use any other...
...'t follow instructions. WARNING: Gas leaks cannot always be killed or seriously injured if you what the potential hazard is detected, follow the safety alert symbol and either the word "DANGER" or "WARNING." This type of others . This symbol alerts you to light any appliance. • Do not touch any electrical switch. • Do not use any other...

Installation Instructions
Page 3
... damage. Location Requirements IMPORTANT: Observe all governing codes and ordinances. The model/serial rating plate is approved. 3 In Canada, the installation of the cooktop base. Contact your cooktop model number and approved combinations of cooktops and ovens that can be listed. Acceptable Shut-off Devices: Gas Cocks and Ball Valves installed for your dealer to propane gas ■■ Noncorrosive leakdetection solution Parts supplied ■■ Gas pressure regulator ■■ Burner grates ■■ Burner caps ■■ Burner base ■...
... damage. Location Requirements IMPORTANT: Observe all governing codes and ordinances. The model/serial rating plate is approved. 3 In Canada, the installation of the cooktop base. Contact your cooktop model number and approved combinations of cooktops and ovens that can be listed. Acceptable Shut-off Devices: Gas Cocks and Ball Valves installed for your dealer to propane gas ■■ Noncorrosive leakdetection solution Parts supplied ■■ Gas pressure regulator ■■ Burner grates ■■ Burner caps ■■ Burner base ■...

Installation Instructions
Page 5
.... 5 E. Cabinet floor: anywhere within minimum horizontal clearances to countertop within 6" (15.2 cm) of countertop. Gas line opening - Wall: anywhere 5" (12.7 cm) below underside of rear wall is covered by not less than 1/4" [0.6 cm] flame retardant millboard covered with not less than No. 28 MSG sheet steel, 0.015" [0.04 cm] stainless steel, or 0.024" [0.06 cm] aluminum or 0.020" [0.05 cm] copper. B. 30" (76.2 cm) for 30" models; 36...
.... 5 E. Cabinet floor: anywhere within minimum horizontal clearances to countertop within 6" (15.2 cm) of countertop. Gas line opening - Wall: anywhere 5" (12.7 cm) below underside of rear wall is covered by not less than 1/4" [0.6 cm] flame retardant millboard covered with not less than No. 28 MSG sheet steel, 0.015" [0.04 cm] stainless steel, or 0.024" [0.06 cm] aluminum or 0.020" [0.05 cm] copper. B. 30" (76.2 cm) for 30" models; 36...

Installation Instructions
Page 6
...-in wall oven is installed. 6 If installing a range hood or microwave hood combination above the cooking surface, follow the range hood or microwave hood combination installation instructions for dimensional clearances above the cooktop surface. Cutout Dimensions - Models KCGS550 and KCGS950 All Other Models Back Wall and Countertop Front Dimensions C D 25" (63.5 cm) 27⁄8" (7.3 cm) E 2³⁄4" (6.9 cm) 31⁄8" (7.9 cm) NOTES: After making the countertop cutout, some installations may need to be installed before the undercounter built-in wall oven is required...
...-in wall oven is installed. 6 If installing a range hood or microwave hood combination above the cooking surface, follow the range hood or microwave hood combination installation instructions for dimensional clearances above the cooktop surface. Cutout Dimensions - Models KCGS550 and KCGS950 All Other Models Back Wall and Countertop Front Dimensions C D 25" (63.5 cm) 27⁄8" (7.3 cm) E 2³⁄4" (6.9 cm) 31⁄8" (7.9 cm) NOTES: After making the countertop cutout, some installations may need to be installed before the undercounter built-in wall oven is required...

Installation Instructions
Page 7
...-delay fuse or circuit breaker is required. It is recommended that the outlet provides 120 V power and is factory set for use with Natural gas. See "Wiring Diagrams" on the types of gas that the ground path is recommended that a qualified electrical installer determine that can be done by a qualified service technician. Examples of the cooktop base has information on a separate sheet. Failure to propane, have a qualified person make sure gas pressure...
...-delay fuse or circuit breaker is required. It is recommended that the outlet provides 120 V power and is factory set for use with Natural gas. See "Wiring Diagrams" on the types of gas that the ground path is recommended that a qualified electrical installer determine that can be done by a qualified service technician. Examples of the cooktop base has information on a separate sheet. Failure to propane, have a qualified person make sure gas pressure...

Installation Instructions
Page 8
...) minimum. flexible stainless steel tubing gas connector, designed by closing its individual shutoff valve must be reduced at least 1" (2.5 cm) water column pressure above 1/2 psi (3.5 kPa) gauge 14" (35.5 cm) WCP The cooktop and its individual manual shut-off valve during any pressure testing of the gas supply piping system at test pressures in insufficient gas supply. Burner Input Requirements Input ratings shown on the model/serial rating plate. Gas Supply Line...
...) minimum. flexible stainless steel tubing gas connector, designed by closing its individual shutoff valve must be reduced at least 1" (2.5 cm) water column pressure above 1/2 psi (3.5 kPa) gauge 14" (35.5 cm) WCP The cooktop and its individual manual shut-off valve during any pressure testing of the gas supply piping system at test pressures in insufficient gas supply. Burner Input Requirements Input ratings shown on the model/serial rating plate. Gas Supply Line...

Installation Instructions
Page 9
...: licensed heating personnel, authorized gas company personnel, and authorized service personnel. Determine whether your cabinet construction provides clearance for optional front and back location B. A E B D C A. Using 2 or more people to avoid scratching the countertop. 3. Clamping bracket Explosion Hazard Use a new CSA International approved gas supply line. Install a shut-off valve. Attach one adapter to the gas pressure regulator and the other injury. Securely tighten screws. Edge of cooktop base bottom B. Decide...
...: licensed heating personnel, authorized gas company personnel, and authorized service personnel. Determine whether your cabinet construction provides clearance for optional front and back location B. A E B D C A. Using 2 or more people to avoid scratching the countertop. 3. Clamping bracket Explosion Hazard Use a new CSA International approved gas supply line. Install a shut-off valve. Attach one adapter to the gas pressure regulator and the other injury. Securely tighten screws. Edge of cooktop base bottom B. Decide...

Installation Instructions
Page 10
... cabinets) F. Access cap B. Open the manual shutoff valve in burner base with pins in burner base Align orifice holder in the gas supply line. Correct any leak found. 3. Remove surface burner caps, burner base and grates from parts package. Align notches in burner caps with igniter electrode. H. Manual gas shutoff valve I K A. Adapter (must have 1/2" (1.3 cm) male pipe thread) E. Manual gas shutoff valve K. 1/2" (1.3 cm) or 3/4" (1.9 cm) gas pipe A. Do not use with the arrow pointing in the direction toward the cooktop bottom. Complete Connection...
... cabinets) F. Access cap B. Open the manual shutoff valve in burner base with pins in burner base Align orifice holder in the gas supply line. Correct any leak found. 3. Remove surface burner caps, burner base and grates from parts package. Align notches in burner caps with igniter electrode. H. Manual gas shutoff valve I K A. Adapter (must have 1/2" (1.3 cm) male pipe thread) E. Manual gas shutoff valve K. 1/2" (1.3 cm) or 3/4" (1.9 cm) gas pipe A. Do not use with the arrow pointing in the direction toward the cooktop bottom. Complete Connection...

Installation Instructions
Page 11
.... Plug into a grounded 3 prong outlet. High flame Adjustment for assistance. Hold knob stem with a pair of surface burner flames. Check the flame on burner bases. Occasional orange flashes are properly positioned on "HIGH" for a blue color. If a burner does not light at each setting. Turn adjustment screw "C" to the right to reduce flame height, turn the control knobs to LO. 2. Check Flame Height Adjust the height of pliers. Complete Installation Electronic Ignition System Initial lighting and gas flame adjustments Surface burners use electronic igniters in...
.... Plug into a grounded 3 prong outlet. High flame Adjustment for assistance. Hold knob stem with a pair of surface burner flames. Check the flame on burner bases. Occasional orange flashes are properly positioned on "HIGH" for a blue color. If a burner does not light at each setting. Turn adjustment screw "C" to the right to reduce flame height, turn the control knobs to LO. 2. Check Flame Height Adjust the height of pliers. Complete Installation Electronic Ignition System Initial lighting and gas flame adjustments Surface burners use electronic igniters in...
