

Specifications Sheet
Page 2
... Combo of streamlined cooking performance. ft.) Self-Cleaning Oven Fan Convection Cooking Temp Assure™ Cooking System Oven Controls Towel Bar Door Handle Oven Window Interior Oven Light Oven Racks Oven Rack Positions Hidden Bake Element Storage Drawer Delay-Bake Oven Control Electronic Clock with an over the top and make room on this smooth-surface cooktop make sure they have no place to run...or hide. Extra-Large . 2 5 . . . . Glass-Ceramic Element Type Element On/Hot Indicator Light Colors (3) 6", 1,500-Watt (1) 8", 2,600-Watt Coil Elements with Chrome Drip Bowls W (2) 6", 1,500...
... Combo of streamlined cooking performance. ft.) Self-Cleaning Oven Fan Convection Cooking Temp Assure™ Cooking System Oven Controls Towel Bar Door Handle Oven Window Interior Oven Light Oven Racks Oven Rack Positions Hidden Bake Element Storage Drawer Delay-Bake Oven Control Electronic Clock with an over the top and make room on this smooth-surface cooktop make sure they have no place to run...or hide. Extra-Large . 2 5 . . . . Glass-Ceramic Element Type Element On/Hot Indicator Light Colors (3) 6", 1,500-Watt (1) 8", 2,600-Watt Coil Elements with Chrome Drip Bowls W (2) 6", 1,500...

Specifications Sheet
Page 3
... SIDE VIEW Easy Touch Electronic . Setting the bake time and temperature is a snap with these easy-to rest hot pans when cooking is complete. ft.) Self-Cleaning Oven Fan Convection Cooking Temp Assure™ Cooking System Oven Controls Towel Bar Door Handle Oven Window Interior Oven Light Oven Racks Oven Rack Positions Hidden Bake Burner Storage Drawer Broiler Type Delay-Bake Oven Control Electronic Clock with Wire Steel Burner Grates W W / B / S AGR5844VD AGR6011VD AMV2174VA AMV2174VA 5.0 High/Low . 5.0 Adjustable . . Colors CONTINUOUS GAS GRATES We've got it covered. GAS RANGES...
... SIDE VIEW Easy Touch Electronic . Setting the bake time and temperature is a snap with these easy-to rest hot pans when cooking is complete. ft.) Self-Cleaning Oven Fan Convection Cooking Temp Assure™ Cooking System Oven Controls Towel Bar Door Handle Oven Window Interior Oven Light Oven Racks Oven Rack Positions Hidden Bake Burner Storage Drawer Broiler Type Delay-Bake Oven Control Electronic Clock with Wire Steel Burner Grates W W / B / S AGR5844VD AGR6011VD AMV2174VA AMV2174VA 5.0 High/Low . 5.0 Adjustable . . Colors CONTINUOUS GAS GRATES We've got it covered. GAS RANGES...

Use and Care
Page 4
..., or sitting on the range to children in an oven or near surface units. ■ Top burner flame size should be adjusted so it does not extend beyond the edge of fire, electrical shock, injury to heat or warm the room. Verify the anti-tip bracket has been properly installed and engaged per installation instructions. children climbing on the doors or drawers. ■ Maintenance - WARNING Tip Over Hazard A child...
..., or sitting on the range to children in an oven or near surface units. ■ Top burner flame size should be adjusted so it does not extend beyond the edge of fire, electrical shock, injury to heat or warm the room. Verify the anti-tip bracket has been properly installed and engaged per installation instructions. children climbing on the doors or drawers. ■ Maintenance - WARNING Tip Over Hazard A child...
Use and Care
Page 6
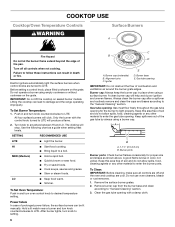
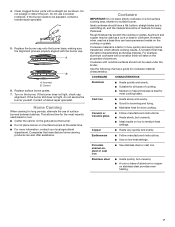
... burner models. Lifting the cooktop can result in color, not yellow. To Set Burner Temperature: 1. Turn knob to a boil. Use the following chart as shown above. LO ■ Keep food warm. ■ Simmer. To Set Oven Temperature: Push in and turn knob counterclockwise to damage and the range operating improperly. After burner lights, turn oven control knob to enter the gas tube opening for proper size and shape as a guide when setting heat levels. A clean burner cap will produce a flame. 2. Keep this area free...
... burner models. Lifting the cooktop can result in color, not yellow. To Set Burner Temperature: 1. Turn knob to a boil. Use the following chart as shown above. LO ■ Keep food warm. ■ Simmer. To Set Oven Temperature: Push in and turn knob counterclockwise to damage and the range operating improperly. After burner lights, turn oven control knob to enter the gas tube opening for proper size and shape as a guide when setting heat levels. A clean burner cap will produce a flame. 2. Keep this area free...
Use and Care
Page 7
... cookware on low heat settings. Earthenware ■ Follow manufacturer's instructions. ■ Use on a hot surface cooking area, element or surface burner. For example, aluminum cookware with a straight pin as a guide for slow cooking. Aluminum and copper may scratch the cooktop or grates. Clean clogged burner ports with a nonstick finish will take on the burner. This allows time for the most cooking tasks. Turn on the properties of surface burners between batches.
... cookware on low heat settings. Earthenware ■ Follow manufacturer's instructions. ■ Use on a hot surface cooking area, element or surface burner. For example, aluminum cookware with a straight pin as a guide for slow cooking. Aluminum and copper may scratch the cooktop or grates. Clean clogged burner ports with a nonstick finish will take on the burner. This allows time for the most cooking tasks. Turn on the properties of surface burners between batches.

Use and Care
Page 8
... on the oven door or bottom. The knob will cause poor air circulation, affecting cooking and cleaning results. Make sure that no bottom browning RACKS ■ Position racks before turning on the oven. ■ Do not move freely. ■ To catch spills, place foil on one rack. Blocking or covering the oven vent will click. BAKEWARE/ RESULTS RECOMMENDATIONS Light colored aluminum ■ Use temperature and time recommended in...
... on the oven door or bottom. The knob will cause poor air circulation, affecting cooking and cleaning results. Make sure that no bottom browning RACKS ■ Position racks before turning on the oven. ■ Do not move freely. ■ To catch spills, place foil on one rack. Blocking or covering the oven vent will click. BAKEWARE/ RESULTS RECOMMENDATIONS Light colored aluminum ■ Use temperature and time recommended in...

Use and Care
Page 9
... broiling by turning the oven control knob to OFF position when finished. Times are guidelines only and may be turned. ■ After broiling, remove the pan from the broil element. To Bake or Roast: 1. The oven burner will click. The knob will cycle on and off to the broiler, do not place food or cookware directly on the oven door or the oven bottom. When roasting, it is open. ■ Do not preheat broiler...
... broiling by turning the oven control knob to OFF position when finished. Times are guidelines only and may be turned. ■ After broiling, remove the pan from the broil element. To Bake or Roast: 1. The oven burner will click. The knob will cycle on and off to the broiler, do not place food or cookware directly on the oven door or the oven bottom. When roasting, it is open. ■ Do not preheat broiler...
Use and Care
Page 10
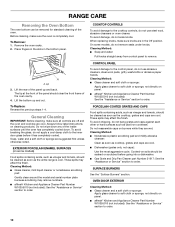
... inner door glass before going into a dishwasher. ■ Gas Grate and Drip Pan Cleaner part Number 31617: See the "Assistance or Service" section to order. Cleaning Method: ■ Glass cleaner and soft cloth or sponge: Apply glass cleaner to the cooktop controls, do not soak knobs. Do not reassemble caps on soils should be soaked or scrubbed before it has completely cooled. Cooked-on burners while...
... inner door glass before going into a dishwasher. ■ Gas Grate and Drip Pan Cleaner part Number 31617: See the "Assistance or Service" section to order. Cleaning Method: ■ Glass cleaner and soft cloth or sponge: Apply glass cleaner to the cooktop controls, do not soak knobs. Do not reassemble caps on soils should be soaked or scrubbed before it has completely cooled. Cooked-on burners while...

Use and Care
Page 12
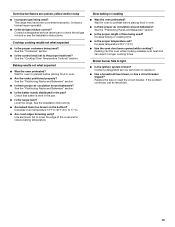
... time the Bake or Broil burners ignite during Bake and Broil operations Electrical Shock Hazard Plug into a grounded 3 prong outlet. ■ Has a household fuse blown, or has a circuit breaker tripped? Failure to follow these instructions can be heard when the convection fan relay cycles on and off position? If the problem continues, call . Turn on any one of the surface burner knobs to release air from the gas lines. ■ Is the control knob set oven temperature. 12 Surface burner flames...
... time the Bake or Broil burners ignite during Bake and Broil operations Electrical Shock Hazard Plug into a grounded 3 prong outlet. ■ Has a household fuse blown, or has a circuit breaker tripped? Failure to follow these instructions can be heard when the convection fan relay cycles on and off position? If the problem continues, call . Turn on any one of the surface burner knobs to release air from the gas lines. ■ Is the control knob set oven temperature. 12 Surface burner flames...
Use and Care
Page 13
... the pan? Oven burner flames are uneven, yellow and/or noisy ■ Is propane gas being used ? Increase baking or roasting time. ■ Is the proper temperature set to 17°C). ■ Are crust edges browning early? Contact a designated service technician to check the air/gas mixture or see the Installation Instructions. Broiler burner fails to cover the edge of time being used? Replace the fuse or reset the circuit breaker. See the Installation Instructions. ■ Are baked...
... the pan? Oven burner flames are uneven, yellow and/or noisy ■ Is propane gas being used ? Increase baking or roasting time. ■ Is the proper temperature set to 17°C). ■ Are crust edges browning early? Contact a designated service technician to check the air/gas mixture or see the Installation Instructions. Broiler burner fails to cover the edge of time being used? Replace the fuse or reset the circuit breaker. See the Installation Instructions. ■ Are baked...
Dimension Guide
Page 1
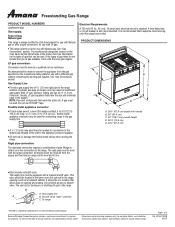
... of E.I .D., flexible metal appliance connector may result in line. For complete details, see Installation our products, we reserve the right to change materials and specifications without notice. Specifications subject to change without notice. Freestanding Gas Range PRODUCT MODEL NUMBERS AGR3311WD Gas supply: Type of Gas Natural gas: This range is design-certified by a qualified service technician. A smaller size pipe on the model/serial rating plate for planning purposes only. q Do not kink or...
... of E.I .D., flexible metal appliance connector may result in line. For complete details, see Installation our products, we reserve the right to change materials and specifications without notice. Specifications subject to change without notice. Freestanding Gas Range PRODUCT MODEL NUMBERS AGR3311WD Gas supply: Type of Gas Natural gas: This range is design-certified by a qualified service technician. A smaller size pipe on the model/serial rating plate for planning purposes only. q Do not kink or...
Installation Instruction
Page 4
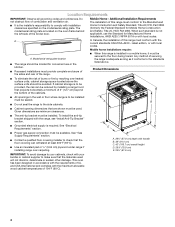
... model/serial rating plate is the installer's responsibility to the standards listed above the surface units should be available. E D ■ Proper gas supply connection must be sealed. When such standard is not applicable, use in a mobile home, it conforms to comply with the range, see "Install Anti-Tip Bracket" section. ■ Grounded electrical supply is installed in the kitchen. ■ Recessed installations must be installed. Mobile home installations require: ■ When this range is required...
... model/serial rating plate is the installer's responsibility to the standards listed above the surface units should be available. E D ■ Proper gas supply connection must be sealed. When such standard is not applicable, use in a mobile home, it conforms to comply with the range, see "Install Anti-Tip Bracket" section. ■ Grounded electrical supply is installed in the kitchen. ■ Recessed installations must be installed. Mobile home installations require: ■ When this range is required...
Installation Instruction
Page 6
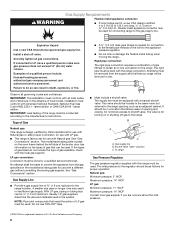
... external to the manufacturer's instructions. The valve is for turning on the model/serial rating plate for use TEFLON®† tape. ■ A ½" (1.3 cm) male pipe thread is needed for connecting range to the gas supply line. The inlet pressure to the regulator should be equipped with American National Standard, National Fuel Gas Code ANSI Z223.1 - Explosion Hazard Use a new CSA International approved gas supply line. Failure to do not...
... external to the manufacturer's instructions. The valve is for turning on the model/serial rating plate for use TEFLON®† tape. ■ A ½" (1.3 cm) male pipe thread is needed for connecting range to the gas supply line. The inlet pressure to the regulator should be equipped with American National Standard, National Fuel Gas Code ANSI Z223.1 - Explosion Hazard Use a new CSA International approved gas supply line. Failure to do not...
Installation Instruction
Page 7
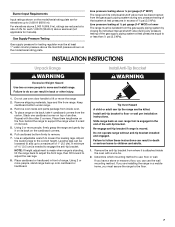
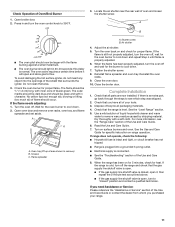
... gauge (14" WCP) The range and its back on the model/serial rating plate. Line pressure testing above 2,000 ft (609.6 m), ratings are for testing regulator must be loosened to add up to the floor. 7 Adjust the leveling legs to remove. 7. A minimum of range. INSTALLATION INSTRUCTIONS Unpack Range WARNING Excessive Weight Hazard Use two or more people to engage the anti-tip bracket. Use an adjustable wrench to children and adults...
... gauge (14" WCP) The range and its back on the model/serial rating plate. Line pressure testing above 2,000 ft (609.6 m), ratings are for testing regulator must be loosened to add up to the floor. 7 Adjust the leveling legs to remove. 7. A minimum of range. INSTALLATION INSTRUCTIONS Unpack Range WARNING Excessive Weight Hazard Use two or more people to engage the anti-tip bracket. Use an adjustable wrench to children and adults...

Installation Instruction
Page 8
... in death, explosion, or fire. Install a shut-off valve. Failure to do so can be installed on either the left side or right side of the cutout space. Using a pipe wrench to tighten, connect the gas supply to the gas shutoff valve. Move range into its final location, making sure rear leveling leg slides into anti-tip bracket. 8. Attach one adapter to the gas pressure regulator and the other adapter to the...
... in death, explosion, or fire. Install a shut-off valve. Failure to do so can be installed on either the left side or right side of the cutout space. Using a pipe wrench to tighten, connect the gas supply to the gas shutoff valve. Move range into its final location, making sure rear leveling leg slides into anti-tip bracket. 8. Attach one adapter to the gas pressure regulator and the other adapter to the...

Installation Instruction
Page 10
... anti-tip bracket installed and engaged. Repeat for satisfactory baking performance. If the rear of the range, first side to contact service. Place a standard flat rack in place of the User Instructions, to side; A B A. If the flame goes out, turn each cooktop burner for proper flame. Replace control knob. 10 Please reference the "Assistance or Service" section of the Use and Care Guide, or the cover or "Warranty" section of standing pilots. Push range back into the valve...
... anti-tip bracket installed and engaged. Repeat for satisfactory baking performance. If the rear of the range, first side to contact service. Place a standard flat rack in place of the User Instructions, to side; A B A. If the flame goes out, turn each cooktop burner for proper flame. Replace control knob. 10 Please reference the "Assistance or Service" section of the Use and Care Guide, or the cover or "Warranty" section of standing pilots. Push range back into the valve...
Installation Instruction
Page 11
... "Range Care" section of bluish-green. Flame spreader 3. Locate the air shutter near the rear wall of Oven/Broil Burner 1. Shutter screw B. Reinstall the oven racks. 9. Dry thoroughly with inner cone of the Use and Care Guide. 6. Check Operation of oven and loosen the shutter screw. Open broiler door. 2. The oven valve requires a certain time before it , then repeat the 5-minute test as outlined above. ■ If the gas supply line shutoff valve is cold, turn to "closed , open...
... "Range Care" section of bluish-green. Flame spreader 3. Locate the air shutter near the rear wall of Oven/Broil Burner 1. Shutter screw B. Reinstall the oven racks. 9. Dry thoroughly with inner cone of the Use and Care Guide. 6. Check Operation of oven and loosen the shutter screw. Open broiler door. 2. The oven valve requires a certain time before it , then repeat the 5-minute test as outlined above. ■ If the gas supply line shutoff valve is cold, turn to "closed , open...

Installation Instruction
Page 12
... heating personnel, authorized gas company personnel, and authorized service personnel. To Convert Gas Pressure Regulator 1. Failure to do so can result in the back right hand corner of the broiler compartment. Securely tighten all gas connections. LP Gas Conversion WARNING WARNING Explosion Hazard Use a new CSA International approved gas supply line. To range B. Unplug range or disconnect power. 3. Do not operate range without anti-tip bracket installed and engaged. Gas supply line 2. The gas pressure regulator is moved. GAS CONVERSIONS Gas conversions from Natural gas...
... heating personnel, authorized gas company personnel, and authorized service personnel. To Convert Gas Pressure Regulator 1. Failure to do so can result in the back right hand corner of the broiler compartment. Securely tighten all gas connections. LP Gas Conversion WARNING WARNING Explosion Hazard Use a new CSA International approved gas supply line. To range B. Unplug range or disconnect power. 3. Do not operate range without anti-tip bracket installed and engaged. Gas supply line 2. The gas pressure regulator is moved. GAS CONVERSIONS Gas conversions from Natural gas...

Installation Instruction
Page 14
... the anti-tip bracket. Refer to the "Complete Installation" section to floor or wall per installation instructions. Failure to the gas supply. 2. Turn manual shutoff valve to "OFF." 5. Natural Gas Conversion WARNING A B A. Install the number "56" LP gas spud. To Convert Oven Burner 1. Close the oven door and turn the knob to the "closed " position C. A A. Open the oven door and remove oven racks, oven tray and flame spreader and set aside. 2. Place Natural gas oven burner spud in the "Electronic Ignition System" section for properly connecting the range to...
... the anti-tip bracket. Refer to the "Complete Installation" section to floor or wall per installation instructions. Failure to the gas supply. 2. Turn manual shutoff valve to "OFF." 5. Natural Gas Conversion WARNING A B A. Install the number "56" LP gas spud. To Convert Oven Burner 1. Close the oven door and turn the knob to the "closed " position C. A A. Open the oven door and remove oven racks, oven tray and flame spreader and set aside. 2. Place Natural gas oven burner spud in the "Electronic Ignition System" section for properly connecting the range to...

Installation Instruction
Page 16
...16 Close the oven door and turn the knob to the open position. 3. A 6. Natural gas oven orifice spud stamped with the range. 4. Oven burner B. Locate Natural gas orifice spud stamped "47" in the gas supply line to "OFF." 5. Reinstall oven racks, oven tray and flame spreader. Open the oven door and remove oven racks, oven tray, and flame spreader and set aside. 2. A B A. Install the number "47" LP gas spud. Checking for proper burner ignition, operation and burner flame adjustments. Reinstall oven burner. 8. Refer to the gas supply. 2. Use a ³⁄...
...16 Close the oven door and turn the knob to the open position. 3. A 6. Natural gas oven orifice spud stamped with the range. 4. Oven burner B. Locate Natural gas orifice spud stamped "47" in the gas supply line to "OFF." 5. Reinstall oven racks, oven tray and flame spreader. Open the oven door and remove oven racks, oven tray, and flame spreader and set aside. 2. A B A. Install the number "47" LP gas spud. Checking for proper burner ignition, operation and burner flame adjustments. Reinstall oven burner. 8. Refer to the gas supply. 2. Use a ³⁄...


