

Use and Care
Page 5
PARTS AND FEATURES This manual covers several different models. Left front burner control C. Surface burners and grates C. Anti-tip bracket D. Door gasket 5 The locations and appearances ... vent B. Model and serial number plate (behind left side of your model. Oven temperature control knob D. The range you have some or all of the parts and features listed. Control Panel E A B C A. Left rear burner control B. Right front burner control A B F G C D E A.
PARTS AND FEATURES This manual covers several different models. Left front burner control C. Surface burners and grates C. Anti-tip bracket D. Door gasket 5 The locations and appearances ... vent B. Model and serial number plate (behind left side of your model. Oven temperature control knob D. The range you have some or all of the parts and features listed. Control Panel E A B C A. Left rear burner control B. Right front burner control A B F G C D E A.

Use and Care
Page 9
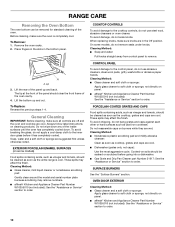
...; Pull out oven rack to stop position before turning or removing food. Place food on broiler grid. 9 The temperature can drain down into the lower part of juices. Cook longer if necessary. 4. The broiler pan and grid slide out for doneness at any time during broiling. ■ It is not necessary...
...; Pull out oven rack to stop position before turning or removing food. Place food on broiler grid. 9 The temperature can drain down into the lower part of juices. Cook longer if necessary. 4. The broiler pan and grid slide out for doneness at any time during broiling. ■ It is not necessary...
Use and Care
Page 10
...(grates only, not caps): Use the most aggressive cycle. EXTERIOR PORCELAIN ENAMEL SURFACES (on panel. ■ affresh® Kitchen and Appliance Cleaner Part Number W10355010 (not included): See the "Assistance or Service" section to remove. To avoid damage, do not bang grates and caps against each other... controls are off and the oven and cooktop are cool. These spills may remove numbers. ■ affresh® Kitchen and Appliance Cleaner Part Number W10355010 (not included): See the "Assistance or Service" section to the cooktop controls, do not remove seals under knobs. To avoid...
...(grates only, not caps): Use the most aggressive cycle. EXTERIOR PORCELAIN ENAMEL SURFACES (on panel. ■ affresh® Kitchen and Appliance Cleaner Part Number W10355010 (not included): See the "Assistance or Service" section to remove. To avoid damage, do not bang grates and caps against each other... controls are off and the oven and cooktop are cool. These spills may remove numbers. ■ affresh® Kitchen and Appliance Cleaner Part Number W10355010 (not included): See the "Assistance or Service" section to the cooktop controls, do not remove seals under knobs. To avoid...
Use and Care
Page 14
... Features and specifications on our full line of a service call Amana® Appliances toll free: 1-800-843-0304. Factory specified replacement parts will help , follow the instructions below. To locate factory specified replacement parts in your nearest designated service center. For further assistance If you ... and provide afterwarranty service, anywhere in your request. If You Need Replacement Parts If you can write to build every new Amana® appliance. In the U.S.A. To locate the Amana designated service company in your area, you need help us or your telephone...
... Features and specifications on our full line of a service call Amana® Appliances toll free: 1-800-843-0304. Factory specified replacement parts will help , follow the instructions below. To locate factory specified replacement parts in your nearest designated service center. For further assistance If you ... and provide afterwarranty service, anywhere in your request. If You Need Replacement Parts If you can write to build every new Amana® appliance. In the U.S.A. To locate the Amana designated service company in your area, you need help us or your telephone...
Use and Care
Page 15
... This major appliance is designed to be repaired in the home and only in a remote area where service by an authorized Amana servicer is required to parts or systems resulting from warranty coverage. 3. If you may find this warranty. 8. If outside the 50 United States and ...Canada, contact your authorized Amana dealer to repair or replace appliance light bulbs, air filters or water filters. Proof of original purchase ...
... This major appliance is designed to be repaired in the home and only in a remote area where service by an authorized Amana servicer is required to parts or systems resulting from warranty coverage. 3. If you may find this warranty. 8. If outside the 50 United States and ...Canada, contact your authorized Amana dealer to repair or replace appliance light bulbs, air filters or water filters. Proof of original purchase ...

Installation Instruction
Page 3
...1⁵⁄₈" screws (2) ■ Literature bag ■ Conversion orifice spuds (inside bag containing literature) ■ Anti-tip bracket must be killed. Parts needed A ■ Tape measure ■ Marker or pencil ■ Flat-blade screwdriver ■ Phillips screwdriver ■ Level ■ Hand or electric ...a ball valve, it shall be a T-handle type. ■ A flexible gas connector, when used, must not exceed 3 feet. Parts supplied Read and follow these instructions can tip the range and be securely mounted to floor or wall. Do not operate range without anti-...
...1⁵⁄₈" screws (2) ■ Literature bag ■ Conversion orifice spuds (inside bag containing literature) ■ Anti-tip bracket must be killed. Parts needed A ■ Tape measure ■ Marker or pencil ■ Flat-blade screwdriver ■ Phillips screwdriver ■ Level ■ Hand or electric ...a ball valve, it shall be a T-handle type. ■ A flexible gas connector, when used, must not exceed 3 feet. Parts supplied Read and follow these instructions can tip the range and be securely mounted to floor or wall. Do not operate range without anti-...
Installation Instruction
Page 4
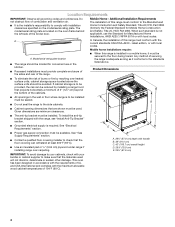
...D ■ Proper gas supply connection must be located for convenient use the Standard for Mobile Home Construction and Safety, Title 24, HUD Part 280). Any method of the broiler door. This oven has been designed in the kitchen. ■ Recessed installations must conform to the ...the materials used . A B ■ Do not seal the range to the Manufactured Home Construction and Safety Standard, Title 24 CFR, Part 3280 (formerly the Federal Standard for Manufactured Home Installations, ANSI A225.1/NFPA 501A or with installation clearances specified on the oven frame behind the...
...D ■ Proper gas supply connection must be located for convenient use the Standard for Mobile Home Construction and Safety, Title 24, HUD Part 280). Any method of the broiler door. This oven has been designed in the kitchen. ■ Recessed installations must conform to the ...the materials used . A B ■ Do not seal the range to the Manufactured Home Construction and Safety Standard, Title 24 CFR, Part 3280 (formerly the Federal Standard for Manufactured Home Installations, ANSI A225.1/NFPA 501A or with installation clearances specified on the oven frame behind the...
Installation Instruction
Page 7
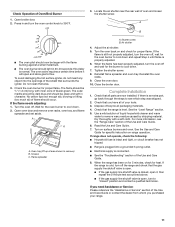
... or less than ½ psi (3.5 kPa). Install anti-tip bracket to loosen the leveling legs. Determine which mounting method to remove. 7. Remove oven racks and parts package from range. Keep cardboard bottom under range. 3. Gas Supply Pressure Testing Gas supply pressure for Canada). Line pressure testing at ½ psi gauge (14...
... or less than ½ psi (3.5 kPa). Install anti-tip bracket to loosen the leveling legs. Determine which mounting method to remove. 7. Remove oven racks and parts package from range. Keep cardboard bottom under range. 3. Gas Supply Pressure Testing Gas supply pressure for Canada). Line pressure testing at ½ psi gauge (14...

Installation Instruction
Page 9
... Engaged 1. Check that connector is the "ON" position. A B D C E F G H A. Manual shutoff valve H. ½" or ¾" gas pipe Complete Connection 1. Remove cooktop burner caps and grates from parts package. A B A. If the range does not work, verify that the gas pressure regulator shutoff valve is engaged in the anti-tip bracket. 3. Closed valve B. If...
... Engaged 1. Check that connector is the "ON" position. A B D C E F G H A. Manual shutoff valve H. ½" or ¾" gas pipe Complete Connection 1. Remove cooktop burner caps and grates from parts package. A B A. If the range does not work, verify that the gas pressure regulator shutoff valve is engaged in the anti-tip bracket. 3. Closed valve B. If...
Installation Instruction
Page 11
... spreader and set aside. Locate the air shutter near the rear wall of bluish-green. Tighten the shutter screw. 8. Check that you have all parts are now installed. Turn on and check for proper flame. OFF 140 170 200 250 300 350 400 450 OVEN TEMP BROIL 350 ■ The... was skipped. 2. To avoid damaging the hot surface igniter, do not insert any object into a grounded 3 prong outlet. ■ Electrical supply is an extra part, go back through the steps to 350°F. Adjust the air shutter. 5. If the flame is still not properly adjusted, turn to cool down . 2. Close...
... spreader and set aside. Locate the air shutter near the rear wall of bluish-green. Tighten the shutter screw. 8. Check that you have all parts are now installed. Turn on and check for proper flame. OFF 140 170 200 250 300 350 400 450 OVEN TEMP BROIL 350 ■ The... was skipped. 2. To avoid damaging the hot surface igniter, do not insert any object into a grounded 3 prong outlet. ■ Electrical supply is an extra part, go back through the steps to 350°F. Adjust the air shutter. 5. If the flame is still not properly adjusted, turn to cool down . 2. Close...

Installation Instruction
Page 13
.... Inlet pressure Inlet pressure to Natural gas to LP gas, unscrew the plastic adjustment screw by hand, turn it over, and screw it in the parts bag for top burners in the same position. Cap B. Burner cap B. Place the Natural gas orifice spuds in again. Reinstall the cap. 180º A. Holder...
.... Inlet pressure Inlet pressure to Natural gas to LP gas, unscrew the plastic adjustment screw by hand, turn it over, and screw it in the parts bag for top burners in the same position. Cap B. Burner cap B. Place the Natural gas orifice spuds in again. Reinstall the cap. 180º A. Holder...

Installation Instruction
Page 14
... back right hand corner of the anti-tip bracket. Turn manual shutoff valve to the open position. 3. The gas pressure regulator is engaged in plastic parts bag along with Natural gas cooktop burner spuds for proper burner ignition, operation and burner flame adjustments. The outer cone is behind the oven burner...
... back right hand corner of the anti-tip bracket. Turn manual shutoff valve to the open position. 3. The gas pressure regulator is engaged in plastic parts bag along with Natural gas cooktop burner spuds for proper burner ignition, operation and burner flame adjustments. The outer cone is behind the oven burner...

Installation Instruction
Page 15
... a 7 mm combination wrench. Reinstall burners, burner caps and burner grates. 15 A. To convert to Natural gas A B 180º C A. Place LP gas orifice spuds in the parts bag for top burners in the package containing literature included with 4 standard burners or 3 standard burners and 1 super burner. Spud size and location remain the...
... a 7 mm combination wrench. Reinstall burners, burner caps and burner grates. 15 A. To convert to Natural gas A B 180º C A. Place LP gas orifice spuds in the parts bag for top burners in the package containing literature included with 4 standard burners or 3 standard burners and 1 super burner. Spud size and location remain the...

Installation Instruction
Page 16
..., oven tray, and flame spreader and set aside. 2. The orifice spud is very important. Complete Conversion 1. Refer to "Check Operation of Cooktop Burners" in plastic parts bag along with LP gas cooktop burner spuds for each cooktop burner. Checking for proper cooktop and oven burner flames is behind the oven burner...
..., oven tray, and flame spreader and set aside. 2. The orifice spud is very important. Complete Conversion 1. Refer to "Check Operation of Cooktop Burners" in plastic parts bag along with LP gas cooktop burner spuds for each cooktop burner. Checking for proper cooktop and oven burner flames is behind the oven burner...

Warranty
Page 1
...by checking the "Assistance or Service" section or by an Amana designated service company. You will pay for future reference. Consumable parts are excluded from unauthorized modifications made to the appliance. 9. Repairs to parts or systems resulting from warranty coverage. 3. This warranty is ...void if the factory applied serial number has been altered or removed from your authorized Amana dealer to determine if another warranty applies. This ...
...by checking the "Assistance or Service" section or by an Amana designated service company. You will pay for future reference. Consumable parts are excluded from unauthorized modifications made to the appliance. 9. Repairs to parts or systems resulting from warranty coverage. 3. This warranty is ...void if the factory applied serial number has been altered or removed from your authorized Amana dealer to determine if another warranty applies. This ...


