Installation Instruction
Page 1
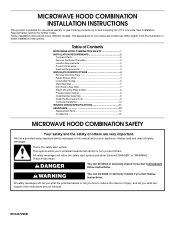
...Damper Assembly 9 Install the Microwave Oven 9 Complete Installation 10 VENTING DESIGN SPECIFICATIONS 11 ASSISTANCE 12 Replacement Parts 12 Accessories 12 MICROWAVE HOOD COMBINATION SAFETY Your safety and the safety of your appliance. All safety messages...not followed. All safety messages will follow instructions. Table of Contents MICROWAVE HOOD COMBINATION SAFETY 1 INSTALLATION REQUIREMENTS 2 Tools and Parts 2 Remove Cardboard Template 2 Location Requirements 2 Product Dimensions 3 Electrical Requirements 3 INSTALLATION INSTRUCTIONS 4 Remove Mounting Plate 4 Rotate ...
...Damper Assembly 9 Install the Microwave Oven 9 Complete Installation 10 VENTING DESIGN SPECIFICATIONS 11 ASSISTANCE 12 Replacement Parts 12 Accessories 12 MICROWAVE HOOD COMBINATION SAFETY Your safety and the safety of your appliance. All safety messages...not followed. All safety messages will follow instructions. Table of Contents MICROWAVE HOOD COMBINATION SAFETY 1 INSTALLATION REQUIREMENTS 2 Tools and Parts 2 Remove Cardboard Template 2 Location Requirements 2 Product Dimensions 3 Electrical Requirements 3 INSTALLATION INSTRUCTIONS 4 Remove Mounting Plate 4 Rotate ...

Installation Instruction
Page 2
... using a rectangular to round transition piece, the 3" (7.6 cm) clearance needs to use as a rear wall template. 1. See "Rectangular to it during the "Mark Rear Wall" part of packaging) Aluminum grease filters Charcoal filters (Depending on model, aluminum grease filter and charcoal filter may not be included. Sheet metal screws (2) G. Location Requirements...
... using a rectangular to round transition piece, the 3" (7.6 cm) clearance needs to use as a rear wall template. 1. See "Rectangular to it during the "Mark Rear Wall" part of packaging) Aluminum grease filters Charcoal filters (Depending on model, aluminum grease filter and charcoal filter may not be included. Sheet metal screws (2) G. Location Requirements...
Installation Instruction
Page 8
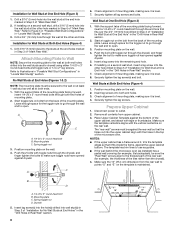
... 3 of the microwave oven. Drill a 3/4" (19 mm) hole through both end holes. 3. Attach Mounting Plate to Wall NOTE: Secure the mounting plate to the thickest part of the rear wall (for example, the thickness of mounting plate. 2. With the support tabs of the mounting plate facing forward, insert 1/4-20 x 3" round-head...
... 3 of the microwave oven. Drill a 3/4" (19 mm) hole through both end holes. 3. Attach Mounting Plate to Wall NOTE: Secure the mounting plate to the thickest part of the rear wall (for example, the thickness of mounting plate. 2. With the support tabs of the mounting plate facing forward, insert 1/4-20 x 3" round-head...
Installation Instruction
Page 12
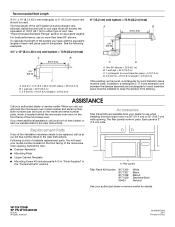
... the door. ■ Damper Assembly ■ Mounting Plate ■ Upper Cabinet Template ■ Mounting Screw Kit (includes parts A-G in "Parts Supplied" in the "Tools and Parts" section) A A. Filler panels Filler Panel Kit Number 8171336 8171337 8171338 8171339 99403 White Black Biscuit Stainless Steel Almond See ... (7.6 cm) wide. ASSISTANCE Call your authorized dealer or service center for details. Each panel is a list of available replacement parts. To calculate the length of the system you need , add the equivalent lengths of each vent piece used . Replacement...
... the door. ■ Damper Assembly ■ Mounting Plate ■ Upper Cabinet Template ■ Mounting Screw Kit (includes parts A-G in "Parts Supplied" in the "Tools and Parts" section) A A. Filler panels Filler Panel Kit Number 8171336 8171337 8171338 8171339 99403 White Black Biscuit Stainless Steel Almond See ... (7.6 cm) wide. ASSISTANCE Call your authorized dealer or service center for details. Each panel is a list of available replacement parts. To calculate the length of the system you need , add the equivalent lengths of each vent piece used . Replacement...

Use and Care
Page 1
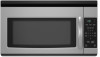
... potential hazard is the safety alert symbol. Puede encontrar su número de modelo y de serie en la etiqueta ubicada en la parte frontal de la abertura del horno de microondas, detrás de la puerta. Always read and obey all instructions before using electrical appliances...are not followed. MICROWAVE HOOD COMBINATION USER INSTRUCTIONS THANK YOU for example, closed glass jars - You will need assistance, call us at www.amana.com for additional information. Microwave Hood Combination Safety Your safety and the safety of burns, electric shock, fire, injury to persons, or ...
... potential hazard is the safety alert symbol. Puede encontrar su número de modelo y de serie en la etiqueta ubicada en la parte frontal de la abertura del horno de microondas, detrás de la puerta. Always read and obey all instructions before using electrical appliances...are not followed. MICROWAVE HOOD COMBINATION USER INSTRUCTIONS THANK YOU for example, closed glass jars - You will need assistance, call us at www.amana.com for additional information. Microwave Hood Combination Safety Your safety and the safety of burns, electric shock, fire, injury to persons, or ...
Use and Care
Page 2
...-door operation can burn off power at the fuse or circuit breaker panel. - Carefully attend the microwave oven when paper, plastic, or other part of oven is not always present. Do not overheat the liquid. - Stir the liquid both gas and electric cooking equipment. ■ Intended...■ When flambeing foods under the hood, turn oven off, and disconnect the power cord, or shut off the pad and touch electrical parts involving a risk of fire in the oven cavity: - Call an authorized service company for storage purposes. SAVE THESE INSTRUCTIONS PRECAUTIONS TO AVOID POSSIBLE...
...-door operation can burn off power at the fuse or circuit breaker panel. - Carefully attend the microwave oven when paper, plastic, or other part of oven is not always present. Do not overheat the liquid. - Stir the liquid both gas and electric cooking equipment. ■ Intended...■ When flambeing foods under the hood, turn oven off, and disconnect the power cord, or shut off the pad and touch electrical parts involving a risk of fire in the oven cavity: - Call an authorized service company for storage purposes. SAVE THESE INSTRUCTIONS PRECAUTIONS TO AVOID POSSIBLE...
Use and Care
Page 3
... until 2 tones sound and padlock icon appears in the display. The "DEMO" icon will appear in the display. SAVE THESE INSTRUCTIONS This device complies with Part 18 of electric shock by providing an escape wire for FAST. 3. To avoid damage to the microwave oven due to exit Demo Mode. Control Lock...
... until 2 tones sound and padlock icon appears in the display. The "DEMO" icon will appear in the display. SAVE THESE INSTRUCTIONS This device complies with Part 18 of electric shock by providing an escape wire for FAST. 3. To avoid damage to the microwave oven due to exit Demo Mode. Control Lock...
Use and Care
Page 5
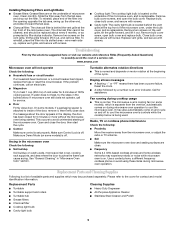
...rotation at 100% cooking power. The microwave oven's cooling fan (on and off to cool the microwave oven. Replacement Parts and Cleaning Supplies Following is normal. Replacement Parts Cleaning Supplies ■ Turntable ■ Turntable support and rollers ■ Turntable hub ■ Grease filters ■...cover, and is behind the vent grille at the top front of available parts and supplies which is replaceable. Remove bulb cover screws, and open bulb cover and replace bulb. www.amana.com Microwave oven will not operate Check the following : ■ Proximity ...
...rotation at 100% cooking power. The microwave oven's cooling fan (on and off to cool the microwave oven. Replacement Parts and Cleaning Supplies Following is normal. Replacement Parts Cleaning Supplies ■ Turntable ■ Turntable support and rollers ■ Turntable hub ■ Grease filters ■...cover, and is behind the vent grille at the top front of available parts and supplies which is replaceable. Remove bulb cover screws, and open bulb cover and replace bulb. www.amana.com Microwave oven will not operate Check the following : ■ Proximity ...

Use and Care
Page 6
... or lower front facing of your correspondence. Have your authorized Amana dealer to determine if another warranty applies. 9/07 For additional product information or to parts or systems resulting from warranty coverage. 3. AMANA® MAJOR APPLIANCE WARRANTY LIMITED WARRANTY For one year from ... light bulbs, air filters or water filters. Costs associated with the product, Amana brand of Whirlpool Corporation or Whirlpool Canada LP (hereafter "Amana") will pay for factory specified parts and repair labor to correct defects in accordance with original model/serial numbers that...
... or lower front facing of your correspondence. Have your authorized Amana dealer to determine if another warranty applies. 9/07 For additional product information or to parts or systems resulting from warranty coverage. 3. AMANA® MAJOR APPLIANCE WARRANTY LIMITED WARRANTY For one year from ... light bulbs, air filters or water filters. Costs associated with the product, Amana brand of Whirlpool Corporation or Whirlpool Canada LP (hereafter "Amana") will pay for factory specified parts and repair labor to correct defects in accordance with original model/serial numbers that...

Warranty
Page 1
...appliance is operated and maintained according to instructions attached to or furnished with the product, Amana brand of Whirlpool Corporation or Whirlpool Canada LP (hereafter "Amana") will pay for factory specified parts and repair labor to correct defects in a remote area where service by an authorized... Amana servicer is not available. 10. Outside the 50 United States and Canada, this limited warranty. ...
...appliance is operated and maintained according to instructions attached to or furnished with the product, Amana brand of Whirlpool Corporation or Whirlpool Canada LP (hereafter "Amana") will pay for factory specified parts and repair labor to correct defects in a remote area where service by an authorized... Amana servicer is not available. 10. Outside the 50 United States and Canada, this limited warranty. ...
