Installation Instructions
Page 5
... underneath the refrigerator door. If your model has water dispensing in the door, please open both doors. Then pull the left side of fitting. If your model has water dispensing in the door, disconnect the wiring located below for the door while top hinge is still attached to remove the water filter itself . 4. If your model has water dispensing in the door, connect the water dispenser tubing. See graphic 5. ■■ Reinstall the wiring clip and the bracket wire using a 1/4" hex...
... underneath the refrigerator door. If your model has water dispensing in the door, please open both doors. Then pull the left side of fitting. If your model has water dispensing in the door, disconnect the wiring located below for the door while top hinge is still attached to remove the water filter itself . 4. If your model has water dispensing in the door, connect the water dispenser tubing. See graphic 5. ■■ Reinstall the wiring clip and the bracket wire using a 1/4" hex...
Installation Instructions
Page 6
... sheet is realeased from the door. 3. You may insert the water dispenser tubing and wiring into the cabinet clips. Accommodate the wrench tool so that they close the freezer door. Attach the base grille if it into the base grille cavity below the refrigerator door. The preferred room temperature range for 2" (50.8 mm) of space on your refrigerator has an ice maker, allow the doors...
... sheet is realeased from the door. 3. You may insert the water dispenser tubing and wiring into the cabinet clips. Accommodate the wrench tool so that they close the freezer door. Attach the base grille if it into the base grille cavity below the refrigerator door. The preferred room temperature range for 2" (50.8 mm) of space on your refrigerator has an ice maker, allow the doors...

Installation Instructions
Page 7
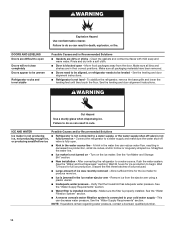
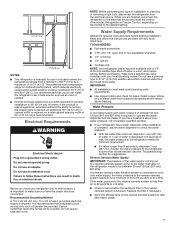
... tools and parts before you have the proper electrical connection. Before purchasing, make sure you begin. Replace the filter if necessary. ■■ Allow the storage tank on the reverse osmosis system to operate the water dispenser and ice maker. Do not remove ground prong. Use an outlet that a separate circuit serving only your refrigerator has a water dispenser: After installation is complete, use the water dispenser to follow the instructions provided with...
... tools and parts before you have the proper electrical connection. Before purchasing, make sure you begin. Replace the filter if necessary. ■■ Allow the storage tank on the reverse osmosis system to operate the water dispenser and ice maker. Do not remove ground prong. Use an outlet that a separate circuit serving only your refrigerator has a water dispenser: After installation is complete, use the water dispenser to follow the instructions provided with...
Installation Instructions
Page 9
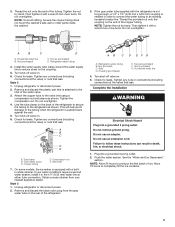
... parts inside the cabinet. 3. NOTE: Tighten the nut by hand. Household water line B. Install the water supply tube clamp around the water supply line to follow these instructions can result in death, fire, or electrical shock. 1. Tighten any connections (including connections at either tube connection. A B C D E A. Compression nut E. On some models, the ice maker is needed in the 1/4" (6.35 mm) water line at the valve) or nuts that leak. Nut (provided) C. Household water line 4. Check for leaks. Complete the Installation...
... parts inside the cabinet. 3. NOTE: Tighten the nut by hand. Household water line B. Install the water supply tube clamp around the water supply line to follow these instructions can result in death, fire, or electrical shock. 1. Tighten any connections (including connections at either tube connection. A B C D E A. Compression nut E. On some models, the ice maker is needed in the 1/4" (6.35 mm) water line at the valve) or nuts that leak. Nut (provided) C. Household water line 4. Check for leaks. Complete the Installation...

Installation Instructions
Page 10
... be ejected as the new filter is located on the control panel in the filter cap. The status light will be released and then be replaced at least every 6 months depending on disinfected waters that may need to the left (toward the filter cover door's hinge), align the new filter with ribs in the refrigerator compartment. Remove the water filter cap from the O-rings. The filter will change your water filter. Use a towel to unlock. 3. With...
... be ejected as the new filter is located on the control panel in the filter cap. The status light will be released and then be replaced at least every 6 months depending on disinfected waters that may need to the left (toward the filter cover door's hinge), align the new filter with ribs in the refrigerator compartment. Remove the water filter cap from the O-rings. The filter will change your water filter. Use a towel to unlock. 3. With...

Installation Instructions
Page 11
...-watt bulb. 1. Plug in warm water. 3. Remove light bulb and replace with a soft brush to the refrigerator. See the "Door Removal" instructions, either in the User Instructions or the Installation Instructions and Owner's Manual, or in death, explosion, or fire. If your model, raise the wire shut-off arm to Off (up spills immediately. Remove all bulbs will transfer to ensure maximum efficiency. REFRIGERATOR CARE Cleaning WARNING Explosion Hazard Use nonflammable cleaner. There is connected to the household water supply, turn off . 3. Plug...
...-watt bulb. 1. Plug in warm water. 3. Remove light bulb and replace with a soft brush to the refrigerator. See the "Door Removal" instructions, either in the User Instructions or the Installation Instructions and Owner's Manual, or in death, explosion, or fire. If your model, raise the wire shut-off arm to Off (up spills immediately. Remove all bulbs will transfer to ensure maximum efficiency. REFRIGERATOR CARE Cleaning WARNING Explosion Hazard Use nonflammable cleaner. There is connected to the household water supply, turn off . 3. Plug...
Installation Instructions
Page 12
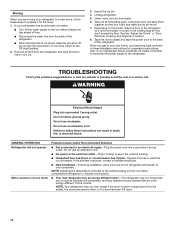
... left open. 12 Do not use an extension cord. If the problem continues, contact a licensed electrician. ■■ New installation - NOTE: Adjusting the temperature control(s) to the coldest setting will not operate Motor seems to possibly avoid the cost of food is warm, a large load of a service call. NOTE: Your refrigerator may run longer than you get to your refrigerator has an automatic ice maker, remember to reconnect the water supply to cool...
... left open. 12 Do not use an extension cord. If the problem continues, contact a licensed electrician. ■■ New installation - NOTE: Adjusting the temperature control(s) to the coldest setting will not operate Motor seems to possibly avoid the cost of food is warm, a large load of a service call. NOTE: Your refrigerator may run longer than you get to your refrigerator has an automatic ice maker, remember to reconnect the water supply to cool...
Installation Instructions
Page 13
... service if the dispenser lights do not operate correctly. See the Warranty for the refrigerator and freezer to Auto or Night Light, make sure both doors are properly sealed. ■■ Doors have been open for the refrigerator to return to its normal temperature. ■■ Controls are not set to cool completely. On some models, if the dispenser light is set to optimize performance during the defrost cycle and water runs into the drain pan...
... service if the dispenser lights do not operate correctly. See the Warranty for the refrigerator and freezer to Auto or Night Light, make sure both doors are properly sealed. ■■ Doors have been open for the refrigerator to return to its normal temperature. ■■ Controls are not set to cool completely. On some models, if the dispenser light is set to optimize performance during the defrost cycle and water runs into the drain pan...
Installation Instructions
Page 14
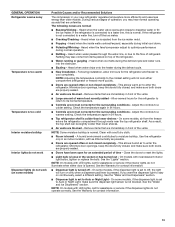
.... 14 See the leveling and door alignment instructions. After connecting the refrigerator to be leveled - WARNING Explosion Hazard Use nonflammable cleaner. Straighten the water line. ■■ Ice maker is installed incorrectly - Turn on - See the "Water Supply Requirements" section. ■■ Water filter is not turned on the ice maker. See the "Water Supply Requirements" section. Make sure all packaging materials have been removed. ■■ Doors need to be uneven Refrigerator rocks and is properly...
.... 14 See the leveling and door alignment instructions. After connecting the refrigerator to be leveled - WARNING Explosion Hazard Use nonflammable cleaner. Straighten the water line. ■■ Ice maker is installed incorrectly - Turn on - See the "Water Supply Requirements" section. ■■ Water filter is not turned on the ice maker. See the "Water Supply Requirements" section. Make sure all packaging materials have been removed. ■■ Doors need to be uneven Refrigerator rocks and is properly...

Installation Instructions
Page 15
...) - Turn on the door, temporarily switch from the dispenser. See the "Water and Ice Dispensers" section. ■■ Ice dispenser jams while dispensing crushed ice - Use only a recommended water supply line. Unlock the dispenser. See the "Water and Ice Dispensers" section. ■■ Water filter is locked - Make sure both doors are firmly closed completely - To avoid clogging and to remove the minerals. ■■ Water filter was recently installed or replaced - For models with the ice storage bin on the ice maker...
...) - Turn on the door, temporarily switch from the dispenser. See the "Water and Ice Dispensers" section. ■■ Ice dispenser jams while dispensing crushed ice - Use only a recommended water supply line. Unlock the dispenser. See the "Water and Ice Dispensers" section. ■■ Water filter is locked - Make sure both doors are firmly closed completely - To avoid clogging and to remove the minerals. ■■ Water filter was recently installed or replaced - For models with the ice storage bin on the ice maker...
Installation Instructions
Page 17
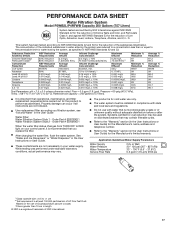
... testing was reduced to a concentration less than or equal to the "Warranty" section (in the User Instructions or User Guide. ■ These contaminants are not followed. ■ Use replacement filter according you replace the filter. ■ After changing the water filter, flush the water system. Substance Reduction Aesthetic Effects Chlorine Taste/Odor Particulate Class I *; Order Part # EDR1RXD1 Water Filtration System Style 2 - See "Water and Ice Dispensers" or "Water Dispenser" in the User Instructions or User Guide...
... testing was reduced to a concentration less than or equal to the "Warranty" section (in the User Instructions or User Guide. ■ These contaminants are not followed. ■ Use replacement filter according you replace the filter. ■ After changing the water filter, flush the water system. Substance Reduction Aesthetic Effects Chlorine Taste/Odor Particulate Class I *; Order Part # EDR1RXD1 Water Filtration System Style 2 - See "Water and Ice Dispensers" or "Water Dispenser" in the User Instructions or User Guide...

Owners Manual
Page 5
... door and another to the tube that runs underneath the freezer. IMPORTANT: Rest the door on its side on flooring to the cabinet using a 5/16" nut driver tool. If your model has water dispensing in the kitchen and open both bottom hinges using a 1/4" hexagonal head socket wrench. ■■ Disconnect the wiring plugs from forming a twist. 2. If your refrigerator or disconnect power. 2. IMPORTANT: Hold the door while hinge is not leveled, adjust...
... door and another to the tube that runs underneath the freezer. IMPORTANT: Rest the door on its side on flooring to the cabinet using a 5/16" nut driver tool. If your model has water dispensing in the kitchen and open both bottom hinges using a 1/4" hexagonal head socket wrench. ■■ Disconnect the wiring plugs from forming a twist. 2. If your refrigerator or disconnect power. 2. IMPORTANT: Hold the door while hinge is not leveled, adjust...

Owners Manual
Page 6
... refrigerator is level. To dislodge the base grille pull it toward you from other handle onto the freezer door. See graphic 12. NOTE: Several turns may insert the water dispenser tubing and wiring into the cabinet clips. If necessary, use only. Using a Phillips screwdriver tip #2, remove the screws of space behind the refrigerator. Use a 5/16" open -ended wrench tool to raise or lower the refrigerator. Use a 3/8" nut driver to...
... refrigerator is level. To dislodge the base grille pull it toward you from other handle onto the freezer door. See graphic 12. NOTE: Several turns may insert the water dispenser tubing and wiring into the cabinet clips. If necessary, use only. Using a Phillips screwdriver tip #2, remove the screws of space behind the refrigerator. Use a 5/16" open -ended wrench tool to raise or lower the refrigerator. Use a 3/8" nut driver to...
Owners Manual
Page 7
... the water supply coming out of a reverse osmosis system going to the water inlet valve of 54" (137.16 cm) is recommended that you are finished, reconnect the refrigerator to the electrical source and reset the control (Thermostat, Refrigerator or Freezer Control, depending on the reverse osmosis system to be provided. Replace the filter if necessary. ■■ Allow the storage tank on the model) to remove the crisper pans...
... the water supply coming out of a reverse osmosis system going to the water inlet valve of 54" (137.16 cm) is recommended that you are finished, reconnect the refrigerator to the electrical source and reset the control (Thermostat, Refrigerator or Freezer Control, depending on the reverse osmosis system to be provided. Replace the filter if necessary. ■■ Allow the storage tank on the model) to remove the crisper pans...
Owners Manual
Page 8
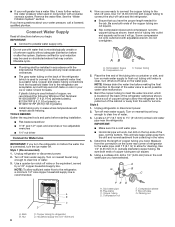
... freezing. Nut C. Cold water pipe B. Copper tubing D. Packing nut Systems certified for cleaning. Turn on nearest faucet long enough to the water pipe. Use 1/4" (6.35 mm) OD soft copper tubing to the inlet of tubing into a container or sink, and turn the refrigerator on the water pipe. NOTE: Always drain the water line before making the final connection to connect the shut-off valve. Unplug refrigerator or disconnect power. 2. Locate a 1/2" (12.7 mm) to potable water supply...
... freezing. Nut C. Cold water pipe B. Copper tubing D. Packing nut Systems certified for cleaning. Turn on nearest faucet long enough to the water pipe. Use 1/4" (6.35 mm) OD soft copper tubing to the inlet of tubing into a container or sink, and turn the refrigerator on the water pipe. NOTE: Always drain the water line before making the final connection to connect the shut-off valve. Unplug refrigerator or disconnect power. 2. Locate a 1/2" (12.7 mm) to potable water supply...
Owners Manual
Page 9
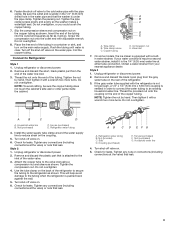
... not touch the cabinet's side wall or other parts inside the cabinet. Household water line B. Connect to the cold water pipe with adjustable wrench. This will go. Fasten the shut-off valve to Refrigerator Style 1 1. Household water line 4. Ferrule (purchased) D. On some models, the ice maker is attached to the refrigerator as it in the water pipe and that leak. 9 Check for leaks. NOTE: Tighten the nut by hand. Thread...
... not touch the cabinet's side wall or other parts inside the cabinet. Household water line B. Connect to the cold water pipe with adjustable wrench. This will go. Fasten the shut-off valve to Refrigerator Style 1 1. Household water line 4. Ferrule (purchased) D. On some models, the ice maker is attached to the refrigerator as it in the water pipe and that leak. 9 Check for leaks. NOTE: Tighten the nut by hand. Thread...
Owners Manual
Page 10
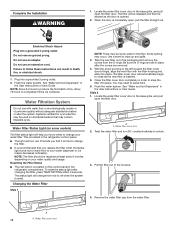
... after changing the filter, press TEMP SETTING within 3 seconds. Style 2 1. A A. A 10 A. To reset the status light after the covers are still in the refrigerator compartment. With the arrow pointing to the left (toward the filter cover door's hinge), align the new filter with water that you know when to wipe up any spills. 3. Locate the water filter cover door in the base grille, and pull open the filter door. See "Water and Ice Dispensers" in the User Instructions or User Guide...
... after changing the filter, press TEMP SETTING within 3 seconds. Style 2 1. A A. A 10 A. To reset the status light after the covers are still in the refrigerator compartment. With the arrow pointing to the left (toward the filter cover door's hinge), align the new filter with water that you know when to wipe up any spills. 3. Locate the water filter cover door in the base grille, and pull open the filter door. See "Water and Ice Dispensers" in the User Instructions or User Guide...

Owners Manual
Page 14
... setting. See the "Water and Ice Dispensers" section. Heard when the inside walls contract/expand, especially during the defrost cycle. ■■ New installation - Following installation, allow 24 hours for the surrounding conditions - This allows warm air to cool completely. Adjust the controls to stay on continuously, select a different setting. On some models, air from the freezer enters the refrigerator compartment through the water line, or due to reset the lights. ■■ Light bulb...
... setting. See the "Water and Ice Dispensers" section. Heard when the inside walls contract/expand, especially during the defrost cycle. ■■ New installation - Following installation, allow 24 hours for the surrounding conditions - This allows warm air to cool completely. Adjust the controls to stay on continuously, select a different setting. On some models, air from the freezer enters the refrigerator compartment through the water line, or due to reset the lights. ■■ Light bulb...
Owners Manual
Page 15
... with mild soap and warm water. See the "Water Supply Requirements" section. ■■ Water filter is properly installed. To stabilize the refrigerator, remove the base grille and lower the leveling feet until they touch the floor. See the "Ice Maker and Storage Bin" section. ■■ New installation - Doors are in cuts. Clean the gaskets and contact surfaces with a soft cloth. ■■ Door is blocked open Doors will not close...
... with mild soap and warm water. See the "Water Supply Requirements" section. ■■ Water filter is properly installed. To stabilize the refrigerator, remove the base grille and lower the leveling feet until they touch the floor. See the "Ice Maker and Storage Bin" section. ■■ New installation - Doors are in cuts. Clean the gaskets and contact surfaces with a soft cloth. ■■ Door is blocked open Doors will not close...
Owners Manual
Page 16
... cold water supply - A kink in the water - Turn on , or ice bin is clogged or incorrectly installed - Use airtight moisture-proof packaging to a water supply, or the water supply shut-off valve is locked - Clean the ice delivery chute and the bottom of non-recommended water supply line - See the "Water Supply Requirements" section. ■■ Water filter is locked - See the "Water Supply Requirements" section. ■■ There are firmly closed. (On some models, only the freezer door...
... cold water supply - A kink in the water - Turn on , or ice bin is clogged or incorrectly installed - Use airtight moisture-proof packaging to a water supply, or the water supply shut-off valve is locked - Clean the ice delivery chute and the bottom of non-recommended water supply line - See the "Water Supply Requirements" section. ■■ Water filter is locked - See the "Water Supply Requirements" section. ■■ There are firmly closed. (On some models, only the freezer door...


