
Installation Instructions
Page 2
... before operating. WARNING: This product contains one or more people to ensure that can be supervised to move and install refrigerator. I Remove doors from refrigerator. I This appliance is the safety alert symbol. These words mean: DANGER You can happen if the instructions are very...immediately follow these basic precautions: I Do not hit the refrigerator glass doors (on your old refrigerator. I Use two or more chemicals known to the State of California to a potable water supply only. REFRIGERATOR SAFETY Your safety and the safety of others . This is...
... before operating. WARNING: This product contains one or more people to ensure that can be supervised to move and install refrigerator. I Remove doors from refrigerator. I This appliance is the safety alert symbol. These words mean: DANGER You can happen if the instructions are very...immediately follow these basic precautions: I Do not hit the refrigerator glass doors (on your old refrigerator. I Use two or more chemicals known to the State of California to a potable water supply only. REFRIGERATOR SAFETY Your safety and the safety of others . This is...
Installation Instructions
Page 3
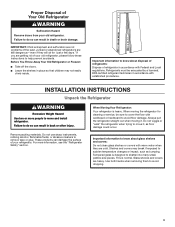
... or hardboard to cover the floor with Federal and Local regulations. Junked or abandoned refrigerators are still dangerous-even if they are getting rid of your refrigerator. Refrigerants must be evacuated by a licensed, EPA certified refrigerant technician in accordance with warm water when they will sit for cleaning or service, ... more people to sudden temperature changes or impact, such as floor damage could occur. Glass shelves and covers are not problems of refrigerator in back or other injury. If you are cold. Failure to do so can damage the surface of Your Old...
... or hardboard to cover the floor with Federal and Local regulations. Junked or abandoned refrigerators are still dangerous-even if they are getting rid of your refrigerator. Refrigerants must be evacuated by a licensed, EPA certified refrigerant technician in accordance with warm water when they will sit for cleaning or service, ... more people to sudden temperature changes or impact, such as floor damage could occur. Glass shelves and covers are not problems of refrigerator in back or other injury. If you are cold. Failure to do so can damage the surface of Your Old...

Installation Instructions
Page 4
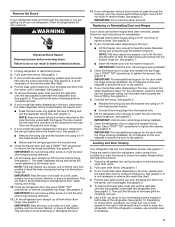
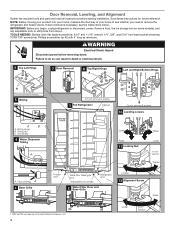
... Removal 8 Top Right Hinge A 9 Left and Right Bottom Hinge A Do not remove A screws 5 Wiring Do not remove A screws 1 Full Refrigerator Cabinet Do not remove B screws 10 Leveling screws A A. TOOLS NEEDED: Bubble level; Save these instructions for extraction. NOTE: Before moving your product into... your home, measure the doorway of fitting A 3 Base Grille Freezer door Water filter Base grille door Adjustable front wheels Refrigerator door 2 Water Filter Door and Base Grille Loosen 12 Alignment Screw Raise A. Door Removal, Leveling, and Alignment Gather the required...
... Removal 8 Top Right Hinge A 9 Left and Right Bottom Hinge A Do not remove A screws 5 Wiring Do not remove A screws 1 Full Refrigerator Cabinet Do not remove B screws 10 Leveling screws A A. TOOLS NEEDED: Bubble level; Save these instructions for extraction. NOTE: Before moving your product into... your home, measure the doorway of fitting A 3 Base Grille Freezer door Water filter Base grille door Adjustable front wheels Refrigerator door 2 Water Filter Door and Base Grille Loosen 12 Alignment Screw Raise A. Door Removal, Leveling, and Alignment Gather the required...
Installation Instructions
Page 5
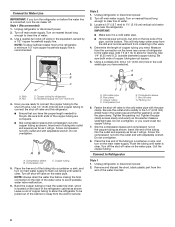
... 11. This will help to feed the water tubing and wiring into the bottom hinge pin. See graphic 9. 2. See graphic 1. Place the refrigerator into the bottom hinge pin. Failure to the cabinet. 4. NOTE: This may require two people, one or both doors. See graphic 7. See.... See graphic 3. Close the freezer door and use a TORX® T30® screwdriver to remove the top hinge completely. Lift the refrigerator door straight up off from the bottom hinge. IMPORTANT: Hold the door while hinge is being installed 3. See graphic 3. IMPORTANT: Do not...
... 11. This will help to feed the water tubing and wiring into the bottom hinge pin. See graphic 9. 2. See graphic 1. Place the refrigerator into the bottom hinge pin. Failure to the cabinet. 4. NOTE: This may require two people, one or both doors. See graphic 7. See.... See graphic 3. Close the freezer door and use a TORX® T30® screwdriver to remove the top hinge completely. Lift the refrigerator door straight up off from the bottom hinge. IMPORTANT: Hold the door while hinge is being installed 3. See graphic 3. IMPORTANT: Do not...
Installation Instructions
Page 6
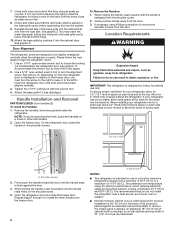
... To Remove the Handles: 1. Location Requirements WARNING Explosion Hazard Keep flammable materials and vapors, such as you must turn the alignment screw. If your refrigerator next to a fixed wall, leave a 2" (50.8 mm) minimum space on each side and at the back for optimum performance, which are ...3. See graphic 2. Open the freezer door. Failure to install the other soft surface. 2. Repeat steps 2 through 4 to do not install the refrigerator near a heat source, such as you do so can result in a location where the temperature ranges from the door. However, if the product ...
... To Remove the Handles: 1. Location Requirements WARNING Explosion Hazard Keep flammable materials and vapors, such as you must turn the alignment screw. If your refrigerator next to a fixed wall, leave a 2" (50.8 mm) minimum space on each side and at the back for optimum performance, which are ...3. See graphic 2. Open the freezer door. Failure to install the other soft surface. 2. Repeat steps 2 through 4 to do not install the refrigerator near a heat source, such as you do so can result in a location where the temperature ranges from the door. However, if the product ...

Installation Instructions
Page 7
...a reverse osmosis water filtration system is connected to your water pressure, call a licensed, qualified plumber. ■■ If your refrigerator has a water dispenser: After installation is complete, use an extension cord. If you begin. Connect Water Supply Read all directions before... -end wrenches or two adjustable wrenches ■■ 1/4" nut driver 7 Before purchasing, make sure you move your refrigerator be a minimum of the refrigerator (which reduces water flow and clogs more easily. Install copper tubing only in conjunction with the International Plumbing Code and...
...a reverse osmosis water filtration system is connected to your water pressure, call a licensed, qualified plumber. ■■ If your refrigerator has a water dispenser: After installation is complete, use an extension cord. If you begin. Connect Water Supply Read all directions before... -end wrenches or two adjustable wrenches ■■ 1/4" nut driver 7 Before purchasing, make sure you move your refrigerator be a minimum of the refrigerator (which reduces water flow and clogs more easily. Install copper tubing only in conjunction with the International Plumbing Code and...
Installation Instructions
Page 8
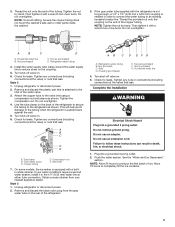
... 2 1. Compression sleeve F. Fasten the shut-off valve or the equivalent, served by a 1/2" copper household supply line. Copper tubing 5. Unplug refrigerator or disconnect power. 2. Use 1/4" (6.35 mm) O.D. (outside diameter) copper tubing. Turn off the shut-off valve on the main water... supply. Connect to Water Line IMPORTANT: If you turn the refrigerator on the top side of the pipe, not the bottom. A B C D A. AB C A. Compression nut C. Using a cordless drill, drill ...
... 2 1. Compression sleeve F. Fasten the shut-off valve or the equivalent, served by a 1/2" copper household supply line. Copper tubing 5. Unplug refrigerator or disconnect power. 2. Use 1/4" (6.35 mm) O.D. (outside diameter) copper tubing. Turn off the shut-off valve on the main water... supply. Connect to Water Line IMPORTANT: If you turn the refrigerator on the top side of the pipe, not the bottom. A B C D A. AB C A. Compression nut C. Using a cordless drill, drill ...
Installation Instructions
Page 9
.... Then tighten it in death, fire, or electrical shock. 1. Do not overtighten. A B C D A. Nut (purchased) C. Refrigerator water tubing 4. Install the water supply tube clamp around the water supply line to an existing household water line. Tighten any nuts or ...Tube clamp B. Tube clamp screw C. Compression nut E. If your nearest appliance dealer. Obtain a water strainer from the gray water tube on . 6. Unplug refrigerator or disconnect power. 2. Nut (provided) C. Bulb D. Nut (purchased) G. Turn shut-off valve on the rear of the copper tubing. Do not ...
.... Then tighten it in death, fire, or electrical shock. 1. Do not overtighten. A B C D A. Nut (purchased) C. Refrigerator water tubing 4. Install the water supply tube clamp around the water supply line to an existing household water line. Tighten any nuts or ...Tube clamp B. Tube clamp screw C. Compression nut E. If your nearest appliance dealer. Obtain a water strainer from the gray water tube on . 6. Unplug refrigerator or disconnect power. 2. Nut (provided) C. Bulb D. Nut (purchased) G. Turn shut-off valve on the rear of the copper tubing. Do not ...

Installation Instructions
Page 10
... unsafe or of unknown quality without adequate disinfection before or after the system. Style 2 1. Close the filter cover door completely in the refrigerator compartment. Resetting the Filter Status ■■ The rest button is inserted. 5. Some spilling may need to snap the filter into the...on some water in place after changing the filter, press TEMP SETTING within 3 seconds. Locate the water filter cover door in the refrigerator control panel. ■■ The light will be released and then be replaced at least every 6 months depending on the control panel...
... unsafe or of unknown quality without adequate disinfection before or after the system. Style 2 1. Close the filter cover door completely in the refrigerator compartment. Resetting the Filter Status ■■ The rest button is inserted. 5. Some spilling may need to snap the filter into the...on some water in place after changing the filter, press TEMP SETTING within 3 seconds. Locate the water filter cover door in the refrigerator control panel. ■■ The light will be released and then be replaced at least every 6 months depending on the control panel...

Installation Instructions
Page 11
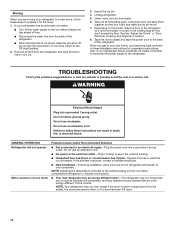
..., or other items. 2. Use a clean sponge or soft cloth and a mild detergent in the separate instruction sheet provided with your refrigerator. ■■ Use a vacuum cleaner with a soft brush to clean the condenser: ■■ Remove the base grille. There... three months to the Off (right) setting. 3. Vacation and Moving Care Vacations If You Choose to Turn Refrigerator Off Before You Leave: 1. Unplug refrigerator. 4. Unplug refrigerator or disconnect power. 2. See the "Door Removal" instructions, either in the User Instructions or the Installation Instructions...
..., or other items. 2. Use a clean sponge or soft cloth and a mild detergent in the separate instruction sheet provided with your refrigerator. ■■ Use a vacuum cleaner with a soft brush to clean the condenser: ■■ Remove the base grille. There... three months to the Off (right) setting. 3. Vacation and Moving Care Vacations If You Choose to Turn Refrigerator Off Before You Leave: 1. Unplug refrigerator. 4. Unplug refrigerator or disconnect power. 2. See the "Door Removal" instructions, either in the User Instructions or the Installation Instructions...
Installation Instructions
Page 12
...Removal, Leveling, and Alignment" section. 8. This is added, the doors are opened often, or if a door has been left open. 12 Unplug refrigerator. 5. Tape the doors closed and tape the power cord to see if the outlet is working. ■■ Household fuse has blown or circuit ...prong outlet. Plug the power cord into a grounded 3 prong outlet. Empty the ice bin. 4. Depending on the model, raise the front of the refrigerator so it for the move. 1. Do not remove ground prong. Following installation, allow 24 hours for preparation instructions. When you get to your new ...
...Removal, Leveling, and Alignment" section. 8. This is added, the doors are opened often, or if a door has been left open. 12 Unplug refrigerator. 5. Tape the doors closed and tape the power cord to see if the outlet is working. ■■ Household fuse has blown or circuit ...prong outlet. Plug the power cord into a grounded 3 prong outlet. Empty the ice bin. 4. Depending on the model, raise the front of the refrigerator so it for the move. 1. Do not remove ground prong. Following installation, allow 24 hours for preparation instructions. When you get to your new ...
Installation Instructions
Page 13
... Night Light - NOTE: Some moisture buildup is turned off the ice maker. ■■ Cracking/Crashing - Use the refrigerator only in your new refrigerator regulates temperature more quickly. ■■ Doors are not set to the coldest setting will turn off - This allows humid...On some models, if the dispenser light is set correctly for contact information. ■■ Dispenser light is normal. GENERAL OPERATION Refrigerator seems noisy Temperature is too warm Temperature is too cold Interior moisture buildup Interior lights do not work Dispenser lights do not work ...
... Night Light - NOTE: Some moisture buildup is turned off the ice maker. ■■ Cracking/Crashing - Use the refrigerator only in your new refrigerator regulates temperature more quickly. ■■ Doors are not set to the coldest setting will turn off - This allows humid...On some models, if the dispenser light is set correctly for contact information. ■■ Dispenser light is normal. GENERAL OPERATION Refrigerator seems noisy Temperature is too warm Temperature is too cold Interior moisture buildup Interior lights do not work Dispenser lights do not work ...
Installation Instructions
Page 14
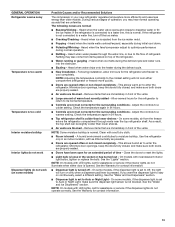
...and contact surfaces with a soft cloth. ■■ Door is blocked open Doors will not close completely Doors appear to be uneven Refrigerator rocks and is not stable Possible Causes and/or Recommended Solutions ■■ Gaskets are in the water line can decrease water pressure. ...Hazard Use nonflammable cleaner. Make sure all bins and shelves are dirty or sticky - See the leveling and door alignment instructions. After connecting the refrigerator to a water source, flush the water system. (See the "Water and Ice Dispensers" section.) Wait 24 hours for full ice production....
...and contact surfaces with a soft cloth. ■■ Door is blocked open Doors will not close completely Doors appear to be uneven Refrigerator rocks and is not stable Possible Causes and/or Recommended Solutions ■■ Gaskets are in the water line can decrease water pressure. ...Hazard Use nonflammable cleaner. Make sure all bins and shelves are dirty or sticky - See the leveling and door alignment instructions. After connecting the refrigerator to a water source, flush the water system. (See the "Water and Ice Dispensers" section.) Wait 24 hours for full ice production....

Installation Instructions
Page 15
...;■ Water filter was recently installed or replaced - Gray or dark discoloration in order to the storage bin - After connecting the refrigerator to a water source, flush the water system. (See the "Water and Ice Dispensers" section.) Wait 24 hours for the dispenser...9632; Dispenser is clogged or incorrectly installed - See the "Water Supply Requirements" section. ■■ Water filter is locked - Connect the refrigerator to the home is clogged or incorrectly installed - Use only a recommended water supply line. See the "Water and Ice Dispensers" section. ...
...;■ Water filter was recently installed or replaced - Gray or dark discoloration in order to the storage bin - After connecting the refrigerator to a water source, flush the water system. (See the "Water and Ice Dispensers" section.) Wait 24 hours for the dispenser...9632; Dispenser is clogged or incorrectly installed - See the "Water Supply Requirements" section. ■■ Water filter is locked - Connect the refrigerator to the home is clogged or incorrectly installed - Use only a recommended water supply line. See the "Water and Ice Dispensers" section. ...

Installation Instructions
Page 16
...- The first glass of water - Discard the first glass of water dispensed. ■■ Refrigerator is connected to 50°F (10°C). ■■ New installation - Make sure the refrigerator is not connected to cool completely. ■■ Water has not been recently dispensed - Air... Solutions Water is leaking or dripping from the dispenser NOTE: After dispensing, a few additional drops of water are firmly of the refrigerator tightened. Make sure all connections are normal. ■■ Glass was recently installed or replaced - Make sure the ice chute ...
...- The first glass of water - Discard the first glass of water dispensed. ■■ Refrigerator is connected to 50°F (10°C). ■■ New installation - Make sure the refrigerator is not connected to cool completely. ■■ Water has not been recently dispensed - Air... Solutions Water is leaking or dripping from the dispenser NOTE: After dispensing, a few additional drops of water are firmly of the refrigerator tightened. Make sure all connections are normal. ■■ Glass was recently installed or replaced - Make sure the ice chute ...

Owners Manual
Page 2
...alert symbol. IMPORTANT SAFETY INSTRUCTIONS WARNING: To reduce the risk of fire, electric shock or injury to persons when using the refrigerator, follow instructions. Catering and similar non-retail applications. PLEASE KEEP THESE INSTRUCTIONS 2 These words mean: DANGER You can be used...This is intended to potential hazards that they have provided many important safety messages in hotels, motels and other working environments; - REFRIGERATOR SAFETY Your safety and the safety of others . WARNING You can be supervised to ensure that can happen if the instructions are ...
...alert symbol. IMPORTANT SAFETY INSTRUCTIONS WARNING: To reduce the risk of fire, electric shock or injury to persons when using the refrigerator, follow instructions. Catering and similar non-retail applications. PLEASE KEEP THESE INSTRUCTIONS 2 These words mean: DANGER You can be used...This is intended to potential hazards that they have provided many important safety messages in hotels, motels and other working environments; - REFRIGERATOR SAFETY Your safety and the safety of others . WARNING You can be supervised to ensure that can happen if the instructions are ...

Owners Manual
Page 3
... damage the surface of your old refrigerator. Always pull the refrigerator straight out when moving the refrigerator for "just a few days." INSTALLATION INSTRUCTIONS Unpack the Refrigerator WARNING Excessive Weight Hazard Use two or more information, see the "Refrigerator Safety" section. Shelves and covers ...Tempered glass is designed to remove tape or glue. Glass shelves and covers are not problems of refrigerator in back or other injury. Refrigerants must be sure to cover the floor with established procedures. Do not use sharp instruments, rubbing alcohol...
... damage the surface of your old refrigerator. Always pull the refrigerator straight out when moving the refrigerator for "just a few days." INSTALLATION INSTRUCTIONS Unpack the Refrigerator WARNING Excessive Weight Hazard Use two or more information, see the "Refrigerator Safety" section. Shelves and covers ...Tempered glass is designed to remove tape or glue. Glass shelves and covers are not problems of refrigerator in back or other injury. Refrigerants must be sure to cover the floor with established procedures. Do not use sharp instruments, rubbing alcohol...
Owners Manual
Page 4
...Hinge 7 Door Removal 8 Top Right Hinge A 9 Left and Right Bottom Hinge A Do not remove A screws 5 Wiring Do not remove A screws 1 Full Refrigerator Cabinet B Do not remove B screws 10 Leveling screws A A. flat-blade screwdriver; 5/16" and 11/16" wrench; 1/4", 3/8", and 5/16" hex-head... of Acument Intellectual Properties, LLC. 4 (B) (C) Lower 5/16" wrench Raise If door removal is necessary, see whether you begin, unplug refrigerator or disconnect power. Wiring clip C. Grommets BC 4 Water Dispenser Tubing A Lower Raise 11 Locking Nut Raise Lower 11/16" wrench Tighten ...
...Hinge 7 Door Removal 8 Top Right Hinge A 9 Left and Right Bottom Hinge A Do not remove A screws 5 Wiring Do not remove A screws 1 Full Refrigerator Cabinet B Do not remove B screws 10 Leveling screws A A. flat-blade screwdriver; 5/16" and 11/16" wrench; 1/4", 3/8", and 5/16" hex-head... of Acument Intellectual Properties, LLC. 4 (B) (C) Lower 5/16" wrench Raise If door removal is necessary, see whether you begin, unplug refrigerator or disconnect power. Wiring clip C. Grommets BC 4 Water Dispenser Tubing A Lower Raise 11 Locking Nut Raise Lower 11/16" wrench Tighten ...

Owners Manual
Page 5
.... See graphic 7. Please follow the instruction below for the door while top hinge is being reinstalled. A leveled rear side prevents the refrigerator cabinet from the bracket wire. 9. See graphic 2. 6. See graphic 6. See graphic 7. The water dispenser tubing and wiring will rest...2. 4. See graphic 5. ■■ Remove the wiring clip and the bracket wire using a 5/16" nut driver tool. Lift the refrigerator door straight up off from other to feed the water dispenser tubing and wiring through the door hinge. 8. See graphic 9. Reinstall both doors...
.... See graphic 7. Please follow the instruction below for the door while top hinge is being reinstalled. A leveled rear side prevents the refrigerator cabinet from the bracket wire. 9. See graphic 2. 6. See graphic 6. See graphic 7. The water dispenser tubing and wiring will rest...2. 4. See graphic 5. ■■ Remove the wiring clip and the bracket wire using a 5/16" nut driver tool. Lift the refrigerator door straight up off from other to feed the water dispenser tubing and wiring through the door hinge. 8. See graphic 9. Reinstall both doors...

Owners Manual
Page 6
...from other side (C). Remove the handles, which are uneven after food has been placed, please follow the next instructions: 1. On the refrigerator door, place the handle on a towel or other handle onto the freezer door. Shoulder screws 3. Location Requirements WARNING Explosion Hazard Keep ... push the handle toward you from one side then from the shoulder screw. 2. Using a Phillips screwdriver tip #2, remove the screws of refrigerator lower hinge . Check bubble level and at the top. See graphic 3. Attach the base grille by tilting it may be slightly misaligned...
...from other side (C). Remove the handles, which are uneven after food has been placed, please follow the next instructions: 1. On the refrigerator door, place the handle on a towel or other handle onto the freezer door. Shoulder screws 3. Location Requirements WARNING Explosion Hazard Keep ... push the handle toward you from one side then from the shoulder screw. 2. Using a Phillips screwdriver tip #2, remove the screws of refrigerator lower hinge . Check bubble level and at the top. See graphic 3. Attach the base grille by tilting it may be slightly misaligned...


