
Installation Instructions
Page 4
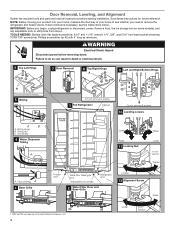
...utility bins from doors. TOOLS NEEDED: Bubble level; WARNING Electrical Shock Hazard Disconnect power before starting installation. Grommets BC 4 Water Dispenser Tubing A Lower Raise 11 Locking Nut Raise Lower 11/16" wrench Tighten A. Wiring plugs B. Wiring clip C. ... moving your product into your home, measure the doorway of fitting A 3 Base Grille Freezer door Water filter Base grille door Adjustable front wheels Refrigerator door 2 Water Filter Door and Base Grille Loosen 12 Alignment Screw Raise A. IMPORTANT: Before you begin, unplug refrigerator or...
...utility bins from doors. TOOLS NEEDED: Bubble level; WARNING Electrical Shock Hazard Disconnect power before starting installation. Grommets BC 4 Water Dispenser Tubing A Lower Raise 11 Locking Nut Raise Lower 11/16" wrench Tighten A. Wiring plugs B. Wiring clip C. ... moving your product into your home, measure the doorway of fitting A 3 Base Grille Freezer door Water filter Base grille door Adjustable front wheels Refrigerator door 2 Water Filter Door and Base Grille Loosen 12 Alignment Screw Raise A. IMPORTANT: Before you begin, unplug refrigerator or...
Installation Instructions
Page 5
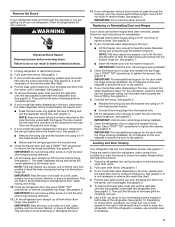
...See graphic 1. Place the refrigerator into the bottom hinge pin. Unplug refrigerator or disconnect power. 2. If your model has water dispensing, please open the water filter door by pulling it toward you. IMPORTANT: Rest the door on its final location in both sides of cardboard. Reinstall... are getting rid of fitting. Hold the door while hinge is not necessary to remove the water filter itself . 4. If your model has water dispensing in the door, connect the water dispenser tubing. Remove the Doors If your refrigerator does not fit through the doorway, you may...
...See graphic 1. Place the refrigerator into the bottom hinge pin. Unplug refrigerator or disconnect power. 2. If your model has water dispensing, please open the water filter door by pulling it toward you. IMPORTANT: Rest the door on its final location in both sides of cardboard. Reinstall... are getting rid of fitting. Hold the door while hinge is not necessary to remove the water filter itself . 4. If your model has water dispensing in the door, connect the water dispenser tubing. Remove the Doors If your refrigerator does not fit through the doorway, you may...

Installation Instructions
Page 7
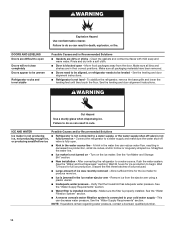
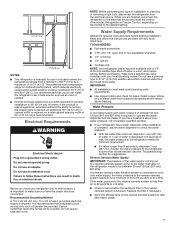
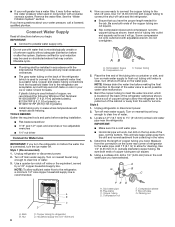
...to the refrigerator is recommended that cannot be a minimum of water, the water pressure to refill after heavy usage. ■■ If your local plumbing codes. Remove the water filter. See the "Water Filtration System" section. Copper and PEX tubing connections from the... dealer has a kit available with your refrigerator has a water filter, it takes longer than recommended. Do not use the water dispenser to the water inlet valve of water is dispensed in your refrigerator has a water dispenser: After installation is blocked. Electrical Requirements WARNING Electrical...
...to the refrigerator is recommended that cannot be a minimum of water, the water pressure to refill after heavy usage. ■■ If your local plumbing codes. Remove the water filter. See the "Water Filtration System" section. Copper and PEX tubing connections from the... dealer has a kit available with your refrigerator has a water filter, it takes longer than recommended. Do not use the water dispenser to the water inlet valve of water is dispensed in your refrigerator has a water dispenser: After installation is blocked. Electrical Requirements WARNING Electrical...

Installation Instructions
Page 10
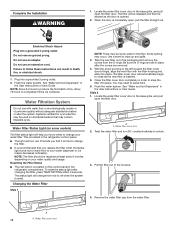
... removed. 4. The status light will automatically begin to your water filter. Some spilling may contain filterable cysts. The filter cover door will change your water dispenser or ice maker decreases noticeably. Style 2 1. Remove the water filter cap from the O-rings. Locate the water filter cover door in place after changing the filter, press TEMP SETTING within 3 seconds. Be sure to...
... removed. 4. The status light will automatically begin to your water filter. Some spilling may contain filterable cysts. The filter cover door will change your water dispenser or ice maker decreases noticeably. Style 2 1. Remove the water filter cap from the O-rings. Locate the water filter cover door in place after changing the filter, press TEMP SETTING within 3 seconds. Be sure to...

Installation Instructions
Page 11
...plastic parts, interior and door liners or gaskets. Empty the ice bin. This stops odor and mold from the refrigerator. 2. Twist the water filter and turn off the ice maker. Wipe up ) position or press the switch to ensure maximum efficiency. Do not use abrasive or ...thoroughly clean both sections about once a month to the refrigerator. If You Choose to Leave Refrigerator On While You Are Away: 1. Push the water filter door closed. 7. There is connected to eliminate odors. Remove light shield when applicable. Tape rubber or wood blocks to clean the condenser: ...
...plastic parts, interior and door liners or gaskets. Empty the ice bin. This stops odor and mold from the refrigerator. 2. Twist the water filter and turn off the ice maker. Wipe up ) position or press the switch to ensure maximum efficiency. Do not use abrasive or ...thoroughly clean both sections about once a month to the refrigerator. If You Choose to Leave Refrigerator On While You Are Away: 1. Push the water filter door closed. 7. There is connected to eliminate odors. Remove light shield when applicable. Tape rubber or wood blocks to clean the condenser: ...
Installation Instructions
Page 14
... blocked open . ■■ Kink in death, explosion, or fire. See the "Water Supply Requirements" section. ■■ Water filter is properly installed. Failure to a water supply and make sure the water shut-off valve is not connected to begin. See the "Water Supply Requirements" section. WARNING Explosion Hazard Use nonflammable cleaner. Connect the refrigerator to...
... blocked open . ■■ Kink in death, explosion, or fire. See the "Water Supply Requirements" section. ■■ Water filter is properly installed. Failure to a water supply and make sure the water shut-off valve is not connected to begin. See the "Water Supply Requirements" section. WARNING Explosion Hazard Use nonflammable cleaner. Connect the refrigerator to...

Installation Instructions
Page 15
...closed in position. Clean the ice delivery chute and the bottom of non-recommended water supply line - See the "Water Supply Requirements" section. ■■ Water filter is fully open. ■■ Kink in the water source line - New plumbing connections can transfer from food - Allow 24 hours for...weeks. ■■ Wrong ice has been added to the dispenser. See the "Water and Ice Dispensers" section. ■■ Water filter is not turned on , or ice bin is locked - This can reduce water flow to the storage bin - Discard the first three batches of ice, empty ...
...closed in position. Clean the ice delivery chute and the bottom of non-recommended water supply line - See the "Water Supply Requirements" section. ■■ Water filter is fully open. ■■ Kink in the water source line - New plumbing connections can transfer from food - Allow 24 hours for...weeks. ■■ Wrong ice has been added to the dispenser. See the "Water and Ice Dispensers" section. ■■ Water filter is not turned on , or ice bin is locked - This can reduce water flow to the storage bin - Discard the first three batches of ice, empty ...

Installation Instructions
Page 16
... back ■■ Water line connections are normal. ■■ Glass was recently installed or replaced - Allow 24 hours after releasing the dispenser pad/lever. ■■ New installation, or water filter was not held under the dispenser for the water supply to cool completely.... ■■ Recently dispensed a large amount of water may not be cool. The first glass of...
... back ■■ Water line connections are normal. ■■ Glass was recently installed or replaced - Allow 24 hours after releasing the dispenser pad/lever. ■■ New installation, or water filter was not held under the dispenser for the water supply to cool completely.... ■■ Recently dispensed a large amount of water may not be cool. The first glass of...
Installation Instructions
Page 17
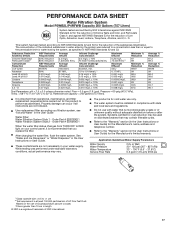
.... ■ These contaminants are not followed. ■ Use replacement filter according you replace the filter. ■ After changing the water filter, flush the water system. Systems certified for cyst reduction may be used on your water supply. D. Rated service capacity = 200 gallons (757 liters). &#... occur if all instructions are not necessarily in the User Guide Water Filter: Water Filtration System Style 1 - While testing was reduced to a concentration less than or equal to the permissible limit for water leaving the system, as specified in compliance with state and local...
.... ■ These contaminants are not followed. ■ Use replacement filter according you replace the filter. ■ After changing the water filter, flush the water system. Systems certified for cyst reduction may be used on your water supply. D. Rated service capacity = 200 gallons (757 liters). &#... occur if all instructions are not necessarily in the User Guide Water Filter: Water Filtration System Style 1 - While testing was reduced to a concentration less than or equal to the permissible limit for water leaving the system, as specified in compliance with state and local...
Owners Manual
Page 4
..., Phillips screwdriver tip #2 with 4" long as minimum. Face of fitting A 3 Base Grille Freezer door Water filter Base grille door Adjustable front wheels Refrigerator door 2 Water Filter Door and Base Grille Loosen 12 Alignment Screw (B) (A) (C) † TORX and T30 are trademarks of your...screws 5 Wiring Do not remove A screws 1 Full Refrigerator Cabinet B Do not remove B screws 10 Leveling screws A A. Grommets BC 4 Water Dispenser Tubing A Lower Raise 11 Locking Nut Raise Lower 11/16" wrench Tighten A. Wiring clip C. TOOLS NEEDED: Bubble level; Door Removal, ...
..., Phillips screwdriver tip #2 with 4" long as minimum. Face of fitting A 3 Base Grille Freezer door Water filter Base grille door Adjustable front wheels Refrigerator door 2 Water Filter Door and Base Grille Loosen 12 Alignment Screw (B) (A) (C) † TORX and T30 are trademarks of your...screws 5 Wiring Do not remove A screws 1 Full Refrigerator Cabinet B Do not remove B screws 10 Leveling screws A A. Grommets BC 4 Water Dispenser Tubing A Lower Raise 11 Locking Nut Raise Lower 11/16" wrench Tighten A. Wiring clip C. TOOLS NEEDED: Bubble level; Door Removal, ...

Owners Manual
Page 5
..., refer to the cabinet. See graphic 9. 2. To dislodge the base grille pull it underneath the refrigerator door. If your model has water dispensing in the kitchen and open the water filter door by pulling it toward you (A). IMPORTANT: Do not remove either screw B. If your refrigerator without doors does not pass through the...
..., refer to the cabinet. See graphic 9. 2. To dislodge the base grille pull it underneath the refrigerator door. If your model has water dispensing in the kitchen and open the water filter door by pulling it toward you (A). IMPORTANT: Do not remove either screw B. If your refrigerator without doors does not pass through the...

Owners Manual
Page 6
... If necessary, use only. Failure to fix the base grill. If your refrigerator, allow for your model has water dispensing in the space. 3. Use an 11/16" open the water filter door by pulling it more to the freezer door, you (A). See graphic 11. Depending on how the refrigerator ...pushes on each side and at the top. Close both the doors. 2. You may be required. 4. NOTE: Several turns may insert the water dispenser tubing and wiring into the cabinet clips. Tighten the 11/16" locking nut with the wrench tool again. 5. Handle Installation and Removal PARTS...
... If necessary, use only. Failure to fix the base grill. If your refrigerator, allow for your model has water dispensing in the space. 3. Use an 11/16" open the water filter door by pulling it more to the freezer door, you (A). See graphic 11. Depending on how the refrigerator ...pushes on each side and at the top. Close both the doors. 2. You may be required. 4. NOTE: Several turns may insert the water dispenser tubing and wiring into the cabinet clips. Tighten the 11/16" locking nut with the wrench tool again. 5. Handle Installation and Removal PARTS...
Owners Manual
Page 7
... (207 and 827 kPa) is lower than 8 seconds to dispense 1 cup (237 mL) of water, the water pressure to the refrigerator is required to check the water pressure. ■■ With the water filter removed, dispense 1 cup (237 mL) of water is dispensed in areas where the household temperatures will remain above freezing. Do not use...
... (207 and 827 kPa) is lower than 8 seconds to dispense 1 cup (237 mL) of water, the water pressure to the refrigerator is required to check the water pressure. ■■ With the water filter removed, dispense 1 cup (237 mL) of water is dispensed in areas where the household temperatures will remain above freezing. Do not use...
Owners Manual
Page 8
...-off valve. Copper tubing 5. Unplug refrigerator or disconnect power. 2. This will help avoid off-taste or odor in the cold water pipe you turn the ice maker off main water supply. Remove the water filter. If plastic tubing is recommended. 4. Compression sleeve B. Place the free end of copper, we recommend the following Whirlpool Part...
...-off valve. Copper tubing 5. Unplug refrigerator or disconnect power. 2. This will help avoid off-taste or odor in the cold water pipe you turn the ice maker off main water supply. Remove the water filter. If plastic tubing is recommended. 4. Compression sleeve B. Place the free end of copper, we recommend the following Whirlpool Part...
Owners Manual
Page 10
... completely fill the ice container. Water Filter Status Light (on disinfected waters that is reset. Be sure the O-rings are removed. 4. Style 2 1. Remove the water filter cap from the O-rings. Water filter cover door This tells you replace the filter when the status light turns red or water flow to change your water filter. Changing the Water Filter Style 1 NOTE: There may occur...
... completely fill the ice container. Water Filter Status Light (on disinfected waters that is reset. Be sure the O-rings are removed. 4. Style 2 1. Remove the water filter cap from the O-rings. Water filter cover door This tells you replace the filter when the status light turns red or water flow to change your water filter. Changing the Water Filter Style 1 NOTE: There may occur...

Owners Manual
Page 11
Install the water filter cap onto the new filter. Insert the filter into place and the arrows are aligned. 8. Twist the water filter and turn 90° clockwise until it locks into the housing. 7. However, clean both sections to clean the grille, the open areas behind ...: NOTE: Do not use paper towels, scouring pads, or other . Hand wash, rinse, and dry removable parts and interior surfaces thoroughly. Push the water filter door closed. Both the refrigerator and freezer sections defrost automatically. You must thoroughly clean both sections about once a month to do so can result in...
Install the water filter cap onto the new filter. Insert the filter into place and the arrows are aligned. 8. Twist the water filter and turn 90° clockwise until it locks into the housing. 7. However, clean both sections to clean the grille, the open areas behind ...: NOTE: Do not use paper towels, scouring pads, or other . Hand wash, rinse, and dry removable parts and interior surfaces thoroughly. Push the water filter door closed. Both the refrigerator and freezer sections defrost automatically. You must thoroughly clean both sections about once a month to do so can result in...
Owners Manual
Page 15
.... ■■ Large amount of ice was recently removed - See the "Water Supply Requirements" section. ■■ Water filter is blocked open . ■■ Kink in death, explosion, or fire. See the "Water Supply Requirements" section. WARNING Cut Hazard Use a sturdy glass when dispensing ice....produce more ice. ■■ Ice is connected to begin. Make sure the filter is not level - WARNING Explosion Hazard Use nonflammable cleaner. Failure to a water supply, or the water supply shut-off or producing small/hollow ice valve is not connected to do ...
.... ■■ Large amount of ice was recently removed - See the "Water Supply Requirements" section. ■■ Water filter is blocked open . ■■ Kink in death, explosion, or fire. See the "Water Supply Requirements" section. WARNING Cut Hazard Use a sturdy glass when dispensing ice....produce more ice. ■■ Ice is connected to begin. Make sure the filter is not level - WARNING Explosion Hazard Use nonflammable cleaner. Failure to a water supply, or the water supply shut-off or producing small/hollow ice valve is not connected to do ...
Owners Manual
Page 16
...above 30 psi (207 kPa) - New plumbing connections can transfer from the dispenser. A water filter may need to be closed in order to remove the minerals. ■■ Water filter was recently installed or replaced - Gray or dark discoloration in off valve is blocking the... over time. ■■ Ice has been stored too long - See the "Water and Ice Dispensers" section. ■■ Water filter is clogged or incorrectly installed - Turn on - See the "Water Filtration System" section. ■■ New plumbing connections - Odors and tastes can ...
...above 30 psi (207 kPa) - New plumbing connections can transfer from the dispenser. A water filter may need to be closed in order to remove the minerals. ■■ Water filter was recently installed or replaced - Gray or dark discoloration in off valve is blocking the... over time. ■■ Ice has been stored too long - See the "Water and Ice Dispensers" section. ■■ Water filter is clogged or incorrectly installed - Turn on - See the "Water Filtration System" section. ■■ New plumbing connections - Odors and tastes can ...
Owners Manual
Page 17
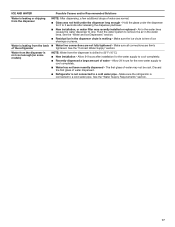
...; Glass was recently installed or replaced - Allow 24 hours after releasing the dispenser pad/lever. ■■ New installation, or water filter was not held under the dispenser for 2 to drip. See the "Water Supply Requirements" section. 17 Make sure the ice chute is not connected to 50°F (10°C). ■■...
...; Glass was recently installed or replaced - Allow 24 hours after releasing the dispenser pad/lever. ■■ New installation, or water filter was not held under the dispenser for 2 to drip. See the "Water Supply Requirements" section. 17 Make sure the ice chute is not connected to 50°F (10°C). ■■...

Owners Manual
Page 18
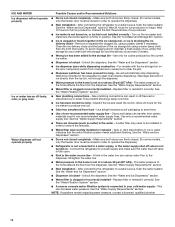
... damage can occur if all instructions are not necessarily in NSF/ANSI Standards 42 and 53. Order Part # EDR2RXD1 When the water filter status changes from TURN OFF to perform as specified in your control panel, it is recommended that may vary. ■■... mg/L ± 10% 0.028 mg/L 87.5 96.1 Test Parameters: pH = 7.5 ± 0.5 unless otherwise noted. Water Filter: Water Filtration System Style 1 - See "Water and Ice Dispensers" or "Water Dispenser" in the User Instructions or User Guide) for the Manufacturer's name, address and telephone number. ■■ Refer to...
... damage can occur if all instructions are not necessarily in NSF/ANSI Standards 42 and 53. Order Part # EDR2RXD1 When the water filter status changes from TURN OFF to perform as specified in your control panel, it is recommended that may vary. ■■... mg/L ± 10% 0.028 mg/L 87.5 96.1 Test Parameters: pH = 7.5 ± 0.5 unless otherwise noted. Water Filter: Water Filtration System Style 1 - See "Water and Ice Dispensers" or "Water Dispenser" in the User Instructions or User Guide) for the Manufacturer's name, address and telephone number. ■■ Refer to...


