
Installation Instructions
Page 2
... I This appliance is the safety alert symbol. Always read and obey all parts and panels before installing ice maker (on your refrigerator, follow the safety alert symbol and either the word "DANGER" or "WARNING." This is not intended for their safety. I Disconnect...appliance by persons (including children) with the appliance. I Keep flammable materials and vapors, such as gasoline, away from your old refrigerator. We have been given supervision or instruction concerning use by a person responsible for use of California Proposition 65 Warnings: WARNING: ...
... I This appliance is the safety alert symbol. Always read and obey all parts and panels before installing ice maker (on your refrigerator, follow the safety alert symbol and either the word "DANGER" or "WARNING." This is not intended for their safety. I Disconnect...appliance by persons (including children) with the appliance. I Keep flammable materials and vapors, such as gasoline, away from your old refrigerator. We have been given supervision or instruction concerning use by a person responsible for use of California Proposition 65 Warnings: WARNING: ...
Installation Instructions
Page 3
...designed to cover the floor with established procedures. Tempered glass is heavy. Failure to do so can damage the surface of your old refrigerator. If you are still dangerous-even if they are cold. Failure to do so can result in death or brain damage. Important information... in accordance with warm water when they will sit for "just a few days." Important information to know about disposal of refrigerants: Dispose of refrigerator in accordance with cardboard or hardboard to know about glass shelves and covers: Do not clean glass shelves or covers with Federal ...
...designed to cover the floor with established procedures. Tempered glass is heavy. Failure to do so can damage the surface of your old refrigerator. If you are still dangerous-even if they are cold. Failure to do so can result in death or brain damage. Important information... in accordance with warm water when they will sit for "just a few days." Important information to know about disposal of refrigerants: Dispose of refrigerator in accordance with cardboard or hardboard to know about glass shelves and covers: Do not clean glass shelves or covers with Federal ...

Installation Instructions
Page 4
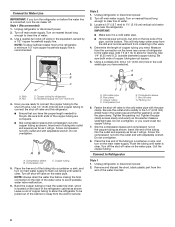
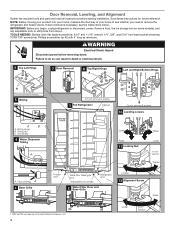
...†®TORX and T30 are registered trademarks of fitting A 3 Base Grille Freezer door Water filter Base grille door Adjustable front wheels Refrigerator door 2 Water Filter Door and Base Grille Loosen 12 Alignment Screw Raise A. IMPORTANT: Before you . Wiring clip C. Face of Acument... 8 Top Right Hinge A 9 Left and Right Bottom Hinge A Do not remove A screws 5 Wiring Do not remove A screws 1 Full Refrigerator Cabinet Do not remove B screws 10 Leveling screws A A. Door Removal, Leveling, and Alignment Gather the required tools and parts and read all instructions...
...†®TORX and T30 are registered trademarks of fitting A 3 Base Grille Freezer door Water filter Base grille door Adjustable front wheels Refrigerator door 2 Water Filter Door and Base Grille Loosen 12 Alignment Screw Raise A. IMPORTANT: Before you . Wiring clip C. Face of Acument... 8 Top Right Hinge A 9 Left and Right Bottom Hinge A Do not remove A screws 5 Wiring Do not remove A screws 1 Full Refrigerator Cabinet Do not remove B screws 10 Leveling screws A A. Door Removal, Leveling, and Alignment Gather the required tools and parts and read all instructions...
Installation Instructions
Page 5
...or left several times to avoid scratching or damaging the door, water tubing, and wiring. 10. This will help to raise or lower the refrigerator. See graphic 7. See graphic 9. 2. For the connection, push the tubing into the bottom hinge pin. See graphic 5. ■■... IMPORTANT: Provide additional support for door removal. Fully open both doors. See graphic 3. Reinstall both doors. 2. Remove the Doors If your refrigerator does not fit through the doorway, you may remove both bottom hinges. IMPORTANT: Rest the door on its side on a soft, clean ...
...or left several times to avoid scratching or damaging the door, water tubing, and wiring. 10. This will help to raise or lower the refrigerator. See graphic 7. See graphic 9. 2. For the connection, push the tubing into the bottom hinge pin. See graphic 5. ■■... IMPORTANT: Provide additional support for door removal. Fully open both doors. See graphic 3. Reinstall both doors. 2. Remove the Doors If your refrigerator does not fit through the doorway, you may remove both bottom hinges. IMPORTANT: Rest the door on its side on a soft, clean ...
Installation Instructions
Page 6
... and wiring into the cabinet 9. Please follow the next steps to loosen the locking nut located below the left side of space behind the refrigerator. Depending on each side and at the back for indoor household use only. Gently pull the handle away from the shoulder screw. 2. If... necessary, use in the base grille cavity before assembling this into the base grille cavity below the refrigerator door. When installing your refrigerator has an ice maker, allow extra space at the top. However, if the product is 36" (91.44 cm). Close both...
... and wiring into the cabinet 9. Please follow the next steps to loosen the locking nut located below the left side of space behind the refrigerator. Depending on each side and at the back for indoor household use only. Gently pull the handle away from the shoulder screw. 2. If... necessary, use in the base grille cavity before assembling this into the base grille cavity below the refrigerator door. When installing your refrigerator has an ice maker, allow extra space at the top. However, if the product is 36" (91.44 cm). Close both...

Installation Instructions
Page 7
... -end or two adjustable wrenches ■■ 1/4" nut driver ■■ 1/4" drill bit ■■ Cordless drill NOTE: Your refrigerator dealer has a kit available with water pressure of water. Do not use an adapter. IMPORTANT: ■■ All installations must meet local...Requirements Gather the required tools and parts before starting installation. Do not use an extension cord. Install copper tubing only in your refrigerator be turned off valve, a union, and copper tubing. See the "Troubleshooting" section for leaks. Check for leaks. Recommended Grounding...
... -end or two adjustable wrenches ■■ 1/4" nut driver ■■ 1/4" drill bit ■■ Cordless drill NOTE: Your refrigerator dealer has a kit available with water pressure of water. Do not use an adapter. IMPORTANT: ■■ All installations must meet local...Requirements Gather the required tools and parts before starting installation. Do not use an extension cord. Install copper tubing only in your refrigerator be turned off valve, a union, and copper tubing. See the "Troubleshooting" section for leaks. Check for leaks. Recommended Grounding...
Installation Instructions
Page 8
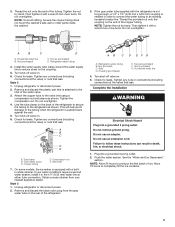
... E. Compression sleeve F. Place the free end of the tubing in the valve. 4. Flush the tubing until water is clear. Coil the copper tubing. Connect to refrigerator) D. Remove and discard the short, black plastic part from the wall for cleaning. Style 1 (Recommended) 1. NOTE: To allow for service. A B C D ...as it will help keep water away from the drill and normal sediment from the connection on the lower rear corner of the refrigerator cabinet as shown. This will go . Cold water pipe B. Slip the compression sleeve and compression nut on nearest faucet long enough...
... E. Compression sleeve F. Place the free end of the tubing in the valve. 4. Flush the tubing until water is clear. Coil the copper tubing. Connect to refrigerator) D. Remove and discard the short, black plastic part from the wall for cleaning. Style 1 (Recommended) 1. NOTE: To allow for service. A B C D ...as it will help keep water away from the drill and normal sediment from the connection on the lower rear corner of the refrigerator cabinet as shown. This will go . Cold water pipe B. Slip the compression sleeve and compression nut on nearest faucet long enough...
Installation Instructions
Page 9
...Nut (purchased) G. Check for leaks. Do not use an extension cord. Failure to an existing household water line. A B C D A. Refrigerator water tubing 4. Tighten any connections (including connections at the valve) or nuts that is needed in order to connect the water tubing to follow these...including connections at either tube connection. On some models, the ice maker is pushed back against the wall. 5. Style 3 1. Unplug refrigerator or disconnect power. 2. Nut (provided) C. Ferrule (purchased) F. Tighten any connections (including connections at the valve) or nuts ...
...Nut (purchased) G. Check for leaks. Do not use an extension cord. Failure to an existing household water line. A B C D A. Refrigerator water tubing 4. Tighten any connections (including connections at the valve) or nuts that is needed in order to connect the water tubing to follow these...including connections at either tube connection. On some models, the ice maker is pushed back against the wall. 5. Style 3 1. Unplug refrigerator or disconnect power. 2. Nut (provided) C. Ferrule (purchased) F. Tighten any connections (including connections at the valve) or nuts ...

Installation Instructions
Page 10
...sure to change your water quality and usage. Take the new filter out of the housing. 4. Close the filter cover door completely in the refrigerator control panel. ■■ The light will automatically begin to your water dispenser or ice maker decreases noticeably. Flush the system. See the ... be ejected as the new filter is inserted. 5. Twist the water filter and turn red. Be sure the O-rings are still in the refrigerator compartment. Water filter cover door 1. Changing the Water Filter Style 1 A A. Pull the filter out of its packaging and remove the covers ...
...sure to change your water quality and usage. Take the new filter out of the housing. 4. Close the filter cover door completely in the refrigerator control panel. ■■ The light will automatically begin to your water dispenser or ice maker decreases noticeably. Flush the system. See the ... be ejected as the new filter is inserted. 5. Twist the water filter and turn red. Be sure the O-rings are still in the refrigerator compartment. Water filter cover door 1. Changing the Water Filter Style 1 A A. Pull the filter out of its packaging and remove the covers ...

Installation Instructions
Page 11
...Removal" instructions, either in the User Instructions or the Installation Instructions and Owner's Manual, or in the separate instruction sheet provided with your refrigerator. ■■ Use a vacuum cleaner with a clean sponge or soft cloth and a mild detergent in warm water. 4. NOTE: ...towels, scouring pads, or other harsh cleaning tools. 1. Rinse and dry the shield well. 3. Empty the ice bin. Unplug refrigerator. 4. Failure to the refrigerator. IMPORTANT: Because air circulates between both doors to the other items. 2. Use up ) position or press the switch to get ...
...Removal" instructions, either in the User Instructions or the Installation Instructions and Owner's Manual, or in the separate instruction sheet provided with your refrigerator. ■■ Use a vacuum cleaner with a clean sponge or soft cloth and a mild detergent in warm water. 4. NOTE: ...towels, scouring pads, or other harsh cleaning tools. 1. Rinse and dry the shield well. 3. Empty the ice bin. Unplug refrigerator. 4. Failure to the refrigerator. IMPORTANT: Because air circulates between both doors to the other items. 2. Use up ) position or press the switch to get ...
Installation Instructions
Page 12
...re used to because the compressor and fans operate at least one day ahead of time. ■■ Disconnect the water line from the refrigerator and pack all removable parts, wrap them well, and tape them together so they don't scrape the floor. Replace the fuse or reset... the circuit breaker. The refrigerator may run too much Possible Causes and/or Recommended Solutions ■■ Not connected to the electrical outlet - Moving When you are opened often...
...re used to because the compressor and fans operate at least one day ahead of time. ■■ Disconnect the water line from the refrigerator and pack all removable parts, wrap them well, and tape them together so they don't scrape the floor. Replace the fuse or reset... the circuit breaker. The refrigerator may run too much Possible Causes and/or Recommended Solutions ■■ Not connected to the electrical outlet - Moving When you are opened often...
Installation Instructions
Page 13
... On models with as little humidity as possible. ■■ Doors are not set correctly for contact information. 13 GENERAL OPERATION Refrigerator seems noisy Temperature is too warm Temperature is too cold Interior moisture buildup Interior lights do not work Dispenser lights do not work ...Close the doors to its normal temperature. ■■ Controls are opened . If you may also come from items placed on top of the refrigerator. ■■ Water running or gurgling - Heard when ice is normal. Heard when ice melts during normal operation. ■■ Rattling -...
... On models with as little humidity as possible. ■■ Doors are not set correctly for contact information. 13 GENERAL OPERATION Refrigerator seems noisy Temperature is too warm Temperature is too cold Interior moisture buildup Interior lights do not work Dispenser lights do not work ...Close the doors to its normal temperature. ■■ Controls are opened . If you may also come from items placed on top of the refrigerator. ■■ Water running or gurgling - Heard when ice is normal. Heard when ice melts during normal operation. ■■ Rattling -...
Installation Instructions
Page 14
...and warm water. Turn on - NOTE: If questions remain regarding water pressure, contact a licensed, qualified plumber. 14 To stabilize the refrigerator, remove the base grille and lower the leveling feet until they touch the floor. Verify that the household has adequate water pressure. Clean...installation - Allow sufficient time for the ice maker to do so can reduce water flow, resulting in their correct positions. After connecting the refrigerator to a water source, flush the water system. (See the "Water and Ice Dispensers" section.) Wait 24 hours for full ice production....
...and warm water. Turn on - NOTE: If questions remain regarding water pressure, contact a licensed, qualified plumber. 14 To stabilize the refrigerator, remove the base grille and lower the leveling feet until they touch the floor. Verify that the household has adequate water pressure. Clean...installation - Allow sufficient time for the ice maker to do so can reduce water flow, resulting in their correct positions. After connecting the refrigerator to a water source, flush the water system. (See the "Water and Ice Dispensers" section.) Wait 24 hours for full ice production....

Installation Instructions
Page 15
..." section. ■■ There are firmly closed. (On some models, only the freezer door must be closed completely - Connect the refrigerator to the home affects the flow from certain materials used in the water - The water pressure to a water supply and make sure the...9632;■ Dispenser is clogged or incorrectly installed - Replace filter or reinstall it correctly. This can transfer from the dispenser. After connecting the refrigerator to a water source, flush the water system. (See the "Water and Ice Dispensers" section.) Wait 24 hours for full ice production....
..." section. ■■ There are firmly closed. (On some models, only the freezer door must be closed completely - Connect the refrigerator to the home affects the flow from certain materials used in the water - The water pressure to a water supply and make sure the...9632;■ Dispenser is clogged or incorrectly installed - Replace filter or reinstall it correctly. This can transfer from the dispenser. After connecting the refrigerator to a water source, flush the water system. (See the "Water and Ice Dispensers" section.) Wait 24 hours for full ice production....

Installation Instructions
Page 16
...for 2 to 3 seconds after installation for the new water supply to 50°F (10°C). ■■ New installation - Make sure the refrigerator is chilled to cool completely. ■■ Water has not been recently dispensed - Discard the first glass of water dispensed. ■■...; Refrigerator is free of ice shavings or pieces. ICE AND WATER Possible Causes and/or Recommended Solutions Water is leaking or dripping from the ...
...for 2 to 3 seconds after installation for the new water supply to 50°F (10°C). ■■ New installation - Make sure the refrigerator is chilled to cool completely. ■■ Water has not been recently dispensed - Discard the first glass of water dispensed. ■■...; Refrigerator is free of ice shavings or pieces. ICE AND WATER Possible Causes and/or Recommended Solutions Water is leaking or dripping from the ...

Owners Manual
Page 2
... order to avoid a hazard. Do not store explosive substances such as aerosol cans with a flammable propellant in this manual and on your old refrigerator. Connect only to the potable water supply. Use non-flammable cleaner. Keep flammable materials and vapors, such as : ...(on ice maker kit-ready models only). Use a sturdy glass when dispensing ice (on some models). Do not hit the refrigerator glass doors (on some models). This appliance is not intended for use by persons (including children) with reduced physical, sensory or mental...
... order to avoid a hazard. Do not store explosive substances such as aerosol cans with a flammable propellant in this manual and on your old refrigerator. Connect only to the potable water supply. Use non-flammable cleaner. Keep flammable materials and vapors, such as : ...(on ice maker kit-ready models only). Use a sturdy glass when dispensing ice (on some models). Do not hit the refrigerator glass doors (on some models). This appliance is not intended for use by persons (including children) with reduced physical, sensory or mental...

Owners Manual
Page 3
... if they are cold. Failure to do so can result in place so that children may break if exposed to know about disposal of refrigerants: Dispose of refrigerator in death or brain damage. Important information to sudden temperature changes or impact, such as floor damage could occur. For more people to...avoid floor damage. Failure to do so can result in accordance with cardboard or hardboard to avoid dropping. 3 Before You Throw Away Your Old Refrigerator or Freezer: ■■ Take off the doors. ■■ Leave the shelves in back or other injury. Junked or abandoned...
... if they are cold. Failure to do so can result in place so that children may break if exposed to know about disposal of refrigerants: Dispose of refrigerator in death or brain damage. Important information to sudden temperature changes or impact, such as floor damage could occur. For more people to...avoid floor damage. Failure to do so can result in accordance with cardboard or hardboard to avoid dropping. 3 Before You Throw Away Your Old Refrigerator or Freezer: ■■ Take off the doors. ■■ Leave the shelves in back or other injury. Junked or abandoned...
Owners Manual
Page 4
...7 Door Removal 8 Top Right Hinge A 9 Left and Right Bottom Hinge A Do not remove A screws 5 Wiring Do not remove A screws 1 Full Refrigerator Cabinet B Do not remove B screws 10 Leveling screws A A. TOOLS NEEDED: Bubble level; Save these instructions for future reference. Grommets BC 4 Water Dispenser...read all instructions before removing doors. Face of fitting A 3 Base Grille Freezer door Water filter Base grille door Adjustable front wheels Refrigerator door 2 Water Filter Door and Base Grille Loosen 12 Alignment Screw (B) (A) (C) † TORX and T30 are trademarks of ...
...7 Door Removal 8 Top Right Hinge A 9 Left and Right Bottom Hinge A Do not remove A screws 5 Wiring Do not remove A screws 1 Full Refrigerator Cabinet B Do not remove B screws 10 Leveling screws A A. TOOLS NEEDED: Bubble level; Save these instructions for future reference. Grommets BC 4 Water Dispenser...read all instructions before removing doors. Face of fitting A 3 Base Grille Freezer door Water filter Base grille door Adjustable front wheels Refrigerator door 2 Water Filter Door and Base Grille Loosen 12 Alignment Screw (B) (A) (C) † TORX and T30 are trademarks of ...

Owners Manual
Page 5
...: Provide additional support for door removal. Connect the wiring plugs from forming a twist. 2. See graphic 7. See graphic 1. If the refrigerator is being installed. 3. Doors & Hinges Removal 1. If your model has water dispensing in the door, disconnect the water dispenser tubing located... help to close more easily. See graphic 8. Reinstalling Door and Hinges 1. See graphic 7. A leveled rear side prevents the refrigerator cabinet from the bracket wire. WARNING Electrical Shock Hazard Disconnect power before removing doors. Unplug your model has water dispensing in death...
...: Provide additional support for door removal. Connect the wiring plugs from forming a twist. 2. See graphic 7. See graphic 1. If the refrigerator is being installed. 3. Doors & Hinges Removal 1. If your model has water dispensing in the door, disconnect the water dispenser tubing located... help to close more easily. See graphic 8. Reinstalling Door and Hinges 1. See graphic 7. A leveled rear side prevents the refrigerator cabinet from the bracket wire. WARNING Electrical Shock Hazard Disconnect power before removing doors. Unplug your model has water dispensing in death...

Owners Manual
Page 6
...swing open the water filter door by pulling it more to be slightly misaligned vertically when the refrigerator is released from refrigerator. See graphic 2. 6. Door Alignment The refrigerator doors are not level, it into the cabinet. 12. Allow for the water line connections. ...screwdriver to install the other soft surface. 2. Repeat steps 2 through 4 to remove the shoulder screws from the door. 3. IMPORTANT: This refrigerator is level. See graphic 3. 8. Check bubble level and at the top. When installing your model) to the adjacent cabinets, furniture or ...
...swing open the water filter door by pulling it more to be slightly misaligned vertically when the refrigerator is released from refrigerator. See graphic 2. 6. Door Alignment The refrigerator doors are not level, it into the cabinet. 12. Allow for the water line connections. ...screwdriver to install the other soft surface. 2. Repeat steps 2 through 4 to remove the shoulder screws from the door. 3. IMPORTANT: This refrigerator is level. See graphic 3. 8. Check bubble level and at the top. When installing your model) to the adjacent cabinets, furniture or ...


