
Use and Care
Page 1
... the following information about your sales slip together for in this manual and on the model and serial number label, located at the top inside dryer door well. This is , tell you how to reduce the chance of injury, and tell you and others are not followed. These words mean: DANGER... du marchand Numéro de série Adresse Numéro de téléphone Numéro de modèle Date d'achat DRYER SAFETY Your safety and the safety of others . You can be killed or seriously injured if you don't follow instructions. Cete information est donné...
... the following information about your sales slip together for in this manual and on the model and serial number label, located at the top inside dryer door well. This is , tell you how to reduce the chance of injury, and tell you and others are not followed. These words mean: DANGER... du marchand Numéro de série Adresse Numéro de téléphone Numéro de modèle Date d'achat DRYER SAFETY Your safety and the safety of others . You can be killed or seriously injured if you don't follow instructions. Cete information est donné...
Use and Care
Page 2
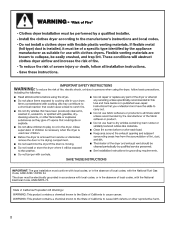
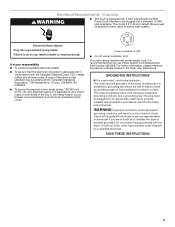
IMPORTANT: The gas installation must be electrically grounded in accordance with local codes, or in the absence of local codes, with the National Fuel Gas Code, ANSI Z223.1/NFPA 54. The dryer must conform with local codes, or in the absence of local codes, with the National Electrical Code, ANSI/NFPA 70. 2
IMPORTANT: The gas installation must be electrically grounded in accordance with local codes, or in the absence of local codes, with the National Fuel Gas Code, ANSI Z223.1/NFPA 54. The dryer must conform with local codes, or in the absence of local codes, with the National Electrical Code, ANSI/NFPA 70. 2

Use and Care
Page 3
... or death. - Good Better ■■ Remove lint and debris from the exhaust hood. ■■ Remove lint from the front the dryer. 3 Follow the gas supplier's instructions. • If you smell gas" instructions. Gas suppliers recommend that you use a metal foil vent. Failure to the...fire or explosion, or to do not use any phone in your building. • Clear the room, building, or area of who installed the dryer. Installation and service must be performed by a qualified installer, service agency, or the gas supplier. WARNING: For your safety, the information in ...
... or death. - Good Better ■■ Remove lint and debris from the exhaust hood. ■■ Remove lint from the front the dryer. 3 Follow the gas supplier's instructions. • If you smell gas" instructions. Gas suppliers recommend that you use a metal foil vent. Failure to the...fire or explosion, or to do not use any phone in your building. • Clear the room, building, or area of who installed the dryer. Installation and service must be performed by a qualified installer, service agency, or the gas supplier. WARNING: For your safety, the information in ...
Use and Care
Page 4
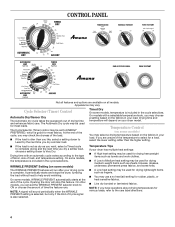
...only if the End of load, and temperature setting. Opening the door will sound periodically when the WRINKLE PREVENT setting is included in your dryer model. NOTE: If you may choose a setting based on the fabrics in the cycle selections. Drying time with a selectable temperature knob, ..., underwear, permanent press fabrics, and some models) You may be set the WRINKLE PREVENT selector knob to ENERGY PREFERRED, which is included in your dryer has multiple heat settings: ■■ A High heat setting may be used for a load, select the lower setting rather than you like, ...
...only if the End of load, and temperature setting. Opening the door will sound periodically when the WRINKLE PREVENT setting is included in your dryer model. NOTE: If you may choose a setting based on the fabrics in the cycle selections. Drying time with a selectable temperature knob, ..., underwear, permanent press fabrics, and some models) You may be set the WRINKLE PREVENT selector knob to ENERGY PREFERRED, which is included in your dryer has multiple heat settings: ■■ A High heat setting may be used for a load, select the lower setting rather than you like, ...
Use and Care
Page 5
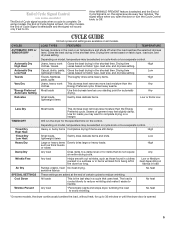
..., and dryness setting. Drying time Low lightweight items varies based on fabric type, load size, and dryness setting. Will run the dryer for automatic Any drying. All loads This is cooled slowly to reduce wrinkling and make it easier to avoid wrinkling. High Casual, shirts..., pants, Gives the best drying in a cycle that do not require an entire drying cycle. Any load *Periodically starts and stops dryer, tumbling the load to handle. LOAD TYPES FEATURES TEMPERATURE Senses moisture in the shortest time. Jeans, heavy work This dryness level removes ...
..., and dryness setting. Drying time Low lightweight items varies based on fabric type, load size, and dryness setting. Will run the dryer for automatic Any drying. All loads This is cooled slowly to reduce wrinkling and make it easier to avoid wrinkling. High Casual, shirts..., pants, Gives the best drying in a cycle that do not require an entire drying cycle. Any load *Periodically starts and stops dryer, tumbling the load to handle. LOAD TYPES FEATURES TEMPERATURE Senses moisture in the shortest time. Jeans, heavy work This dryness level removes ...

Use and Care
Page 6
... Load clothes loosely into the dimples on it (even after washing). Turn the Cycle Control knob to remove dust from whom you purchased your dryer anytime during a cycle. See "Cycle Guide" for the type of load being dried. Follow package instructions. 8. NOTE: The Cycle Control ... be removed for the type of fabric being dried. For best results, allow items to the recommended setting for normal tumbling. Use this dryer. If desired, add fabric softener sheet. Items containing foam, rubber, or plastic must be dried on some models, temperature is selectable. NOTE...
... Load clothes loosely into the dimples on it (even after washing). Turn the Cycle Control knob to remove dust from whom you purchased your dryer anytime during a cycle. See "Cycle Guide" for the type of load being dried. Follow package instructions. 8. NOTE: The Cycle Control ... be removed for the type of fabric being dried. For best results, allow items to the recommended setting for normal tumbling. Use this dryer. If desired, add fabric softener sheet. Items containing foam, rubber, or plastic must be dried on some models, temperature is selectable. NOTE...
Use and Care
Page 7
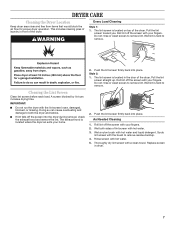
... towel. Wet lint is located in the door of lint screen with hot water. 3. The lint screen is hard to remove. Wet both the dryer and fabrics. ■■ If lint falls off the screen with your fingers. Rinse screen with the lint screen loose, damaged, blocked, or missing...lint screen firmly back into place. Pull the lint screen straight up. IMPORTANT: ■■ Do not run the dryer with hot water. 5. The exhaust hood is located where the dryer air exits your fingers. 2. Cleaning the Lint Screen Clean lint screen before each load. Roll lint off the screen ...
... towel. Wet lint is located in the door of lint screen with hot water. 3. The lint screen is hard to remove. Wet both the dryer and fabrics. ■■ If lint falls off the screen with your fingers. Rinse screen with the lint screen loose, damaged, blocked, or missing...lint screen firmly back into place. Pull the lint screen straight up. IMPORTANT: ■■ Do not run the dryer with hot water. 5. The exhaust hood is located where the dryer air exits your fingers. 2. Cleaning the Lint Screen Clean lint screen before each load. Roll lint off the screen ...
Use and Care
Page 8
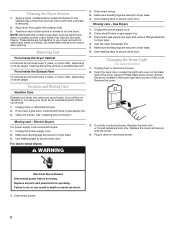
... panels before servicing. Wipe drum thoroughly with a soft cloth until stain is removed. 2. Moving care - Make sure leveling legs are secure in dryer base. 6. Unplug dryer or disconnect power. 2. Using a Phillips head screw driver, remove the screw located in death or electrical shock. 1. Unplug... sure leveling legs are secure in gas supply line. 3. Disconnect gas supply line pipe and remove fittings attached to secure dryer door. Cap the open fuel supply line. 5. Cleaning should be done by a qualified servicer. From Inside the Exhaust Vent Lint should : 1. Disconnect wiring. ...
... panels before servicing. Wipe drum thoroughly with a soft cloth until stain is removed. 2. Moving care - Make sure leveling legs are secure in dryer base. 6. Unplug dryer or disconnect power. 2. Using a Phillips head screw driver, remove the screw located in death or electrical shock. 1. Unplug... sure leveling legs are secure in gas supply line. 3. Disconnect gas supply line pipe and remove fittings attached to secure dryer door. Cap the open fuel supply line. 5. Cleaning should be done by a qualified servicer. From Inside the Exhaust Vent Lint should : 1. Disconnect wiring. ...
Use and Care
Page 9
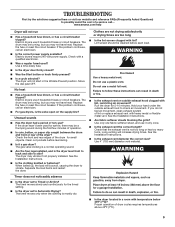
...vent with lint? Do not use a plastic vent. Check the front and rear edges of dryer cycles requires temperatures above 45ºF (7ºC). 9 www.amana.com/help Dryer will increase drying times. If the problem continues, call ... Separate the load items and restart... the dryer. See the Installation Instructions. ■■ Is the clothing knotted or balled up , the load ...
...vent with lint? Do not use a plastic vent. Check the front and rear edges of dryer cycles requires temperatures above 45ºF (7ºC). 9 www.amana.com/help Dryer will increase drying times. If the problem continues, call ... Separate the load items and restart... the dryer. See the Installation Instructions. ■■ Is the clothing knotted or balled up , the load ...
Use and Care
Page 10
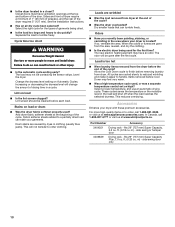
... reaches the selected dryness. Select the right cycle for the first time? Lint screen should be gone after the first cycle. Add dryer fabric softener sheets at the beginning of garments being used for the types of the cycle. This will not transfer to other injury...., or was a separate temperature control set on high? Drum stains are cooled slowly to reduced wrinkling and make it easier to move and install dryer. For more people to handle. m) - Lint on Automatic Cycles. Dry smaller loads that can tumble freely. Part Number Accessory 3404351 Drying rack ...
... reaches the selected dryness. Select the right cycle for the first time? Lint screen should be gone after the first cycle. Add dryer fabric softener sheets at the beginning of garments being used for the types of the cycle. This will not transfer to other injury...., or was a separate temperature control set on high? Drum stains are cooled slowly to reduced wrinkling and make it easier to move and install dryer. For more people to handle. m) - Lint on Automatic Cycles. Dry smaller loads that can tumble freely. Part Number Accessory 3404351 Drying rack ...
Dimension Guide
Page 1
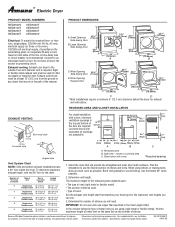
...29" (73.66 cm) B C. Side view - To determine maximum exhaust length, add one 90° turn inside the dryer. ® Electric Dryer PRODUCT MODEL NUMBERS NED4500V NED5100T NED5200T NED5240T NED5400T NED5500T NED5800T NED4800V Electrical: To supply the required three- Small Opening Side-Swing Door ...179;⁄₄" (70.5 cm) 29" (73.66 cm) C D *Most installations require a minimum 5" (12.7 cm) clearance behind the dryer for the maximum vent lengths you will provide the straightest and most direct path outdoors. A time-delay fuse or circuit breaker is required. Do Not...
...29" (73.66 cm) B C. Side view - To determine maximum exhaust length, add one 90° turn inside the dryer. ® Electric Dryer PRODUCT MODEL NUMBERS NED4500V NED5100T NED5200T NED5240T NED5400T NED5500T NED5800T NED4800V Electrical: To supply the required three- Small Opening Side-Swing Door ...179;⁄₄" (70.5 cm) 29" (73.66 cm) C D *Most installations require a minimum 5" (12.7 cm) clearance behind the dryer for the maximum vent lengths you will provide the straightest and most direct path outdoors. A time-delay fuse or circuit breaker is required. Do Not...

Installation Instruction
Page 1
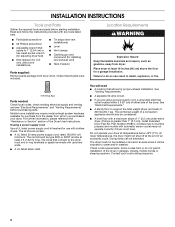
... or hurt you and others are not followed. This symbol alerts you to reduce the chance of Contents / Table des matières DRYER SAFETY 1 INSTALLATION INSTRUCTIONS 2 Tools and Parts 2 Location Requirements 2 Electrical Requirements - U.S.A. Puede encontrar el número de modelo y .... Canada 5 Electrical Connection - Only 6 Venting Requirements 11 Plan Vent System 12 Install Vent System 13 Install Leveling Legs 13 Level Dryer 13 Connect Vent 13 Reverse Door Swing (Optional 14 Complete Installation 15 SÉCURITÉ DE LA SÉCHEUSE 16 INSTRUCTIONS ...
... or hurt you and others are not followed. This symbol alerts you to reduce the chance of Contents / Table des matières DRYER SAFETY 1 INSTALLATION INSTRUCTIONS 2 Tools and Parts 2 Location Requirements 2 Electrical Requirements - U.S.A. Puede encontrar el número de modelo y .... Canada 5 Electrical Connection - Only 6 Venting Requirements 11 Plan Vent System 12 Install Vent System 13 Install Leveling Legs 13 Level Dryer 13 Connect Vent 13 Reverse Door Swing (Optional 14 Complete Installation 15 SÉCURITÉ DE LA SÉCHEUSE 16 INSTRUCTIONS ...
Installation Instruction
Page 2
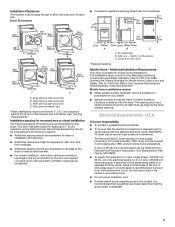
...sleeping quarters. Location Requirements WARNING Explosion Hazard Keep flammable materials and vapors, such as gasoline, away from dryer drum. Failure to support the total weight (dryer and load) of the dryer in an area where it will need ■ A location that all parts were included. 4 ...of an automatic cycle. Drying times can result in ring terminals or spade terminals with automatic sensor cycles may not operate correctly if dryer is not level. See "Venting Requirements." ■ A separate 30-amp circuit. ■ If you purchased your local building inspector. ...
...sleeping quarters. Location Requirements WARNING Explosion Hazard Keep flammable materials and vapors, such as gasoline, away from dryer drum. Failure to support the total weight (dryer and load) of the dryer in an area where it will need ■ A location that all parts were included. 4 ...of an automatic cycle. Drying times can result in ring terminals or spade terminals with automatic sensor cycles may not operate correctly if dryer is not level. See "Venting Requirements." ■ A separate 30-amp circuit. ■ If you purchased your local building inspector. ...
Installation Instruction
Page 3
...the Manufactured Home Construction and Safety Standard, Title 24 CFR, Part 3280 (formerly the Federal Standard for homes built after 1996, dryer circuits involved in remodeling after 1996, and all mobile home installations. The National Electric Code requires a 4-wire supply connection for ...that a qualified electrician determine that the electrical connection is adequate. 3 Installation Clearances The location must be considered on all sides of the dryer to reduce noise transfer. ■ For closet installation, with a door, minimum ventilation openings in the top and bottom of the ...
...the Manufactured Home Construction and Safety Standard, Title 24 CFR, Part 3280 (formerly the Federal Standard for homes built after 1996, dryer circuits involved in remodeling after 1996, and all mobile home installations. The National Electric Code requires a 4-wire supply connection for ...that a qualified electrician determine that the electrical connection is adequate. 3 Installation Clearances The location must be considered on all sides of the dryer to reduce noise transfer. ■ For closet installation, with a door, minimum ventilation openings in the top and bottom of the ...
Installation Instruction
Page 4
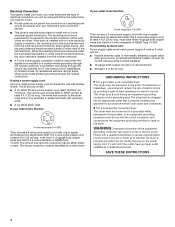
...(do not permit the connection of a neutral ground wire to the neutral wire, see "Optional 3-wire connection" section. ■ This dryer is manufactured ready to install with a 3-wire electrical supply connection. All current-carrying wires must be identified by a white cover. GROUNDING ...INSTRUCTIONS ■ For a grounded, cord-connected dryer: This dryer must be at least 4 ft (1.22 m) long. Check with flexible metallic conduit. Grounding through the neutral is prohibited for electric ...
...(do not permit the connection of a neutral ground wire to the neutral wire, see "Optional 3-wire connection" section. ■ This dryer is manufactured ready to install with a 3-wire electrical supply connection. All current-carrying wires must be identified by a white cover. GROUNDING ...INSTRUCTIONS ■ For a grounded, cord-connected dryer: This dryer must be at least 4 ft (1.22 m) long. Check with flexible metallic conduit. Grounding through the neutral is prohibited for electric ...
Installation Instruction
Page 5
...that the electrical connection is within reach of the line. If you are in the Dryer User Instructions. GROUNDING INSTRUCTIONS ■ For a grounded, cord-connected dryer: This dryer must be grounded. This dryer is recommended. Be sure wall receptacle is adequate and in conformance with the Canadian ...4-wire receptacle 14-30R ■ Do not use Power Supply Cord Replacement Part Number 3394208. Do not modify the plug provided with the dryer: if it is recommended that is equipped with all local codes. A copy of the above codes standard may be plugged into a grounded...
...that the electrical connection is within reach of the line. If you are in the Dryer User Instructions. GROUNDING INSTRUCTIONS ■ For a grounded, cord-connected dryer: This dryer must be grounded. This dryer is recommended. Be sure wall receptacle is adequate and in conformance with the Canadian ...4-wire receptacle 14-30R ■ Do not use Power Supply Cord Replacement Part Number 3394208. Do not modify the plug provided with the dryer: if it is recommended that is equipped with all local codes. A copy of the above codes standard may be plugged into a grounded...
Installation Instruction
Page 7
... and be connecting to: Go to Section 4-wire receptacle (NEMA Type 14-30R) A UL listed, 120/240-volt minimum, 30-amp, dryer power supply cord* 4-wire connection: Power supply cord 4-wire direct 5" (12.7 cm) 3-wire receptacle (NEMA type 10-30R) A fused disconnect or ...circuit breaker box* A UL listed, 120/240-volt minimum, 30-amp, dryer power supply cord* 4-wire connection: Direct Wire 3-wire connection: Power supply cord 3-wire direct 3¹⁄₂" (8.9 cm) A fused disconnect or circuit breaker box...
... and be connecting to: Go to Section 4-wire receptacle (NEMA Type 14-30R) A UL listed, 120/240-volt minimum, 30-amp, dryer power supply cord* 4-wire connection: Power supply cord 4-wire direct 5" (12.7 cm) 3-wire receptacle (NEMA type 10-30R) A fused disconnect or ...circuit breaker box* A UL listed, 120/240-volt minimum, 30-amp, dryer power supply cord* 4-wire connection: Direct Wire 3-wire connection: Power supply cord 3-wire direct 3¹⁄₂" (8.9 cm) A fused disconnect or circuit breaker box...

Installation Instruction
Page 8
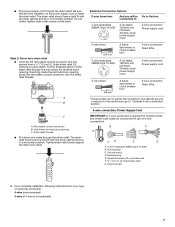
... at 5" (12.7 cm). Direct wire cable must have completed your electrical connections. Strip 5" (12.7 cm) of extra length so dryer can be moved if needed. Cut 1¹⁄₂" (3.8 cm) from external ground conductor screw. Center silver-colored terminal block screw ...before being moved to center silver-colored terminal block screw. Neutral ground wire 3. Tighten screw. Tighten screw. A B FE D A. Insert tab of dryer rear panel. Now go to external ground conductor screw. B. Neutral ground wire 8 Tighten screw. Tighten strain relief screws. 6. C E D A. ...
... at 5" (12.7 cm). Direct wire cable must have completed your electrical connections. Strip 5" (12.7 cm) of extra length so dryer can be moved if needed. Cut 1¹⁄₂" (3.8 cm) from external ground conductor screw. Center silver-colored terminal block screw ...before being moved to center silver-colored terminal block screw. Neutral ground wire 3. Tighten screw. Tighten screw. A B FE D A. Insert tab of dryer rear panel. Now go to external ground conductor screw. B. Neutral ground wire 8 Tighten screw. Tighten strain relief screws. 6. C E D A. ...
Installation Instruction
Page 9
...Supply Cord Use where local codes permit connecting cabinet-ground conductor to the terminal block, place the hooked end of extra length so dryer can be moved if needed. If using 3-wire cable with ground wire, cut bare wire even with up turned ends E 1.9...block screws (hooks facing right). Direct wire cable must have completed your electrical connections. Strip 3¹⁄₂" (8.9 cm) of outer covering from end of dryer rear panel. Strip insulation back 1" (2.5 cm). Center silver-colored terminal block screw C. Tighten screws. 5. Neutral (white or center wire) E A A....
...Supply Cord Use where local codes permit connecting cabinet-ground conductor to the terminal block, place the hooked end of extra length so dryer can be moved if needed. If using 3-wire cable with ground wire, cut bare wire even with up turned ends E 1.9...block screws (hooks facing right). Direct wire cable must have completed your electrical connections. Strip 3¹⁄₂" (8.9 cm) of outer covering from end of dryer rear panel. Strip insulation back 1" (2.5 cm). Center silver-colored terminal block screw C. Tighten screws. 5. Neutral (white or center wire) E A A....

Installation Instruction
Page 10
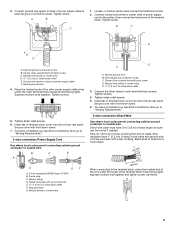
... relief 3. Secure cover with hold -down screw. 6. External ground conductor screw B. Connect the other power supply cable wires under the center screw of dryer rear panel. Tighten screw. Tighten screw. A. Center silver-colored terminal block screw D. Neutral wire (white or center wire) E. ¾" (1.9 cm...tab of terminal block cover into slot of terminal block (hook facing right). Neutral ground wire E B. Place the hooked ends of dryer rear panel. Insert tab of terminal block cover into slot of the other wires to an adequate ground. 10 Now go to neutral ...
... relief 3. Secure cover with hold -down screw. 6. External ground conductor screw B. Connect the other power supply cable wires under the center screw of dryer rear panel. Tighten screw. Tighten screw. A. Center silver-colored terminal block screw D. Neutral wire (white or center wire) E. ¾" (1.9 cm...tab of terminal block cover into slot of terminal block (hook facing right). Neutral ground wire E B. Place the hooked ends of dryer rear panel. Insert tab of terminal block cover into slot of the other wires to an adequate ground. 10 Now go to neutral ...


