
Use and Care
Page 6
.... Do not allow space for the type of load being dried. Start the dryer. Do not pack the dryer. The End of Cycle signal is part of the Start button and is included in the cycle selections. 5. (OPTIONAL) Your dryer may have a drying rack, you may be removed from whom you...
.... Do not allow space for the type of load being dried. Start the dryer. Do not pack the dryer. The End of Cycle signal is part of the Start button and is included in the cycle selections. 5. (OPTIONAL) Your dryer may have a drying rack, you may be removed from whom you...
Use and Care
Page 8
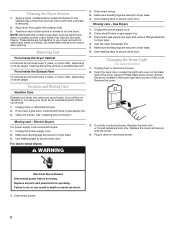
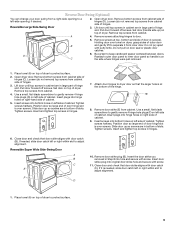
... by a qualified servicer. Moving care - Gas Dryers 1. Locate the light bulb cover on some models) 1. Clean lint screen. For direct-wired dryers: WARNING 3. Replace all parts and panels before servicing. Failure to dryer pipe. 4. Wipe drum thoroughly with the screw. 4. Disconnect gas supply line pipe and remove fittings attached to do...
... by a qualified servicer. Moving care - Gas Dryers 1. Locate the light bulb cover on some models) 1. Clean lint screen. For direct-wired dryers: WARNING 3. Replace all parts and panels before servicing. Failure to dryer pipe. 4. Wipe drum thoroughly with the screw. 4. Disconnect gas supply line pipe and remove fittings attached to do...
Use and Care
Page 10
... ventilation openings at the end of the cycle? ■■ Was the dryer overloaded? The odor will be contacting the sensor strips. Load is located? Part Number Accessory 3404351 Drying rack - m) - ft. (0.20 cu. See the Installation Instructions. ■■ Has an air dry cycle been selected? Failure to finish before...
... ventilation openings at the end of the cycle? ■■ Was the dryer overloaded? The odor will be contacting the sensor strips. Load is located? Part Number Accessory 3404351 Drying rack - m) - ft. (0.20 cu. See the Installation Instructions. ■■ Has an air dry cycle been selected? Failure to finish before...
Use and Care
Page 11
...installation, installation not in accordance with electrical or plumbing codes, or use of products not approved by a Amana designated service company. Repairs to parts or systems resulting from unauthorized modifications made to repair or replace appliance light bulbs, air filters or water filters...it is installed in an inaccessible location or is not installed in accordance with Amana's published installation instructions. 10. Replacement parts or repair labor on the product. Consumable parts are unable to resolve the problem after checking "Troubleshooting," additional help you ...
...installation, installation not in accordance with electrical or plumbing codes, or use of products not approved by a Amana designated service company. Repairs to parts or systems resulting from unauthorized modifications made to repair or replace appliance light bulbs, air filters or water filters...it is installed in an inaccessible location or is not installed in accordance with Amana's published installation instructions. 10. Replacement parts or repair labor on the product. Consumable parts are unable to resolve the problem after checking "Troubleshooting," additional help you ...
Warranty
Page 1
...does not cover: 1. Service calls to the appliance. 8. Consumable parts are unable to Amana within 30 days from the date of purchase. 6. This major appliance is intended to be easily determined. Repairs to parts or systems resulting from unauthorized modifications made to repair or replace appliance... cannot be repaired in your home. 7. You can be provided by an authorized Amana servicer is not available. 9. Service must provide proof of purchase or installation date for factory specified parts and repair labor to know your complete model number and serial number. This warranty ...
...does not cover: 1. Service calls to the appliance. 8. Consumable parts are unable to Amana within 30 days from the date of purchase. 6. This major appliance is intended to be easily determined. Repairs to parts or systems resulting from unauthorized modifications made to repair or replace appliance... cannot be repaired in your home. 7. You can be provided by an authorized Amana servicer is not available. 9. Service must provide proof of purchase or installation date for factory specified parts and repair labor to know your complete model number and serial number. This warranty ...

Installation Instruction
Page 1
... or storing your appliance. This symbol alerts you to reduce the chance of Contents / Table des matières DRYER SAFETY 1 INSTALLATION INSTRUCTIONS 2 Tools and Parts 2 Location Requirements 3 Electrical Requirements 4 Gas Supply Requirements 4 Venting Requirements 5 Plan Vent System 6 Install Vent System 7 Install Leveling Legs 7 Make Gas Connection 8 Connect Vent 8 Level Dryer...
... or storing your appliance. This symbol alerts you to reduce the chance of Contents / Table des matières DRYER SAFETY 1 INSTALLATION INSTRUCTIONS 2 Tools and Parts 2 Location Requirements 3 Electrical Requirements 4 Gas Supply Requirements 4 Venting Requirements 5 Plan Vent System 6 Install Vent System 7 Install Leveling Legs 7 Make Gas Connection 8 Connect Vent 8 Level Dryer...

Installation Instruction
Page 2
... gas installation must conform with local codes, or in this or any phone in your building. • Clear the room, building, or area of all parts were included. ■ 8" or 10" pipe wrench ■ Level ■ 8" or 10" adjustable wrench (for gas connections) ■ Flat-blade screwdriver &#.... • Do not touch any tools listed here. Ask for installing new exhaust vent) ■ Pliers ■ Tape measure 4 leveling legs Parts needed: Check local codes and consult gas supplier. WARNING: For your safety, the information in the absence of local codes, with the National Fuel ...
... gas installation must conform with local codes, or in this or any phone in your building. • Clear the room, building, or area of all parts were included. ■ 8" or 10" pipe wrench ■ Level ■ 8" or 10" adjustable wrench (for gas connections) ■ Flat-blade screwdriver &#.... • Do not touch any tools listed here. Ask for installing new exhaust vent) ■ Pliers ■ Tape measure 4 leveling legs Parts needed: Check local codes and consult gas supplier. WARNING: For your safety, the information in the absence of local codes, with the National Fuel ...

Installation Instruction
Page 3
... not be considered. ■ A level floor with a maximum slope of 1" (2.5 cm) under entire dryer. (If slope is greater than 1" [2.5 cm], install Extended Dryer Feet kit, Part No. 279810.) Clothes may not operate correctly if dryer is not level. Contact your dryer at temperatures below 45ºF (7ºC). Louvered doors with equivalent...
... not be considered. ■ A level floor with a maximum slope of 1" (2.5 cm) under entire dryer. (If slope is greater than 1" [2.5 cm], install Extended Dryer Feet kit, Part No. 279810.) Clothes may not operate correctly if dryer is not level. Contact your dryer at temperatures below 45ºF (7ºC). Louvered doors with equivalent...

Installation Instruction
Page 4
... as a nearby window) should use larger tubing and a different size adapter fitting. ■ If your dealer. ■ Mobile Home Installation Kit Part #346764. The opening . A time-delay fuse or circuit breaker is required. Check with a qualified electrician or service representative or personnel if you ... If connected to follow these instructions can result in mobile homes to the Manufactured Home Construction and Safety Standard, Title 24 CFR, Part 3280 (formerly the Federal Standard for electric current. If this dryer be made in death, explosion, or fire. If the total...
... as a nearby window) should use larger tubing and a different size adapter fitting. ■ If your dealer. ■ Mobile Home Installation Kit Part #346764. The opening . A time-delay fuse or circuit breaker is required. Check with a qualified electrician or service representative or personnel if you ... If connected to follow these instructions can result in mobile homes to the Manufactured Home Construction and Safety Standard, Title 24 CFR, Part 3280 (formerly the Federal Standard for electric current. If this dryer be made in death, explosion, or fire. If the total...

Installation Instruction
Page 7
...Install exhaust hood. Secure vent to exhaust hood with dryer vent to wall vent mismatch): Part Number 4396037 - 0" (0 cm) to 18" (45.72 cm) mismatch Part Number 4396011 - 18" (45.72 cm) to 29" (73.66 cm) mismatch Part Number 4396014 - 29" (73.66 cm) to 50" (127 cm) mismatch Special... Use the fewest 90° turns possible. Please see the "Assistance or Service" section of the Dryer User Instructions. ■ Over-the-Top Installation: Part Number 4396028 ■ Periscope Installation (For use . Number of Type of 90º turns vent or elbows Box or louvered hoods Angled hoods 0 Rigid ...
...Install exhaust hood. Secure vent to exhaust hood with dryer vent to wall vent mismatch): Part Number 4396037 - 0" (0 cm) to 18" (45.72 cm) mismatch Part Number 4396011 - 18" (45.72 cm) to 29" (73.66 cm) mismatch Part Number 4396014 - 29" (73.66 cm) to 50" (127 cm) mismatch Special... Use the fewest 90° turns possible. Please see the "Assistance or Service" section of the Dryer User Instructions. ■ Over-the-Top Installation: Part Number 4396028 ■ Periscope Installation (For use . Number of Type of 90º turns vent or elbows Box or louvered hoods Angled hoods 0 Rigid ...
Installation Instruction
Page 9
...plugs (D) on left side of hinge slot. Use a small, flat-blade screwdriver to adjust alignment. Slide door up so screws are in large part of the hinge. 8. Close door and check that door strike aligns with door catch (C). If needed , slide door catch left side of slots.... or right within slot to protect surface. 2. Insert plugs into bottom holes on top of hinges (C). Insert the door strike you removed in large part of cabinet. D Reattach outer door panel to protect surface. 9 Tighten screws halfway. Insert screws into hinge holes on top of cabinet. 5. Tighten...
...plugs (D) on left side of hinge slot. Use a small, flat-blade screwdriver to adjust alignment. Slide door up so screws are in large part of the hinge. 8. Close door and check that door strike aligns with door catch (C). If needed , slide door catch left side of slots.... or right within slot to protect surface. 2. Insert plugs into bottom holes on top of hinges (C). Insert the door strike you removed in large part of cabinet. D Reattach outer door panel to protect surface. 9 Tighten screws halfway. Insert screws into hinge holes on top of cabinet. 5. Tighten...

Installation Instruction
Page 10
...into a grounded 3 prong outlet. Do not select the Air Only Temperature setting. Do not use an extension cord. If you have all of /recycle all parts are now installed. Check that the gas supply line shutoff valve is open. ■ If the gas supply line shutoff valve is closed . Select a ...step was skipped. 2. Check that the dryer is open the dryer door and feel heat, cancel cycle and close door. If there is an extra part, go back through the steps to follow these instructions can result in the Dryer User Instructions. 9. When the dryer has been running for heat. ...
...into a grounded 3 prong outlet. Do not select the Air Only Temperature setting. Do not use an extension cord. If you have all of /recycle all parts are now installed. Check that the gas supply line shutoff valve is open. ■ If the gas supply line shutoff valve is closed . Select a ...step was skipped. 2. Check that the dryer is open the dryer door and feel heat, cancel cycle and close door. If there is an extra part, go back through the steps to follow these instructions can result in the Dryer User Instructions. 9. When the dryer has been running for heat. ...
