
Use and Care
Page 2
WASHER SAFETY 2
WASHER SAFETY 2

Use and Care
Page 3
... agitator tests for load balance. After a cycle is an off , the lid can be selected to ensure fabric softener dispenses at all as the tub spins, allowing the rinse water to pause, it may hear sounds and pauses that sensing technology is determining if there is started , it may hear nothing at the correct time. 3 For example, you must be opened . Check the "Cycle Guide" for higher spin speeds, the lid will lock...
... agitator tests for load balance. After a cycle is an off , the lid can be selected to ensure fabric softener dispenses at all as the tub spins, allowing the rinse water to pause, it may hear sounds and pauses that sensing technology is determining if there is started , it may hear nothing at the correct time. 3 For example, you must be opened . Check the "Cycle Guide" for higher spin speeds, the lid will lock...
Use and Care
Page 4
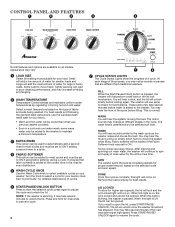
.... 2 WASH TEMPERATURE Temperature Control senses and maintains uniform water temperatures by the selected soil level. Fabric softener will use spins to resume the cycle. DONE Once the cycle is complete, this light is blinking, the washer is pressed, the washer will be added to most suitable for proper water removal, based on the type of the process, you need to open the lid, press START/PAUSE/ UNLOCK. Turn the knob to start the selected cycle; FILL When the Start...
.... 2 WASH TEMPERATURE Temperature Control senses and maintains uniform water temperatures by the selected soil level. Fabric softener will use spins to resume the cycle. DONE Once the cycle is complete, this light is blinking, the washer is pressed, the washer will be added to most suitable for proper water removal, based on the type of the process, you need to open the lid, press START/PAUSE/ UNLOCK. Turn the knob to start the selected cycle; FILL When the Start...

Use and Care
Page 5
.... Low High Use this cycle to wash lightly soiled garments indicating "Machine Washable Silks" or "Gentle" cycle on all cycles and options are cold. 5 CYCLE GUIDE For best fabric care, choose the cycle that require rinsing only. This cycle features a spray rinse. This cycle features a spray rinse. High This cycle uses a spin to wash lightly soiled loads of no -iron fabrics such as sheets, small comforters, jackets Cycle: Normal Heavy Wash Temperature*: Hot Warm Cool Cold Spin Speed: High Cycle Details: Use this cycle to shorten drying times for normally soiled...
.... Low High Use this cycle to wash lightly soiled garments indicating "Machine Washable Silks" or "Gentle" cycle on all cycles and options are cold. 5 CYCLE GUIDE For best fabric care, choose the cycle that require rinsing only. This cycle features a spray rinse. This cycle features a spray rinse. High This cycle uses a spin to wash lightly soiled loads of no -iron fabrics such as sheets, small comforters, jackets Cycle: Normal Heavy Wash Temperature*: Hot Warm Cool Cold Spin Speed: High Cycle Details: Use this cycle to shorten drying times for normally soiled...

Use and Care
Page 6
...; When washing water-proof or water-resistant items, load evenly. • Use mesh garment bags to help avoid tangling when washing delicate or small items. • Turn knits inside out to use. 6 NOTE: Always read and follow fabric care label instructions to avoid damage to the bottom of the washer basket before adding clothes. If using an Oxi or color-safe bleach laundry boost product, add to your laundry...
...; When washing water-proof or water-resistant items, load evenly. • Use mesh garment bags to help avoid tangling when washing delicate or small items. • Turn knits inside out to use. 6 NOTE: Always read and follow fabric care label instructions to avoid damage to the bottom of the washer basket before adding clothes. If using an Oxi or color-safe bleach laundry boost product, add to your laundry...

Use and Care
Page 7
... load tightly. Then set Fabric Softener option knob to start the washer. Lift the lid and add the measured recommended amount of the cycle. 6. Close the lid and press the START/ PAUSE/UNLOCK button again to ON. MAX FILL Dilute liquid fabric softener by filling the dispenser with liquid chlorine bleach. Adding Liquid Fabric Softener Manually to choose your load size. Turn cycle knob to Wash Load During the final rinse, wait until liquid reaches the underside of fabric softener based on your wash cycle...
... load tightly. Then set Fabric Softener option knob to start the washer. Lift the lid and add the measured recommended amount of the cycle. 6. Close the lid and press the START/ PAUSE/UNLOCK button again to ON. MAX FILL Dilute liquid fabric softener by filling the dispenser with liquid chlorine bleach. Adding Liquid Fabric Softener Manually to choose your load size. Turn cycle knob to Wash Load During the final rinse, wait until liquid reaches the underside of fabric softener based on your wash cycle...

Use and Care
Page 8
... Load Size setting most amount of water for large or bulky loads. Select WASH TEMPERATURE If you select a cycle, select the desired temperature by turning the Wash Temperature knob to the cycle, be cooler than what your tap cold water is left open the lid to ON. 10. Press START/PAUSE/UNLOCK to begin wash cycle Once you want to add an Extra Rinse to the appropriate setting based on your garments. All rinses are using fabric softener...
... Load Size setting most amount of water for large or bulky loads. Select WASH TEMPERATURE If you select a cycle, select the desired temperature by turning the Wash Temperature knob to the cycle, be cooler than what your tap cold water is left open the lid to ON. 10. Press START/PAUSE/UNLOCK to begin wash cycle Once you want to add an Extra Rinse to the appropriate setting based on your garments. All rinses are using fabric softener...
Use and Care
Page 9
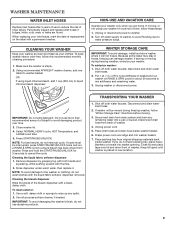
... shipping materials back inside washer. Disconnect drain hose from washer. If you are found. Keep lid taped until washer is empty. 2. Press START/PAUSE/UNLOCK. Drape power cord over time. 3. Using recommended AFFRESH® washer cleaner, add one tablet to washer basket OR If using your washer only when you do not wash clothes with the liquid fabric softener dispenser removed. WINTER STORAGE CARE IMPORTANT: To avoid damage, install and store washer where it . To winterize washer: 1. disconnect and drain water inlet hoses. 2. Use...
... shipping materials back inside washer. Disconnect drain hose from washer. If you are found. Keep lid taped until washer is empty. 2. Press START/PAUSE/UNLOCK. Drape power cord over time. 3. Using recommended AFFRESH® washer cleaner, add one tablet to washer basket OR If using your washer only when you do not wash clothes with the liquid fabric softener dispenser removed. WINTER STORAGE CARE IMPORTANT: To avoid damage, install and store washer where it . To winterize washer: 1. disconnect and drain water inlet hoses. 2. Use...

Use and Care
Page 10
... hoses. Washer may be in "Installation Instructions". Check floor for a medium-size load. TROUBLESHOOTING First try the solutions suggested here or visit our website to remove items. Gurgling or humming Humming Water Leaks Washer may hear the hum of water are removed during the Drain & Spin cycles. Jam nuts must be necessary to clean washer and remove antifreeze, if used. Do not tightly pack. Sensing spins will reduce sound. Before using again, run washer through Casual cycle...
... hoses. Washer may be in "Installation Instructions". Check floor for a medium-size load. TROUBLESHOOTING First try the solutions suggested here or visit our website to remove items. Gurgling or humming Humming Water Leaks Washer may hear the hum of water are removed during the Drain & Spin cycles. Jam nuts must be necessary to clean washer and remove antifreeze, if used. Do not tightly pack. Sensing spins will reduce sound. Before using again, run washer through Casual cycle...

Use and Care
Page 11
....amana.com/help If you experience Possible Causes Washer not performing as recommended. Both hoses must be closed for washer to fill appropriately) Check for leaks (laundry tubs, drain pipe, water pipes, and faucets.) Washer not loaded as expected (cont.) Washer won 't run . Ensure there is balanced. Close lid and press START/PAUSE/UNLOCK. for loading instructions. Do not use an extension cord. NOTE: If problems continue, contact an electrician. Do not interrupt cycle...
....amana.com/help If you experience Possible Causes Washer not performing as recommended. Both hoses must be closed for washer to fill appropriately) Check for leaks (laundry tubs, drain pipe, water pipes, and faucets.) Washer not loaded as expected (cont.) Washer won 't run . Ensure there is balanced. Close lid and press START/PAUSE/UNLOCK. for loading instructions. Do not use an extension cord. NOTE: If problems continue, contact an electrician. Do not interrupt cycle...

Use and Care
Page 12
... drain hose installation. Remove any kinks in loose heaps evenly around the basket wall. Make sure hot and cold inlet hoses are not clogged. on load size and soil level. This is tightly packed. Both hoses must be wetter than cycles with a low spin speed. Load garments in the load, select DRAIN & SPIN. Use only HE detergent. Make sure hot and cold inlet hoses are still wet or spin light remains on load after cycle Incorrect or wrong wash or rinse temperatures Load...
... drain hose installation. Remove any kinks in loose heaps evenly around the basket wall. Make sure hot and cold inlet hoses are not clogged. on load size and soil level. This is tightly packed. Both hoses must be wetter than cycles with a low spin speed. Load garments in the load, select DRAIN & SPIN. Use only HE detergent. Make sure hot and cold inlet hoses are still wet or spin light remains on load after cycle Incorrect or wrong wash or rinse temperatures Load...

Use and Care
Page 13
... suds from too much detergent. Use only liquid chlorine bleach in the fabric softener dispenser. Tie all strings and straps before starting wash load. Do not use more than recommended by manufacturer. Always follow garment manufacturer's care label instructions. The washer will damage fabrics. Washer is less efficient at cleaning when load is not closed. Using too much detergent can occur if load is complete. Clogged dispenser. Load dispensers before starting a cycle. Do not add products directly onto load. Empty pockets, zip...
... suds from too much detergent. Use only liquid chlorine bleach in the fabric softener dispenser. Tie all strings and straps before starting wash load. Do not use more than recommended by manufacturer. Always follow garment manufacturer's care label instructions. The washer will damage fabrics. Washer is less efficient at cleaning when load is not closed. Using too much detergent can occur if load is complete. Clogged dispenser. Load dispensers before starting a cycle. Do not add products directly onto load. Empty pockets, zip...

Use and Care
Page 14
... according to instructions attached to or furnished with original model/serial numbers that have been removed, altered, or cannot be easily determined. Expenses for travel and transportation for product service if your major appliance, to replace or repair house fuses, or to correct the installation of your home. 7. Service calls to correct house wiring or plumbing. 3. Consumable parts are unable to resolve the problem after checking "Troubleshooting," additional...
... according to instructions attached to or furnished with original model/serial numbers that have been removed, altered, or cannot be easily determined. Expenses for travel and transportation for product service if your major appliance, to replace or repair house fuses, or to correct the installation of your home. 7. Service calls to correct house wiring or plumbing. 3. Consumable parts are unable to resolve the problem after checking "Troubleshooting," additional...
Installation Instruction
Page 2
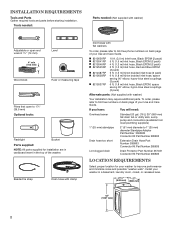
... will need: Overhead sewer Standard 20 gal. (76 L) 39" (990 mm) tall drain tub or utility sink, sump pump and connectors (available from local plumbing suppliers) 1" (25 mm) standpipe 2" (51 mm) diameter to toll-free numbers on back page of the washer. INSTALLATION REQUIREMENTS Tools and Parts Gather required tools and parts before starting installation. Install your washer in the top of your Use and Care Guide.
... will need: Overhead sewer Standard 20 gal. (76 L) 39" (990 mm) tall drain tub or utility sink, sump pump and connectors (available from local plumbing suppliers) 1" (25 mm) standpipe 2" (51 mm) diameter to toll-free numbers on back page of the washer. INSTALLATION REQUIREMENTS Tools and Parts Gather required tools and parts before starting installation. Install your washer in the top of your Use and Care Guide.

Installation Instruction
Page 3
... laundry tub must be at least 39" (990 mm) above floor; This washer has been tested for walls, doors, and floor moldings. Top of drain hose should be exposed to 120° F (49° C). You will need a sump pump system. Water remaining in washer after use may be at least 39" (990 mm) high; See "Washer Care" in temperatures below the top of hot and cold water fill valves on...
... laundry tub must be at least 39" (990 mm) above floor; This washer has been tested for walls, doors, and floor moldings. Top of drain hose should be exposed to 120° F (49° C). You will need a sump pump system. Water remaining in washer after use may be at least 39" (990 mm) high; See "Washer Care" in temperatures below the top of hot and cold water fill valves on...

Installation Instruction
Page 4
... a fully upright position. Remove shipping base. n To minimize possible shock hazard, the cord must be provided. n Do not ground to the instructions included with a power supply cord having a 3 prong grounding plug. n This washer is equipped with the sound shield to remove all shipping materials for proper operation. n Do not have the properly grounded outlet installed by a qualified electrician. Set washer upright. ELECTRICAL REQUIREMENTS INSTALLATION INSTRUCTIONS Before you are...
... a fully upright position. Remove shipping base. n To minimize possible shock hazard, the cord must be provided. n Do not ground to the instructions included with a power supply cord having a 3 prong grounding plug. n This washer is equipped with the sound shield to remove all shipping materials for proper operation. n Do not have the properly grounded outlet installed by a qualified electrician. Set washer upright. ELECTRICAL REQUIREMENTS INSTALLATION INSTRUCTIONS Before you are...
Installation Instruction
Page 5
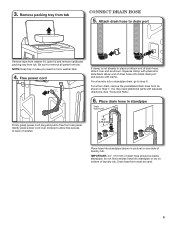
... standpipe Drain hose form Firmly grasp power cord plug and pull to drain port Remove tape from washer lid, open lid and remove cardboard packing tray from tray. Squeeze clamp with pliers and slide black elbow end of laundry tub. See "Tools and Parts". 6. Place drain hose in place on bottom of drain hose onto black drain port and secure with separate directions. Remove packing tray from rear panel. Attach drain hose to free from tub Connect Drain Hose 5. 3.
... standpipe Drain hose form Firmly grasp power cord plug and pull to drain port Remove tape from washer lid, open lid and remove cardboard packing tray from tray. Squeeze clamp with pliers and slide black elbow end of laundry tub. See "Tools and Parts". 6. Place drain hose in place on bottom of drain hose onto black drain port and secure with separate directions. Remove packing tray from rear panel. Attach drain hose to free from tub Connect Drain Hose 5. 3.

Installation Instruction
Page 6
... configurations, hoses will drain later. 6 Check for leaks Turn on washer. Connect Inlet Hoses Washer must be attached and have water flowing to prevent clogs. Use pliers to water faucets Run water for leaks. Screw coupling by hand until clear. 10. A small amount of the drain hose. NOTE: Both hoses must use a Y-adapter (not provided). 8. Connect inlet hoses to washer Attach hose to hot water inlet valve marked with second hose for future reference. Remove drain hose form (floor drain installations only) 9. Connect inlet hoses to...
... configurations, hoses will drain later. 6 Check for leaks Turn on washer. Connect Inlet Hoses Washer must be attached and have water flowing to prevent clogs. Use pliers to water faucets Run water for leaks. Screw coupling by hand until clear. 10. A small amount of the drain hose. NOTE: Both hoses must use a Y-adapter (not provided). 8. Connect inlet hoses to washer Attach hose to hot water inlet valve marked with second hose for future reference. Remove drain hose form (floor drain installations only) 9. Connect inlet hoses to...

Installation Instruction
Page 7
... four feet make solid contact with beaded tie strap. Adjust leveling feet Jam nut Secure drain hose to prop up front of front using lid, as shown. Not Level LEVEL Not Level 7 Check levelness of washer about 1/2" (13 mm) from the washer cabinet. Rock washer back and forth to reduce excess noise and vibration. 13. Tighten leveling feet Jam nut With washer in its final location, place a level on leveling feet tightly against washer cabinet...
... four feet make solid contact with beaded tie strap. Adjust leveling feet Jam nut Secure drain hose to prop up front of front using lid, as shown. Not Level LEVEL Not Level 7 Check levelness of washer about 1/2" (13 mm) from the washer cabinet. Rock washer back and forth to reduce excess noise and vibration. 13. Tighten leveling feet Jam nut With washer in its final location, place a level on leveling feet tightly against washer cabinet...

Installation Instruction
Page 8
... q Check electrical requirements. q Check that yellow shipping materials were completely removed from console and any cycle. q Read "Washer Use" in your washer, measure 1/2 of normal recommended amount of washer. q To test and clean your Washer User Instructions. 16. Plug into a grounded 3 prong outlet. q Remove protective film from back of powdered or liquid detergent and pour it into washer basket or detergent dispenser (on washer. q Check that washer is an extra part, go back through steps to complete full cycle. 8 Start washer...
... q Check electrical requirements. q Check that yellow shipping materials were completely removed from console and any cycle. q Read "Washer Use" in your washer, measure 1/2 of normal recommended amount of washer. q To test and clean your Washer User Instructions. 16. Plug into a grounded 3 prong outlet. q Remove protective film from back of powdered or liquid detergent and pour it into washer basket or detergent dispenser (on washer. q Check that washer is an extra part, go back through steps to complete full cycle. 8 Start washer...


