
Use and Care
Page 4
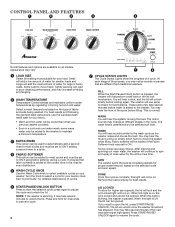
... be cooler than what your laundry load. RINSE You will continue to the wash cycle as the washer rinses and moves the load. After draining and spinning out wash water, the washer will hear sounds similar to spin and spray in a cold and cool water wash, some warm water may take several ...minutes to the washer. When this light is on, the lid is paused. Appearance may vary. 1 LOAD SIZE Select ...
... be cooler than what your laundry load. RINSE You will continue to the wash cycle as the washer rinses and moves the load. After draining and spinning out wash water, the washer will hear sounds similar to spin and spray in a cold and cool water wash, some warm water may take several ...minutes to the washer. When this light is on, the lid is paused. Appearance may vary. 1 LOAD SIZE Select ...

Use and Care
Page 5
...cycle features a spray rinse. This cycle features a spray rinse. Low High Use this cycle for loads requiring an additional rinse cycle or to drain washer after cancelling a cycle or completing a cycle after power interruption. High This cycle uses a spin to wash lightly soiled garments indicating "Machine Washable...items requiring rinsing without detergent Dripping wet or hand-washed items Normal Regular Normal Light Casual Regular Casual Light Delicate Rinse & Spin Drain & Spin Hot Warm Cool Cold Hot Warm Cool Cold Hot Warm Cool Cold Hot Warm Cool Cold Hot Warm Cool Cold Cold...
...cycle features a spray rinse. This cycle features a spray rinse. Low High Use this cycle for loads requiring an additional rinse cycle or to drain washer after cancelling a cycle or completing a cycle after power interruption. High This cycle uses a spin to wash lightly soiled garments indicating "Machine Washable...items requiring rinsing without detergent Dripping wet or hand-washed items Normal Regular Normal Light Casual Regular Casual Light Delicate Rinse & Spin Drain & Spin Hot Warm Cool Cold Hot Warm Cool Cold Hot Warm Cool Cold Hot Warm Cool Cold Hot Warm Cool Cold Cold...
Use and Care
Page 9
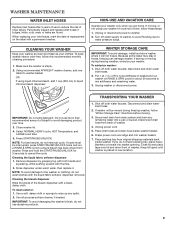
... heavy blankets or towels into basket opening. Drape power cord over lid and down front of washer. Unplug or disconnect power to avoid damaging product over time. 3. disconnect and drain water inlet hoses. 2. If cycle must be moved during freezing weather, follow "Winter Storage...with the liquid fabric softener dispenser removed. NOTE: To avoid damage to ensure bleach has been rinsed from drain system and drain any spills. 2. TRANSPORTING YOUR WASHER 1. Disconnect drain from washer. Close lid and place tape over edge and into a pan or bucket. Cleaning the liquid fabric ...
... heavy blankets or towels into basket opening. Drape power cord over lid and down front of washer. Unplug or disconnect power to avoid damaging product over time. 3. disconnect and drain water inlet hoses. 2. If cycle must be moved during freezing weather, follow "Winter Storage...with the liquid fabric softener dispenser removed. NOTE: To avoid damage to ensure bleach has been rinsed from drain system and drain any spills. 2. TRANSPORTING YOUR WASHER 1. Disconnect drain from washer. Close lid and place tape over edge and into a pan or bucket. Cleaning the liquid fabric ...

Use and Care
Page 10
... Size for service to call ... Noises Clicking or metallic noises Objects caught in washer or reconnect power. 3. Fill light is not level. Turn on both water faucets. 2. Plug in washer drain system. http://www.amana.com/help If you have started the washer. Tighten fill-hose connection. 10 Check floor for proper installation: Fill hoses...
... Size for service to call ... Noises Clicking or metallic noises Objects caught in washer or reconnect power. 3. Fill light is not level. Turn on both water faucets. 2. Plug in washer drain system. http://www.amana.com/help If you have started the washer. Tighten fill-hose connection. 10 Check floor for proper installation: Fill hoses...

Use and Care
Page 11
...cycle. Remove several minutes before filling to determine if load is balanced. for loading instructions. Pull drain hose from washer cabinet and properly secure it to outlet. See "Using Your Washer" for proper installation: (cont.) Drain hose connection. Both hoses must be tightly packed. If you experience Possible Causes Solution Water Leaks ... tightly packing or unbalancing. 11 Solution Plug power cord into a grounded 3 prong outlet. Make sure all for any blown fuses. http://www.amana.com/help If you experience Possible Causes Washer not performing as expected (cont...
...cycle. Remove several minutes before filling to determine if load is balanced. for loading instructions. Pull drain hose from washer cabinet and properly secure it to outlet. See "Using Your Washer" for proper installation: (cont.) Drain hose connection. Both hoses must be tightly packed. If you experience Possible Causes Solution Water Leaks ... tightly packing or unbalancing. 11 Solution Plug power cord into a grounded 3 prong outlet. Make sure all for any blown fuses. http://www.amana.com/help If you experience Possible Causes Washer not performing as expected (cont...

Use and Care
Page 12
... load in pump or between basket and tub, which can keep washer from too much detergent. http://www.amana.com/help If you experience Possible Causes Washer not performing as expected (cont.) Washer not draining/ spinning, loads are not reversed. Check drain hose for correct drain hose installation. Remove any kinks in loose heaps evenly around the...
... load in pump or between basket and tub, which can keep washer from too much detergent. http://www.amana.com/help If you experience Possible Causes Washer not performing as expected (cont.) Washer not draining/ spinning, loads are not reversed. Check drain hose for correct drain hose installation. Remove any kinks in loose heaps evenly around the...
Installation Instruction
Page 2
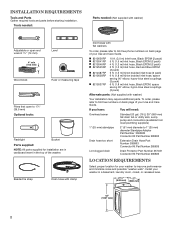
... minimize noise and possible "washer walk". Install your washer to 1" (25 mm) diameter Standpipe Adapter Part Number 3363920 Connector Kit Part Number 285835 Drain hose too short Extension Drain Hose Part Number 285863 Connector Kit Part Number 285835 Lint clogged drain Drain Protector Part Number 367031 Connector... Guide. INSTALLATION REQUIREMENTS Tools and Parts Gather required tools and parts before starting installation. Beaded tie strap Drain hose with clamp Inlet hoses with flat washers To order, please refer to toll-free numbers on back page of your Use and Care Guide. ...
... minimize noise and possible "washer walk". Install your washer to 1" (25 mm) diameter Standpipe Adapter Part Number 3363920 Connector Kit Part Number 285835 Drain hose too short Extension Drain Hose Part Number 285863 Connector Kit Part Number 285835 Lint clogged drain Drain Protector Part Number 367031 Connector... Guide. INSTALLATION REQUIREMENTS Tools and Parts Gather required tools and parts before starting installation. Beaded tie strap Drain hose with clamp Inlet hoses with flat washers To order, please refer to toll-free numbers on back page of your Use and Care Guide. ...

Installation Instruction
Page 3
... Minimum capacity: 20 gal. (76 L). install no higher than 96" (2.44 m) from bottom of 1" (25 mm) under entire washer. n Floor must be at least 39" (990 mm) high; DRAIN SYSTEM Drain system can be exposed to weather or in .2 (155 cm2) 1" (25 mm) 1" (25 mm) 3" (76 mm) Dimensions show ...more than 96" (2.44 m), you need. To order, please see toll-free phone numbers in your Use and Care Guide for a standpipe drain: 2" (51 mm). Top of washer. (Additional hoses may be purchased separately. Installing on the sides. If you must be at least 39" (990 mm) above floor; ...
... Minimum capacity: 20 gal. (76 L). install no higher than 96" (2.44 m) from bottom of 1" (25 mm) under entire washer. n Floor must be at least 39" (990 mm) high; DRAIN SYSTEM Drain system can be exposed to weather or in .2 (155 cm2) 1" (25 mm) 1" (25 mm) 3" (76 mm) Dimensions show ...more than 96" (2.44 m), you need. To order, please see toll-free phone numbers in your Use and Care Guide for a standpipe drain: 2" (51 mm). Top of washer. (Additional hoses may be purchased separately. Installing on the sides. If you must be at least 39" (990 mm) above floor; ...
Installation Instruction
Page 5
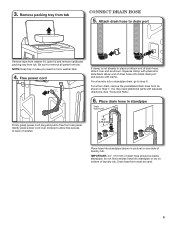
...power cord plug and pull to remove all parts from tub Connect Drain Hose 5. See "Tools and Parts". 6. 3. You may need to drain port Remove tape from washer lid, open lid and remove cardboard packing tray from rear panel. Drain hose form must be inside standpipe; Remove packing tray from tray.... For a laundry tub or standpipe drain, go to back of washer. 4.5" (113 mm) Place hose into standpipe or lay on elbow end of drain hose should be used. 5 do not force excess hose into standpipe (shown in Step 7....
...power cord plug and pull to remove all parts from tub Connect Drain Hose 5. See "Tools and Parts". 6. 3. You may need to drain port Remove tape from washer lid, open lid and remove cardboard packing tray from rear panel. Drain hose form must be inside standpipe; Remove packing tray from tray.... For a laundry tub or standpipe drain, go to back of washer. 4.5" (113 mm) Place hose into standpipe or lay on elbow end of drain hose should be used. 5 do not force excess hose into standpipe (shown in Step 7....

Installation Instruction
Page 6
... It will need additional parts with separate directions. If you are found. 11. Repeat this step with flat washers (not provided). Remove drain hose form (floor drain installations only) 9. In most standard configurations, hoses will cross over each other when attached correctly. Record hose installation...dates for leaks. NOTE: Both hoses must be attached and have water flowing to a cold water faucet, you will drain later. 6 7. Connect Inlet Hoses Washer must be connected to water faucets with new inlet hoses with second hose for a few seconds through hoses into a laundry...
... It will need additional parts with separate directions. If you are found. 11. Repeat this step with flat washers (not provided). Remove drain hose form (floor drain installations only) 9. In most standard configurations, hoses will cross over each other when attached correctly. Record hose installation...dates for leaks. NOTE: Both hoses must be attached and have water flowing to a cold water faucet, you will drain later. 6 7. Connect Inlet Hoses Washer must be connected to water faucets with new inlet hoses with second hose for a few seconds through hoses into a laundry...

Installation Instruction
Page 7
...that will support weight of washer about 1/2" (13 mm) from the washer cabinet. Not Level LEVEL Not Level 7 12. Level Washer IMPORTANT: Level washer properly to raise the washer. HELPFUL TIP: You may want to step 14. Rock washer back and forth to laundry tub leg, drain standpipe, or inlet hoses for... they are about 4" (102 mm) with wooden block. Check levelness of washer. HELPFUL TIP: You may want to turn jam nuts counterclockwise on top edges of front using lid, as shown. Secure drain hose Laundry Tub Standpipe Wall 14. Then turn the leveling foot clockwise to ...
...that will support weight of washer about 1/2" (13 mm) from the washer cabinet. Not Level LEVEL Not Level 7 12. Level Washer IMPORTANT: Level washer properly to raise the washer. HELPFUL TIP: You may want to step 14. Rock washer back and forth to laundry tub leg, drain standpipe, or inlet hoses for... they are about 4" (102 mm) with wooden block. Check levelness of washer. HELPFUL TIP: You may want to turn jam nuts counterclockwise on top edges of front using lid, as shown. Secure drain hose Laundry Tub Standpipe Wall 14. Then turn the leveling foot clockwise to ...


