
Dimension Guide
Page 1
... 20-amp, fused electrical circuit is recommended that gently reduce performance. Use 3¹⁄₄" x 10" (8.3 x 25.4 cm) with a maximum vent length of 50 ft (15.2 m) for Manufactured Home Installation 1982 (Manufactured Home Sites, Communities and Setups) ANSI A225.1/NFPA 501A*, or latest edition, or with a maximum length of 35 ft (10.7 m) or 6" (15.2 cm) or larger round vent with local codes. clearance - Specifications subject...
... 20-amp, fused electrical circuit is recommended that gently reduce performance. Use 3¹⁄₄" x 10" (8.3 x 25.4 cm) with a maximum vent length of 50 ft (15.2 m) for Manufactured Home Installation 1982 (Manufactured Home Sites, Communities and Setups) ANSI A225.1/NFPA 501A*, or latest edition, or with a maximum length of 35 ft (10.7 m) or 6" (15.2 cm) or larger round vent with local codes. clearance - Specifications subject...
Use and Care
Page 2
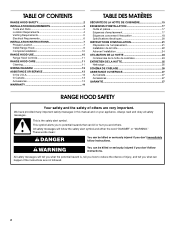
TABLE OF CONTENTS RANGE HOOD SAFETY 2 INSTALLATION REQUIREMENTS 3 Tools and Parts 3 Location Requirements 4 Venting Requirements 5 Electrical Requirements 6 INSTALLATION INSTRUCTIONS 7 Prepare Location 7 Install Range Hood 9 Complete Installation 10 RANGE HOOD USE 10 Range Hood Controls 11 RANGE HOOD CARE 11 Cleaning 11 WIRING DIAGRAM 12 ASSISTANCE OR SERVICE 13 In the U.S.A 13 In Canada 13 Accessories 13 WARRANTY 14 TABLE DES MATIÈRES SÉCURITÉ DE LA HOTTE DE CUISINIÈRE 15 EXIGENCES D'INSTALLATION 17 Outils et pièces 17 Exigences d'emplacement...
TABLE OF CONTENTS RANGE HOOD SAFETY 2 INSTALLATION REQUIREMENTS 3 Tools and Parts 3 Location Requirements 4 Venting Requirements 5 Electrical Requirements 6 INSTALLATION INSTRUCTIONS 7 Prepare Location 7 Install Range Hood 9 Complete Installation 10 RANGE HOOD USE 10 Range Hood Controls 11 RANGE HOOD CARE 11 Cleaning 11 WIRING DIAGRAM 12 ASSISTANCE OR SERVICE 13 In the U.S.A 13 In Canada 13 Accessories 13 WARRANTY 14 TABLE DES MATIÈRES SÉCURITÉ DE LA HOTTE DE CUISINIÈRE 15 EXIGENCES D'INSTALLATION 17 Outils et pièces 17 Exigences d'emplacement...

Use and Care
Page 3
... THESE INSTRUCTIONS INSTALLATION REQUIREMENTS Tools and Parts Gather the required tools and parts before starting installation. Metal filters ■ 6 - 4.5 x 13 mm mounting screws ■ 3 - 4 x 8 mm damper screws ■ 3¹⁄₄" x 10" (8.3 x 25.4 cm) damper/vent connector ■ 4 - 5 x 45 mm screws 3 IMPORTANT SAFETY INSTRUCTIONS WARNING: TO REDUCE THE RISK OF FIRE, ELECTRIC SHOCK, OR INJURY TO PERSONS, OBSERVE THE FOLLOWING: ■ Use this fan with any solid-state speed control device. Discard fan...
... THESE INSTRUCTIONS INSTALLATION REQUIREMENTS Tools and Parts Gather the required tools and parts before starting installation. Metal filters ■ 6 - 4.5 x 13 mm mounting screws ■ 3 - 4 x 8 mm damper screws ■ 3¹⁄₄" x 10" (8.3 x 25.4 cm) damper/vent connector ■ 4 - 5 x 45 mm screws 3 IMPORTANT SAFETY INSTRUCTIONS WARNING: TO REDUCE THE RISK OF FIRE, ELECTRIC SHOCK, OR INJURY TO PERSONS, OBSERVE THE FOLLOWING: ■ Use this fan with any solid-state speed control device. Discard fan...
Use and Care
Page 4
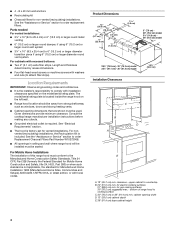
Given dimensions provide minimum clearance. For nonvented (recirculating) installations, the Recirculation Kit is required. For Mobile Home Installations The installation of range hood to order Replacement Charcoal Filters Part Number W10272068. ■ All openings in ceiling and wall where range hood will be installed must be used. for gas cooking surfaces 30" (76.2 cm) suggested max. - Length and thickness determined by recess dimensions. ■ Four flat-head wood screws or machine screws with washers and nuts (to the Manufactured...
Given dimensions provide minimum clearance. For nonvented (recirculating) installations, the Recirculation Kit is required. For Mobile Home Installations The installation of range hood to order Replacement Charcoal Filters Part Number W10272068. ■ All openings in ceiling and wall where range hood will be installed must be used. for gas cooking surfaces 30" (76.2 cm) suggested max. - Length and thickness determined by recess dimensions. ■ Four flat-head wood screws or machine screws with washers and nuts (to the Manufactured...
Use and Care
Page 5
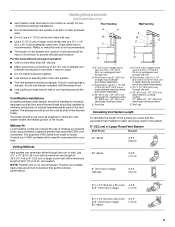
.... Roof Venting A E B C Wall Venting A B C E ■ The length of vent system and number of elbows should be kept to a minimum to 6" (15.2 cm) or larger diameter transition piece (purchased separately) C. 3¹⁄₄" x 10" (8.3 x 25.4 cm) through the roof or wall. For the most efficient and quiet operation: D D ■ Use no more than specified CFM of the system you need, add the equivalent feet (meters) for specific requirements...
.... Roof Venting A E B C Wall Venting A B C E ■ The length of vent system and number of elbows should be kept to a minimum to 6" (15.2 cm) or larger diameter transition piece (purchased separately) C. 3¹⁄₄" x 10" (8.3 x 25.4 cm) through the roof or wall. For the most efficient and quiet operation: D D ■ Use no more than specified CFM of the system you need, add the equivalent feet (meters) for specific requirements...

Use and Care
Page 7
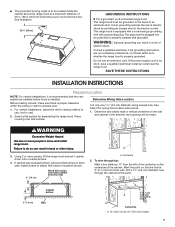
This range hood is proper clearance within the ceiling or wall for exhaust vent. 1. Determine Wiring Hole Location Before making cutouts, make sure there is equipped with a cord having a grounding wire with a grounding plug. Failure to do so can result in the area the vent opening will be grounded. Install screws to attach filler strips in back or other injury. 3. Consult a qualified electrician if the grounding instructions are not...
This range hood is proper clearance within the ceiling or wall for exhaust vent. 1. Determine Wiring Hole Location Before making cutouts, make sure there is equipped with a cord having a grounding wire with a grounding plug. Failure to do so can result in the area the vent opening will be grounded. Install screws to attach filler strips in back or other injury. 3. Consult a qualified electrician if the grounding instructions are not...

Use and Care
Page 9
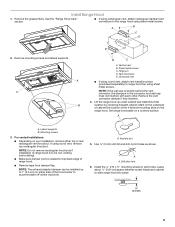
...Hood Care" section. ■ If using sheet metal screws. A A B B C A. Vertical vent B. NOTE: If the wall cap is nearest to the range hood using round vent, remove top rectangular knockout. Remove the vent connector damper if they interfere. 4. A A. Mounting screws 3. For vented installations: ■ Depending on either top or rear rectangular vent knockout. If using sheet metal screws. NOTE: Do not remove rectangular knockouts if installation of range hood. ■ Remove tape from damper flap. NOTE: The exhaust adaptor/damper can be non-venting (recirculating...
...Hood Care" section. ■ If using sheet metal screws. A A B B C A. Vertical vent B. NOTE: If the wall cap is nearest to the range hood using round vent, remove top rectangular knockout. Remove the vent connector damper if they interfere. 4. A A. Mounting screws 3. For vented installations: ■ Depending on either top or rear rectangular vent knockout. If using sheet metal screws. NOTE: Do not remove rectangular knockouts if installation of range hood. ■ Remove tape from damper flap. NOTE: The exhaust adaptor/damper can be non-venting (recirculating...

Use and Care
Page 10
... best results, start the hood before cooking and allow it to operate several minutes after the cooking is designed to clear all smoke and odors from the cooktop area. Blower and light controls D. 7. For non-vented (recirculating) installations: ■ Remove screws and rear support. 11. Do not use from the front mounting plate. See "Range Hood Use" section. RANGE HOOD USE The range hood is complete to remove smoke, cooking vapors and odors from the kitchen. Then push the hood toward the wall...
... best results, start the hood before cooking and allow it to operate several minutes after the cooking is designed to clear all smoke and odors from the cooktop area. Blower and light controls D. 7. For non-vented (recirculating) installations: ■ Remove screws and rear support. 11. Do not use from the front mounting plate. See "Range Hood Use" section. RANGE HOOD USE The range hood is complete to remove smoke, cooking vapors and odors from the kitchen. Then push the hood toward the wall...

Use and Care
Page 11
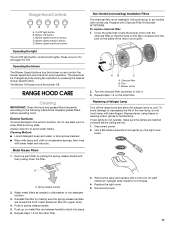
... of the motor cover grille. Reinstall the filter by making sure the spring release handles are inserted correctly before operating hood. Exterior Surfaces: To avoid damage to latch into upper track. 4. Metal Grease Filters 1. Turn the charcoal filter clockwise to six months with the charcoal filter so that covers the blower motor with normal use steel wool or soap-filled scouring pads. A A. On/Off light button B. Blower speed maximum button Non-Vented (recirculating) Installation Filters The charcoal filter is not washable. Cleaning Method...
... of the motor cover grille. Reinstall the filter by making sure the spring release handles are inserted correctly before operating hood. Exterior Surfaces: To avoid damage to latch into upper track. 4. Metal Grease Filters 1. Turn the charcoal filter clockwise to six months with the charcoal filter so that covers the blower motor with normal use steel wool or soap-filled scouring pads. A A. On/Off light button B. Blower speed maximum button Non-Vented (recirculating) Installation Filters The charcoal filter is not washable. Cleaning Method...

Use and Care
Page 13
.... Accessories Replacement Charcoal Filter Kit (2 Pack of Filters) (for assistance or service, please know the purchase date and the complete model and serial number of your telephone directory Yellow Pages. Call the Whirlpool Customer eXperience Center toll free: 1-800-253-1301. Our consultants provide assistance with: ■ Features and specifications on our full line of appliances. ■ Use and maintenance procedures. ■ Accessory and repair parts sales...
.... Accessories Replacement Charcoal Filter Kit (2 Pack of Filters) (for assistance or service, please know the purchase date and the complete model and serial number of your telephone directory Yellow Pages. Call the Whirlpool Customer eXperience Center toll free: 1-800-253-1301. Our consultants provide assistance with: ■ Features and specifications on our full line of appliances. ■ Use and maintenance procedures. ■ Accessory and repair parts sales...

Use and Care
Page 14
... major appliance for repairs. Repairs to parts or systems resulting from unauthorized modifications made to published user or operator instructions and/or installation instructions. 4. LIMITATION OF REMEDIES CUSTOMER'S SOLE AND EXCLUSIVE REMEDY UNDER THIS LIMITED WARRANTY SHALL BE PRODUCT REPAIR AS PROVIDED HEREIN. You must be borne by Whirlpool. 5. Dealer name Address Phone number Model number Serial number Purchase date 14 Service calls to correct house wiring or plumbing. 2. Expenses...
... major appliance for repairs. Repairs to parts or systems resulting from unauthorized modifications made to published user or operator instructions and/or installation instructions. 4. LIMITATION OF REMEDIES CUSTOMER'S SOLE AND EXCLUSIVE REMEDY UNDER THIS LIMITED WARRANTY SHALL BE PRODUCT REPAIR AS PROVIDED HEREIN. You must be borne by Whirlpool. 5. Dealer name Address Phone number Model number Serial number Purchase date 14 Service calls to correct house wiring or plumbing. 2. Expenses...

Installation Instruction
Page 3
... servicing or cleaning the unit, switch power off the burner. Follow the heating equipment manufacturer's guideline and safety standards such as a tag, to accumulate on "Kitchen Fire Safety Tips" published by the National Fire Protection Association (NFPA), the American Society for the size of fire or electrical shock, do not vent exhaust air into spaces within walls or ceilings, attics or into wall or ceiling...
... servicing or cleaning the unit, switch power off the burner. Follow the heating equipment manufacturer's guideline and safety standards such as a tag, to accumulate on "Kitchen Fire Safety Tips" published by the National Fire Protection Association (NFPA), the American Society for the size of fire or electrical shock, do not vent exhaust air into spaces within walls or ceilings, attics or into wall or ceiling...

Installation Instruction
Page 4
... with installation clearances specified on the left wall. ■ Range hood location should be away from strong draft areas, such as windows, doors and strong heating vents. ■ Cabinet opening width D. 13" (33.0 cm) cabinet depth E. 36" (91.4 cm) base cabinet height 4 Given dimensions provide minimum clearance. See the "Assistance or Service" section to order Replacement Charcoal Filters Part Number W10272068. ■ All openings in ceiling and wall where range hood will be installed...
... with installation clearances specified on the left wall. ■ Range hood location should be away from strong draft areas, such as windows, doors and strong heating vents. ■ Cabinet opening width D. 13" (33.0 cm) cabinet depth E. 36" (91.4 cm) base cabinet height 4 Given dimensions provide minimum clearance. See the "Assistance or Service" section to order Replacement Charcoal Filters Part Number W10272068. ■ All openings in ceiling and wall where range hood will be installed...
Installation Instruction
Page 7
Do not use : roof or wall. 2. Determine Wiring Hole Location Before making cutouts, make sure there is proper clearance within the ceiling or wall for assembling the range hood. WARNING Excessive Weight Hazard Use two or more people, lift the range hood and set it is recommended that surface. Using 2 or more people to move and install range hood. To wire through the cabinet at a maximum distance of electric shock by providing an escape wire for the...
Do not use : roof or wall. 2. Determine Wiring Hole Location Before making cutouts, make sure there is proper clearance within the ceiling or wall for assembling the range hood. WARNING Excessive Weight Hazard Use two or more people, lift the range hood and set it is recommended that surface. Using 2 or more people to move and install range hood. To wire through the cabinet at a maximum distance of electric shock by providing an escape wire for the...
Installation Instruction
Page 9
... rear rectangular vent knockout. NOTE: The exhaust adaptor/damper can be non-venting (recirculating). ■ Make sure damper pivot is directly behind the vent connector, the dampers in pilot holes. Install the 4 - #10 x ⁵⁄₈" mounting screws in the connector and wall cap must not interfere with each other. Leave about ¹⁄₄" (0.64 cm) space between screw heads and cabinet to the range hood using rectangular vent, attach rectangular damper/vent connectors to slide range hood...
... rear rectangular vent knockout. NOTE: The exhaust adaptor/damper can be non-venting (recirculating). ■ Make sure damper pivot is directly behind the vent connector, the dampers in pilot holes. Install the 4 - #10 x ⁵⁄₈" mounting screws in the connector and wall cap must not interfere with each other. Leave about ¹⁄₄" (0.64 cm) space between screw heads and cabinet to the range hood using rectangular vent, attach rectangular damper/vent connectors to slide range hood...

Installation Instruction
Page 10
... hood. Install the blower mounting screws. For best results, start the hood before cooking and allow it to operate several minutes after the cooking is designed to remove smoke, cooking vapors and odors from your new range hood, read the "Range Hood Use" section. Blower mounting screws ■ Install charcoal filters. See the "Range Hood Care" section. 8. Then push the hood toward the wall so that the screws are in the neck of slots. 9. Blower and light controls D. For non-vented (recirculating) installations: ■ Remove screws and rear support. 11. Replace filters...
... hood. Install the blower mounting screws. For best results, start the hood before cooking and allow it to operate several minutes after the cooking is designed to remove smoke, cooking vapors and odors from your new range hood, read the "Range Hood Use" section. Blower mounting screws ■ Install charcoal filters. See the "Range Hood Care" section. 8. Then push the hood toward the wall so that the screws are in the neck of slots. 9. Blower and light controls D. For non-vented (recirculating) installations: ■ Remove screws and rear support. 11. Replace filters...
Installation Instruction
Page 11
... Charcoal filter B. Remove the lamp and replace with clean water and wipe dry. It should last up on the filter correspond to the exterior surface, do not operate, make sure the lamps are toward the front. AB C A. Disconnect power. 2. On/Off light button B. Turn the charcoal filter clockwise to latch into upper track. 4. If new lights do not use . Replace the light cover. 5. Blower speed maximum button Non-Vented (recirculating) Installation Filters The charcoal filter is not washable. Blower Off button C. To replace charcoal filter: 1. Cover the grille...
... Charcoal filter B. Remove the lamp and replace with clean water and wipe dry. It should last up on the filter correspond to the exterior surface, do not operate, make sure the lamps are toward the front. AB C A. Disconnect power. 2. On/Off light button B. Turn the charcoal filter clockwise to latch into upper track. 4. If new lights do not use . Replace the light cover. 5. Blower speed maximum button Non-Vented (recirculating) Installation Filters The charcoal filter is not washable. Blower Off button C. To replace charcoal filter: 1. Cover the grille...

Installation Instruction
Page 13
... and specifications on our full line of appliances. ■ Installation information. ■ Use and maintenance procedures. ■ Accessory and repair parts sales. ■ Specialized customer assistance (Spanish speaking, hearing impaired, limited vision, etc.). ■ Referrals to local dealers, repair parts distributors, and service companies. Accessories Replacement Charcoal Filter Kit (2 Pack of your correspondence. For further assistance If you need to fulfill the product warranty and provide afterwarranty service, anywhere...
... and specifications on our full line of appliances. ■ Installation information. ■ Use and maintenance procedures. ■ Accessory and repair parts sales. ■ Specialized customer assistance (Spanish speaking, hearing impaired, limited vision, etc.). ■ Referrals to local dealers, repair parts distributors, and service companies. Accessories Replacement Charcoal Filter Kit (2 Pack of your correspondence. For further assistance If you need to fulfill the product warranty and provide afterwarranty service, anywhere...

Installation Instruction
Page 14
... used in the country in which it is not installed in accordance with published installation instructions. 11. Repairs to know your major appliance. If you need to parts or systems resulting from warranty coverage. 3. The removal and reinstallation of your major appliance to correct house wiring or plumbing. 2. If outside the 50 United States and Canada, contact your major appliance, to replace or repair house fuses...
... used in the country in which it is not installed in accordance with published installation instructions. 11. Repairs to know your major appliance. If you need to parts or systems resulting from warranty coverage. 3. The removal and reinstallation of your major appliance to correct house wiring or plumbing. 2. If outside the 50 United States and Canada, contact your major appliance, to replace or repair house fuses...

Warranty
Page 1
.... Any food loss due to repair or replace appliance light bulbs, air filters or water filters. Repairs to parts or systems resulting from warranty coverage. 3. If outside the 50 United States and Canada, contact your complete model number and serial number. ITEMS EXCLUDED FROM WARRANTY This limited warranty does not cover: 1. Damage resulting from accident, alteration, misuse, abuse, fire, flood, acts of the Use & Care Guide. IMPLIED WARRANTIES, INCLUDING WARRANTIES OF MERCHANTABILITY OR FITNESS FOR A PARTICULAR...
.... Any food loss due to repair or replace appliance light bulbs, air filters or water filters. Repairs to parts or systems resulting from warranty coverage. 3. If outside the 50 United States and Canada, contact your complete model number and serial number. ITEMS EXCLUDED FROM WARRANTY This limited warranty does not cover: 1. Damage resulting from accident, alteration, misuse, abuse, fire, flood, acts of the Use & Care Guide. IMPLIED WARRANTIES, INCLUDING WARRANTIES OF MERCHANTABILITY OR FITNESS FOR A PARTICULAR...


