
Installation Instructions
Page 1
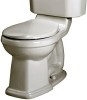
...installation may create a vacuum on the system and draw water from the other toilet. Close toilet supply valve and flush tank completely. Disconnect and remove supply line. from tank and bowl. Product names listed herein are trademarks of china...Champion® 4 2-piece Toilets Models - 2625, 2627, 2738 Portsmouth® Champion® 4 2-piece Toilets Models - 2733, 2735 Thank you begin. (Certain installations may require professional help.) Also be clean and level before you for drainage as throw over is installed! the benchmark of a cross fitting for selecting American Standard...
...installation may create a vacuum on the system and draw water from the other toilet. Close toilet supply valve and flush tank completely. Disconnect and remove supply line. from tank and bowl. Product names listed herein are trademarks of china...Champion® 4 2-piece Toilets Models - 2625, 2627, 2738 Portsmouth® Champion® 4 2-piece Toilets Models - 2733, 2735 Thank you begin. (Certain installations may require professional help.) Also be clean and level before you for drainage as throw over is installed! the benchmark of a cross fitting for selecting American Standard...
Installation Instructions
Page 4
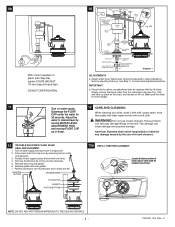
... water supply and flush toilet to siphon, an adjustment may be required with one hand. 4. Adjust water level. See Step 11 for 30 seconds. If bowl fails to empty tank. 2. WARNING: Do not use of hose clip to vent tube at location as shown. American Standard shall not be ... Fig. 10A With correct washers in place (see Fig. 10A) and take up or down. VALVE BODY SHANK WASHER WATER LEVEL ADJUSTMENT ROD ADJUSTABLE HEIGHT LOCK NUT CONE WASHER COUPLING NUT (HAND TIGHT ONLY) THREADED SHANK PARTS FOR WATER CONNECTION (SEE STEP 9) Diagram 1 ADJUSTMENTS a. Simply remove the...
... water supply and flush toilet to siphon, an adjustment may be required with one hand. 4. Adjust water level. See Step 11 for 30 seconds. If bowl fails to empty tank. 2. WARNING: Do not use of hose clip to vent tube at location as shown. American Standard shall not be ... Fig. 10A With correct washers in place (see Fig. 10A) and take up or down. VALVE BODY SHANK WASHER WATER LEVEL ADJUSTMENT ROD ADJUSTABLE HEIGHT LOCK NUT CONE WASHER COUPLING NUT (HAND TIGHT ONLY) THREADED SHANK PARTS FOR WATER CONNECTION (SEE STEP 9) Diagram 1 ADJUSTMENTS a. Simply remove the...
Installation Instructions
Page 5
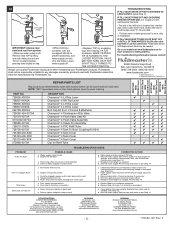
...that were not manufactured by toilet tank number which can be obtained by products used . a. In the United States: American Standard Brands P.O. V TROUBLESHOOTING IF FILL VALVE SHUTS OFF BUT CONTINUES TO LEAK SLOWLY, repeat Step 14. Attach refill tube ...2 Covers & Washers) Champion® 4 Fluidmaster 400a Valve Champion® 4 Flush Valve Seal Kit Champion® 4 Flush Valve Assembly Champion® 4 Clevis Pin Assembly Champion® 4 PVC Refill Tube Champion® 4 Tank To Bowl Coupling Kit #241 Champion® 4 Tank Cover Champion® 4 Tank Cover Champion® 4 Tank Cover ...
...that were not manufactured by toilet tank number which can be obtained by products used . a. In the United States: American Standard Brands P.O. V TROUBLESHOOTING IF FILL VALVE SHUTS OFF BUT CONTINUES TO LEAK SLOWLY, repeat Step 14. Attach refill tube ...2 Covers & Washers) Champion® 4 Fluidmaster 400a Valve Champion® 4 Flush Valve Seal Kit Champion® 4 Flush Valve Assembly Champion® 4 Clevis Pin Assembly Champion® 4 PVC Refill Tube Champion® 4 Tank To Bowl Coupling Kit #241 Champion® 4 Tank Cover Champion® 4 Tank Cover Champion® 4 Tank Cover ...

Valve Replacement
Page 1
...from the tower. Disconnect the refill tube from the end of the refill tube; Affix the end of tank. Properly configured Champion4 Flushing System. Re-insert the "S" clip into the end of the refill tube attachment. Adjust the water level to the valve overflow .... Alternate view of the refill tube. AMERICAN STANDARD COMPANIES Champion4 Valve Replacement Instructions r Turn off and disconnect the supply line. Drain the tank and un-tighten tank mounting bolts. Ob I • •, • Install a New Champion4 Flush valve with the vent tube positioned as ...
...from the tower. Disconnect the refill tube from the end of the refill tube; Affix the end of tank. Properly configured Champion4 Flushing System. Re-insert the "S" clip into the end of the refill tube attachment. Adjust the water level to the valve overflow .... Alternate view of the refill tube. AMERICAN STANDARD COMPANIES Champion4 Valve Replacement Instructions r Turn off and disconnect the supply line. Drain the tank and un-tighten tank mounting bolts. Ob I • •, • Install a New Champion4 Flush valve with the vent tube positioned as ...


