
Installation Instructions
Page 1
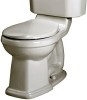
... fine quality for selecting American Standard - Remove old mounting hardware, remove toilet and plug floor waste opening to -back installation may require professional help.) Also be clean and level before you for over is installed! the benchmark of AS America, Inc. © AS A m e r i c a , I n c . 2 011 730529-100 Rev. INSTALLATION INSTRUCTIONS CARE AND MAINTENANCE Champion® 4 2-piece Toilets...
... fine quality for selecting American Standard - Remove old mounting hardware, remove toilet and plug floor waste opening to -back installation may require professional help.) Also be clean and level before you for over is installed! the benchmark of AS America, Inc. © AS A m e r i c a , I n c . 2 011 730529-100 Rev. INSTALLATION INSTRUCTIONS CARE AND MAINTENANCE Champion® 4 2-piece Toilets...
Installation Instructions
Page 2
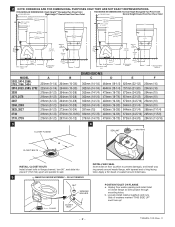
... facing toilet. DO NOT REMOVE INSTALL WAX SEAL Invert toilet on closet flange so bolts project through mounting holes. V ROUGHING-IN DIMENSIONS: Right Height™ Elongated Two Piece Toilet FINISHED WALL Right Height™ Round Front Two Piece Toilet ROUGHING-IN DIMENSIONS: Normal Height Elongated Two Piece Toilet FINISHED WALL Normal Height Round Front Two Piece Toilet...
... facing toilet. DO NOT REMOVE INSTALL WAX SEAL Invert toilet on closet flange so bolts project through mounting holes. V ROUGHING-IN DIMENSIONS: Right Height™ Elongated Two Piece Toilet FINISHED WALL Right Height™ Round Front Two Piece Toilet ROUGHING-IN DIMENSIONS: Normal Height Elongated Two Piece Toilet FINISHED WALL Normal Height Round Front Two Piece Toilet...
Installation Instructions
Page 3
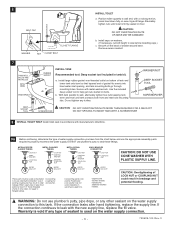
...be used on bolts. Use existing coupling nut and washer. Captive cone washers already included. RIBS WASHER/NUT DEEP SOCKET TOOL RUBBER GASKET INSTALL TANK Recommended tool: Deep socket tool included in breakage and potential flooding. ! a. b. CAUTION: DO NOT OVERTIGHTEN NUTS MORE THAN REQUIRED... NOT SPIN BOLTS INSIDE TANK WITH A SCREWDRIVER 8 INSTALL TOILET SEAT Install toilet seat in water leakage. CAUTION: Overtightening of LOCK NUT or COUPLING NUT could result in tank kit. Install caps on washers. (If necessary, cut bolt height to wall and, with metal washer/nuts. No ...
...be used on bolts. Use existing coupling nut and washer. Captive cone washers already included. RIBS WASHER/NUT DEEP SOCKET TOOL RUBBER GASKET INSTALL TANK Recommended tool: Deep socket tool included in breakage and potential flooding. ! a. b. CAUTION: DO NOT OVERTIGHTEN NUTS MORE THAN REQUIRED... NOT SPIN BOLTS INSIDE TANK WITH A SCREWDRIVER 8 INSTALL TOILET SEAT Install toilet seat in water leakage. CAUTION: Overtightening of LOCK NUT or COUPLING NUT could result in tank kit. Install caps on washers. (If necessary, cut bolt height to wall and, with metal washer/nuts. No ...
Installation Instructions
Page 5
.... ® Registered trademark of installation procedure. c. a. Check that were not manufactured by engaging lugs and rotating 1/8 turn clockwise. Consult a plumber if necessary. e. Readjust chain length as needed . (see Step 13) b. Review Step 10. Mississauga, Ontario Canada L5R 3M3 Toll Free: (800) 387-0369 www.americanstandard.ca In Mexico: American Standard B&K Mexico S. Remove valve...
.... ® Registered trademark of installation procedure. c. a. Check that were not manufactured by engaging lugs and rotating 1/8 turn clockwise. Consult a plumber if necessary. e. Readjust chain length as needed . (see Step 13) b. Review Step 10. Mississauga, Ontario Canada L5R 3M3 Toll Free: (800) 387-0369 www.americanstandard.ca In Mexico: American Standard B&K Mexico S. Remove valve...

Valve Replacement
Page 1
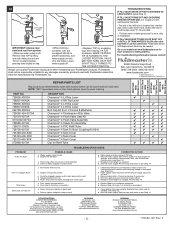
... the hair pin cotter through the clevis pin hole. Adjust the water level to back edge of the refill tube; Properly configured Champion4 Flushing System. AMERICAN STANDARD COMPANIES Champion4 Valve Replacement Instructions r Turn off and disconnect the supply line. Place the tank on a stable work top. Replace the tank lid. Place the...an additional 3/4 turn. 9 Align the lock nut "flat" parallel to 1 inch below the overflow tube. Remove 2 inches (50mm) from lift arm. Ob I • •, • Install a New Champion4 Flush valve with the vent tube positioned as shown.
... the hair pin cotter through the clevis pin hole. Adjust the water level to back edge of the refill tube; Properly configured Champion4 Flushing System. AMERICAN STANDARD COMPANIES Champion4 Valve Replacement Instructions r Turn off and disconnect the supply line. Place the tank on a stable work top. Replace the tank lid. Place the...an additional 3/4 turn. 9 Align the lock nut "flat" parallel to 1 inch below the overflow tube. Remove 2 inches (50mm) from lift arm. Ob I • •, • Install a New Champion4 Flush valve with the vent tube positioned as shown.

