
Installation Instructions
Page 1
..., please read these instructions carefully before you for back-to-back installations. CAUTION: PRODUCT IS FRAGILE. Recommended fitting type for selecting American Standard - c. NOTE: Mounting surface must be sure your plumbing and venting conditions, the flow from the Champion in a back-to-back installation may create a vacuum on the system and draw water from the...
..., please read these instructions carefully before you for back-to-back installations. CAUTION: PRODUCT IS FRAGILE. Recommended fitting type for selecting American Standard - c. NOTE: Mounting surface must be sure your plumbing and venting conditions, the flow from the Champion in a back-to-back installation may create a vacuum on the system and draw water from the...
Installation Instructions
Page 2
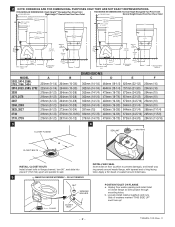
Loosely install retainer washers and nuts. ROUGHING-IN DIMENSIONS: Right Height™ Elongated Two Piece Toilet FINISHED WALL Right Height™ Round Front Two Piece Toilet ROUGHING-IN DIMENSIONS: Normal Height Elongated Two Piece Toilet FINISHED WALL Normal Height Round Front Two Piece Toilet 772mm (30-3/8") *(72281-3m/8m") 19mm ± 6mm (1 &#...place 6" (152 mm) apart and parallel to prevent damage), and install wax ring evenly around toilet base. V Unplug floor waste opening and install toilet on floor (cushion to wall. 5 MANIFOLD INSIDE WATERWAY - THEY ...
Loosely install retainer washers and nuts. ROUGHING-IN DIMENSIONS: Right Height™ Elongated Two Piece Toilet FINISHED WALL Right Height™ Round Front Two Piece Toilet ROUGHING-IN DIMENSIONS: Normal Height Elongated Two Piece Toilet FINISHED WALL Normal Height Round Front Two Piece Toilet 772mm (30-3/8") *(72281-3m/8m") 19mm ± 6mm (1 &#...place 6" (152 mm) apart and parallel to prevent damage), and install wax ring evenly around toilet base. V Unplug floor waste opening and install toilet on floor (cushion to wall. 5 MANIFOLD INSIDE WATERWAY - THEY ...
Installation Instructions
Page 3
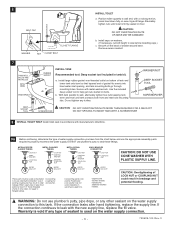
...firmly seated on washers. (If necessary, cut bolt height to insure water-tight connection. Alternately tighten nuts until tank contacts both front and rear bowl mounting ribs. Install caps on floor. ! Remove excess sealant. 7 TANK MTG. Install large rubber gasket over threaded outlet on bolts. ... may result in breakage and potential flooding. ! b. Use of sealant around base. 6 BOLT CAP WASHER CLOSET FLANGE NUT CLOSET BOLT INSTALL TOILET a. Smooth off the bead of existing coupling nut may not seal completely on wax ring and flange. BOLTS PREINSTALLED MTG. With tank ...
...firmly seated on washers. (If necessary, cut bolt height to insure water-tight connection. Alternately tighten nuts until tank contacts both front and rear bowl mounting ribs. Install caps on floor. ! Remove excess sealant. 7 TANK MTG. Install large rubber gasket over threaded outlet on bolts. ... may result in breakage and potential flooding. ! b. Use of sealant around base. 6 BOLT CAP WASHER CLOSET FLANGE NUT CLOSET BOLT INSTALL TOILET a. Smooth off the bead of existing coupling nut may not seal completely on wax ring and flange. BOLTS PREINSTALLED MTG. With tank ...
Installation Instructions
Page 5
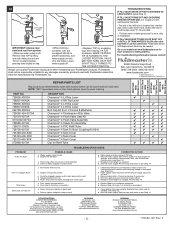
...Attention: Director of Customer Care For residents of installation procedure. de R.L. c. a. Sand or ...Champion® 4 Fluidmaster 400a Valve Champion® 4 Flush Valve Seal Kit Champion® 4 Flush Valve Assembly Champion® 4 Clevis Pin Assembly Champion® 4 PVC Refill Tube Champion® 4 Tank To Bowl Coupling Kit #241 Champion® 4 Tank Cover Champion® 4 Tank Cover Champion...Toilet leaks Toilet does not shut off water supply. Replace flush valve seal as needed . (see Step 14) c. Remove cap and clean as per Step 14. In the United States: American Standard...
...Attention: Director of Customer Care For residents of installation procedure. de R.L. c. a. Sand or ...Champion® 4 Fluidmaster 400a Valve Champion® 4 Flush Valve Seal Kit Champion® 4 Flush Valve Assembly Champion® 4 Clevis Pin Assembly Champion® 4 PVC Refill Tube Champion® 4 Tank To Bowl Coupling Kit #241 Champion® 4 Tank Cover Champion® 4 Tank Cover Champion...Toilet leaks Toilet does not shut off water supply. Replace flush valve seal as needed . (see Step 14) c. Remove cap and clean as per Step 14. In the United States: American Standard...


