Product Flyer
Page 1
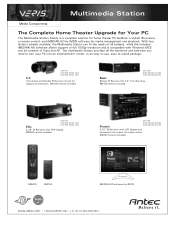
... the included iMEDIAN HD software allows support of Vista and XP. RM100 remote included. Multimedia Station Media Components The Complete Home Theater Upgrade for Your PC The Multimedia Station Family is compatible with Windows MCE and all the hardware and software you need to turn your PC into an entertainment center, in an easy to use, easy to install package. RM200 remote included. www.antec.com 1-800-22ANTEC...
... the included iMEDIAN HD software allows support of Vista and XP. RM100 remote included. Multimedia Station Media Components The Complete Home Theater Upgrade for Your PC The Multimedia Station Family is compatible with Windows MCE and all the hardware and software you need to turn your PC into an entertainment center, in an easy to use, easy to install package. RM200 remote included. www.antec.com 1-800-22ANTEC...
Manual
Page 3
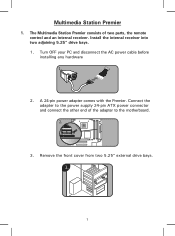
Turn OFF your PC and disconnect the AC power cable before installing any hardware 2. Remove the front cover from two 5.25" external drive bays. 1 The Multimedia Station Premier consists of the adapter to the power supply 24-pin ATX power connector and connect the other end of two parts, the remote control and an internal receiver. Install the internal receiver into two adjoining 5.25" drive bays. 1. Connect the adapter to the motherboard. 3. A 24-pin power adapter comes with the Premier. Multimedia Station Premier 1.
Turn OFF your PC and disconnect the AC power cable before installing any hardware 2. Remove the front cover from two 5.25" external drive bays. 1 The Multimedia Station Premier consists of the adapter to the power supply 24-pin ATX power connector and connect the other end of two parts, the remote control and an internal receiver. Install the internal receiver into two adjoining 5.25" drive bays. 1. Connect the adapter to the motherboard. 3. A 24-pin power adapter comes with the Premier. Multimedia Station Premier 1.
Manual
Page 4
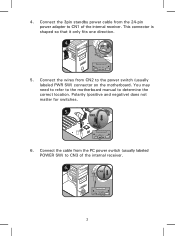
You may need to refer to the motherboard manual to CN3 of the internal receiver. Connect the wires from the 24-pin power adapter to the power switch (usually labeled PWR SW) connector on the motherboard. Polarity (positive and negative) does not matter for switches. 6. Connect the 3pin standby power cable from CN2 to CN1 of the internal receiver. 2 This connector is shaped so that it only fits one direction. 5. Connect the cable from the PC power switch (usually labeled POWER SW) to determine the correct location. 4.
You may need to refer to the motherboard manual to CN3 of the internal receiver. Connect the wires from the 24-pin power adapter to the power switch (usually labeled PWR SW) connector on the motherboard. Polarity (positive and negative) does not matter for switches. 6. Connect the 3pin standby power cable from CN2 to CN1 of the internal receiver. 2 This connector is shaped so that it only fits one direction. 5. Connect the cable from the PC power switch (usually labeled POWER SW) to determine the correct location. 4.
Manual
Page 5
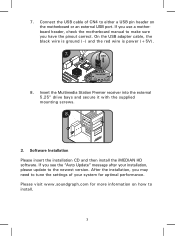
... the USB adapter cable, the black wire is ground (-) and the red wire is power (+5V). 8. After the installation, you have the pinout correct. If you use a motherboard header, check the motherboard manual to make sure you may need to tune the settings of CN4 to install. 3 Insert the Multimedia Station Premier receiver into the external 5.25" drive bays and secure it with the supplied mounting screws. 2. If you see the "Auto Update...
... the USB adapter cable, the black wire is ground (-) and the red wire is power (+5V). 8. After the installation, you have the pinout correct. If you use a motherboard header, check the motherboard manual to make sure you may need to tune the settings of CN4 to install. 3 Insert the Multimedia Station Premier receiver into the external 5.25" drive bays and secure it with the supplied mounting screws. 2. If you see the "Auto Update...
Manual
Page 6
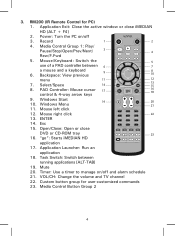
... click 12. VOL/CH: Change the volume and TV channel 22. Mouse/Keyboard: Switch the 5 use of a PAD controller between running applications [ALT-TAB] 19. Windows Menu 21 11. Esc 15. Record 1 2 4. ENTER 14. "go": Starts iMEDIAN HD application 17. Media Control Group 1: Play/ Pause/Stop/Open/Prev/Next/ 3 4 Rew/F.Fwd 5. Select/Space 14 13 15 8. Mute 20. Power: Turn the PC on /off...
... click 12. VOL/CH: Change the volume and TV channel 22. Mouse/Keyboard: Switch the 5 use of a PAD controller between running applications [ALT-TAB] 19. Windows Menu 21 11. Esc 15. Record 1 2 4. ENTER 14. "go": Starts iMEDIAN HD application 17. Media Control Group 1: Play/ Pause/Stop/Open/Prev/Next/ 3 4 Rew/F.Fwd 5. Select/Space 14 13 15 8. Mute 20. Power: Turn the PC on /off...
Manual
Page 7
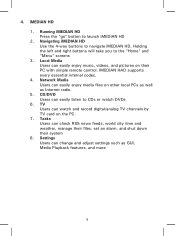
..., videos, and pictures on their system 8. Holding the left and right buttons will take you to navigate iMEDIAN HD. Settings Users can watch DVDs 6. iMEDIAN HD 1. TV Users can change and adjust settings such as Internet radio. 5. Local Media Users can check RSS news feeds, world city time and weather, manage their files, set an alarm, and shut down their PC with simple remote control. Navigating iMEDIAN HD Use...
..., videos, and pictures on their system 8. Holding the left and right buttons will take you to navigate iMEDIAN HD. Settings Users can watch DVDs 6. iMEDIAN HD 1. TV Users can change and adjust settings such as Internet radio. 5. Local Media Users can check RSS news feeds, world city time and weather, manage their files, set an alarm, and shut down their PC with simple remote control. Navigating iMEDIAN HD Use...
Manual
Page 30
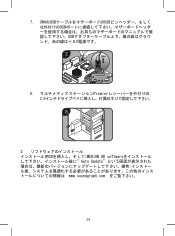
7. CN4のUSB USB USB USB V 8 Premier 3.5 2 CD iMEDIAN HD software Auto Update www.soundgraph.com 28
7. CN4のUSB USB USB USB V 8 Premier 3.5 2 CD iMEDIAN HD software Auto Update www.soundgraph.com 28
Manual
Page 36
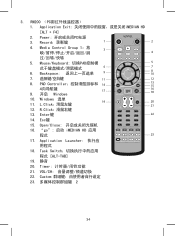
Power PC电源 3. Task Switch 程式 [ALT-TAB] 19. 静音 20. Custom 23 2 34 Backspace 9 8 10 7 11 12 8. "go": 启动 iMEDIAN HD 应用 程式 23 17. Timer 21. Enter键 22 14. RM200 (PC 1. L.Click 19 20 21 12. Open/Close 16. Media Control Group 1:放 3 4 5. PAD Controller 14...
Power PC电源 3. Task Switch 程式 [ALT-TAB] 19. 静音 20. Custom 23 2 34 Backspace 9 8 10 7 11 12 8. "go": 启动 iMEDIAN HD 应用 程式 23 17. Timer 21. Enter键 22 14. RM200 (PC 1. L.Click 19 20 21 12. Open/Close 16. Media Control Group 1:放 3 4 5. PAD Controller 14...
Manual
Page 38
Antec, Inc. 47900 Fremont Blvd. All rights reserved. Reproduction in whole or in China. Stuttgartstraat 12 3047 AS Rotterdam The Netherlands tel: +31 (0) 10 462-2060 fax: +31 (0) 10 437-1752 Customer Support: US & Canada 1-800-22ANTEC customersupport@antec.com Europe +31 (0) 10 462-2060 europe.techsupport@antec.com www.antec.com © Copyright 2008 Antec, Inc. Printed in part without written permission is prohibited. All trademarks are the property of their respective owners. Fremont, CA 94538 USA tel: 510-770-1200 fax: 510-770-1288 Antec Europe B.V.
Antec, Inc. 47900 Fremont Blvd. All rights reserved. Reproduction in whole or in China. Stuttgartstraat 12 3047 AS Rotterdam The Netherlands tel: +31 (0) 10 462-2060 fax: +31 (0) 10 437-1752 Customer Support: US & Canada 1-800-22ANTEC customersupport@antec.com Europe +31 (0) 10 462-2060 europe.techsupport@antec.com www.antec.com © Copyright 2008 Antec, Inc. Printed in part without written permission is prohibited. All trademarks are the property of their respective owners. Fremont, CA 94538 USA tel: 510-770-1200 fax: 510-770-1288 Antec Europe B.V.
