Manual
Page 2
... and improve our products to 7 expansion slots, the P100 also supports 2 tool-less 5.25" drives and 7 tool-less 3.5"/ 2.5" drives. P100 User Manual Congratulations on installing the motherboard and peripherals, please refer to improvements applied for Antec's computer enclosures. For more comprehensive instructions on your new chassis may differ slightly from the description in this...
... and improve our products to 7 expansion slots, the P100 also supports 2 tool-less 5.25" drives and 7 tool-less 3.5"/ 2.5" drives. P100 User Manual Congratulations on installing the motherboard and peripherals, please refer to improvements applied for Antec's computer enclosures. For more comprehensive instructions on your new chassis may differ slightly from the description in this...
Manual
Page 3
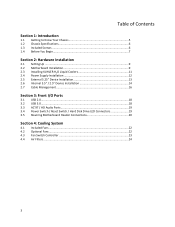
Table of Contents Section 1: Introduction 1.1 Getting to Know Your Chassis 5 1.2 Chassis Specifications 6 1.3 Included Screws 6 1.4 Before You Begin 7 Section 2: Hardware Installation 2.1 Setting Up ...9 2.2 Motherboard Installation 9 2.3 Installing KUHLER H2O Liquid Coolers 11 2.4 Power Supply Installation 12 2.5 External 5.25" ...
Table of Contents Section 1: Introduction 1.1 Getting to Know Your Chassis 5 1.2 Chassis Specifications 6 1.3 Included Screws 6 1.4 Before You Begin 7 Section 2: Hardware Installation 2.1 Setting Up ...9 2.2 Motherboard Installation 9 2.3 Installing KUHLER H2O Liquid Coolers 11 2.4 Power Supply Installation 12 2.5 External 5.25" ...
Manual
Page 5
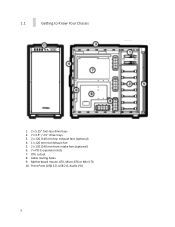
Motherboard mount: ATX, Micro ATX or Mini-ITX 10. Front Ports (USB 3.0, USB 2.0, Audio I/O) 5 CPU cutout 8. Cable routing holes 9. 1.1 Getting to Know Your Chassis 1. 2 x 5.25" tool-less drive bays 2. 7 x 3.5" / 2.5" drive trays 3. 2 x 120 /140 mm top exhaust fans (optional) 4. 1 x 120 mm rear exhaust fan 5. 2 x 120 /140 mm front intake fans (optional) 6. 7 x PCI-E expansion slots 7.
Motherboard mount: ATX, Micro ATX or Mini-ITX 10. Front Ports (USB 3.0, USB 2.0, Audio I/O) 5 CPU cutout 8. Cable routing holes 9. 1.1 Getting to Know Your Chassis 1. 2 x 5.25" tool-less drive bays 2. 7 x 3.5" / 2.5" drive trays 3. 2 x 120 /140 mm top exhaust fans (optional) 4. 1 x 120 mm rear exhaust fan 5. 2 x 120 /140 mm front intake fans (optional) 6. 7 x PCI-E expansion slots 7.

Manual
Page 6
HDD screw (30) C. p. Power supply screw(4) G. 2.5" tray-mount screw (12) A B C D E F G 6 1.2 Chassis Specifications Chassis Type Chassis Color Dimensions Weight Cooling Drive Bays Expansion Slots Motherboard Size Front I/O Panel Mid-Tower Black with aluminum door 18.9" (H) x 8.6" (W) x 20.4" (D) 484 mm (H) x 220 mm (W) x 523 ...
HDD screw (30) C. p. Power supply screw(4) G. 2.5" tray-mount screw (12) A B C D E F G 6 1.2 Chassis Specifications Chassis Type Chassis Color Dimensions Weight Cooling Drive Bays Expansion Slots Motherboard Size Front I/O Panel Mid-Tower Black with aluminum door 18.9" (H) x 8.6" (W) x 20.4" (D) 484 mm (H) x 220 mm (W) x 523 ...

Manual
Page 7
...CPU cooler to find out if there are correctly aligned and oriented. Avoid hurried or careless motions. Handle components and cards with the P100 will be difficult to fix and may buckle. Remember to use your build environment is not designed to support the weight of an adult.... Although it is constructed of heavy-duty steel and internally reinforced, it is clean, well-lit, and free of dust. Antec chassis feature rounded edges that minimize the occurrence of the entire connector. This manual is not designed to cover CPU, RAM, or expansion card ...
...CPU cooler to find out if there are correctly aligned and oriented. Avoid hurried or careless motions. Handle components and cards with the P100 will be difficult to fix and may buckle. Remember to use your build environment is not designed to support the weight of an adult.... Although it is constructed of heavy-duty steel and internally reinforced, it is clean, well-lit, and free of dust. Antec chassis feature rounded edges that minimize the occurrence of the entire connector. This manual is not designed to cover CPU, RAM, or expansion card ...

Manual
Page 9
... Installation Before proceeding: Check the manual for your motherboard. Make sure you have the correct I /O panel. Remove the panel by gripping the end of the chassis. Make sure you have the correct I/O panel for the correct I /O panel. 9 CAUTION: Do not use your motherboard manufacturer for your CPU cooler to pry or... do before installing the motherboard. Note: Place the panel thumbscrews aside carefully and remember where they are steps you . If the panel provided with the chassis isn't suitable, please contact your fingernails to find out if there are .
... Installation Before proceeding: Check the manual for your motherboard. Make sure you have the correct I /O panel. Remove the panel by gripping the end of the chassis. Make sure you have the correct I/O panel for the correct I /O panel. 9 CAUTION: Do not use your motherboard manufacturer for your CPU cooler to pry or... do before installing the motherboard. Note: Place the panel thumbscrews aside carefully and remember where they are steps you . If the panel provided with the chassis isn't suitable, please contact your fingernails to find out if there are .

Manual
Page 10
... the standoffs with six preinstalled motherboard standoffs. Install standoffs as needed and put the motherboard in. Use the provided motherboard mounting screws to secure your chassis exterior if left connected. 3. Align the motherboard with the standoff holes. Screw your motherboard into the standoffs. 10 The...
... the standoffs with six preinstalled motherboard standoffs. Install standoffs as needed and put the motherboard in. Use the provided motherboard mounting screws to secure your chassis exterior if left connected. 3. Align the motherboard with the standoff holes. Screw your motherboard into the standoffs. 10 The...

Manual
Page 11
... fan power hub directly above the fan. 2. For any other hand. To acquire this, please contact Antec customer support (information listed at end of the radiator. 1. Remove the screws on the back of the chassis while supporting the fan with the end of the tubes positioned at 11 Unscrew the rear fan...
... fan power hub directly above the fan. 2. For any other hand. To acquire this, please contact Antec customer support (information listed at end of the radiator. 1. Remove the screws on the back of the chassis while supporting the fan with the end of the tubes positioned at 11 Unscrew the rear fan...
Manual
Page 13
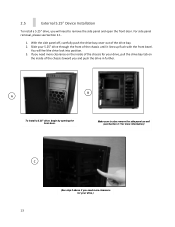
... drive.) 13 You will need to also remove the side panel as well (see Section 2.1. 1. If you need more clearance on the inside of the chassis toward you and push the drive in further. B A To install a 5.25" drive, begin by opening the front door. Make sure to remove the side ... for your 5.25" drive through the front of the drive bay. 2. With the side panel off, carefully push the drive bay cover out of the chassis until it lines up flush with the front bezel. 2.5 External 5.25" Device Installation To install a 5.25" drive, you will feel the drive lock into position...
... drive.) 13 You will need to also remove the side panel as well (see Section 2.1. 1. If you need more clearance on the inside of the chassis toward you and push the drive in further. B A To install a 5.25" drive, begin by opening the front door. Make sure to remove the side ... for your 5.25" drive through the front of the drive bay. 2. With the side panel off, carefully push the drive bay cover out of the chassis until it lines up flush with the front bezel. 2.5 External 5.25" Device Installation To install a 5.25" drive, you will feel the drive lock into position...
Manual
Page 19
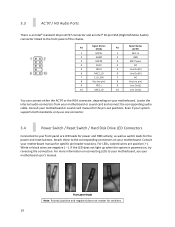
... one connector. 3.4 Power Switch / Reset Switch / Hard Disk Drive LED Connectors Connected to the corresponding connectors on connecting LEDs to the front panel of the chassis. Attach these to your motherboard. If the LED does not light up when the system is an Intel® standard 10-pin AC'97 connector...
... one connector. 3.4 Power Switch / Reset Switch / Hard Disk Drive LED Connectors Connected to the corresponding connectors on connecting LEDs to the front panel of the chassis. Attach these to your motherboard. If the LED does not light up when the system is an Intel® standard 10-pin AC'97 connector...

Manual
Page 24
The P100 features a removable PSU filter that can also lock the filter by pushing down on the tabs at ...checking the air filter at least once a month initially. One filter is the front filter and the other is completely inside the chassis). Note: From time to check/wash more often than those who don't use their systems every day) and on the tab ... will change depending on system usage (users whose systems run 24/7 will likely have to time it will result in the P100 that can access the front filter by pulling on the tab (circled above ) at the top of the front filter. You...
The P100 features a removable PSU filter that can also lock the filter by pushing down on the tabs at ...checking the air filter at least once a month initially. One filter is the front filter and the other is completely inside the chassis). Note: From time to check/wash more often than those who don't use their systems every day) and on the tab ... will change depending on system usage (users whose systems run 24/7 will likely have to time it will result in the P100 that can access the front filter by pulling on the tab (circled above ) at the top of the front filter. You...
Product Flyer
Page 1
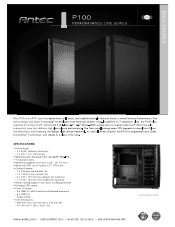
...19" (H) x 8.7" (W) x 20.6" (D) • I 11 _4- 0-761345-81100-2 www.antec.com 1-800-22ANTEC (US) / +49 40 226 139 22 (EU) / + 866-(0)800-060-696 (AP) RoHS svo" As with all Antec chassis' the P100 is engineered with internal motherboard connector - 2 x USB 2.0 - The front panel swings open 270 degrees... to 7 expansion slots, the P100 also supports 2 tool-less 5.25" drives and 7 tool-less 3.5"/ 2.5" drives...
...19" (H) x 8.7" (W) x 20.6" (D) • I 11 _4- 0-761345-81100-2 www.antec.com 1-800-22ANTEC (US) / +49 40 226 139 22 (EU) / + 866-(0)800-060-696 (AP) RoHS svo" As with all Antec chassis' the P100 is engineered with internal motherboard connector - 2 x USB 2.0 - The front panel swings open 270 degrees... to 7 expansion slots, the P100 also supports 2 tool-less 5.25" drives and 7 tool-less 3.5"/ 2.5" drives...