
Manual
Page 1
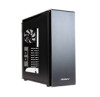
... one slim optical drive bay, three antivibration 3.5"/2.5" removable drive cages (eight 3.5"/2.5" HDD bays). Audio In/Out • Unit Dimensions - 555mm(H) x 223.6mm(W) x 557mm(D) - 21.85"(H) x 8.80"(W) x 21.92"(D) 0-761345-83800-9 www.antec.com 1-800-22ANTEC (US) / +31-(0)10-4622060 (EU) / + 866-(0)800-060-696 (AP) Like all models in /out jacks. ENCLOSURES P380 PERFORMANCE ONE...
... one slim optical drive bay, three antivibration 3.5"/2.5" removable drive cages (eight 3.5"/2.5" HDD bays). Audio In/Out • Unit Dimensions - 555mm(H) x 223.6mm(W) x 557mm(D) - 21.85"(H) x 8.80"(W) x 21.92"(D) 0-761345-83800-9 www.antec.com 1-800-22ANTEC (US) / +31-(0)10-4622060 (EU) / + 866-(0)800-060-696 (AP) Like all models in /out jacks. ENCLOSURES P380 PERFORMANCE ONE...

User Manual
Page 2
..., the P380 is equipped with your computer components and has a long enough power harness to ensure the highest quality. At Antec, we continually refine and improve our products to reach your motherboard and peripheral devices. As such, your purchase of Antec's award-winning Performance One enclosure series. The case boasts one slim optical drive bay...
..., the P380 is equipped with your computer components and has a long enough power harness to ensure the highest quality. At Antec, we continually refine and improve our products to reach your motherboard and peripheral devices. As such, your purchase of Antec's award-winning Performance One enclosure series. The case boasts one slim optical drive bay...

User Manual
Page 3
... You Begin 7 Section 2: Hardware Installation 2.1 Setting Up...9 2.2 Motherboard Installation 10 2.3 Installing KUHLER H2O Liquid Coolers 11 2.4 Power Supply Installation 12 2.5 Internal 3.5" / 2.5" Device Installation 13 2.6 Slim Optical Drive Tray Installation 17 2.7 Cable Management 18 Section 3: Front I/O Ports 3.1 USB 2.0 ...20 3.2 USB 3.0 ...20 3.3 AC'97 / HD Audio Ports 21 3.4 Power Switch / Reset Switch / Hard Disk...
... You Begin 7 Section 2: Hardware Installation 2.1 Setting Up...9 2.2 Motherboard Installation 10 2.3 Installing KUHLER H2O Liquid Coolers 11 2.4 Power Supply Installation 12 2.5 Internal 3.5" / 2.5" Device Installation 13 2.6 Slim Optical Drive Tray Installation 17 2.7 Cable Management 18 Section 3: Front I/O Ports 3.1 USB 2.0 ...20 3.2 USB 3.0 ...20 3.3 AC'97 / HD Audio Ports 21 3.4 Power Switch / Reset Switch / Hard Disk...
User Manual
Page 5
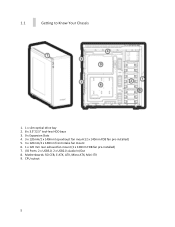
CPU cutout 5 Motherboards: SSI CEB, E-ATX, ATX, Micro ATX, Mini-ITX 9. Audio In/Out 8. I/O Ports: 2 x USB3.0; 2 x USB2.0; 1.1 Getting to Know Your Chassis 1. 1 x slim optical drive bay 2. 8 x 3.5"/2.5" tool-less HDD bays 3. 9 x Expansion Slots 4. 3 x 120mm/2 x 140mm top exhaust fan mount (2 x 140mm FDB fan pre-installed) 5. 3 x 120mm/2 x 140mm front intake fan mount 6. 1 x 120 mm rear exhaust fan mount (1 x 120mm FDB fan pre-installed) 7.
CPU cutout 5 Motherboards: SSI CEB, E-ATX, ATX, Micro ATX, Mini-ITX 9. Audio In/Out 8. I/O Ports: 2 x USB3.0; 2 x USB2.0; 1.1 Getting to Know Your Chassis 1. 1 x slim optical drive bay 2. 8 x 3.5"/2.5" tool-less HDD bays 3. 9 x Expansion Slots 4. 3 x 120mm/2 x 140mm top exhaust fan mount (2 x 140mm FDB fan pre-installed) 5. 3 x 120mm/2 x 140mm front intake fan mount 6. 1 x 120 mm rear exhaust fan mount (1 x 120mm FDB fan pre-installed) 7.

User Manual
Page 6
1.2 Chassis Specifications Chassis Type Chassis Color Dimensions Weight Cooling Drive Bays Expansion Slots Motherboard Size Front I/O Panel Full Tower Black 21.85" (H) x 8.80" (W) x 21.92" (D) 555 mm (H) x 223.6 mm (W) x 557 mm (D) 27 lbs / 12.25 ... fan mount(2 x 140mm FDB fan pre-installed) - 3 x 120mm/2 x 140mm front intake fan mount - 1 x 120 mm rear exhaust fan mount(1 x 120mm FDB fan pre-installed) - 1 x Slim optical drive bay - 8 x 3.5"/2.5" tool-less HDD bays 9: supports up to 3-way NVIDIA® SLI® / AMD CrossFireX™ SSI CEB, E-ATX, ATX, Micro ATX, Mini-ITX - 2 x USB...
1.2 Chassis Specifications Chassis Type Chassis Color Dimensions Weight Cooling Drive Bays Expansion Slots Motherboard Size Front I/O Panel Full Tower Black 21.85" (H) x 8.80" (W) x 21.92" (D) 555 mm (H) x 223.6 mm (W) x 557 mm (D) 27 lbs / 12.25 ... fan mount(2 x 140mm FDB fan pre-installed) - 3 x 120mm/2 x 140mm front intake fan mount - 1 x 120 mm rear exhaust fan mount(1 x 120mm FDB fan pre-installed) - 1 x Slim optical drive bay - 8 x 3.5"/2.5" tool-less HDD bays 9: supports up to 3-way NVIDIA® SLI® / AMD CrossFireX™ SSI CEB, E-ATX, ATX, Micro ATX, Mini-ITX - 2 x USB...
User Manual
Page 17
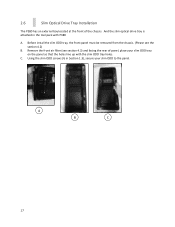
A B C 17 And the slim optical drive tray is attached in Section 1.3), secure your slim ODD tray on the panel so that the holes line up with P380 A. Remove the front air filter (see the section 4.2) B. Before install the slim ODD tray, the front panel must be removed from the chassis. (Please see section 4.3) and facing the rear of the chassis. 2.6 Slim Optical Drive Tray Installation The P380 has an external bay located at the front of panel, place your slim ODD to the panel. Using the slim ODD screws (G in the tool pack with the slim ODD tray holes. C.
A B C 17 And the slim optical drive tray is attached in Section 1.3), secure your slim ODD tray on the panel so that the holes line up with P380 A. Remove the front air filter (see the section 4.2) B. Before install the slim ODD tray, the front panel must be removed from the chassis. (Please see section 4.3) and facing the rear of the chassis. 2.6 Slim Optical Drive Tray Installation The P380 has an external bay located at the front of panel, place your slim ODD to the panel. Using the slim ODD screws (G in the tool pack with the slim ODD tray holes. C.