
Manual
Page 1
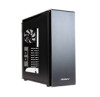
... one slim optical drive bay, three antivibration 3.5"/2.5" removable drive cages (eight 3.5"/2.5" HDD bays). SPECIFICATIONS: • Case Type: Full-Tower • 8 Drive bays: - 1 x Slim optical drive bay - 8 x 3.5"/2.5" tool-less HDD bays • Motherboards: SSI CEB, E-ATX, ... 223.6mm(W) x 557mm(D) - 21.85"(H) x 8.80"(W) x 21.92"(D) 0-761345-83800-9 www.antec.com 1-800-22ANTEC (US) / +31-(0)10-4622060 (EU) / + 866-(0)800-060-696 (AP) ENCLOSURES P380 PERFORMANCE ONE SERIES The P380 is almost inaudible even when the fans are spinning at front - 1 x 360mm radiator /1 x 240mm radiator...
... one slim optical drive bay, three antivibration 3.5"/2.5" removable drive cages (eight 3.5"/2.5" HDD bays). SPECIFICATIONS: • Case Type: Full-Tower • 8 Drive bays: - 1 x Slim optical drive bay - 8 x 3.5"/2.5" tool-less HDD bays • Motherboards: SSI CEB, E-ATX, ... 223.6mm(W) x 557mm(D) - 21.85"(H) x 8.80"(W) x 21.92"(D) 0-761345-83800-9 www.antec.com 1-800-22ANTEC (US) / +31-(0)10-4622060 (EU) / + 866-(0)800-060-696 (AP) ENCLOSURES P380 PERFORMANCE ONE SERIES The P380 is almost inaudible even when the fans are spinning at front - 1 x 360mm radiator /1 x 240mm radiator...

User Manual
Page 2
... spinning at a high speed. For more comprehensive instructions on your purchase of the Antec P380! The P380 does not include a power supply. At Antec, we continually refine and improve our products to ensure the highest quality. Disclaimer This...Antec's award-winning Performance One enclosure series. Like all features, descriptions, and illustrations in this manual due to improvements applied for the optimal building experience. The case boasts one slim optical drive bay, three anti-vibration 3.5"/2.5" removable drive cages (eight 3.5"/2.5" HDD bays). With roomy interior, the P380...
... spinning at a high speed. For more comprehensive instructions on your purchase of the Antec P380! The P380 does not include a power supply. At Antec, we continually refine and improve our products to ensure the highest quality. Disclaimer This...Antec's award-winning Performance One enclosure series. Like all features, descriptions, and illustrations in this manual due to improvements applied for the optimal building experience. The case boasts one slim optical drive bay, three anti-vibration 3.5"/2.5" removable drive cages (eight 3.5"/2.5" HDD bays). With roomy interior, the P380...
User Manual
Page 9
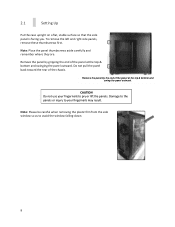
.... Note: Please be careful when removing the plastic film from the side window so as to pry or lift the panels. 2.1 Setting Up Put the case upright on a flat, stable surface so that the side panel is facing you. CAUTION Do not use your fingernails may result.
.... Note: Please be careful when removing the plastic film from the side window so as to pry or lift the panels. 2.1 Setting Up Put the case upright on a flat, stable surface so that the side panel is facing you. CAUTION Do not use your fingernails may result.
User Manual
Page 12
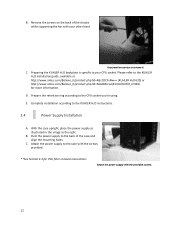
C. B. E. With the case upright, place the power supply as illustrated in the image to the back of the chassis while ...KUHLER H2O backplate is specific to the KUHLER H2O installation guide, available at http://www.antec.com/Believe_it/product.php?id=Mjc2OCYxNw== (KUHLER H2O 620) or http://www.antec.com/Believe_it/product.php?id=NzA0MzcwJjE3 (KUHLER H2O 920) for PSU filter removal instructions Attach...according to the KUHLER H2O instructions. 2.4 Power Supply Installation A. Remove the screws on the back of the case and align the mounting holes. B. Unscrew the rear fan to the...
C. B. E. With the case upright, place the power supply as illustrated in the image to the back of the chassis while ...KUHLER H2O backplate is specific to the KUHLER H2O installation guide, available at http://www.antec.com/Believe_it/product.php?id=Mjc2OCYxNw== (KUHLER H2O 620) or http://www.antec.com/Believe_it/product.php?id=NzA0MzcwJjE3 (KUHLER H2O 920) for PSU filter removal instructions Attach...according to the KUHLER H2O instructions. 2.4 Power Supply Installation A. Remove the screws on the back of the case and align the mounting holes. B. Unscrew the rear fan to the...

User Manual
Page 15
The following illustration shows how to take it out from the case, just loosen the screws around it. (as a set, therefore they should be loosen together at the same time. Once you are going to remove Top, ... cage A. Loosen 4 screws at the inside of chassis (yellow circle), left side of bracket can be lifted straight out. To remove the Hard disk cages P380 has three HDD cages. Three of HDD cage is complete dismantling. Remove the front panel first. (How to remove the front panel, please see the...
The following illustration shows how to take it out from the case, just loosen the screws around it. (as a set, therefore they should be loosen together at the same time. Once you are going to remove Top, ... cage A. Loosen 4 screws at the inside of chassis (yellow circle), left side of bracket can be lifted straight out. To remove the Hard disk cages P380 has three HDD cages. Three of HDD cage is complete dismantling. Remove the front panel first. (How to remove the front panel, please see the...
User Manual
Page 18
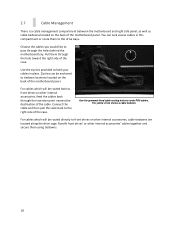
... destination of the cable. Zip ties can tuck excess cables in place. Use the grommet-lined cable routing holes to the right side of the case. Use the zip ties provided to hold your cables in this compartment or route them to tiedown locations located on the back of the motherboard... tiedowns are located along the drive cage. For cables which will be routed directly to pass through the hole toward the right side of the case.
... destination of the cable. Zip ties can tuck excess cables in place. Use the grommet-lined cable routing holes to the right side of the case. Use the zip ties provided to hold your cables in this compartment or route them to tiedown locations located on the back of the motherboard... tiedowns are located along the drive cage. For cables which will be routed directly to pass through the hole toward the right side of the case.
User Manual
Page 21
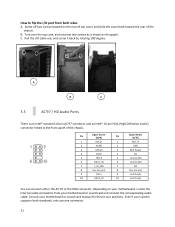
... out, and screw it shows on the graph. Even if your motherboard or sound card and connect the corresponding audio cable. Turn over the top case, and unscrew two screws as it back by rotating 180 degree. Consult your motherboard. Pin Signal Names (HDA) 1 MIC2L 2 AGND 3 MIC2R 4 AVCC 5 FRO-R 6 MIC2_JD 7 F_IO_SEN...
... out, and screw it shows on the graph. Even if your motherboard or sound card and connect the corresponding audio cable. Turn over the top case, and unscrew two screws as it back by rotating 180 degree. Consult your motherboard. Pin Signal Names (HDA) 1 MIC2L 2 AGND 3 MIC2R 4 AVCC 5 FRO-R 6 MIC2_JD 7 F_IO_SEN...
User Manual
Page 26
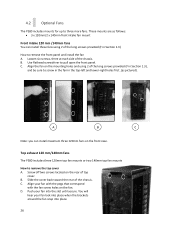
...fan. You will hear your fan lock into place when the brackets around the fan snap into the slot until secure. B. C. 4.2 Optional Fans The P380 includes mounts for up to remove the front panel and install the fan A. How to three more fans. B. D. Screw off two screws located on ...the front case. These mounts are as pictured). Slide the cover back toward the rear of the chassis. A B C Note: you can install these fans using 2 of...
...fan. You will hear your fan lock into place when the brackets around the fan snap into the slot until secure. B. C. 4.2 Optional Fans The P380 includes mounts for up to remove the front panel and install the fan A. How to three more fans. B. D. Screw off two screws located on ...the front case. These mounts are as pictured). Slide the cover back toward the rear of the chassis. A B C Note: you can install these fans using 2 of...
