Manual
Page 2
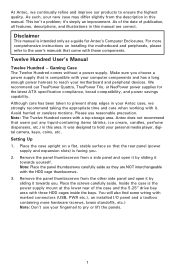
... a guide for the latest ATX specification compliance, broad compatibility, and power savings capability. Inside the case is intended only as they are correct. This isn't a problem; As such, your Antec case, we continually refine and improve our products to pry or lift the panels. 1 Avoid hurried or careless motions. Note: The Twelve Hundred comes with a top storage area. Setting Up 1. Twelve Hundred User's Manual Twelve Hundred...
... a guide for the latest ATX specification compliance, broad compatibility, and power savings capability. Inside the case is intended only as they are correct. This isn't a problem; As such, your Antec case, we continually refine and improve our products to pry or lift the panels. 1 Avoid hurried or careless motions. Note: The Twelve Hundred comes with a top storage area. Setting Up 1. Twelve Hundred User's Manual Twelve Hundred...
Manual
Page 3
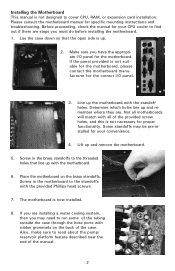
If the panel provided is not necessary for the correct I /O panel for specific mounting instructions and troubleshooting. Screw in the motherboard to read about the pump/ reservoir platform feature described near the end of the provided screw holes, and this is not suitable for the motherboard, please ...tubing outside the case through the hose ports with the standoff holes. Screw in the brass standoffs to run some of the case. Before proceeding, check the manual for your CPU cooler to cover CPU, RAM, or expansion card installation. Determine which holes line up and remove...
If the panel provided is not necessary for the correct I /O panel for specific mounting instructions and troubleshooting. Screw in the motherboard to read about the pump/ reservoir platform feature described near the end of the provided screw holes, and this is not suitable for the motherboard, please ...tubing outside the case through the hose ports with the standoff holes. Screw in the brass standoffs to run some of the case. Before proceeding, check the manual for your CPU cooler to cover CPU, RAM, or expansion card installation. Determine which holes line up and remove...
Manual
Page 4
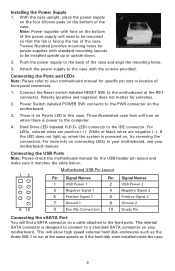
... the back of the power supply will allow high speed external hard disk enclosures such as if the hard disk were installed inside the case. 3 Installing the Power Supply 1. With the case upright, place the power supply on the four silicone pads on , try reversing the connection. Twelve Hundred provides mounting holes for switches. 2. LED) connects to be mounted so that the fan is no Power LED in this case. For...
... the back of the power supply will allow high speed external hard disk enclosures such as if the hard disk were installed inside the case. 3 Installing the Power Supply 1. With the case upright, place the power supply on the four silicone pads on , try reversing the connection. Twelve Hundred provides mounting holes for switches. 2. LED) connects to be mounted so that the fan is no Power LED in this case. For...
Manual
Page 5
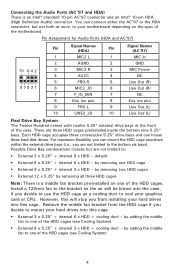
... hard drives into the case, if you are three HDD cages preinstalled inside the bottom nine 5.25" bays. Remove the middle fan bracket from installing your motherboard depending on one of the HDD cages. by removing one of the HDD cages (see Cooling System) 4 Connecting the Audio Ports (AC'97 and HDA) There is a middle fan bracket pre-installed on the spec...
... hard drives into the case, if you are three HDD cages preinstalled inside the bottom nine 5.25" bays. Remove the middle fan bracket from installing your motherboard depending on one of the HDD cages. by removing one of the HDD cages (see Cooling System) 4 Connecting the Audio Ports (AC'97 and HDA) There is a middle fan bracket pre-installed on the spec...
Manual
Page 6
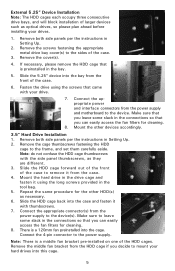
... connector(s) from the power supply and motherboard to mount your drive. 7. Remove the middle fan bracket from the front of the case. 6. Remove both side panels per the instructions in the connections so that is a 120mm fan preinstalled into the bay from the HDD cage if you can easily access the fan filters for the other devices accordingly. 3.5" Hard Drive Installation 1. Note: There...
... connector(s) from the power supply and motherboard to mount your drive. 7. Remove the middle fan bracket from the front of the case. 6. Remove both side panels per the instructions in the connections so that is a 120mm fan preinstalled into the bay from the HDD cage if you can easily access the fan filters for the other devices accordingly. 3.5" Hard Drive Installation 1. Note: There...
Manual
Page 7
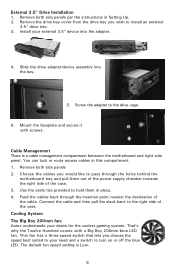
... blue LED fan. The default fan speed setting is a cable management compartment between the motherboard and right side panel. Remove the drive bay cover from the drive bay you choose the speed best suited to your desire for the coolest gaming system. Choose the cables you would like to turn on or off the blue LED. That's why the Twelve Hundred comes...
... blue LED fan. The default fan speed setting is a cable management compartment between the motherboard and right side panel. Remove the drive bay cover from the drive bay you choose the speed best suited to your desire for the coolest gaming system. Choose the cables you would like to turn on or off the blue LED. That's why the Twelve Hundred comes...
Manual
Page 8
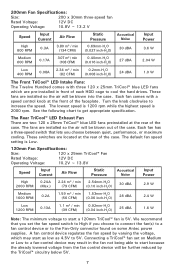
... LED fans which may result in front of the case. A fan control device regulates the fan speed by the TriCool™ circuitry below 5V. 7 Each fan has a three-speed switch that you set on some Antec power supplies. The default fan speed setting is 2000 rpm. The Rear TriCool™ LED Exhaust Fan There are pre-installed in the fan not being able to cool the hard drives. 200mm Fan Specifications...
... LED fans which may result in front of the case. A fan control device regulates the fan speed by the TriCool™ circuitry below 5V. 7 Each fan has a three-speed switch that you set on some Antec power supplies. The default fan speed setting is 2000 rpm. The Rear TriCool™ LED Exhaust Fan There are pre-installed in the fan not being able to cool the hard drives. 200mm Fan Specifications...
Manual
Page 9
... fan (at the rear end of an empty HDD cage. 6. Connect the fan to the mount. We recommend using a TriCool™ fan) through the cable guide that you do NOT install hard drives in order to the 5.25" drive bays and set them aside. 2. Do not overtighten. 4. The Middle Fan - Note: There should be no need to disconnect the power or data connections from the HDD or the fan...
... fan (at the rear end of an empty HDD cage. 6. Connect the fan to the mount. We recommend using a TriCool™ fan) through the cable guide that you do NOT install hard drives in order to the 5.25" drive bays and set them aside. 2. Do not overtighten. 4. The Middle Fan - Note: There should be no need to disconnect the power or data connections from the HDD or the fan...
Manual
Page 10
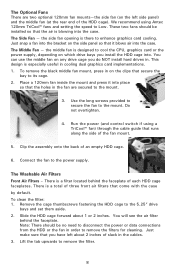
...water cooling kit such as a pump or reservoir. Users who don't use it . Water Cooling Platform This case comes with your water cooling kit. 9 This plate is a filter located in the 3rd 5.25" drive bay. The plate can be mounted in high system temperatures and possible stability problems. We recommend... inside of the side panel, so you to time it out of the twelve 5.25" drive bays for maximum flexibility. The frequency will have to wash the installed air filters. Remove the filter by sliding it will be compatible with a 5.25" metal plate pre-installed in the side fan bracket.
...water cooling kit such as a pump or reservoir. Users who don't use it . Water Cooling Platform This case comes with your water cooling kit. 9 This plate is a filter located in the 3rd 5.25" drive bay. The plate can be mounted in high system temperatures and possible stability problems. We recommend... inside of the side panel, so you to time it out of the twelve 5.25" drive bays for maximum flexibility. The frequency will have to wash the installed air filters. Remove the filter by sliding it will be compatible with a 5.25" metal plate pre-installed in the side fan bracket.
Manual
Page 11
Antec, Inc. 47900 Fremont Blvd. Stuttgartstraat 12 3047 AS Rotterdam The Netherlands tel: +31 (0) 10 462-2060 fax: +31 (0) 10 437-1752 Customer Support: US & Canada 1-800-22ANTEC customersupport@antec.com Europe +31 (0) 10 462-2060 europe.techsupport@antec.com www.antec.com © Copyright 2008 Antec, Inc. All trademarks are the property of their respective owners. All rights reserved. Fremont, CA 94538 USA tel: 510-770-1200 fax: 510-770-1288 Antec Europe B.V. Printed in part without written permission is prohibited. Reproduction in whole or in China.
Antec, Inc. 47900 Fremont Blvd. Stuttgartstraat 12 3047 AS Rotterdam The Netherlands tel: +31 (0) 10 462-2060 fax: +31 (0) 10 437-1752 Customer Support: US & Canada 1-800-22ANTEC customersupport@antec.com Europe +31 (0) 10 462-2060 europe.techsupport@antec.com www.antec.com © Copyright 2008 Antec, Inc. All trademarks are the property of their respective owners. All rights reserved. Fremont, CA 94538 USA tel: 510-770-1200 fax: 510-770-1288 Antec Europe B.V. Printed in part without written permission is prohibited. Reproduction in whole or in China.
Product Flyer
Page 1
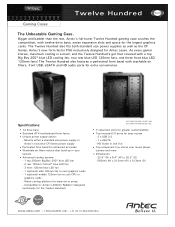
Specifications: • 12 drive bays • Standard ATX motherboard form factor • Unique power supply option: - Compatible w/ Antec's 200mm Radiator (designed exclusively for the Twelve Hundred) UCC13# 0761345-15120-7 NA UCC13# 0761345-08120-7 EC • 7 expansion slots for greater customizability • Top mounted I/O ports for reservoir or pump - The Twelve Hundred also features a perforated front bezel with twelve drive bays, seven expansion slots and...
Specifications: • 12 drive bays • Standard ATX motherboard form factor • Unique power supply option: - Compatible w/ Antec's 200mm Radiator (designed exclusively for the Twelve Hundred) UCC13# 0761345-15120-7 NA UCC13# 0761345-08120-7 EC • 7 expansion slots for greater customizability • Top mounted I/O ports for reservoir or pump - The Twelve Hundred also features a perforated front bezel with twelve drive bays, seven expansion slots and...

