User Manual
Page 3
...-inch or 23-inch Apple Cinema Display, you need : • Mac OS X v10.2.8 or later and one of Mac OS X. Be sure to read all the installation instructions and safety information in this guide before you can set up quickly and start using it up and use your new display. Use Software Update often to www.apple.com/displays for more information about the specific Macintosh computers and graphics cards that are compatible with a DVI port...
...-inch or 23-inch Apple Cinema Display, you need : • Mac OS X v10.2.8 or later and one of Mac OS X. Be sure to read all the installation instructions and safety information in this guide before you can set up quickly and start using it up and use your new display. Use Software Update often to www.apple.com/displays for more information about the specific Macintosh computers and graphics cards that are compatible with a DVI port...
User Manual
Page 4
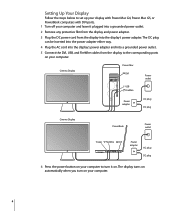
... plug DC plug Cinema Display PowerBook Power outlet USB FireWire DVI Power adapter AC plug DC plug 6 Press the power button on . The DC plug can be inserted into the power adapter either way. 4 Plug the AC cord into the display's power adapter and into a grounded power outlet. 5 Connect the DVI, USB, and FireWire cables from the display into the display's power adapter. Setting Up Your Display Follow the steps below to set up your display with Power Mac G4, Power Mac G5, or PowerBook computers with DVI ports. 1 Turn...
... plug DC plug Cinema Display PowerBook Power outlet USB FireWire DVI Power adapter AC plug DC plug 6 Press the power button on . The DC plug can be inserted into the power adapter either way. 4 Plug the AC cord into the display's power adapter and into a grounded power outlet. 5 Connect the DVI, USB, and FireWire cables from the display into the display's power adapter. Setting Up Your Display Follow the steps below to set up your display with Power Mac G4, Power Mac G5, or PowerBook computers with DVI ports. 1 Turn...
User Manual
Page 5
... stand and the top of the display to turn your display on or off, puts the computer to get your display up (+) or down Power USB ports LED FireWire Security slot ports Use System Preferences to adjust the resolution, brightness, and color on your display. 1 Choose Apple (K) > System Preferences, and click Displays. 2 Click Options in Displays preferences to: • Control whether the display power button turns the display on and off and to an alternate mounting...
... stand and the top of the display to turn your display on or off, puts the computer to get your display up (+) or down Power USB ports LED FireWire Security slot ports Use System Preferences to adjust the resolution, brightness, and color on your display. 1 Choose Apple (K) > System Preferences, and click Displays. 2 Click Options in Displays preferences to: • Control whether the display power button turns the display on and off and to an alternate mounting...
User Manual
Page 6
.... Simply follow the instructions included with a cleaner containing alcohol or acetone. Adapters and cords for using the power adapter: • Make sure you spill something on your display, do the following: • Turn your display is not grounded, contact a licensed electrician to many different VESA-compatible mounting solutions. Warning: Don't clean the screen with the kit. Use a cleaner intended for attachment to replace the outlet with your...
.... Simply follow the instructions included with a cleaner containing alcohol or acetone. Adapters and cords for using the power adapter: • Make sure you spill something on your display, do the following: • Turn your display is not grounded, contact a licensed electrician to many different VESA-compatible mounting solutions. Warning: Don't clean the screen with the kit. Use a cleaner intended for attachment to replace the outlet with your...
User Manual
Page 7
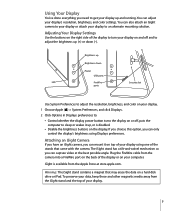
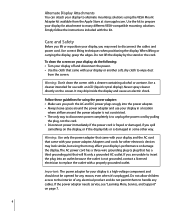
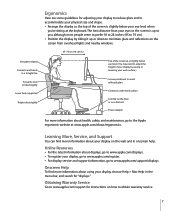
... to www.apple.com/support/displays. Ergonomics Here are some guidelines for adjusting your display to reduce glare and to accommodate your physical size and shape. • Arrange the display so the top of your display by raising or lowering your work surface.) Screen positioned to avoid reflected glare Clearance under work surface Feet flat on the floor or on a footrest Power adapter For more...
... to www.apple.com/support/displays. Ergonomics Here are some guidelines for adjusting your display to reduce glare and to accommodate your physical size and shape. • Arrange the display so the top of your display by raising or lowering your work surface.) Screen positioned to avoid reflected glare Clearance under work surface Feet flat on the floor or on a footrest Power adapter For more...

User Manual
Page 8
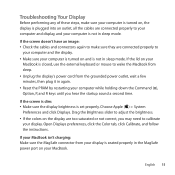
... or Service Provider. Use the brightness buttons on the side of the display or choose Apple (K) > System Preferences, and click Displays. • If a portion of the screen remains dim after the display has warmed up and the white LED on the front of the display is turned on, all the cables are set properly. Troubleshooting Your Display Before taking any of these cables are firmly plugged in sleep mode. The ports on...
... or Service Provider. Use the brightness buttons on the side of the display or choose Apple (K) > System Preferences, and click Displays. • If a portion of the screen remains dim after the display has warmed up and the white LED on the front of the display is turned on, all the cables are set properly. Troubleshooting Your Display Before taking any of these cables are firmly plugged in sleep mode. The ports on...
User Manual
Page 9
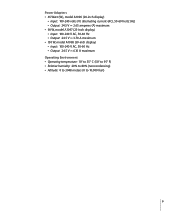
Power Adapters • 65 Watt (W), model A1096 (20-inch display) • Input: 100-240 volts (V) alternating current (AC), 50-60 hertz (Hz) • Output: 24.5 V ¯ 2.65 amperes (A) maximum • 90 W, model A1097 (23-inch display) • Input: 100-240 V AC, 50-60 Hz • Output: 24.5 V ¯ 3.70 A maximum • 150 W, model A1098 (30-inch display) • Input: 100-240 V AC, 50-60 Hz...
Power Adapters • 65 Watt (W), model A1096 (20-inch display) • Input: 100-240 volts (V) alternating current (AC), 50-60 hertz (Hz) • Output: 24.5 V ¯ 2.65 amperes (A) maximum • 90 W, model A1097 (23-inch display) • Input: 100-240 V AC, 50-60 Hz • Output: 24.5 V ¯ 3.70 A maximum • 150 W, model A1098 (30-inch display) • Input: 100-240 V AC, 50-60 Hz...
User Manual
Page 27
This equipment generates, uses, and can radiate radio frequency energy and, if not installed and used in a particular installation. If necessary, consult an Apple Authorized Service Provider or Apple. Important: Changes or modifications to this product using the Mac OS X operating system meet the standards for ergonomics, energy efficiency, emissions, and ecology of causing interference to radios, television sets, and other uses where the...
This equipment generates, uses, and can radiate radio frequency energy and, if not installed and used in a particular installation. If necessary, consult an Apple Authorized Service Provider or Apple. Important: Changes or modifications to this product using the Mac OS X operating system meet the standards for ergonomics, energy efficiency, emissions, and ecology of causing interference to radios, television sets, and other uses where the...
User Guide
Page 5
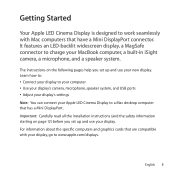
For information about the specific computers and graphics cards that are compatible with your MacBook computer, a built-in iSight camera, a microphone, and a speaker system. English 5 Getting Started Your Apple LED Cinema Display is designed to www.apple.com/displays. Important: Carefully read all the installation instructions (and the safety information starting on the following pages help you set up and use your display. The instructions on page 12) before you...
For information about the specific computers and graphics cards that are compatible with your MacBook computer, a built-in iSight camera, a microphone, and a speaker system. English 5 Getting Started Your Apple LED Cinema Display is designed to www.apple.com/displays. Important: Carefully read all the installation instructions (and the safety information starting on the following pages help you set up and use your display. The instructions on page 12) before you...
User Guide
Page 6
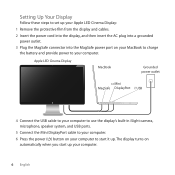
... provide power to set up your computer. 6 English Setting Up Your Display Follow these steps to your computer. Apple LED Cinema Display MacBook Grounded power outlet Mini MagSafe DisplayPort USB 4 Connect the USB cable to your computer to use the display's built-in iSight camera, microphone, speaker system, and USB ports. 5 Connect the Mini DisplayPort cable to your computer. 6 Press the power (®) button on your computer to start up your Apple LED Cinema Display: 1 Remove the...
... provide power to set up your computer. 6 English Setting Up Your Display Follow these steps to your computer. Apple LED Cinema Display MacBook Grounded power outlet Mini MagSafe DisplayPort USB 4 Connect the USB cable to your computer to use the display's built-in iSight camera, microphone, speaker system, and USB ports. 5 Connect the Mini DisplayPort cable to your computer. 6 Press the power (®) button on your computer to start up your Apple LED Cinema Display: 1 Remove the...
User Guide
Page 7
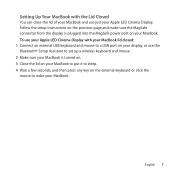
... lid closed: 1 Connect an external USB keyboard and mouse to a USB port on your display, or use just your MacBook. To use your Apple LED Cinema Display with the Lid Closed You can close the lid of your MacBook and use the Bluetooth® Setup Assistant to set up a wireless keyboard and mouse. 2 Make sure your MacBook is plugged into the MagSafe power port on the external...
... lid closed: 1 Connect an external USB keyboard and mouse to a USB port on your display, or use just your MacBook. To use your Apple LED Cinema Display with the Lid Closed You can close the lid of your MacBook and use the Bluetooth® Setup Assistant to set up a wireless keyboard and mouse. 2 Make sure your MacBook is plugged into the MagSafe power port on the external...
User Guide
Page 8
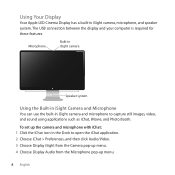
... icon in iSight camera and microphone to open the iChat application. 2 Choose iChat > Preferences, and then click Audio/Video. 3 Choose Display iSight from the Camera pop-up menu. 4 Choose Display Audio from the Microphone pop-up menu. 8 English Using Your Display Your Apple LED Cinema Display has a built-in iSight camera, microphone, and speaker system. The USB connection between the display and your computer is required for these...
... icon in iSight camera and microphone to open the iChat application. 2 Choose iChat > Preferences, and then click Audio/Video. 3 Choose Display iSight from the Camera pop-up menu. 4 Choose Display Audio from the Microphone pop-up menu. 8 English Using Your Display Your Apple LED Cinema Display has a built-in iSight camera, microphone, and speaker system. The USB connection between the display and your computer is required for these...
User Guide
Page 9
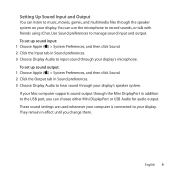
... change them. You can choose either Mini DisplayPort or USB Audio for audio output. They remain in Sound preferences. 3 Choose Display Audio to record sounds, or talk with friends using iChat. English 9 To set up sound input: 1 Choose Apple () > System Preferences, and then click Sound. 2 Click the Input tab in effect until you can use the microphone to input sound through your display. If your Mac computer supports sound output through the speaker...
... change them. You can choose either Mini DisplayPort or USB Audio for audio output. They remain in Sound preferences. 3 Choose Display Audio to record sounds, or talk with friends using iChat. English 9 To set up sound input: 1 Choose Apple () > System Preferences, and then click Sound. 2 Click the Input tab in effect until you can use the microphone to input sound through your display. If your Mac computer supports sound output through the speaker...
User Guide
Page 10
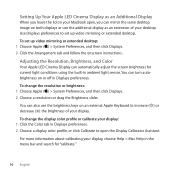
Use Displays preferences to set up video mirroring or extended desktop. Adjusting the Resolution, Brightness, and Color Your Apple LED Cinema Display can turn autobrightness on your MacBook open the Display Calibrator Assistant. You can automatically adjust the screen brightness for "calibrate." 10 English For more information about calibrating your display: 1 Click the Color tab in the menu bar and search for current light conditions using the built-in Displays preferences. To set up video mirroring or extended desktop: 1 Choose...
Use Displays preferences to set up video mirroring or extended desktop. Adjusting the Resolution, Brightness, and Color Your Apple LED Cinema Display can turn autobrightness on your MacBook open the Display Calibrator Assistant. You can automatically adjust the screen brightness for "calibrate." 10 English For more information about calibrating your display: 1 Click the Color tab in the menu bar and search for current light conditions using the built-in Displays preferences. To set up video mirroring or extended desktop: 1 Choose...
User Guide
Page 12
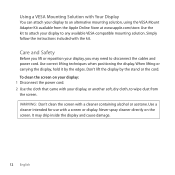
... English To clean the screen on the screen. It may need to any available VESA-compatible mounting solution. Don't lift the display by the edges. Never spray cleaner directly on your display: 1 Disconnect the power cord. 2 Use the cloth that came with a cleaner containing alcohol or acetone. Use a cleaner intended for use with the kit. Use correct lifting techniques when positioning the display. WARNING: Don't clean the screen with your display...
... English To clean the screen on the screen. It may need to any available VESA-compatible mounting solution. Don't lift the display by the edges. Never spray cleaner directly on your display: 1 Disconnect the power cord. 2 Use the cloth that came with a cleaner containing alcohol or acetone. Use a cleaner intended for use with the kit. Use correct lifting techniques when positioning the display. WARNING: Don't clean the screen with your display...
User Guide
Page 14
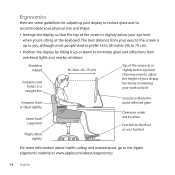
... Lower back supported Thighs tilted slightly Screen positioned to avoid reflected glare Clearance under work surface Feet flat on the floor or on a footrest For more information about health, safety, and maintenance, go to 70 cm). ÂÂ Position the display by raising or lowering your eye level when you're sitting at www.apple.com/about/ergonomics. 14 English
... Lower back supported Thighs tilted slightly Screen positioned to avoid reflected glare Clearance under work surface Feet flat on the floor or on a footrest For more information about health, safety, and maintenance, go to 70 cm). ÂÂ Position the display by raising or lowering your eye level when you're sitting at www.apple.com/about/ergonomics. 14 English
User Guide
Page 15
... an image: ÂÂ Check the cables and connectors again to make sure your computer is turned on, the display is plugged into an outlet, all the cables are connected properly to your computer and display, and your computer is not in sleep mode. If the screen is dim: ÂÂ Make sure the display brightness is set properly. Open Displays preferences, click the Color tab, click Calibrate, and follow the instructions. If...
... an image: ÂÂ Check the cables and connectors again to make sure your computer is turned on, the display is plugged into an outlet, all the cables are connected properly to your computer and display, and your computer is not in sleep mode. If the screen is dim: ÂÂ Make sure the display brightness is set properly. Open Displays preferences, click the Color tab, click Calibrate, and follow the instructions. If...
User Guide
Page 16
To learn about Using your display Display service, support, discussions, troubleshooting, and software downloads The latest information about your display on the Apple website and in iSight camera, microphone, speaker system, or USB ports on the display aren't working: Make sure the USB cable from the display is connected to your display See Mac Help and search for "displays." The Apple Display site at www.apple.com/support/displays. If the built-in Mac Help. More Troubleshooting Information You can find more information...
To learn about Using your display Display service, support, discussions, troubleshooting, and software downloads The latest information about your display on the Apple website and in iSight camera, microphone, speaker system, or USB ports on the display aren't working: Make sure the USB cable from the display is connected to your display See Mac Help and search for "displays." The Apple Display site at www.apple.com/support/displays. If the built-in Mac Help. More Troubleshooting Information You can find more information...

User Guide
Page 60
...Apple Inc. It is important that came with your authority to operate the product. See the service and support information that you use of the FCC Rules. However, there is no guarantee that to which can radiate radio frequency energy and, if not installed and used in accordance with the instructions... the use compliant peripheral devices and shielded cables between the equipment and receiver. • Connect the equipment into an outlet on , the user is connected. • Consult the dealer or an experienced radio/TV technician for a Class B digital device, pursuant to part 15 ...
...Apple Inc. It is important that came with your authority to operate the product. See the service and support information that you use of the FCC Rules. However, there is no guarantee that to which can radiate radio frequency energy and, if not installed and used in accordance with the instructions... the use compliant peripheral devices and shielded cables between the equipment and receiver. • Connect the equipment into an outlet on , the user is connected. • Consult the dealer or an experienced radio/TV technician for a Class B digital device, pursuant to part 15 ...

User Guide
Page 61
... or the brightness adjustment in a room with low ambient lighting. For more information about ENERGY STAR®, visit: www.energystar.gov Apple and the Environment Apple Inc. Europe-EU Declaration of products saves money and helps conserve valuable resources. Improving energy efficiency of Conformity See www.apple.com/euro/compliance. This display is available on your display luminance manually, use in Displays preferences...
... or the brightness adjustment in a room with low ambient lighting. For more information about ENERGY STAR®, visit: www.energystar.gov Apple and the Environment Apple Inc. Europe-EU Declaration of products saves money and helps conserve valuable resources. Improving energy efficiency of Conformity See www.apple.com/euro/compliance. This display is available on your display luminance manually, use in Displays preferences...


