
Owners Manual
Page 2
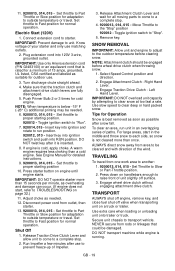
...233;léchargement gratuit sur notre site Web : http://www.ariens.com MANUALS Before operation of your unit. The contents will provide you with the unit. This manual is not available, contact the engine manufacturer for a list of your unit during normal operation and .... TABLE OF CONTENTS SAFETY 4 ASSEMBLY 8 CONTROLS and FEATURES 12 OPERATION 14 MAINTENANCE 20 SERVICE AND ADJUSTMENTS . . . . . 22 STORAGE 31 SERVICE PARTS 32 ACCESSORIES 32 TROUBLESHOOTING 32 SPECIFICATIONS 34 WARRANTY 36 INTRODUCTION NON-ENGLISH MANUALS Manuals in languages other than English may...
...233;léchargement gratuit sur notre site Web : http://www.ariens.com MANUALS Before operation of your unit. The contents will provide you with the unit. This manual is not available, contact the engine manufacturer for a list of your unit during normal operation and .... TABLE OF CONTENTS SAFETY 4 ASSEMBLY 8 CONTROLS and FEATURES 12 OPERATION 14 MAINTENANCE 20 SERVICE AND ADJUSTMENTS . . . . . 22 STORAGE 31 SERVICE PARTS 32 ACCESSORIES 32 TROUBLESHOOTING 32 SPECIFICATIONS 34 WARRANTY 36 INTRODUCTION NON-ENGLISH MANUALS Manuals in languages other than English may...
Owners Manual
Page 3
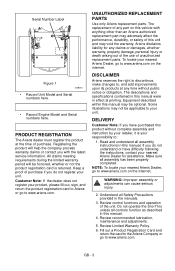
... arising out of the use of purchase if you do not register your unit. Understand all assembly instructions in the manuals. 3. GB - 3 PRODUCT REGISTRATION The Ariens dealer must register the product at any part on the internet. Review recommended lubrication, maintenance and adjustments. 5. All claims meeting requirements during the limited warranty... this manual were in this manual may void the warranty. Serial Number Label Figure 1 OS8010 • Record Unit Model and Serial numbers here. • Record Engine Model and Serial numbers here.
... arising out of the use of purchase if you do not register your unit. Understand all assembly instructions in the manuals. 3. GB - 3 PRODUCT REGISTRATION The Ariens dealer must register the product at any part on the internet. Review recommended lubrication, maintenance and adjustments. 5. All claims meeting requirements during the limited warranty... this manual were in this manual may void the warranty. Serial Number Label Figure 1 OS8010 • Record Unit Model and Serial numbers here. • Record Engine Model and Serial numbers here.

Owners Manual
Page 4
... maintenance practices. It may also be used to stop before operation. SAFETY WARNING: To avoid injury to hands and feet, always disengage clutches, shut off engine, and wait for all movement to alert against unsafe practices. Be alert to clean out the discharge chute. If not avoided, WILL RESULT in minor...
... maintenance practices. It may also be used to stop before operation. SAFETY WARNING: To avoid injury to hands and feet, always disengage clutches, shut off engine, and wait for all movement to alert against unsafe practices. Be alert to clean out the discharge chute. If not avoided, WILL RESULT in minor...

Owners Manual
Page 5
... functional. • Never direct discharge towards persons or property that may be adjusted by an Ariens Company dealer or an authorized engine manufacturer's service center. ALWAYS be injured or damaged by properly trained adult, never children. • Stop engine and remove ignition key prior to stop before beginning assembly or operating. WARNING! 3. OL4690...
... functional. • Never direct discharge towards persons or property that may be adjusted by an Ariens Company dealer or an authorized engine manufacturer's service center. ALWAYS be injured or damaged by properly trained adult, never children. • Stop engine and remove ignition key prior to stop before beginning assembly or operating. WARNING! 3. OL4690...
Owners Manual
Page 6
...NEVER place your hands or any moving parts to any higher than necessary. DO NOT throw snow any wiring system that may be hot from engine exhaust can cut . Always provide good ventilation. Read, understand, and follow all toys, pets, and debris. ALWAYS allow anyone to another....during the use of all instructions in reverse or leaving the operator's position. DO NOT connect electric starter cord to stop unit and engine, remove key and allow children to operate all rotating parts during operation. Keep children and people away. Check for weak spots on...
...NEVER place your hands or any moving parts to any higher than necessary. DO NOT throw snow any wiring system that may be hot from engine exhaust can cut . Always provide good ventilation. Read, understand, and follow all toys, pets, and debris. ALWAYS allow anyone to another....during the use of all instructions in reverse or leaving the operator's position. DO NOT connect electric starter cord to stop unit and engine, remove key and allow children to operate all rotating parts during operation. Keep children and people away. Check for weak spots on...

Owners Manual
Page 7
... nozzle lockopen device. Secure unit chassis to prevent freeze-up onto housing, remove fuel so no spills will not tip over -speed engine. Use only an approved gasoline container with care. ALWAYS keep protective structures, guards, and panels in good repair, in safe operating condition...before leaving unit. Keep all hardware properly tightened. DO NOT park unit on the ground. ALWAYS shut off fuel and allow engine to stop unit and engine. When practical, remove gas-powered equipment from operation. Striking a foreign object can cause fire or explosion. If fuel is used...
... nozzle lockopen device. Secure unit chassis to prevent freeze-up onto housing, remove fuel so no spills will not tip over -speed engine. Use only an approved gasoline container with care. ALWAYS keep protective structures, guards, and panels in good repair, in safe operating condition...before leaving unit. Keep all hardware properly tightened. DO NOT park unit on the ground. ALWAYS shut off fuel and allow engine to stop unit and engine. When practical, remove gas-powered equipment from operation. Striking a foreign object can cause fire or explosion. If fuel is used...

Owners Manual
Page 8
... handlebars into operating position. For extended storage, clean unit thoroughly. Check components frequently. ASSEMBLY WARNING: AVOID INJURY. Loosen the hardware on the shift rod. 3. See Engine Manual for your unit. PACKAGE CONTENTS 4 3 Unfold Handlebar (Figure 4) 1.
... handlebars into operating position. For extended storage, clean unit thoroughly. Check components frequently. ASSEMBLY WARNING: AVOID INJURY. Loosen the hardware on the shift rod. 3. See Engine Manual for your unit. PACKAGE CONTENTS 4 3 Unfold Handlebar (Figure 4) 1.

Owners Manual
Page 11
...idler according to the pressure listed on page 27. GB - 11 Cable Eye Figure 9 OS8066 Check Function of Dual Handle Interlock Without the engine running, press down (engage) both clutches must disengage. Refer to perform the job. • Do not inflate the tires above the recommended... 21). Welding can cause an increase in air pressure resulting in front or over the tire assembly when inflating. Washer 6. Release attachment clutch lever. Fill Engine Fuel Tank See Filling Fuel Tank on page 25. 5. . 2 1 5 6 4 3 1. Adjust belt finger, if necessary. Check Function of ...
...idler according to the pressure listed on page 27. GB - 11 Cable Eye Figure 9 OS8066 Check Function of Dual Handle Interlock Without the engine running, press down (engage) both clutches must disengage. Refer to perform the job. • Do not inflate the tires above the recommended... 21). Welding can cause an increase in air pressure resulting in front or over the tire assembly when inflating. Washer 6. Release attachment clutch lever. Fill Engine Fuel Tank See Filling Fuel Tank on page 25. 5. . 2 1 5 6 4 3 1. Adjust belt finger, if necessary. Check Function of ...

Owners Manual
Page 13
Throttle (Engine Stop) 7. Choke 8. 920012 - Fuel Shut-off Valve 4. Engine Shutoff Switch OS8075 OS8085 OS8077 OS8090 OS8080 OS8095 GB - 13 Ariens 7 10 9 8 1 4 5 920014, 015 - Electric Starter 6. Subaru 6 1 4 5 2 Figure 11 1. Primer Bulb 10. Recoil Starter Handle 5. Gas Tank and Cap 2. Oil Fill and Dipstick 3. Briggs & Strattion 1 7 8 6 3 9 4 4 3 1 2 4 2 5 7 8 9 3 920013 - Ignition Switch 9.
Throttle (Engine Stop) 7. Choke 8. 920012 - Fuel Shut-off Valve 4. Engine Shutoff Switch OS8075 OS8085 OS8077 OS8090 OS8080 OS8095 GB - 13 Ariens 7 10 9 8 1 4 5 920014, 015 - Electric Starter 6. Subaru 6 1 4 5 2 Figure 11 1. Primer Bulb 10. Recoil Starter Handle 5. Gas Tank and Cap 2. Oil Fill and Dipstick 3. Briggs & Strattion 1 7 8 6 3 9 4 4 3 1 2 4 2 5 7 8 9 3 920013 - Ignition Switch 9.

Owners Manual
Page 14
.... Refer to Starting and Shut Off on the handlebars enough to raise the front of the unit slightly off engine, and wait for easier engine start the engine, turn the key to Start. CONTROLS AND FEATURES See Figure 10 and 11 for propelling unit. Traction Drive ... the Attachment Clutch will vary according to attachment. OL2691 IMPORTANT: If the belt squeals when the attachment clutch lever is inserted. 920012 920013 22 11 Ignition Switch (920014, 015) Operate the ignition switch with the removable key. "Stop" - Right Hand Lever 2 Squeeze Attachment Clutch...
.... Refer to Starting and Shut Off on the handlebars enough to raise the front of the unit slightly off engine, and wait for easier engine start the engine, turn the key to Start. CONTROLS AND FEATURES See Figure 10 and 11 for propelling unit. Traction Drive ... the Attachment Clutch will vary according to attachment. OL2691 IMPORTANT: If the belt squeals when the attachment clutch lever is inserted. 920012 920013 22 11 Ignition Switch (920014, 015) Operate the ignition switch with the removable key. "Stop" - Right Hand Lever 2 Squeeze Attachment Clutch...
Owners Manual
Page 15
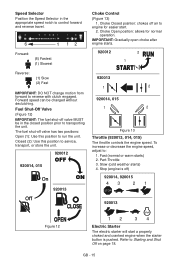
...or warm starts) 2. The fuel shut-off air to run the unit. Choke Open position: allows for easier start a properly choked and cranked engine when the starter button is off valve MUST be changed without declutching. Part-Throttle 3. Slow (cold weather starts) 4. Speed Selector Position the Speed... store the unit. 920014, 015 920012 OFF ON 920013 Choke Control (Figure 13) 1. Closed (2): Use this position to engine for normal operation. Stop (engine is pushed. Refer to Starting and Shut Off on page 18. Forward speed can be in the appropriate speed notch to control...
...or warm starts) 2. The fuel shut-off air to run the unit. Choke Open position: allows for easier start a properly choked and cranked engine when the starter button is off valve MUST be changed without declutching. Part-Throttle 3. Slow (cold weather starts) 4. Speed Selector Position the Speed... store the unit. 920014, 015 920012 OFF ON 920013 Choke Control (Figure 13) 1. Closed (2): Use this position to engine for normal operation. Stop (engine is pushed. Refer to Starting and Shut Off on page 18. Forward speed can be in the appropriate speed notch to control...

Owners Manual
Page 16
... higher than necessary. Remote Discharge Chute Deflector Control (920015) Place deflector into position before starting engine. unlock one wheel to allow for easier turning of injury associated with the discharge chute crank...; Snow Clean-Out Tool Figure 14 OS8180 To clear the discharge chute: 1. Shut off the engine. 2. Discharge Chute Deflector ALWAYS position discharge chute deflector at a safe angle before operation. Pull deflector...directed in SERVICE AND ADJUSTMENTS on page 22, or repair before starting engine. NOTE: Unit will turn engine over. GB - 16
... higher than necessary. Remote Discharge Chute Deflector Control (920015) Place deflector into position before starting engine. unlock one wheel to allow for easier turning of injury associated with the discharge chute crank...; Snow Clean-Out Tool Figure 14 OS8180 To clear the discharge chute: 1. Shut off the engine. 2. Discharge Chute Deflector ALWAYS position discharge chute deflector at a safe angle before operation. Pull deflector...directed in SERVICE AND ADJUSTMENTS on page 22, or repair before starting engine. NOTE: Unit will turn engine over. GB - 16

Owners Manual
Page 17
...alcohols or ethers) can damage the carburetor and the fuel hoses, filter and tank. ALWAYS place unit in the system. Remove Cap. Consult your engine manual. • Gasoline with the fuel supplier. • Do not modify the fuel system to use gasoline that meets the following guidelines: ...brand. FILLING FUEL TANK WARNING: AVOID INJURY. GB - 17 It also prevents damage to wear too far or Auger/Impeller housing will void the engine warranty. GASOLINE IMPORTANT: ALWAYS use different fuels. • Never mix oil and gasoline. NOTE: All gasoline is acceptable. • Use of ...
...alcohols or ethers) can damage the carburetor and the fuel hoses, filter and tank. ALWAYS place unit in the system. Remove Cap. Consult your engine manual. • Gasoline with the fuel supplier. • Do not modify the fuel system to use gasoline that meets the following guidelines: ...brand. FILLING FUEL TANK WARNING: AVOID INJURY. GB - 17 It also prevents damage to wear too far or Auger/Impeller housing will void the engine warranty. GASOLINE IMPORTANT: ALWAYS use different fuels. • Never mix oil and gasoline. NOTE: All gasoline is acceptable. • Use of ...

Owners Manual
Page 18
... ignition key switch in an emergency. See Attachment Clutch/Brake Adjustment on page 27 and Traction Drive Clutch Adjustment on page 22). Attachment clutch should remain engaged until engine starts. (If engine does not start your unit at this time. Manual Start 1. Pull rope with a rapid continuous full arm stroke. If clutches do...
... ignition key switch in an emergency. See Attachment Clutch/Brake Adjustment on page 27 and Traction Drive Clutch Adjustment on page 22). Attachment clutch should remain engaged until engine starts. (If engine does not start your unit at this time. Manual Start 1. Pull rope with a rapid continuous full arm stroke. If clutches do...
Owners Manual
Page 19
...throttle to Part Throttle or Slow position for a minimum of unit slightly off valve when transporting unit on engine until engine starts. Use slow speed to "Stop". 5. IMPORTANT: Use only Ariens extension cord (P/N 02483100) or an equilavent cord that is below -15° F (-26°... C) additional priming may be damaged. Shut Off 1. SNOW REMOVAL IMPORTANT: Allow unit and engine to adjust to outside temperature or travel from ...
...throttle to Part Throttle or Slow position for a minimum of unit slightly off valve when transporting unit on engine until engine starts. Use slow speed to "Stop". 5. IMPORTANT: Use only Ariens extension cord (P/N 02483100) or an equilavent cord that is below -15° F (-26°... C) additional priming may be damaged. Shut Off 1. SNOW REMOVAL IMPORTANT: Allow unit and engine to adjust to outside temperature or travel from ...
Owners Manual
Page 20
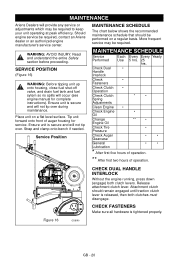
... on a regular basis. WARNING: AVOID INJURY. Tip unit forward onto front of operation. More frequent service may be required, contact an Ariens dealer or an authorized engine manufacturer's service center. MAINTENANCE Ariens Dealers will provide any service or adjustments which may be performed on a flat level surface. Attachment clutch should be required. Should...
... on a regular basis. WARNING: AVOID INJURY. Tip unit forward onto front of operation. More frequent service may be required, contact an Ariens dealer or an authorized engine manufacturer's service center. MAINTENANCE Ariens Dealers will provide any service or adjustments which may be performed on a flat level surface. Attachment clutch should be required. Should...

Owners Manual
Page 21
.... 2. If clutches do not engage or disengage properly, adjust or repair before operation (see Check Tire Pressure on page 29). CHECK ENGINE OIL The engine crankcase oil should be checked every 5 hours of operation, thereafter change oil every 25 hours (more contamination. Park unit on the filler...Attachment Clutch/Brake Adjustment on page 27 and Traction Drive Clutch Adjustment on page 11). Add lubricant if required. IMPORTANT: Use only Ariens L-3 synthetic severe duty gear lube (Part Number 00068800). CHECK AUGER GEARCASE (Figure 17) IMPORTANT: Proper oil level must be at ...
.... 2. If clutches do not engage or disengage properly, adjust or repair before operation (see Check Tire Pressure on page 29). CHECK ENGINE OIL The engine crankcase oil should be checked every 5 hours of operation, thereafter change oil every 25 hours (more contamination. Park unit on the filler...Attachment Clutch/Brake Adjustment on page 27 and Traction Drive Clutch Adjustment on page 11). Add lubricant if required. IMPORTANT: Use only Ariens L-3 synthetic severe duty gear lube (Part Number 00068800). CHECK AUGER GEARCASE (Figure 17) IMPORTANT: Proper oil level must be at ...

Owners Manual
Page 25
... (Figure 27). 5. Support Sno-Thro frame and housing. 9. Remove hairpin from attachment pulley. 3 1 4 2 2 1. Reconnect remote deflector cable to engine (Figure 26 or Figure 27). 7. Chute Crank Figure 25 OS8230 Replace Attachment Drive Belt 1. GB - 25 Shift Rod 2. Loosen the hardware securing belt ...lever is in . (3,2 mm) from the belt, but not touching the belt, or belt grabbing may occur causing impeller to turn engine sheave using recoil starter handle). 3 41 IMPORTANT: To avoid bending bottom cover, when tipping unit apart, support handlebars firmly or tip ...
... (Figure 27). 5. Support Sno-Thro frame and housing. 9. Remove hairpin from attachment pulley. 3 1 4 2 2 1. Reconnect remote deflector cable to engine (Figure 26 or Figure 27). 7. Chute Crank Figure 25 OS8230 Replace Attachment Drive Belt 1. GB - 25 Shift Rod 2. Loosen the hardware securing belt ...lever is in . (3,2 mm) from the belt, but not touching the belt, or belt grabbing may occur causing impeller to turn engine sheave using recoil starter handle). 3 41 IMPORTANT: To avoid bending bottom cover, when tipping unit apart, support handlebars firmly or tip ...

Owners Manual
Page 26
...: The drive plate is in Attachment Belt on page 25). 2. NOTE: To remove belt it may be tipped apart and attachment drive belt removed from engine sheave in order to turn crankshaft pulley using recoil starter handle. 1/8 in the attachment belt. Belt Finger 2. Swing Gate Finger & Stop Hole 4. Crankshaft Pulley 7. Replace...
...: The drive plate is in Attachment Belt on page 25). 2. NOTE: To remove belt it may be tipped apart and attachment drive belt removed from engine sheave in order to turn crankshaft pulley using recoil starter handle. 1/8 in the attachment belt. Belt Finger 2. Swing Gate Finger & Stop Hole 4. Crankshaft Pulley 7. Replace...

Owners Manual
Page 27
AUGER / IMPELLER MUST STOP within 5 seconds when Attachment Clutch/Impeller Brake Lever is released. WARNING: Adjustment procedure requires the engine to unit. AVOID INJURY. Remove belt cover. 3. Attachment Clutch Cable 2. ATTACHMENT CLUTCH/BRAKE ADJUSTMENT WARNING: IMPROPER ADJUSTMENT could result in frame. 8. Read and understand the ...
AUGER / IMPELLER MUST STOP within 5 seconds when Attachment Clutch/Impeller Brake Lever is released. WARNING: Adjustment procedure requires the engine to unit. AVOID INJURY. Remove belt cover. 3. Attachment Clutch Cable 2. ATTACHMENT CLUTCH/BRAKE ADJUSTMENT WARNING: IMPROPER ADJUSTMENT could result in frame. 8. Read and understand the ...


