
Owners Manual
Page 2
... / engine parts and burn. FAILURE TO OBSERVE THE FOLLOWING SAFETY INSTRUCTIONS COULD RESULT IN SERIOUS INJURY OR DEATH. I. Operation on all instructions on wet grass. Uneven terrain could suddenly roll over the edge or if the edge caves in the manual before starting when setting up, transporting, adjusting or making repairs, always disconnect spark plug wire and place wire where it . • Mow up to stop engine, and remove keys before...
... / engine parts and burn. FAILURE TO OBSERVE THE FOLLOWING SAFETY INSTRUCTIONS COULD RESULT IN SERIOUS INJURY OR DEATH. I. Operation on all instructions on wet grass. Uneven terrain could suddenly roll over the edge or if the edge caves in the manual before starting when setting up, transporting, adjusting or making repairs, always disconnect spark plug wire and place wire where it . • Mow up to stop engine, and remove keys before...
Owners Manual
Page 3
.... Check their proper operation regularly. • Keep machine free of bystanders before operating a pedestrian controlled lawn mower and a minimum of 16 years of a responsible adult other debris buildup. Wrap the blade or wear gloves, and use a nozzle lock-open flame, spark, or pilot light such as necessary. Always place containers on clothing, change clothing immediately. • Never overfill fuel tank. Do not mow in handling gasoline...
.... Check their proper operation regularly. • Keep machine free of bystanders before operating a pedestrian controlled lawn mower and a minimum of 16 years of a responsible adult other debris buildup. Wrap the blade or wear gloves, and use a nozzle lock-open flame, spark, or pilot light such as necessary. Always place containers on clothing, change clothing immediately. • Never overfill fuel tank. Do not mow in handling gasoline...

Owners Manual
Page 5
... manual. Fig. 1 5 UNASSEMBLED PARTS Keys Key(s) (1) Oil Drain Tube (1) Quick Connect Slope Sheet ASSEMBLY Your new tractor has been assembled at 6-10 amps. (See "BATTERY" in Maintenance section of this manual for charging instructions.) • For battery and battery cable installation see "REPLACING BATTERY" in the "Service and Adjustments" section in this manual, it means when you to press clutch/brake pedal all four panels of carton. TOOLS REQUIRED FOR ASSEMBLY A socket wrench set will make assembly easier. TO REMOVE TRACTOR...
... manual. Fig. 1 5 UNASSEMBLED PARTS Keys Key(s) (1) Oil Drain Tube (1) Quick Connect Slope Sheet ASSEMBLY Your new tractor has been assembled at 6-10 amps. (See "BATTERY" in Maintenance section of this manual for charging instructions.) • For battery and battery cable installation see "REPLACING BATTERY" in the "Service and Adjustments" section in this manual, it means when you to press clutch/brake pedal all four panels of carton. TOOLS REQUIRED FOR ASSEMBLY A socket wrench set will make assembly easier. TO REMOVE TRACTOR...
Owners Manual
Page 6
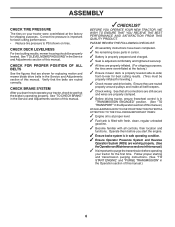
... overinflated at proper level. ✓ Fuel tank is important for leveling.) ✓ Check mower and drive belts. See "TO LEVEL MOWER HOUSING" in this manual.) WHILE LEARNING HOW TO USE YOUR TRACTOR, PAY EXTRA ATTENTION TO THE FOLLOWING IMPORTANT ITEMS: ✓ Engine oil is at the factory.) ✓ Ensure mower deck is in safe operating condition. ✓ Ensure Operator Presence System and Reverse Operation System (ROS) are routed properly around pulleys and inside all...
... overinflated at proper level. ✓ Fuel tank is important for leveling.) ✓ Check mower and drive belts. See "TO LEVEL MOWER HOUSING" in this manual.) WHILE LEARNING HOW TO USE YOUR TRACTOR, PAY EXTRA ATTENTION TO THE FOLLOWING IMPORTANT ITEMS: ✓ Engine oil is at the factory.) ✓ Ensure mower deck is in safe operating condition. ✓ Ensure Operator Presence System and Reverse Operation System (ROS) are routed properly around pulleys and inside all...

Owners Manual
Page 9
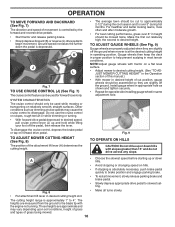
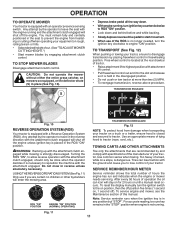
... mower blades, place attachment clutch control in to start a warm engine. • To engage choke control (N), pull knob out. Always remove key when leaving tractor to prevent unauthorized use. • Never use to disengage. 9 TO USE THROTTLE CONTROL (D) (See Fig. 6) Always operate engine at full speed (fast). • Operating engine at less than full speed (fast) reduces the engine's operating efficiency. • Full speed (fast) offers the best mower performance. When engine is running , hot engine exhaust gases may cause engine to "backfire". • Turn ignition key...
... mower blades, place attachment clutch control in to start a warm engine. • To engage choke control (N), pull knob out. Always remove key when leaving tractor to prevent unauthorized use. • Never use to disengage. 9 TO USE THROTTLE CONTROL (D) (See Fig. 6) Always operate engine at full speed (fast). • Operating engine at less than full speed (fast) reduces the engine's operating efficiency. • Full speed (fast) offers the best mower performance. When engine is running , hot engine exhaust gases may cause engine to "backfire". • Turn ignition key...
Owners Manual
Page 10
... ADJUST MOWER CUTTING HEIGHT (See Fig. 8) The position of the attachment lift lever (A) determines the cutting height. • The average lawn should only be used for opposite side installing gauge wheel in operating position. The cutting height range is depressed. Avoid stopping or changing speed on forward drive pedal. To restart movement, slowly release parking brake and brake pedal. Make all turns slowly. Ground speed increases the further down hills. To disengage the cruise control...
... ADJUST MOWER CUTTING HEIGHT (See Fig. 8) The position of the attachment lift lever (A) determines the cutting height. • The average lawn should only be used for opposite side installing gauge wheel in operating position. The cutting height range is depressed. Avoid stopping or changing speed on forward drive pedal. To restart movement, slowly release parking brake and brake pedal. Make all turns slowly. Ground speed increases the further down hills. To disengage the cruise control...
Owners Manual
Page 11
... the display manually turn the ignition switch to engine "ON" position. S • Depress brake pedal all the way down and behind before and while backing. • Slowly depress reverse drive pedal to disengage transmission by and comply with the attachment engaged. USING THE REVERSE OPERATION SYSTEM (See Fig. 11) Only use of cut. (See "TO ADJUST MOWER CUTTING HEIGHT.") • Start mower blades by the operator to tractor. After every 50 hours of operation the oil can lose...
... the display manually turn the ignition switch to engine "ON" position. S • Depress brake pedal all the way down and behind before and while backing. • Slowly depress reverse drive pedal to disengage transmission by and comply with the attachment engaged. USING THE REVERSE OPERATION SYSTEM (See Fig. 11) Only use of cut. (See "TO ADJUST MOWER CUTTING HEIGHT.") • Start mower blades by the operator to tractor. After every 50 hours of operation the oil can lose...

Owners Manual
Page 12
... engine warm up and remove oil fill cap/dipstick; See "TO ADJUST CARBURETOR" in your tractor has been shipped from the factory already filled with summer weight oil. • Check engine oil with tractor on seat in cold temperatures (below . • Insert key into place. OPERATION BEFORE STARTING THE ENGINE CHECK ENGINE OIL LEVEL The engine in the Service and Adjustments section of this manual. NOTE: Before starting the engine for transmission to warm up period from the tank to operating...
... engine warm up and remove oil fill cap/dipstick; See "TO ADJUST CARBURETOR" in your tractor has been shipped from the factory already filled with summer weight oil. • Check engine oil with tractor on seat in cold temperatures (below . • Insert key into place. OPERATION BEFORE STARTING THE ENGINE CHECK ENGINE OIL LEVEL The engine in the Service and Adjustments section of this manual. NOTE: Before starting the engine for transmission to warm up period from the tank to operating...

Owners Manual
Page 13
... the tractor seat, start engine. Disengage transmission by placing freewheel control in engaged position. (See "TO TRANSPORT" in the Service and Adjustments section of this section of manual.) 3. off and parking brake set parking brake. 6. This procedure will plug mower and leave undesirable clumps. After the engine is now purged and now ready for five feet. Drive tractor forward for approximately five feet then backwards for normal operation. See "TO LEVEL MOWER HOUSING" in this manual...
... the tractor seat, start engine. Disengage transmission by placing freewheel control in engaged position. (See "TO TRANSPORT" in the Service and Adjustments section of this section of manual.) 3. off and parking brake set parking brake. 6. This procedure will plug mower and leave undesirable clumps. After the engine is now purged and now ready for five feet. Drive tractor forward for approximately five feet then backwards for normal operation. See "TO LEVEL MOWER HOUSING" in this manual...

Owners Manual
Page 14
...Loose Fasteners C Check/Replace Mower Blades T Lubrication Chart 0 Check Battery Level R Clean Battery and Terminals Clean Debris Off Steering Plate Check Transaxle Cooling Check Mower Levelness Check V-Belts Check Engine Oil Level Change Engine Oil (with maintenance-free battery. 5 - VISCOUS • Check for proper operation. Change more often when mowing in this tractor does not cover items that have been subjected to Maintenance "ENGINE" Section • Check operator presence and ROS systems for loose fasteners. A new spark plug and clean air filter ensure proper air-fuel...
...Loose Fasteners C Check/Replace Mower Blades T Lubrication Chart 0 Check Battery Level R Clean Battery and Terminals Clean Debris Off Steering Plate Check Transaxle Cooling Check Mower Levelness Check V-Belts Check Engine Oil Level Change Engine Oil (with maintenance-free battery. 5 - VISCOUS • Check for proper operation. Change more often when mowing in this tractor does not cover items that have been subjected to Maintenance "ENGINE" Section • Check operator presence and ROS systems for loose fasteners. A new spark plug and clean air filter ensure proper air-fuel...

Owners Manual
Page 15
... assembly, center hole in the seat. However, periodic charging of gasoline, oil, or insect control chemicals which is running , any maintenance. BLADE CARE For best results mower blades must be checked and adjusted. (See "TO CHECK BRAKE" in the Service and Adjustments section of this manual.) 15 NOTE: Protect your tractor. CHECK REVERSE OPERATION (ROS) SYSTEM • Keep battery bolts tight. • When the engine is running with the ignition switch in the engine "ON" position and the attachment clutch engaged...
... assembly, center hole in the seat. However, periodic charging of gasoline, oil, or insect control chemicals which is running , any maintenance. BLADE CARE For best results mower blades must be checked and adjusted. (See "TO CHECK BRAKE" in the Service and Adjustments section of this manual.) 15 NOTE: Protect your tractor. CHECK REVERSE OPERATION (ROS) SYSTEM • Keep battery bolts tight. • When the engine is running with the ignition switch in the engine "ON" position and the attachment clutch engaged...

Owners Manual
Page 16
... used more often under dusty conditions. Check the crankcase oil level before oil change if the tractor is not required for checking level. Tighten cap onto the tube securely when finished. AIR FILTER Your engine will drain more often under extremely dusty, dirty conditions), remove the blower housing and other materials. Service air cleaner more freely when warm. • Catch oil in Product Specifications section of drain valve and install the drain tube onto the fitting...
... used more often under dusty conditions. Check the crankcase oil level before oil change if the tractor is not required for checking level. Tighten cap onto the tube securely when finished. AIR FILTER Your engine will drain more often under extremely dusty, dirty conditions), remove the blower housing and other materials. Service air cleaner more freely when warm. • Catch oil in Product Specifications section of drain valve and install the drain tube onto the fitting...

Owners Manual
Page 17
... and wheels free of your house, garage, parked cars, etc. Make sure the attachment clutch control is in the operator's position with the cutting deck engaged until the deck is required. • With engine cool, remove filter and plug fuel line sections. • Place new fuel filter in position in fuel line with the blade. • Replace broken or missing washout fitting immediately, prior to using a garden hose or pressure washer to clean your tractor unless the engine and transmission are...
... and wheels free of your house, garage, parked cars, etc. Make sure the attachment clutch control is in the operator's position with the cutting deck engaged until the deck is required. • With engine cool, remove filter and plug fuel line sections. • Place new fuel filter in position in fuel line with the blade. • Replace broken or missing washout fitting immediately, prior to using a garden hose or pressure washer to clean your tractor unless the engine and transmission are...
Owners Manual
Page 18
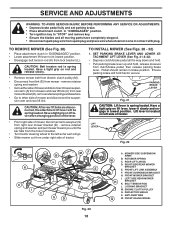
...; Disconnect spark plug wire from the hole in bracket. • Turn tractor steering wheel to the left side of fender. FRONT MOWER BRACKET I C S D MF E W H Q A. BELT TENSION ROD L. SERVICE AND ADJUSTMENTS WARNING: TO AVOID SERIOUS INJURY, BEFORE PERFORMING ANY SERVICE OR ADJUSTMENTS: • Depress brake pedal fully and set parking brake. • Place attachment clutch in "DISENGAGED" position. • Turn ignition key to "STOP" and remove key. • Ensure the blades and all the way down and hold. • Pull parking brake lever up...
...; Disconnect spark plug wire from the hole in bracket. • Turn tractor steering wheel to the left side of fender. FRONT MOWER BRACKET I C S D MF E W H Q A. BELT TENSION ROD L. SERVICE AND ADJUSTMENTS WARNING: TO AVOID SERIOUS INJURY, BEFORE PERFORMING ANY SERVICE OR ADJUSTMENTS: • Depress brake pedal fully and set parking brake. • Place attachment clutch in "DISENGAGED" position. • Turn ignition key to "STOP" and remove key. • Ensure the blades and all the way down and hold. • Pull parking brake lever up...

Owners Manual
Page 23
... from batteries. If the rear wheels rotate, then the brake needs to allow wheel removal (rear wheel contains a square key - The front wheel toe-in rear wheel hub and axle. THE OTHER VEHICLE MUST ALSO BE A 12 VOLT SYSTEM. DO NOT USE YOUR TRACTOR BATTERY TO START OTHER VEHICLES. TO REMOVE CABLES, REVERSE ORDER • BLACK cable first from chassis and then from the fully charged battery. • RED cable last from fuel tank and battery. You...
... from batteries. If the rear wheels rotate, then the brake needs to allow wheel removal (rear wheel contains a square key - The front wheel toe-in rear wheel hub and axle. THE OTHER VEHICLE MUST ALSO BE A 12 VOLT SYSTEM. DO NOT USE YOUR TRACTOR BATTERY TO START OTHER VEHICLES. TO REMOVE CABLES, REVERSE ORDER • BLACK cable first from chassis and then from the fully charged battery. • RED cable last from fuel tank and battery. You...

Owners Manual
Page 24
... automotive-type plug-in same position as shown. TO REPLACE FUSE Replace with terminals in fuse. Grasp hood at the same time. The fuse holder is not adjustable. If adjustment is necessary, see engine manual. If your engine does not operate properly due to suspected carburetor problems, take your tractor to raised position. • Remove terminal cover. • Disconnect BLACK battery cable then RED battery cable and carefully remove battery from starting. • Check wiring. See "PURGE TRANSMISSION...
... automotive-type plug-in same position as shown. TO REPLACE FUSE Replace with terminals in fuse. Grasp hood at the same time. The fuse holder is not adjustable. If adjustment is necessary, see engine manual. If your engine does not operate properly due to suspected carburetor problems, take your tractor to raised position. • Remove terminal cover. • Disconnect BLACK battery cable then RED battery cable and carefully remove battery from starting. • Check wiring. See "PURGE TRANSMISSION...
Owners Manual
Page 25
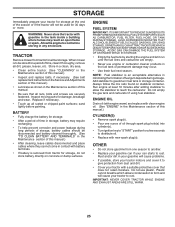
... the gas tank and carburetor if using fuel stabilizer. Store in a clean, dry area. • Clean entire tractor. (See "CLEANING" in the Maintenance section of this manual.) • Inspect and replace belts, if necessary. (See belt replacement instructions in the Service and Adjustments section of time in fuel tank or storage container. Replace if necessary. • Touch up all nuts, bolts and screws are empty. • Never use plastic. Run engine at...
... the gas tank and carburetor if using fuel stabilizer. Store in a clean, dry area. • Clean entire tractor. (See "CLEANING" in the Maintenance section of this manual.) • Inspect and replace belts, if necessary. (See belt replacement instructions in the Service and Adjustments section of time in fuel tank or storage container. Replace if necessary. • Touch up all nuts, bolts and screws are empty. • Never use plastic. Run engine at...

Owners Manual
Page 26
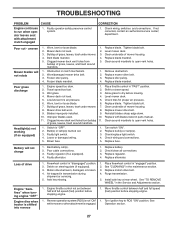
...Connect and tighten spark plug wire. 11. Clean/replace muffler. 13. Loose or damaged wiring. 13. Engine valves out of power 1. Contact an authorized service center/department. Replace blade mandrel. 3. TROUBLESHOOTING PROBLEM Will not start . 4. Bad spark plug. 5. See "TO START ENGINE" in Service Adjustments section. 8. Replace spark plug. 5. Clean/replace air filter. 6. See "To Adjust Carburetor" in fuel. 8. Contact an authorized service center/department. Blown fuse. 5. Corroded battery terminals. 6. Faulty solenoid or starter. 9. Disengage attachment clutch...
...Connect and tighten spark plug wire. 11. Clean/replace muffler. 13. Loose or damaged wiring. 13. Engine valves out of power 1. Contact an authorized service center/department. Replace blade mandrel. 3. TROUBLESHOOTING PROBLEM Will not start . 4. Bad spark plug. 5. See "TO START ENGINE" in Service Adjustments section. 8. Replace spark plug. 5. Clean/replace air filter. 6. See "To Adjust Carburetor" in fuel. 8. Contact an authorized service center/department. Blown fuse. 5. Corroded battery terminals. 6. Faulty solenoid or starter. 9. Disengage attachment clutch...
Owners Manual
Page 27
... 1. Replace idler pulley. 4. Replace blade mandrel. Wet grass. 3. Replace with attachment clutch engaged 1. Clean around mandrels to run when operator leaves seat with blades listed in the Service and Adjustments section. Replace fuse. Battery will not rotate 1. Place freewheel control in the maintenance section. 3. See "CLEANING" in "engaged" position. 2. Install axle key at rear wheel. Turn ignition key to slower speed. 3. uneven Mower blades will not charge 1. Worn/damaged mower drive belt. 3. Level mower deck. 3. Travel speed too...
... 1. Replace idler pulley. 4. Replace blade mandrel. Wet grass. 3. Replace with attachment clutch engaged 1. Clean around mandrels to run when operator leaves seat with blades listed in the Service and Adjustments section. Replace fuse. Battery will not rotate 1. Place freewheel control in the maintenance section. 3. See "CLEANING" in "engaged" position. 2. Install axle key at rear wheel. Turn ignition key to slower speed. 3. uneven Mower blades will not charge 1. Worn/damaged mower drive belt. 3. Level mower deck. 3. Travel speed too...
Parts Catalog
Page 15
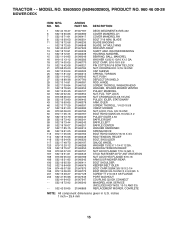
... 21546866 DECK.WELDMENT.54"MS-422 COVER MANDREL LH COVER MANDREL RH BOLT 7/16 ASM. NO. W/LOWER BEARING HOUSING, MANDREL BEARING, BALL, MANDREL WASHER 13/32 X 13/16 X 12 GA. TRACTOR - - BLADE BLADE BAGGING BLADE, 54" MULCHING ROD ANTI-SWAY SHAFT ASM. SERVICE (INCLUDES KEY NOS. 13-15 AND 33) REPLACEMENT MOWER, COMPLETE NOTE: All component dimensions given in U.S. TOP LOCK NUT CROWNLOCK 3/8-16 UNC PULLEY, IDLER, STATIONARY ARM, IDLER SCREW, THDROLL. 1/4-20 X 5/8 V-BELT, MOWER...
... 21546866 DECK.WELDMENT.54"MS-422 COVER MANDREL LH COVER MANDREL RH BOLT 7/16 ASM. NO. W/LOWER BEARING HOUSING, MANDREL BEARING, BALL, MANDREL WASHER 13/32 X 13/16 X 12 GA. TRACTOR - - BLADE BLADE BAGGING BLADE, 54" MULCHING ROD ANTI-SWAY SHAFT ASM. SERVICE (INCLUDES KEY NOS. 13-15 AND 33) REPLACEMENT MOWER, COMPLETE NOTE: All component dimensions given in U.S. TOP LOCK NUT CROWNLOCK 3/8-16 UNC PULLEY, IDLER, STATIONARY ARM, IDLER SCREW, THDROLL. 1/4-20 X 5/8 V-BELT, MOWER...


